实现功能
如果扫描组件注解(@Controller,@Service,@Repository,@Component)默认对象名,已经实现了默认使用首字母小写类名的作为对象名。
但,现实需求中。我们有时候希望可以自己定义对象的名。
实现思路
1.获得扫描组件注解的name属性的值。
2.将这个值作为对象名
实现步骤
1.在AbstractApplicationContext增加一个方法getComponentOfName,用于判断组件注解是否设置了name属性。如果设置了就获得该值
 1 /**
 2      * 获得组件的对象名
 3      *
 4      * @param classType
 5      * @return
 6      */
 7     private String getComponentOfName(Class<?> classType) {
 8         //获得四个组件注解的对象
 9         Component component = classType.getDeclaredAnnotation(Component.class);
10         Service service = classType.getDeclaredAnnotation(Service.class);
11         Controller controller = classType.getDeclaredAnnotation(Controller.class);
12         Repository repository = classType.getDeclaredAnnotation(Repository.class);
13         //判断注解对象是否为空,注解对象的的name属性是否有值
14         if (component != null) {
15             if (!"".equals(component.name()) && component.name() != null) {
16                 return component.name();
17             }
18         }
19         if (service != null) {
20             if (!"".equals(service.name()) && service.name() != null) {
21                 return service.name();
22             }
23         }
24         if (controller != null) {
25             if (!"".equals(controller.name()) && controller.name() != null) {
26                 return controller.name();
27             }
28         }
29         if (repository != null) {
30             if (!"".equals(repository.name()) && repository.name() != null) {
31                 return repository.name();
32             }
33         }
34         return null;
35
36     }
2.修改AbstractApplicationContext类的构造方法。标红处
 1 /**
 2      * 将容器操作加载创建对象的代码写抽象类里面,这样可以方便以后扩展多种实现。
 3      *
 4      * @param classType
 5      */
 6     public AbstractApplicationContext(Class<?> classType) {
 7         // 判断配置类是否有Configuration注解
 8         Configuration annotation = classType.getDeclaredAnnotation(Configuration.class);
 9         if (annotation != null) {
10             // 获得组件扫描注解
11             ComponentScan componentScan = classType.getDeclaredAnnotation(ComponentScan.class);
12             // 获得包名
13             this.basePackage = componentScan.basePackages();
14             // 根据包名获得类全限制名
15             // Set<String> classNames =
16             // PackageUtils.getClassName(this.basePackage[0], true);
17             // 将扫描一个包,修改为多个包
18             Set<String> classNames = PackageUtils.getClassNames(this.basePackage, true);
19             // 通过类名创建对象
20             Iterator<String> iteratorClassName = classNames.iterator();
21             while (iteratorClassName.hasNext()) {
22
23                 String className = iteratorClassName.next();
24                 // System.out.println(className);
25                 try {
26                     // 通过类全名创建对象
27                     Class<?> objectClassType = Class.forName(className);
28                     /*
29                      * 判断如果类权限名对应的不是接口,并且包含有@Component|@Controller|@Service|
30                      * @Repository 才可以创建对象
31                      */
32                     if (this.isComponent(objectClassType)) {
33                         Object instance = objectClassType.newInstance();
34                         // 修改为,默认对象支持首字符小写
35                         String objectName=null;
36                         //获得组件注解的name属性值
37                         String componentName = this.getComponentOfName(objectClassType);
38
39                         if(componentName==null){
40                             //如果组件注解的name属性没有值,使用默认命名对象
41                             objectName= NamingUtils.firstCharToLower(instance.getClass().getSimpleName());
42                         }else{
43                             //如果组件注解的name属性有值,使用自定义命名对象
44                             objectName=componentName;
45                         }
46                         this.getContext().addObject(objectName, instance);
47                     }
48                 } catch (InstantiationException e) {
49                     e.printStackTrace();
50                 } catch (IllegalAccessException e) {
51                     e.printStackTrace();
52                 } catch (ClassNotFoundException e) {
53                     e.printStackTrace();
54                 }
55             }
56         }
57     }
测试代码
1.修改UserService类的组件注解
 1 package ioc.core.test.service;
 2
 3 import ioc.core.annotation.stereotype.Service;
 4
 5 /**
 6  * 一个普通的类,用于测试是否可以创建对象
 7  * @author ranger
 8  *
 9  */
10 @Service(name="uService")
11 public class UserService {
12
13     public void login(){
14         System.out.println("-登录Service-");
15     }
16
17 }
2.测试类
 1 package ioc.core.test;
 2
 3 import org.junit.Test;
 4
 5 import ioc.core.impl.AnntationApplicationContext;
 6 import ioc.core.test.config.Config;
 7 import ioc.core.test.service.UserService;
 8
 9 public class AnntationApplicationContextTest {
10
11     @Test
12     public void login(){
13         try {
14             AnntationApplicationContext context=new AnntationApplicationContext(Config.class);
15             UserService userService = context.getBean("uService", UserService.class);
16             userService.login();
17             System.out.println(context.getContext().getObjects());
18
19         } catch (Exception e) {
20             e.printStackTrace();
21         }
22     }
23
24 }
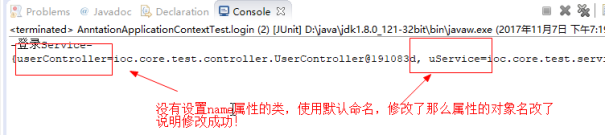
3.测试结果