想要进行节点与节点间、客户端与服务器端、进程与进程间的通信,需要通过网络IO进行。JAVA通过Socket封装TCP/IP网络协议,进行网络之间的数据传输。
1.首先来回顾一下ISO七层模型和TCP/IP四层协议

2.了解一下JAVA通过Socket进行网络通信的流程
本地的进程通过PID标识唯一进程号,网络中通过协议+ip地址+端口号标识一个进程号,如:http://10.10.10.10:8080,网络间的进程被唯一标识后,可以进行网络通信。Socket将TCP/IP复杂的操作,封装为简单的接口供应用层使用,实现网络通信。就像文件IO的“打开—读写—关闭”一样,网络间的通信也变成客户端、服务器端可以给自己的”文件“写入内容,供对方读取,通信结束时关闭“文件”。
Socket通信流程:
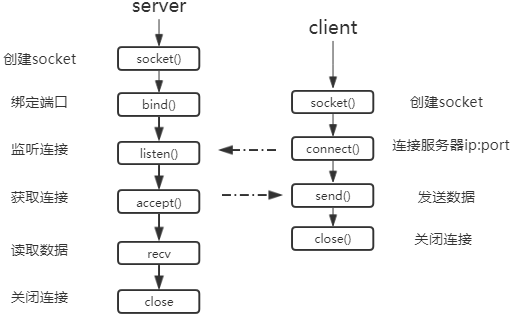
服务端accept()方法会产生阻塞,等待客户端连接。
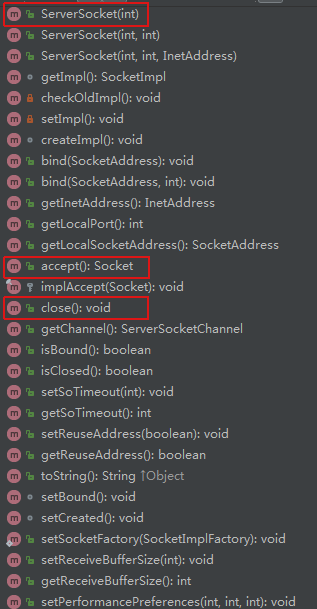
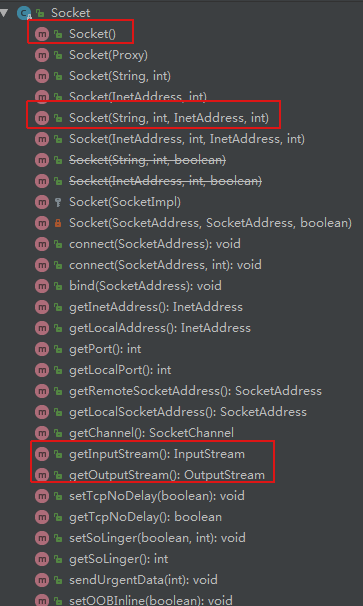
3.JAVA中的ServerSocket、Socket类
ServerSocket类: Socket类:
4.简单的传统BIO通信例子(同步阻塞一问一答式)
服务端代码


package service;

import java.io.*;
import java.net.ServerSocket;
import java.net.Socket;

public class BIOServerTest {


    public static void main(String[] args) throws IOException {
        new BIOServerTest().bind();
    }

    public void bind() throws IOException {
        ServerSocket server = null;
        try {
            server = new ServerSocket(8000);
            Socket socket = null;
            while (true) {
                socket = server.accept();
                new Thread(new BIOServerHandler(socket)).start();
            }
        } catch (IOException e) {
            e.printStackTrace();
        } finally {
            if (server != null) {
                server.close();
            }
        }
    }

    public class BIOServerHandler implements Runnable {
        private Socket socket;

        public BIOServerHandler(Socket socket) {
            this.socket = socket;
        }

        public void run() {
            BufferedReader in = null;
            PrintWriter out = null;
            try {
                in = new BufferedReader(new InputStreamReader(this.socket.getInputStream()));
                out = new PrintWriter(this.socket.getOutputStream(), true);
                String body = null;
                while (true) {
                    body = in.readLine();
                    if (body == null) {
                        break;
                    }
                    System.out.println("client request " + body);
                    out.println("ok");
                }
            } catch (Exception e) {
                if (in != null) {
                    try {
                        in.close();
                    } catch (IOException e1) {
                        e1.printStackTrace();
                    }
                }
                if (out != null) {
                    out.close();
                }
                if (socket!=null){
                    try {
                        socket.close();
                    } catch (IOException e1) {
                        e1.printStackTrace();
                    }
                }
            }
        }
    }
}
客户端代码
package service;

import java.io.BufferedReader;
import java.io.IOException;
import java.io.InputStreamReader;
import java.io.PrintWriter;
import java.net.Socket;

public class BIOClientTest {
    public static void main(String[] args) {
        Socket socket = null;
        BufferedReader in = null;
        PrintWriter out = null;
        try {
            socket = new Socket("127.0.0.1", 8000);
            in = new BufferedReader(new InputStreamReader(socket.getInputStream()));
            out = new PrintWriter(socket.getOutputStream(), true);
            out.println("hello");
            String resp = in.readLine();
            System.out.println("server response " + resp);
        } catch (Exception e) {

        } finally {
            if (in != null) {
                try {
                    in.close();
                } catch (IOException e) {
                    e.printStackTrace();
                }
            }
            if (out != null) {
                out.close();
            }
            if (socket != null) {
                try {
                    socket.close();
                } catch (IOException e) {
                    e.printStackTrace();
                }
            }
        }

    }
}
传统的同步阻塞BIO(Blocking IO)的处理过程中,每有一个客户端的请求,服务端就需要启动一个线程与之对接,监听数据传输。成千上百的客户端访问,在服务端就需要启动成千上百个线程,每一个线程在监听不到数据的时候,又不能得到充分的利用,这种模型显然无法满足高性能、高并发的场景。
5.NIO
JDK1.4引入一个新的库NIO,有人称之为New IO,有人称之为Non-blocking IO,它出现的目的就是要解决阻塞问题,实现非阻塞网络通信,我们就暂且称之为非阻塞IO吧。
在上面的BIO中,数据是面向字节传输,NIO则是面向块传输的,就好比吃米饭,一粒一粒吃,肯定没有一勺一勺吃有感觉,又快又爽,此时它便是在java中提供的高速的、面向块的IO。
下面来了解NIO传输的相关概念:
缓冲区buffer
在面向流的IO中,是将数据写入或读取至Stream对象中(InputStream/OutputStream)。在NIO中,服务端和客户端都是通过访问缓冲区读取、写入来操作数据。每一种java基本类型都对应一种缓冲区如:ByteBuffer、IntBuffer等。每一个Buffer类都是Buffer接口的子类。
通道Channel
Channel是一个通道,网络数据通过Channel读取和写入。Channel不像流,写入要用InputStream,读取要用OutputStream,Channel是双向的,所以既可以用来读,也可以用来写。
多路复用器Selector
多路复用器提供选择已经就绪的任务的能力,相当于雇佣一个服务员来对接多个用餐的客户,Selector会不断轮询注册在其上的Channel,如果某个Channel发生读写事件,这个Channel便处于就绪状态,会被Selector轮询处来,通过SelectorKey获取就绪的Channel后,进行后续的IO操作。在BIO中客户端每有一个客户请求,服务端就需要一个服务员来对接,一个顾客,一个服务员。而NIO用多路复用器之后,就可以一个服务端的线程,服务多个客户端请求,实现高可用。
关键步骤:
(1)创建ServerSocketChannel,配置为非阻塞模式
(2)绑定监听,配置TCP参数
(3)创建独立IO线程,用于轮询多路复用器Selector
(4)创建Selector,将(1)中的serverSocketChannel注册在selector上,并监听selectorKey.ACCEPT
(5)启动IO线程,循环执行Selector.select()方法,轮询就绪的Channel
(6)轮询到就绪的channel时,如果是新的客户端接入,调用ServerSocketChannel.accept()方法,接受新的客户端。
(7)将新接入的客户端SocketChannel设为非阻塞模式,配置TCP参数
(8)SocketChannel注册到Selector,监听OP_READ操作位
(9)如果轮询到Channel为OP_READ,则读取数据
(10)如果为OP_WRITE,说明数据还在发送。
NIO原生接口复杂,不易编写,不好维护,感兴趣的同学可以去了解下。
6.Netty
Netty是NIO框架之一,接口简洁,入门简单,有好的稳定性、健壮性、可扩展性,已经得到了较为广泛的使用。
Netty 提供基于NIO的Server/Client网络应用框架,服务端启动后,就开始等待浏览器(httpRequest请求)或者客户端的请求(服务器绑定端口监听)。浏览器输入ip:port后,server得到请求,经过serverHandler处理后,返回给浏览器或者客户端。
7.Netty的使用
a.maven工程添加netty依赖
        <dependency>
            <groupId>io.netty</groupId>
            <artifactId>netty-all</artifactId>
            <version>4.1.33.Final</version>
        </dependency>
b.基于netty的服务端开发:启动,添加线程组,添加过滤器,绑定端口,监听,释放资源
package service;

import io.netty.bootstrap.ServerBootstrap;
import io.netty.buffer.ByteBuf;
import io.netty.buffer.Unpooled;
import io.netty.channel.*;
import io.netty.channel.nio.NioEventLoopGroup;
import io.netty.channel.socket.SocketChannel;
import io.netty.channel.socket.nio.NioServerSocketChannel;

public class NettyServerTest {
    public static void main(String[] args) {
        new NettyServerTest().bind();
    }
    public void bind() {
        EventLoopGroup bossGroup = new NioEventLoopGroup();
        EventLoopGroup workerGroup = new NioEventLoopGroup();
        ServerBootstrap bootstrap = new ServerBootstrap();
        bootstrap.group(bossGroup, workerGroup).
                channel(NioServerSocketChannel.class).
                option(ChannelOption.SO_BACKLOG, 1024).
                childHandler(new ChannelInitializer<SocketChannel>() {
                    @Override
                    protected void initChannel(SocketChannel socketChannel) throws Exception {
                        socketChannel.pipeline().addLast(new ServerHandler());
                    }
                });
        try {
            ChannelFuture f = bootstrap.bind(8000).sync();
            f.channel().closeFuture().sync();
        } catch (InterruptedException e) {
            e.printStackTrace();
        }finally {
            bossGroup.shutdownGracefully();
            workerGroup.shutdownGracefully();
        }
    }

    public class ServerHandler extends ChannelHandlerAdapter {
        @Override
        public void channelRead(ChannelHandlerContext ctx, Object msg) throws Exception {
            ByteBuf byteBuffer = (ByteBuf) msg;
            byte[] req = new byte[byteBuffer.readableBytes()];
            byteBuffer.readBytes(req);
            String body = new String(req, "UTF-8");
            System.out.println("request body:" + body);
            ByteBuf resp = Unpooled.copiedBuffer(new String("ok").getBytes());
            ctx.write(resp);
        }
        @Override
        public void channelReadComplete(ChannelHandlerContext ctx) {
            ctx.flush();
        }
        @Override
        public void exceptionCaught(ChannelHandlerContext ctx, Throwable cause) throws Exception {
            super.exceptionCaught(ctx, cause);
        }
    }
}
c.基于netty的客户端开发:启动,添加线程组,添加过滤器,建立连接,监听,释放资源
package service;

import io.netty.bootstrap.Bootstrap;
import io.netty.buffer.ByteBuf;
import io.netty.buffer.Unpooled;
import io.netty.channel.*;
import io.netty.channel.nio.NioEventLoopGroup;
import io.netty.channel.socket.SocketChannel;
import io.netty.channel.socket.nio.NioSocketChannel;

public class NettyClientTest {
    public static void main(String[] args) {
        new NettyClientTest().connect();
    }

    public void connect() {
        EventLoopGroup group = new NioEventLoopGroup();
        Bootstrap bootstrap = new Bootstrap();
        bootstrap.group(group)
                .channel(NioSocketChannel.class)
                .option(ChannelOption.TCP_NODELAY, true)
                .handler(new ChannelInitializer<SocketChannel>() {
                    @Override
                    protected void initChannel(SocketChannel socketChannel) throws Exception {
                        socketChannel.pipeline().addLast(new ClientHandler());
                    }
                });
        try {
            ChannelFuture f = bootstrap.connect("127.0.0.0", 8000).sync();
            f.channel().closeFuture().sync();
        } catch (InterruptedException e) {
            e.printStackTrace();
        } finally {
            group.shutdownGracefully();
        }
    }

    private class ClientHandler extends ChannelHandlerAdapter {
        ByteBuf message;

        public ClientHandler() {
            byte[] req = "hello".getBytes();
            message = Unpooled.buffer(req.length);
            message.writeBytes(req);
        }

        @Override
        public void channelActive(ChannelHandlerContext ctx) {
            ctx.writeAndFlush(message);
        }

        @Override
        public void channelRead(ChannelHandlerContext ctx, Object msg) throws Exception {
            ByteBuf byteBuf = (ByteBuf) msg;
            byte[] resp = new byte[byteBuf.readableBytes()];
            byteBuf.readBytes(resp);
            String body = new String(resp, "UTF-8");
            System.out.println("server response " + body);
        }

        @Override
        public void exceptionCaught(ChannelHandlerContext ctx, Throwable cause) throws Exception {
            super.exceptionCaught(ctx, cause);
        }
    }
}