Spring整合SSH
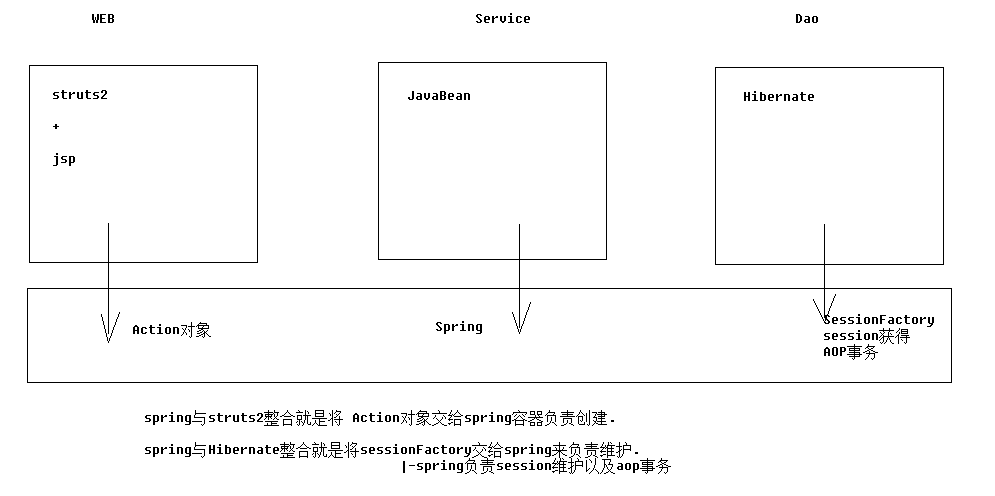
1. 三大框架架构【整合原理】
2. 导包
(1)Hibernate:
- %hibernate_home%/lib/required
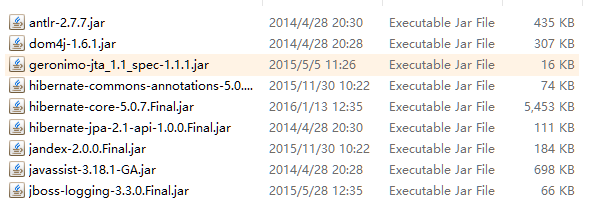
- %hibernate_home%/lib/jpa【java persist api java的持久化规范(接口)】

- 数据库驱动:

(2)Struts2: - struts-blank.war/WEB-INF/lib/*
注意:javassist-3.18.1-GA.jar包与hibernate中的重复,删掉struts2中的那个版本低的。
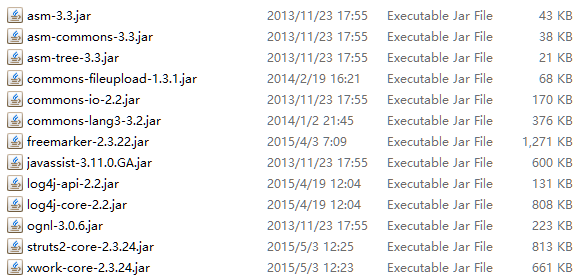
- struts整合spring插件包。注意:这个包一旦导入,那么struts2在启动时就会寻找spring容器.找不到将会抛出异常。

(3)Spring: - 基本【4+2】:core|beans|context|expression|logging|log4j
- 整合aop【4个】:spring-aop|spring-aspect|aop联盟|aopweaving
- 整合web【web包】:spring-web
- 整合Hibernate和事务:4个:spring-jdbc|spring-tx|c3p0|spring-orm
- 整合junit4测试【test包】:spring-test
(4)标签库: - standard.jar
- jstl-1.2.jar
3. 单独配置Spring容器
(1)创建配置文件,并导入约束(4个):beans|context|aop|tx
(2)配置spring随项目启动
<!--1. 配置监听器:让Spring随web启动而创建的监听器-->
<listener>
  	<listener-class>org.springframework.web.context.ContextLoaderListener</listener-class>
</listener>
<!-- 配置spring配置文件位置参数 -->
<context-param>
	<param-name>contextConfigLocation</param-name>
	<param-value>classpath:applicationContext.xml</param-value>
</context-param>
注册监听器ContextLoaderListener。若要在ServletContext初始化时创建Spring容器,就需要使用监听器接口ServletContextListener对ServletContext进行监听,在web.xml中注册该监听器。
Spring为该监听器定义了一个实现类ContextLoaderListener,完成了两个很重要的工作:创建容器对象,并将容器对象放入到了ServletContext的域属性空间中。
打开ContextLoaderListener的源码,看到一共四个方法,两个是构造方法,一个初始化方法,一个销毁方法。所以,在这四个方法中较为重要的方法应该就是contextInitialized(),context初始化方法。
@Override
// ServletContextEvent:初始化的触发事件,即触发时机。
public void contextInitialized(ServletContextEvent event){
    // 初始化Spring容器
    initWebApplicationContext(event.getServletContext());
}
跟踪initWebApplicationContext()方法,可以看到,在其中创建了容器对象。并且,将创建好的容器对象放入到了ServletContext的域属性空间中,key为一个常量:WebApplicationContext.ROOT_WEB_APPLICATION_CONTEXT_ATTRIBUTE。
try{
    if(this.context == null){
        this.context = createWebApplicationContext(servletContext);
    }
……
    servletContext.setAttribute(WebApplicationContext.ROOT_WEB_APPLICATION_CONTEXT_ATTRIBUTE,this.context);
……
}catch(){
……
}
指定Spring配置文件的位置
ContextLoaderListener在对Spring容器进行创建时,需要加载Spring配置文件。其默认的Spring配置文件位置与名称为:WEB-INF/applicationContext.xml。但一般会将该配置文件放置与项目的classpath下,即src下,所以需要在web.xml中对Spring配置文件的位置及名称进行指定。
从监听器ContextLoaderListener的父类ContextLoader的源码中可以看到其要读取的配置文件位置参数名称contextConfigLocation。
4. 单独配置Struts2
(1)配置struts2主配置文件
在src下创建struts.xml文件
<?xml version="1.0" encoding="UTF-8"?>
  <!DOCTYPE struts PUBLIC
	"-//Apache Software Foundation//DTD Struts Configuration 2.3//EN"
	"http://struts.apache.org/dtds/struts-2.3.dtd">

<struts>
	<package name="crm" namespace="/" extends="struts-default" >
		<action name="UserAction_*" class="com.zhy.web.action.UserAction" method="{1}" >
			<result name="success" type="redirect" >/success.jsp</result>
		</action>
	</package>
</struts>
(2)在web.xml中配置Struts2的核心过滤器
  <!-- struts2核心过滤器 -->
<filter>
  	<filter-name>struts2</filter-name>
  	<filter-class>org.apache.struts2.dispatcher.ng.filter.StrutsPrepareAndExecuteFilter</filter-class>
</filter>
<filter-mapping>
  	<filter-name>openSessionInView</filter-name>
  	<url-pattern>/*</url-pattern>
</filter-mapping>
<filter-mapping>
	<filter-name>struts2</filter-name>
	<url-pattern>/*</url-pattern>
</filter-mapping>
5. Struts2与Spring整合
(1)导包:struts2-spring-plugin-2.3.24.jar
(2)配置常量:
在struts.xml中配置常量
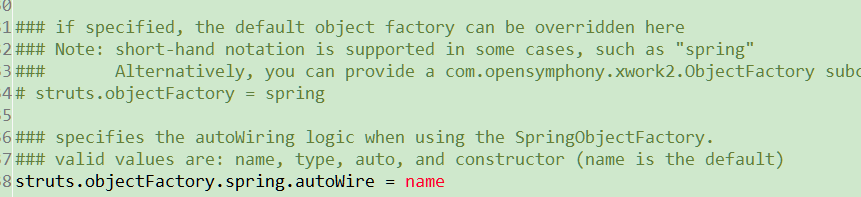
- struts.objectFactory = spring 将Action的创建交给Spring容器
- struts.objectFactory.spring.autoWire = name Spring负责装配Action依赖属性【默认是打开的】
<constant name="struts.objectFactory" value="spring"></constant>
(3)整合方案1:struts2自己创建action,spring负责组装依赖属性
不推荐理由:最好由spring完整管理action的生命周期.spring中功能才应用到Action上。
<struts>
        <!--将Action的创建交给Spring容器-->
        <constant name="struts.objectFactory" value="spring"></constant>
	<package name="crm" namespace="/" extends="struts-default" >
                <!--class属性上仍然配置action的完整类名。Struts2仍然创建action,由spring负责组装Action中的依赖属性-->
		<action name="UserAction_*" class="com.zhy.web.action.UserAction" method="{1}" >
			<result name="success" type="redirect" >/success.jsp</result>
		</action>
	</package>
</struts>
(4)整合方案2:spring负责创建action以及组装【推荐】
- applicationContext.xml:
<!-- action -->
	<!-- 注意:Action对象作用范围一定是多例的.这样才符合struts2架构 -->
	<bean name="userAction" class="cn.itcast.web.action.UserAction" scope="prototype" >
		<property name="userService" ref="userService" ></property>
	</bean>
- struts.xml:
<!-- class属性上填写spring中action对象的BeanName,完全由spring管理action生命周期,包括Action的创建。注意:需要手动组装依赖属性-->
<action name="UserAction_*" class="userAction" method="{1}" >
    <result name="success" type="redirect" >/success.jsp</result>
</action>
6. 单独配置Hibernate
(1)导入实体类&orm元数据
com.zhy.domain
    | Customer.java
    | LinkMan.java
    | User.java
    | Customer.hbm.xml
    | LinkMan.hbm.xml
    | User.hbm.xml
Customer.java
public class Customer {
	private Long cust_id;
	private String cust_name;
	private String cust_source;
	private String cust_industry;
	private String cust_level;
	private String cust_linkman;
	private String cust_phone;
	private String cust_mobile;
        // getter and setter
}
LinkMan.java
public class LinkMan {
    	private Long lkm_id;
	private Character lkm_gender;
	private String lkm_name;
	private String lkm_phone;
	private String lkm_email;
	private String lkm_qq;
	private String lkm_mobile;
	private String lkm_memo;
	private String lkm_position;
	//表达多对一关系
	private Customer customer ;
	//不与数据库中的列对应,只为了接收表单参数
	private Long cust_id;
        // getter and setter
}
User.java
public class User {
    	private Long user_id;
	private String user_code;
	private String user_name;
	private String user_password;
	private Character user_state;
        // getter and setter
}
Customer.hbm.xml
<?xml version="1.0" encoding="UTF-8"?>
<!DOCTYPE hibernate-mapping PUBLIC
    "-//Hibernate/Hibernate Mapping DTD 3.0//EN"
    "http://www.hibernate.org/dtd/hibernate-mapping-3.0.dtd">
   <!-- 配置表与实体对象的关系 -->
   <!-- package属性:填写一个包名.在元素内部凡是需要书写完整类名的属性,可以直接写简答类名了. -->
<hibernate-mapping package="cn.itcast.domain" >
	<!--
		class元素: 配置实体与表的对应关系的
			name: 完整类名
			table:数据库表名
	 -->
	<class name="Customer" table="cst_customer" >
		<!-- id元素:配置主键映射的属性
				name: 填写主键对应属性名
				column(可选): 填写表中的主键列名.默认值:列名会默认使用属性名
				type(可选):填写列(属性)的类型.hibernate会自动检测实体的属性类型.
						每个类型有三种填法: java类型|hibernate类型|数据库类型
				not-null(可选):配置该属性(列)是否不能为空. 默认值:false
				length(可选):配置数据库中列的长度. 默认值:使用数据库类型的最大长度
		 -->
		<id name="cust_id"  >
			<!-- generator:主键生成策略(明天讲) -->
			<generator class="native"></generator>
		</id>
		<!-- property元素:除id之外的普通属性映射
				name: 填写属性名
				column(可选): 填写列名
				type(可选):填写列(属性)的类型.hibernate会自动检测实体的属性类型.
						每个类型有三种填法: java类型|hibernate类型|数据库类型
				not-null(可选):配置该属性(列)是否不能为空. 默认值:false
				length(可选):配置数据库中列的长度. 默认值:使用数据库类型的最大长度
		 -->
		<property name="cust_name" column="cust_name" >
			<!--  <column name="cust_name" sql-type="varchar" ></column> -->
		</property>
		<property name="cust_source" column="cust_source" ></property>
		<property name="cust_industry" column="cust_industry" ></property>
		<property name="cust_level" column="cust_level" ></property>
		<property name="cust_linkman" column="cust_linkman" ></property>
		<property name="cust_phone" column="cust_phone" ></property>
		<property name="cust_mobile" column="cust_mobile" ></property>
	</class>
</hibernate-mapping>
LinkMan.hbm.xml
<?xml version="1.0" encoding="UTF-8"?>
<!DOCTYPE hibernate-mapping PUBLIC
    "-//Hibernate/Hibernate Mapping DTD 3.0//EN"
    "http://www.hibernate.org/dtd/hibernate-mapping-3.0.dtd">
<hibernate-mapping package="cn.itcast.domain" >
	<class name="LinkMan" table="cst_linkman" >
		<id name="lkm_id"  >
			<generator class="native"></generator>
		</id>
		<property name="lkm_gender"  ></property>
		<property name="lkm_name"  ></property>
		<property name="lkm_phone"  ></property>
		<property name="lkm_email"  ></property>
		<property name="lkm_qq"  ></property>
		<property name="lkm_mobile"  ></property>
		<property name="lkm_memo"  ></property>
		<property name="lkm_position"  ></property>

		<!-- 多对一 -->
		<!--
			name属性:引用属性名
			column属性: 外键列名
			class属性: 与我关联的对象完整类名
		 -->
		  <!--
		 	级联操作:	cascade
		 		save-update: 级联保存更新
		 		delete:级联删除
		 		all:save-update+delete
		 	级联操作: 简化操作.目的就是为了少些两行代码.
		  -->
		  <!-- 多的一方: 不能放弃维护关系的.外键字段就在多的一方.  -->
		<many-to-one name="customer" column="lkm_cust_id" class="Customer"  >
		</many-to-one>
	</class>
</hibernate-mapping>
User.hbm.xml
<?xml version="1.0" encoding="UTF-8"?>
<!DOCTYPE hibernate-mapping PUBLIC
    "-//Hibernate/Hibernate Mapping DTD 3.0//EN"
    "http://www.hibernate.org/dtd/hibernate-mapping-3.0.dtd">
<hibernate-mapping package="cn.itcast.domain" >
	<class name="User" table="sys_user" >
		<id name="user_id"  >
			<generator class="native"></generator>
		</id>
		<property name="user_code"  ></property>
		<property name="user_name"  ></property>
		<property name="user_password"  ></property>
		<property name="user_state"  ></property>
	</class>
</hibernate-mapping>
(2)配置主配置文件
<?xml version="1.0" encoding="UTF-8"?>
<!DOCTYPE hibernate-configuration PUBLIC
	"-//Hibernate/Hibernate Configuration DTD 3.0//EN"
	"http://www.hibernate.org/dtd/hibernate-configuration-3.0.dtd">
<hibernate-configuration>
	<session-factory>
		 <!-- 数据库驱动 -->
		<property name="hibernate.connection.driver_class">com.mysql.jdbc.Driver</property>
		 <!-- 数据库url -->
		<property name="hibernate.connection.url">jdbc:mysql:///crm_32</property>
		 <!-- 数据库连接用户名 -->
		<property name="hibernate.connection.username">root</property>
		 <!-- 数据库连接密码 -->
		<property name="hibernate.connection.password">1234</property>
		<!-- 数据库方言,注意: MYSQL在选择方言时,请选择最短的方言.-->
		<property name="hibernate.dialect">org.hibernate.dialect.MySQLDialect</property>
		<!-- 将hibernate生成的sql语句打印到控制台 -->
		<property name="hibernate.show_sql">true</property>
		<!-- 将hibernate生成的sql语句格式化(语法缩进) -->
		<property name="hibernate.format_sql">true</property>
		<!-- 自动导出表结构. 自动建表-->
		<property name="hibernate.hbm2ddl.auto">update</property>
		<!-- 引入实体配置文件 -->
		<mapping resource="cn/itcast/domain/Customer.hbm.xml" />
		<mapping resource="cn/itcast/domain/LinkMan.hbm.xml" />
		<mapping resource="cn/itcast/domain/User.hbm.xml" />
	</session-factory>
</hibernate-configuration>
(3)测试
public class HibernateTest{
    @Test
    public void fun(){
        Configuration conf = new Configuration().configure();
        SessionFactory sf = conf.buildSessionFactory();
        Session session = sf.openSession();
        Transaction tx = session.beginTransaction();
        User user = new User();
        user.setUser_code("tom");
        user.setUser_name("tom");
        session.save(user);
        tx.commit();
        session.close();
        sessionFactory.close();
    }
}
7. Spring整合Hibernate
(1)整合原理:将sessionFactory对象交给spring容器管理
(2)在spring中配置sessionFactory
配置方案一:仍然使用外部的hibernate.cfg.xml配置信息
<!-- 将SessionFactory配置到spring容器中 -->
	<!-- 加载配置方案1:仍然使用外部的hibernate.cfg.xml配置信息 -->
<bean name="sessionFactory" class="org.springframework.orm.hibernate5.LocalSessionFactoryBean" >
		<property name="configLocation" value="classpath:hibernate.cfg.xml" ></property>
</bean>
配置方案二【推荐】:
<!-- 加载配置方案2:在spring配置中放置hibernate配置信息 -->
<bean name="sessionFactory" class="org.springframework.orm.hibernate5.LocalSessionFactoryBean" >
		<!-- 配置hibernate基本信息 -->
		<property name="hibernateProperties">
			<props>
				<!--  必选配置 -->
			<prop key="hibernate.connection.driver_class" >com.mysql.jdbc.Driver</prop>
				<prop key="hibernate.connection.url" >jdbc:mysql:///crm_32</prop>
				<prop key="hibernate.connection.username" >root</prop>
				<prop key="hibernate.connection.password" >1234</prop>
				<prop key="hibernate.dialect" >org.hibernate.dialect.MySQLDialect</prop>

				<!--  可选配置 -->
				<prop key="hibernate.show_sql" >true</prop>
				<prop key="hibernate.format_sql" >true</prop>
				<prop key="hibernate.hbm2ddl.auto" >update</prop>
			</props>
		</property>
		<!-- 引入orm元数据,指定orm元数据所在的包路径,spring会自动读取包中的所有配置 -->
		<property name="mappingDirectoryLocations" value="classpath:cn/itcast/domain" ></property>
</bean>
8. Spring整合c3p0连接池
(1)配置db.properties
jdbc.jdbcUrl=jdbc:mysql:///test
jdbc.driverClass=com.mysql.jdbc.Driver
jdbc.user=root
jdbc.password=123
(2)引入连接池到spring中
<!-- 读取db.properties文件 -->
<context:property-placeholder location="classpath:db.properties" />
<!-- 配置c3p0连接池 -->
<bean name="dataSource" class="com.mchange.v2.c3p0.ComboPooledDataSource" >
		<property name="jdbcUrl" value="${jdbc.jdbcUrl}" ></property>
		<property name="driverClass" value="${jdbc.driverClass}" ></property>
		<property name="user" value="${jdbc.user}" ></property>
		<property name="password" value="${jdbc.password}" ></property>
</bean>
(3)将连接池注入给SessionFactory
<!-- 加载配置方案2:在spring配置中放置hibernate配置信息 -->
<bean name="sessionFactory" class="org.springframework.orm.hibernate5.LocalSessionFactoryBean" >
		<!-- 将连接池注入到sessionFactory, hibernate会通过连接池获得连接 -->
		<property name="dataSource" ref="dataSource" ></property>
		<!-- 配置hibernate基本信息 -->
		<property name="hibernateProperties">
			<props>
				<!--  必选配置 -->
				<prop key="hibernate.dialect" >org.hibernate.dialect.MySQLDialect</prop>

				<!--  可选配置 -->
				<prop key="hibernate.show_sql" >true</prop>
				<prop key="hibernate.format_sql" >true</prop>
				<prop key="hibernate.hbm2ddl.auto" >update</prop>
			</props>
		</property>
		<!-- 引入orm元数据,指定orm元数据所在的包路径,spring会自动读取包中的所有配置 -->
		<property name="mappingDirectoryLocations" value="classpath:cn/itcast/domain" ></property>
</bean>
9. Spring整合Hibernate环境操作数据库
(1)Dao类创建:继承HibernateDaoSupport
public interface UserDao{
    // 根据登录名称查询User对象
    User getByUserCode(String userCode);
}
public classUserDaoImpl extends HibernateDaoSupport implements UserDao{
        @Override
	public User getByUserCode(final String usercode) {
		//HQL
		return getHibernateTemplate().execute(new HibernateCallback<User>() {
			@Override
			public User doInHibernate(Session session) throws HibernateException {
					String hql = "from User where user_code = ? ";
					Query query = session.createQuery(hql);
					query.setParameter(0, usercode);
					User user = (User) query.uniqueResult();
				return user;
			}
		});*/
               //Criteria
		/*DetachedCriteria dc = DetachedCriteria.forClass(User.class);
		dc.add(Restrictions.eq("user_code", usercode));
		List<User> list = (List<User>) getHibernateTemplate().findByCriteria(dc);
		if(list != null && list.size()>0){
			return list.get(0);
		}else{
			return null;
		}*/
        }
        @Override
	public void save(User u) {
		getHibernateTemplate().save(u);
	}
}
(2)Hhibernate模板的操作
- execute
- findByCriteria
(3)spring中配置dao
(4)
10. Spring的AOP事务
(1)准备工作

(2)XML配置AOP事务
- 配置通知
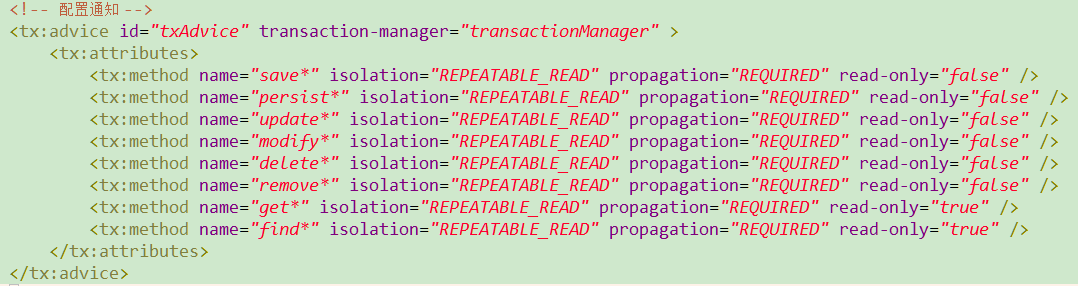
- 配置织入

(3)注解配置事务
- 开启注解事务

- Service类中使用注解


11. 扩大Session作用范围
为了避免使用懒加载时出现no-session问题.需要扩大session的作用范围
- 配置Filter
<!-- 扩大session作用范围
  	注意: 任何filter一定要在struts的filter之前调用-->
<filter>
  	<filter-name>openSessionInView</filter-name>
  	<filter-class>org.springframework.orm.hibernate5.support.OpenSessionInViewFilter</filter-class>
</filter>