3.1 unittest简介
前言
(python基础比较弱的,建议大家多花点时间把基础语法学好,这里有套视频,可以照着练习下:http://pan.baidu.com/s/1i44jZdb 密码:92fs)
熟悉java的应该都清楚常见的单元测试框架Junit和TestNG,这个招聘的需求上也是经常见到的。python里面也有单元测试框架-unittest,相当于是一个python版的junit。
python里面的单元测试框架除了unittest,还有一个pytest框架,这个用的比较少,后面有空再继续分享。
3.1.1 unittest简介
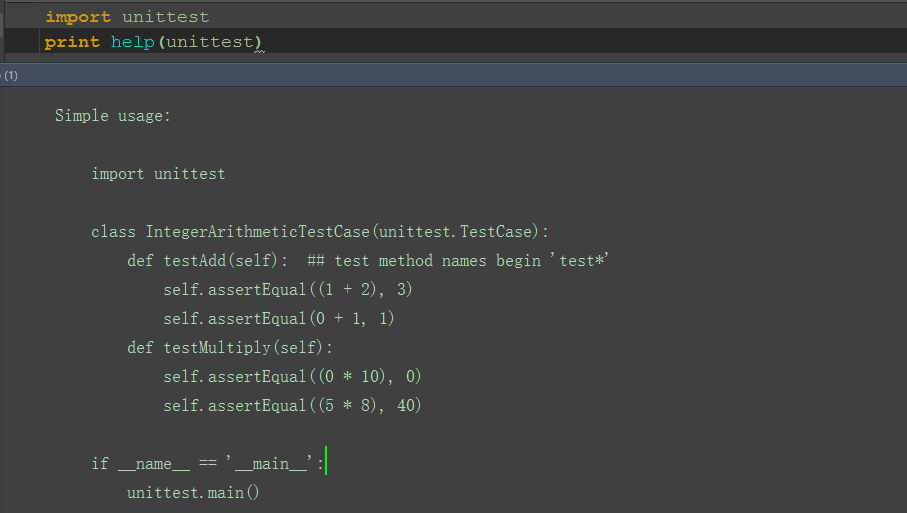
1).先导入unittest
2).用help函数查看源码解析
3).查看描述:
Python unit testing framework, based on Erich Gamma's JUnit and KentBeck's Smalltalk testing framework.
翻译:python的单元测试框架,是基于java的junit测试框架。
3.1.2 简单用法
1).可以把上图的这段代码copy出来,单独运行,看看测试结果。
Simple usage:
import unittest

class IntegerArithmeticTestCase(unittest.TestCase):
       deftestAdd(self):  ## test method names begin 'test*'
            self.assertEqual((1 + 2), 3)
            self.assertEqual(0 + 1, 1)
       deftestMultiply(self):
            self.assertEqual((0 * 10), 0)
            self.assertEqual((5 * 8), 40)

if __name__ == '__main__':
       unittest.main()
2).第一行是导入unittest这个模块
3).class这一行是定义一个测试的类,并继承unittest.TestCase这个类
4).接下来是定义了两个测试case名称:testAdd和testMultiply
5).注释里面有句话很重要,这个要敲下黑板记笔记了:## test method names begin 'test*'
--翻译:测试用例的名称要以test开头
6).然后是断言assert,这里的断言方法是assertEqual-判断两个是否相等,
这个断言可以是一个也可以是多个
7).if下面的这个unittest.main()是运行主函数,运行后会看到测试结果(跑了两个用例耗时0.000秒,两个用例都通过):
----------------------------------------------------------------------
Ran 2 tests in 0.000s
OK
3.1.3 小试牛刀
1).上面的两个案例是加法和乘法,我们可以写个case试下减法和除法。
2).有很多小伙伴不知道断言怎么写,断言其实就是拿实际结果和期望结果去对比,对比的方法很多,这里只是举的最简单的一个判断相等的方法。
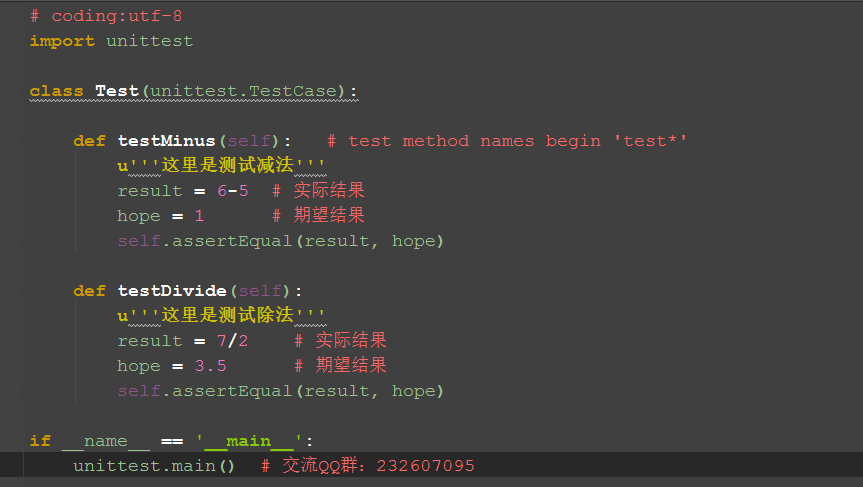
3).最后运行结果,第二个是失败的,失败原因:AssertionError: 3 != 3.5
F.
======================================================================
FAIL: testDivide (__main__.Test)
这里是测试除法
----------------------------------------------------------------------
Traceback (most recent call last):
File "D:/test/web-project/p.py", line 14, in testDivide
self.assertEqual(result, hope)
AssertionError: 3 != 3.5
----------------------------------------------------------------------
Ran 2 tests in 0.000s
FAILED (failures=1)
3.1.4 前置和后置
1).setUp:在写测试用例的时候,每次操作其实都是基于打开浏览器输入对应网址这些操作,这个就是执行用例的前置条件。
2).tearDown:执行完用例后,为了不影响下一次用例的执行,一般有个数据还原的过程,这就是执行用例的后置条件。
3).很多人执行完用例,都不去做数据还原,以致于下一个用例执行失败,这就是不喜欢擦屁股的事情,习惯不好。
4).前置和后置都是非必要的条件,如果没有也可以写pass

3.1.5 博客案例
1).打开博客首页为例,写一个简单的case
2).判断title完全等于期望结果
3).运行通过,下面会有一个绿条显示:1 test passed
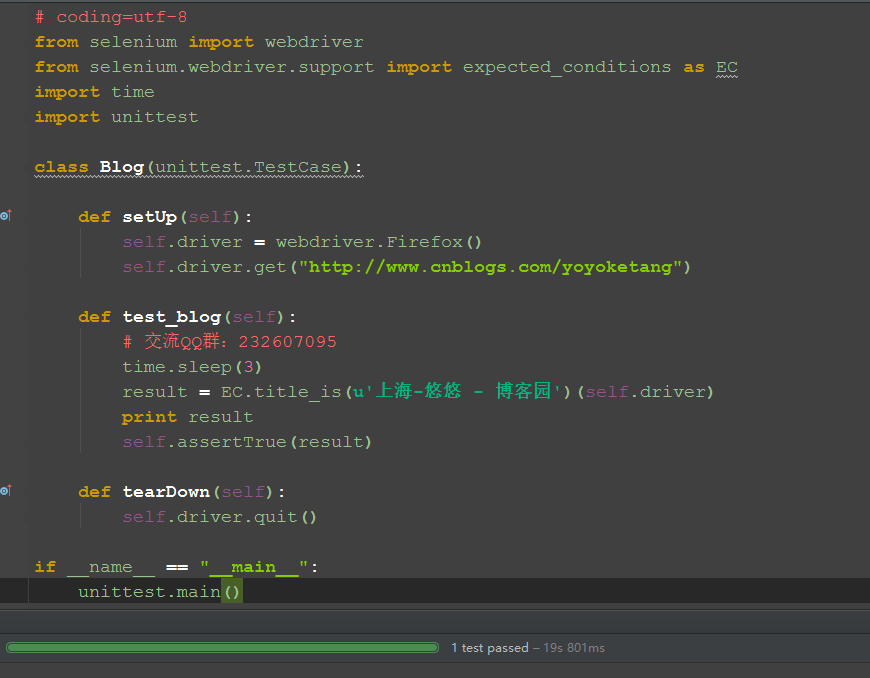
3.1.6 参考代码
# coding=utf-8
from selenium import webdriver
from selenium.webdriver.support import expected_conditions as EC
import time
import unittest
class Blog(unittest.TestCase):
    def setUp(self):
        self.driver = webdriver.Firefox()
        self.driver.get("http://www.cnblogs.com/yoyoketang")
    def test_blog(self):
        time.sleep(3)
        result = EC.title_is(u'上海-悠悠 - 博客园')(self.driver)
        print result
        self.assertTrue(result)
    def tearDown(self):
        self.driver.quit()
if __name__ == "__main__":
    unittest.main()
3.2 unittest执行顺序
前言
很多初学者在使用unittest框架时候,不清楚用例的执行顺序到底是怎样的。对测试类里面的类和方法分不清楚,不知道什么时候执行,什么时候不执行。
本篇通过最简单案例详细讲解unittest执行顺序。
一、案例分析
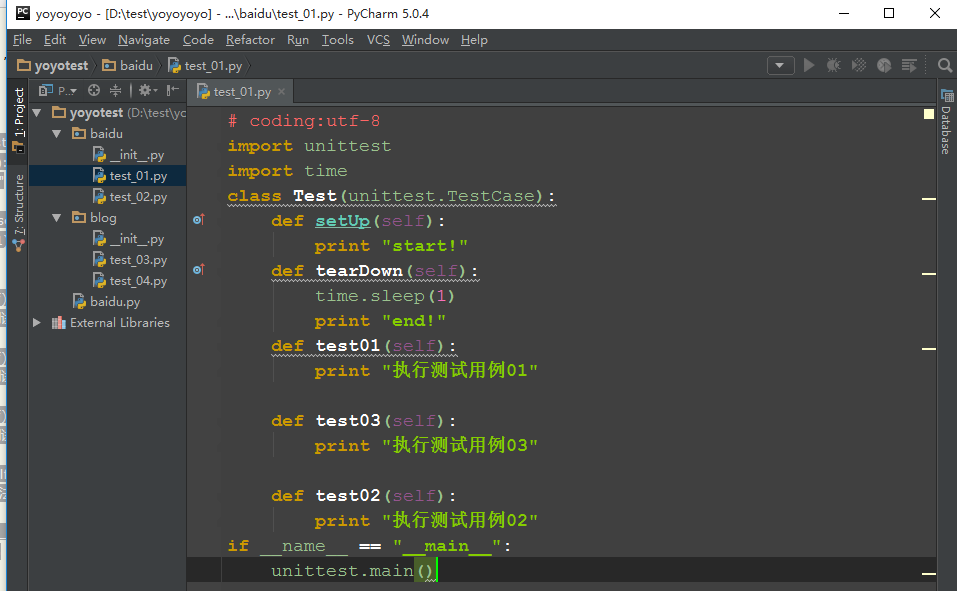
1.先定义一个测试类,里面写几个简单的case
# coding:utf-8
import unittest
import time
class Test(unittest.TestCase):
    def setUp(self):
        print "start!"
    def tearDown(self):
        time.sleep(1)
        print "end!"
    def test01(self):
        print "执行测试用例01"
    def test03(self):
        print "执行测试用例03"
    def test02(self):
        print "执行测试用例02"
    def addtest(self):
        print "add方法"
if __name__ == "__main__":
    unittest.main()
二、执行结果
D: estpython2python.exe D:/test/test01.py
start!
执行测试用例01
end!
start!
执行测试用例02
end!
start!
执行测试用例03
end!
.
----------------------------------------------------------------------
Ran 3 tests in 3.001s
OK
三、结果分析
1.执行顺序:
start!-执行测试用例01-end!
start!-执行测试用例02-end!
start!-执行测试用例03-end!
2.从执行结果可以看出几点:
--先执行的前置setUp,然后执行的用例(test*),最后执行的后置tearDown。
--测试用例(test*)的执行顺序是根据01-02-03执行的,也就是说根据用例名称来顺序执行的。
--addtest(self)这个方法没执行,说明只执行test开头的用例。
四、selenium实例
1.具体实例参考 登录方法(参数化)
# coding:utf-8
from selenium import webdriver
import unittest
import time
class Bolg(unittest.TestCase):
    u'''登录博客'''
    def setUp(self):
        self.driver = webdriver.Firefox()
        url = "https://passport.cnblogs.com/user/signin"
        self.driver.get(url)
        self.driver.implicitly_wait(30)
    def login(self, username, psw):
        u'''这里写了一个登录的方法,账号和密码参数化'''
        self.driver.find_element_by_id("input1").send_keys(username)
        self.driver.find_element_by_id("input2").send_keys(psw)
        self.driver.find_element_by_id("signin").click()
        time.sleep(3)
    def is_login_sucess(self):
        u'''判断是否获取到登录账户名称'''
        try:
            text = self.driver.find_element_by_id("lnk_current_user").text
            print text
            return True
        except:
            return False
    def test_01(self):
        u'''登录案例参考:账号,密码自己设置'''
        self.login(u"上海-悠悠", u"xxxx")  # 调用登录方法
        # 判断结果
        result = self.is_login_sucess()
        self.assertTrue(result)
    def test_02(self):
        u'''登录案例参考:账号,密码自己设置'''
        self.login(u"上海-悠悠", u"xxxx")  # 调用登录方法
        # 判断结果
        result = self.is_login_sucess()
        self.assertTrue(result)
    def tearDown(self):
        self.driver.quit()

if __name__ == "__main__":
    unittest.main()
3.3 unittest批量执行
我们在写用例的时候,单个脚本的用例好执行,那么多个脚本的时候,如何批量执行呢?这时候就需要用到unittet里面的discover方法来加载用例了。
加载用例后,用unittest里面的TextTestRunner这里类的run方法去一次执行多个脚本的用例。
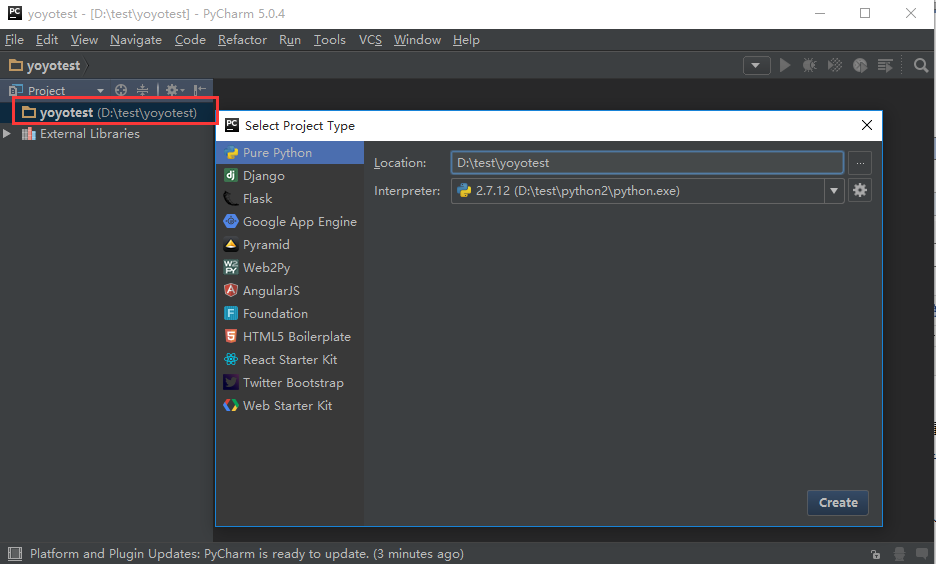
一、新建测试项目
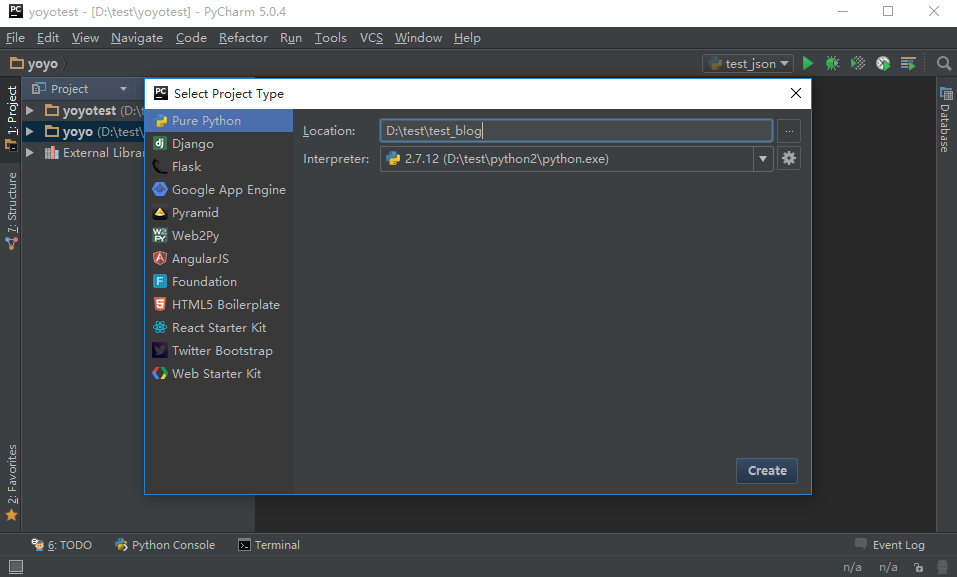
1.pycharm左上角File>New Projetc>Pure Python,在location位置命名一个测试工程的名称:yoyotest,然后保存
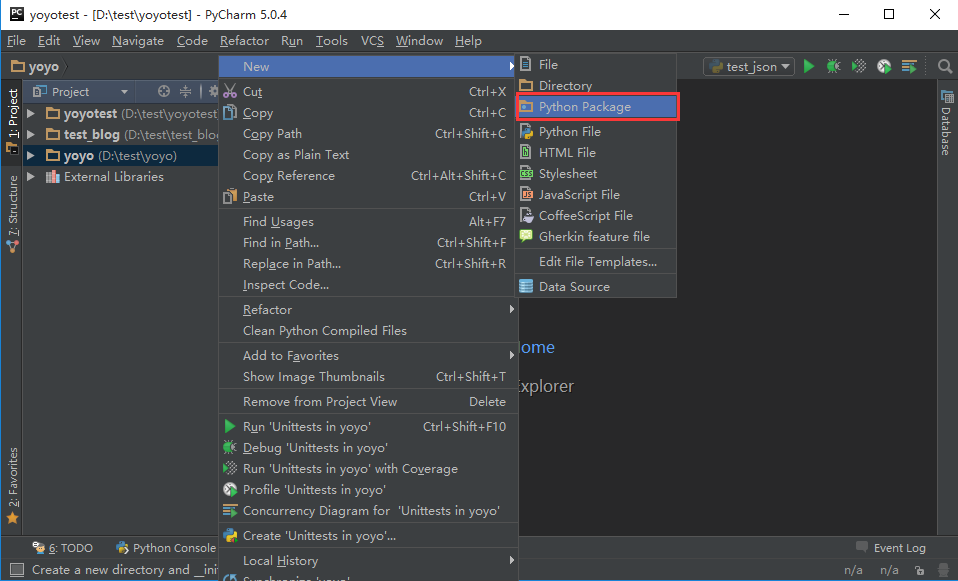
2.选中刚才新建的工程右键>New>Python Package>新建一个case文件夹
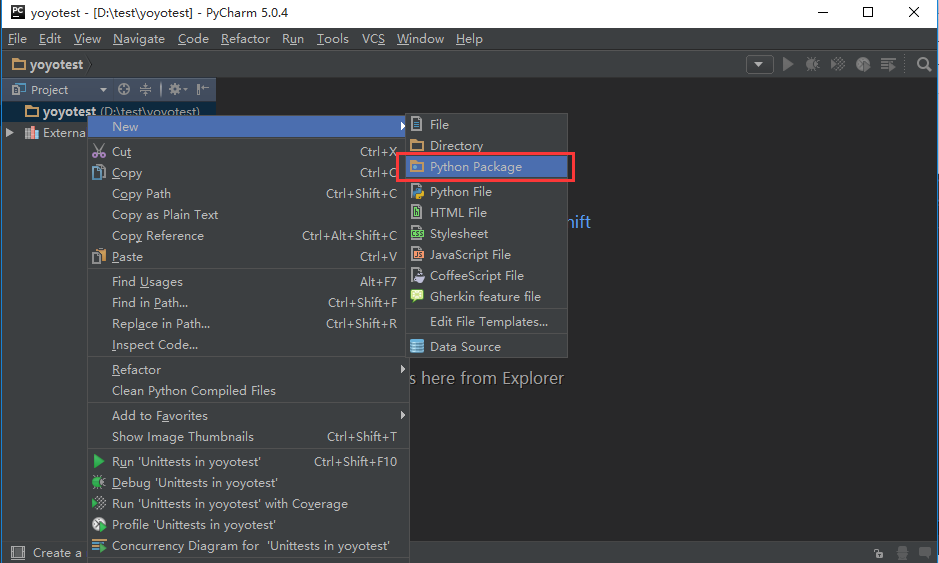
3.重复第2步的操作,新建一个case的文件夹,在里面添加一个baidu和一个blog的文件夹,里面分别有两个用例的脚本,如下图所示。
test_01,test_02,test_03,test_04是我们写用例的脚本
4.test_01创建完后,打开脚本,写入用例
5.在yoyotest这个项目下面创建一个脚本run_all_case.py,接下来用这个脚本去批量执行所有的用例。

二、diascover加载测试用例
1.discover方法里面有三个参数:
-case_dir:这个是待执行用例的目录。
-pattern:这个是匹配脚本名称的规则,test*.py意思是匹配test开头的所有脚本。
-top_level_dir:这个是顶层目录的名称,一般默认等于None就行了。
2.discover加载到的用例是一个list集合,需要重新写入到一个list对象testcase里,这样就可以用unittest里面的TextTestRunner这里类的run方法去执行。
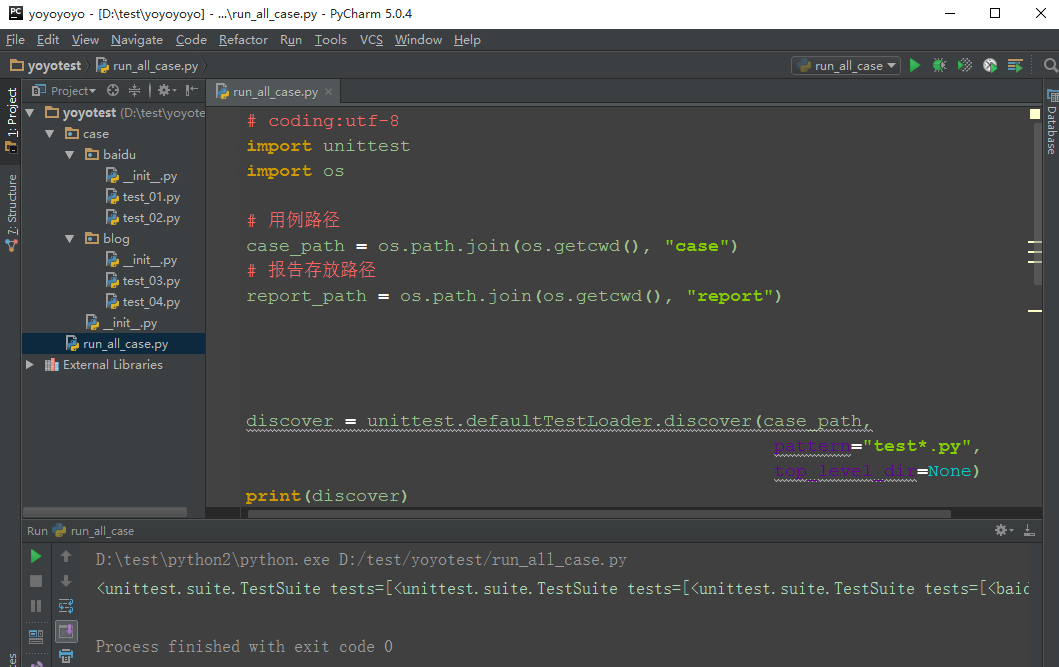
3.运行后结果如下,就是加载到的所有测试用例了:
<unittest.suite.TestSuite tests=[<baidu.test_01.Test testMethod=test01>, <baidu.test_01.Test testMethod=test02>, <baidu.test_01.Test testMethod=test03>, <baidu.test_02.Test
testMethod=test01>, <baidu.test_02.Test testMethod=test02>, <baidu.test_02.Test testMethod=test03>, <bolg.test_03.Test testMethod=test01>, <bolg.test_03.Test testMethod=test02>,
<bolg.test_03.Test testMethod=test03>, <bolg.test_04.Test testMethod=test01>, <bolg.test_04.Test testMethod=test02>, <bolg.test_04.Test testMethod=test03>]>
三、run测试用例
1.为了更方便的理解,可以把上面discover加载用例的方法封装下,写成一个函数

2.参考代码:
# coding:utf-8
import unittest
import os
# 用例路径
case_path = os.path.join(os.getcwd(), "case")
# 报告存放路径
report_path = os.path.join(os.getcwd(), "report")
def all_case():
    discover = unittest.defaultTestLoader.discover(case_path, pattern="test*.py", top_level_dir=None)
    print(discover)
    return discover
if __name__ == "__main__":
    runner = unittest.TextTestRunner()
    runner.run(all_case())
3.4 unittest之装饰器(@classmethod)
前言
前面讲到unittest里面setUp可以在每次执行用例前执行,这样有效的减少了代码量,但是有个弊端,比如打开浏览器操作,每次执行用例时候都会重新打开,这样就会浪费很多时间。
于是就想是不是可以只打开一次浏览器,执行完用例再关闭呢?这就需要用到装饰器(@classmethod)来解决了。
一、装饰器
1.用setUp与setUpClass区别
setup():每个测试case运行前运行
teardown():每个测试case运行完后执行
setUpClass():必须使用@classmethod 装饰器,所有case运行前只运行一次
tearDownClass():必须使用@classmethod装饰器,所有case运行完后只运行一次
2.@是修饰符,classmethod是python里的类方法
二、执行顺序
1.用类方法写几个简单case,可以对比这篇:Selenium2+python自动化52-unittest执行顺序
# coding:utf-8
import unittest
import time

class Test(unittest.TestCase):
    @classmethod
    def setUpClass(cls):
        print "start!"

    @classmethod
    def tearDownClass(cls):
        time.sleep(1)
        print "end!"
    def test01(self):
        print "执行测试用例01"
    def test03(self):
        print "执行测试用例03"
    def test02(self):
        print "执行测试用例02"
    def addtest(self):
        print "add方法"


if __name__ == "__main__":
    unittest.main()
2.从执行结果可以看出,前置和后置在执行用例前只执行了一次。
start!
执行测试用例01
执行测试用例02
执行测试用例03
...end!
----------------------------------------------------------------------
Ran 3 tests in 1.001s
三、selenium实例
1.可以把打开浏览器操作放到前置setUpClass(cls)里,这样就可以实现打开一次浏览器,执行多个case了
# coding:utf-8
from selenium import webdriver
from selenium.webdriver.support import expected_conditions as EC
import unittest

class BolgHome(unittest.TestCase):

    u'''博客首页'''
    @classmethod
    def setUpClass(cls):
        cls.driver = webdriver.Firefox()
        url = "http://www.cnblogs.com/yoyoketang/"
        cls.driver.get(url)
        cls.driver.implicitly_wait(30)

    @classmethod
    def tearDownClass(cls):
        cls.driver.quit()

    def test_01(self):
        u'''验证元素存在:博客园'''
        locator = ("id", "blog_nav_sitehome")
        text = u"博客园"
        result = EC.text_to_be_present_in_element(locator, text)(self.driver)
        self.assertTrue(result)
    def test_02(self):
        u'''验证元素存在:首页'''
        locator = ("id", "blog_nav_myhome")
        text = u"首页"
        result = EC.text_to_be_present_in_element(locator, text)(self.driver)
        self.assertTrue(result)

if __name__ == "__main__":
    unittest.main()
上述代码运行的顺序就是从上至下,而不再是每次执行完成一个testcase之后,执行一次teardownClass再进行下一个testcase。
这样一来,退出浏览器仅仅执行一次即可,这样有一个不好的地方就是,teardownClass这个函数不能再进行每个测试用例的终结操作,比如:修改个人信息后恢复到登录成功后的状态,对当前测试用例的异常处理等。
后来,本人尝试在tearDownClass后增加如下代码:
def tearDown(self):
    self.driver.refresh()
    self.assertEqual( [], self.verificationErrors )
然后,果然每次测试用完成都会刷新当前页面,这样一来,每一个testcase的用例都能被终结函数tearDown结束,最后再执行tearDownClass关闭测试浏览器。
需要说明的是:
@classmethod是python本身的装饰器,所以他不要使用隶属于unittest框架下断言assertEqual。
unittest本身也带有装饰器unittest.skip(),专门用于跳过testcase的装饰器,其用法如下:
 @unittest.skip(reason), skip装饰器:直接跳过装饰下的testcase,reason用来说明原因,下同。

 @unittest.skipIf(condition,reason), skipIf装饰器:condition条件为True时,跳过装饰下的testcase,计入skip的testcase执行次数。

 @unittest.skipUnless(condition,reason),skipUnless装饰器:condition条件为False时,跳过装饰下的testcase,计入skip的testcase执行次数。

 @unittest.expectedFailure(), expectedFailure装饰器:执行装饰下的testcase,执行失败则跳过该testcase,计入expected下成败的testcase次数。
一般来讲,使用@unittest.skipIf 或者 @unittest.skipUnless,应该也能实现@classmethod装饰器的效果, 想来只是实现起来相对来说较为麻烦。
3.5 unittest生成测试报告HTMLTestRunner
前言
批量执行完用例后,生成的测试报告是文本形式的,不够直观,为了更好的展示测试报告,最好是生成HTML格式的。
unittest里面是不能生成html格式报告的,需要导入一个第三方的模块:HTMLTestRunner
备注:(以下是python2.7的HTMLTestRunner,python3.x的HTMLTestRunner需要自己稍做修改,可以在这里下载:http://pan.baidu.com/s/1hs5OXNY)
一、导入HTMLTestRunner
1.这个模块下载不能通过pip安装了,只能下载后手动导入,下载地址:http://tungwaiyip.info/software/HTMLTestRunner.html

2.Download下HTMLTestRunner.py文件就是我们需要下载的包。
3.下载后手动拖到python安装文件的Lib目录下
二、demo解析
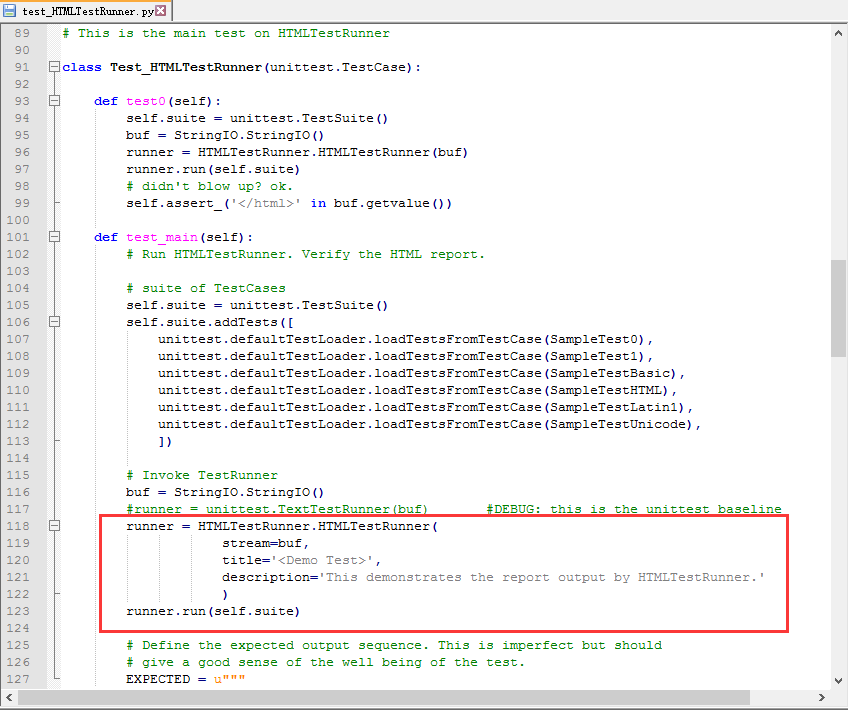
1.下载Download下的第二个文件test_HTMLTestRunner.py,这个就是官方给的一个测试demo了,从这个文件可以找到该模块的用法。
2.找到下图这段,就是官方给的一个demo了,test_main()里上半部分就是加载测试case,我们不需要搞这么复杂。
参考前面一篇内容就行了Selenium2+python自动化53-unittest批量执行(discover)
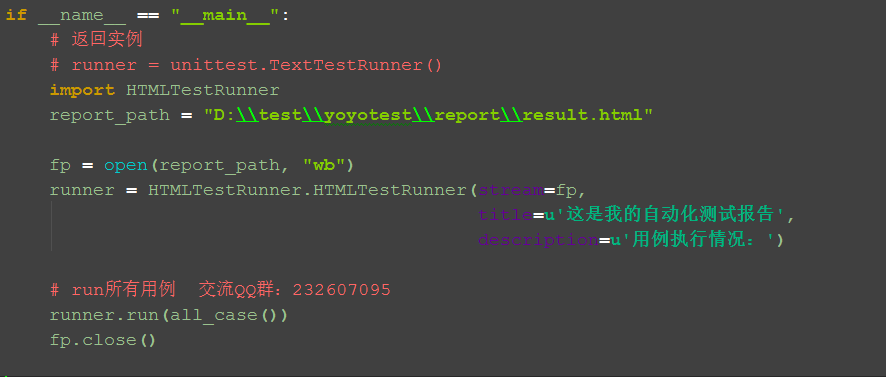
3.最核心的代码是下面的红色区域,这个就是本篇的重点啦。
三、生成html报告
1.我们只需把上面红色区域代码copy到上一篇的基础上稍做修改就可以了,这里主要有三个参数:
--stream:测试报告写入文件的存储区域
--title:测试报告的主题
--description:测试报告的描述
2.report_path是存放测试报告的地址
四、测试报告详情
1.找到测试报告文件,用浏览器打开,点开View里的Detail可以查看详情描述。
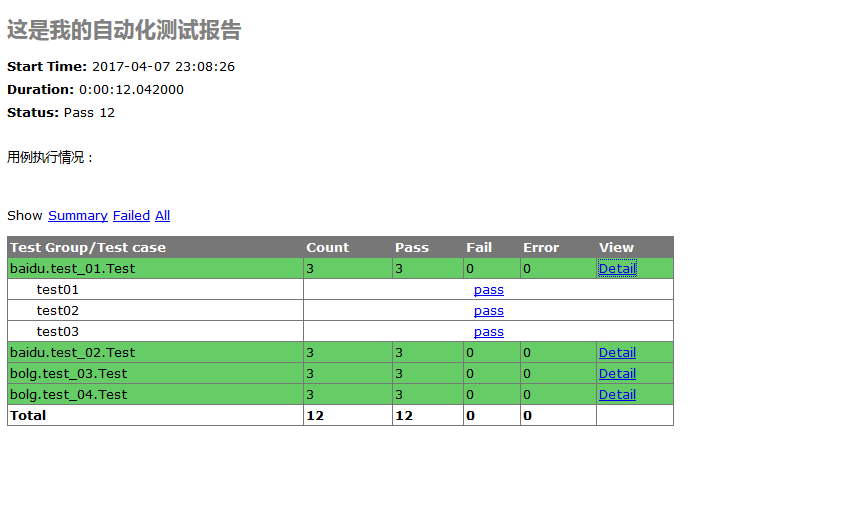
2.为了生成带中文描述的测试用例,可以在case中添加注释,如在test_01的脚本添加如下注释:
class Test(unittest.TestCase):
    def setUp(self):
        print "start!"
    def tearDown(self):
        time.sleep(1)
        print "end!"
    def test01(self):
        u'''测试登录用例,账号:xx 密码xx'''
        print "执行测试用例01"
    def test03(self):
        u'''测试登搜索用例,关键词:xxx'''
        print "执行测试用例03"
3.重新运行后查看测试报告

五、参考代码:
1.我下面的代码文件路径用的相对路径,这样就避免代码换个地址找不到路径的情况了
# coding:utf-8
import unittest
import os
import HTMLTestRunner
# 用例路径
case_path = os.path.join(os.getcwd(), "case")
# 报告存放路径
report_path = os.path.join(os.getcwd(), "report")
def all_case():
    discover = unittest.defaultTestLoader.discover(case_path, pattern="test*.py", top_level_dir=None)
    print(discover)
    return discover

if __name__ == "__main__":
    # runner = unittest.TextTestRunner()
    # runner.run(all_case())
    # html报告文件路径
    report_abspath = os.path.join(report_path, "result.html")
    fp = open(report_abspath, "wb")
    runner = HTMLTestRunner.HTMLTestRunner(stream=fp, title=u'自动化测试报告,测试结果如下:', description=u'用例执行情况:')
    # 调用add_case函数返回值
    runner.run(all_case())
    fp.close()
3.6 html报告乱码问题优化
前言
python2用HTMLTestRunner生成测试报告时,有中文输出情况会出现乱码,这个主要是编码格式不统一,改下编码格式就行。
下载地址:http://tungwaiyip.info/software/HTMLTestRunner.html
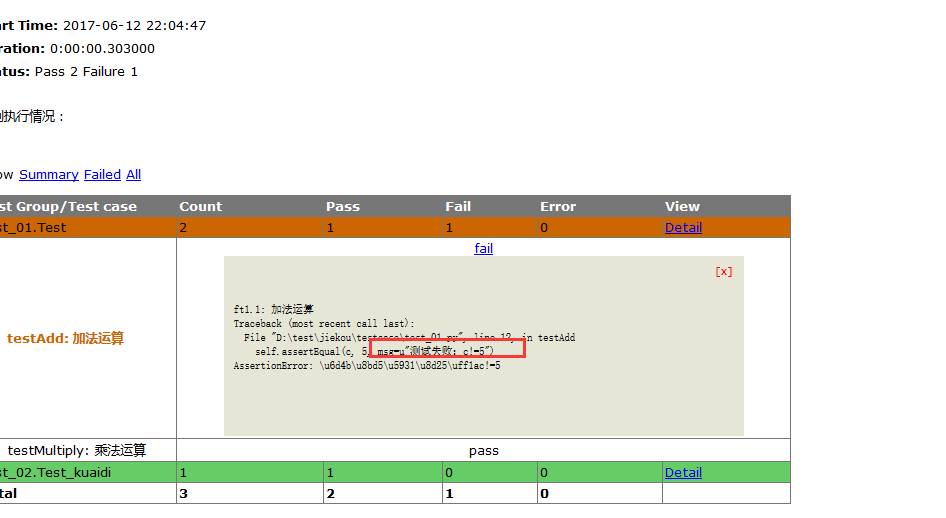
一、中文乱码
1.测试报告中,msg自定义异常内容有中文情况会出现乱码,如下图所示

二、修改编码
1.找到HTMLTestRunner.py文件,搜索:uo =
2.找到红色区域设置编码的两个地方

3.注释掉红色区域这两个设置,重新添加编码格式为:uo = o.decode('utf-8') ue = e.decode('utf-8')
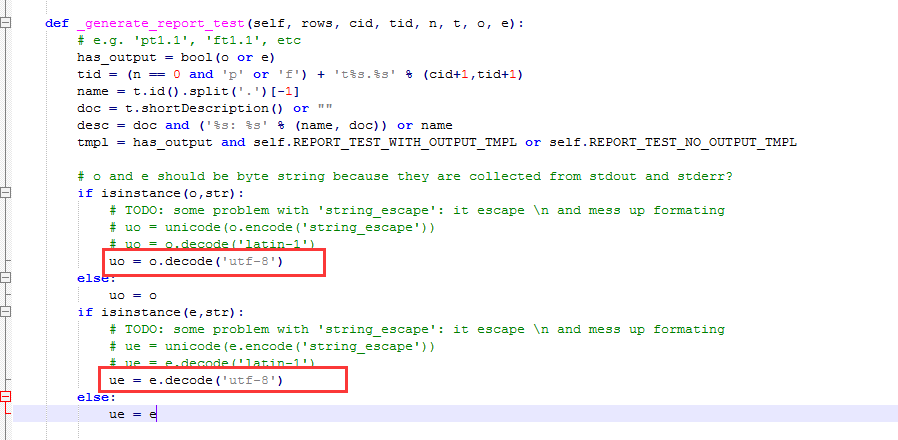
4.修改好之后记得保存,重新运行,乱码问题就解决了
三、python3报告问题
1.python3的小伙伴直接用这个下载地址:http://tungwaiyip.info/software/HTMLTestRunner.html的文件,是不能直接生成报告的,需要稍做修改
2.修改后的源文件已经打包:https://files.cnblogs.com/files/zidonghua/HTMLTestRunner%28%E7%8B%AC%E5%AE%B6%E5%90%88%E9%9B%86%29.zip
(另外很多朋友在简单的示例代码中,生成不了测试报告,我来上传一份完整项目模板:https://files.cnblogs.com/files/zidonghua/%E6%B5%8B%E8%AF%95%E6%8A%A5%E5%91%8A%E6%90%9E%E4%B8%8D%E5%87%BA%E6%9D%A5%E7%9A%84%E7%9C%8B%E8%BF%99%E9%87%8C.rar)
3.7 unittest之断言
前言
在测试用例中,执行完测试用例后,最后一步是判断测试结果是pass还是fail,自动化测试脚本里面一般把这种生成测试结果的方法称为断言(assert)。
用unittest组件测试用例的时候,断言的方法还是很多的,下面介绍几种常用的断言方法:assertEqual、assertIn、assertTrue
3.7.1 简单案例
1).下面写了4个case,其中第四个是执行失败的
# coding:utf-8
import unittest

class Test(unittest.TestCase):
    def test01(self):
        '''判断 a == b '''
        a = 1
        b = 1
        self.assertEqual(a, b)
    def test02(self):
        '''判断 a in b'''
        a = "hello"
        b = "hello world!"
        self.assertIn(a, b)

    def test03(self):
        '''判断 a isTrue '''
        a = True
        self.assertTrue(a)
    def test04(self):
        '''失败案例'''
        a = "上海-悠悠"
        b = "yoyo"
        self.assertEqual(a, b)

if __name__ == "__main__":
    unittest.main()
2).执行结果如下
Failure
Expected :'xe4xb8x8axe6xb5xb7-xe6x82xa0xe6x82xa0'
Actual :'yoyo'
<Click to see difference>
Traceback (most recent call last):
File "D: estyoyotestkecheng est12.py", line 27, in test04
self.assertEqual(a, b)
AssertionError: 'xe4xb8x8axe6xb5xb7-xe6x82xa0xe6x82xa0' != 'yoyo'
3.执行的结果,中文编码不对,没正常显示中文,遇到这种情况,可以自定义异常输出
3.7.2 自定义异常
1).以assertEqual为例分析:
assertEqual(self, first, second, msg=None)
Fail if the two objects are unequal as determined by the'=='
operator.
2).翻译:如果两个对象不能相等,就返回失败,相当于return: first==second
3).这里除了相比较的两个参数first和second,还有第三个参数msg=None,这个msg参数就是遇到异常后自定义输出信息

3.7.3 unittest常用的断言方法
1).assertEqual(self, first, second,msg=None)
--判断两个参数相等:first == second
2).assertNotEqual(self, first, second,msg=None)
--判断两个参数不相等:first != second
3).assertIn(self, member, container,msg=None)
--判断是字符串是否包含:member in container
4).assertNotIn(self, member,container, msg=None)
--判断是字符串是否不包含:member not in container
5).assertTrue(self, expr, msg=None)
--判断是否为真:expr is True
6).assertFalse(self, expr, msg=None)
--判断是否为假:expr is False
7).assertIsNone(self, obj, msg=None)
--判断是否为None:objis None
8).assertIsNotNone(self, obj,msg=None)
--判断是否不为None:obj is not None
3.7.4 unittest所有断言方法
1).下面是unittest框架支持的所有断言方法,有兴趣的同学可以慢慢看。(官方资料)
|  assertAlmostEqual(self, first, second, places=None, msg=None,delta=None)
|      Fail if the two objects are unequal asdetermined by their
|      difference rounded to the given number ofdecimal places
|      (default 7) and comparing to zero, or bycomparing that the
|      between the two objects is more than the givendelta.
|
|      Note that decimal places (from zero) areusually not the same
|      as significant digits (measured from the mostsignficant digit).
|
|      If the two objects compare equal then they willautomatically
|      compare almost equal.
|
|  assertAlmostEquals = assertAlmostEqual(self, first, second,places=None, msg=None, delta=None)
|
|  assertDictContainsSubset(self, expected, actual, msg=None)
|      Checks whether actual is a superset ofexpected.
|
|  assertDictEqual(self, d1, d2, msg=None)
|
|  assertEqual(self, first, second, msg=None)
|      Fail if the two objects are unequal asdetermined by the '=='
|      operator.
|
|  assertEquals = assertEqual(self, first, second, msg=None)
|
|  assertFalse(self, expr, msg=None)
|      Check that the expression is false.
|
|  assertGreater(self, a, b, msg=None)
|      Just like self.assertTrue(a > b), but with anicer default message.
|
|  assertGreaterEqual(self, a, b, msg=None)
|      Just like self.assertTrue(a >= b), but witha nicer default message.
|
|  assertIn(self, member, container, msg=None)
|      Just like self.assertTrue(a in b), but with anicer default message.
|
|  assertIs(self, expr1, expr2, msg=None)
|      Just like self.assertTrue(a is b), but with anicer default message.
|
|  assertIsInstance(self, obj, cls, msg=None)
|      Same as self.assertTrue(isinstance(obj, cls)),with a nicer
|      default message.
|
|  assertIsNone(self, obj, msg=None)
|      Same as self.assertTrue(obj is None), with anicer default message.
|
|  assertIsNot(self, expr1, expr2, msg=None)
|      Just like self.assertTrue(a is not b), but witha nicer default message.
|
|  assertIsNotNone(self, obj, msg=None)
|      Included for symmetry with assertIsNone.
|
|  assertItemsEqual(self, expected_seq, actual_seq, msg=None)
|      An unordered sequence specific comparison. Itasserts that
|      actual_seq and expected_seq have the sameelement counts.
|      Equivalent to::
|
|         self.assertEqual(Counter(iter(actual_seq)),
|                          Counter(iter(expected_seq)))
|
|      Asserts that each element has the same count inboth sequences.
|      Example:
|          - [0, 1, 1] and [1, 0,1] compare equal.
|          - [0, 0, 1] and [0, 1]compare unequal.
|
|  assertLess(self, a, b, msg=None)
|      Just like self.assertTrue(a < b), but with anicer default message.
|
|  assertLessEqual(self, a, b, msg=None)
|      Just like self.assertTrue(a <= b), but witha nicer default message.
|
|  assertListEqual(self, list1, list2, msg=None)
|      A list-specific equality assertion.
|
|      Args:
|          list1: The first listto compare.
|          list2: The second listto compare.
|          msg: Optional messageto use on failure instead of a list of
|                 differences.
|
|  assertMultiLineEqual(self, first, second, msg=None)
|      Assert that two multi-line strings are equal.
|
|  assertNotAlmostEqual(self, first, second, places=None, msg=None,delta=None)
|      Fail if the two objects are equal as determinedby their
|      difference rounded to the given number ofdecimal places
|      (default 7) and comparing to zero, or bycomparing that the
|      between the two objects is less than the givendelta.
|
|      Note that decimal places (from zero) areusually not the same
|      as significant digits (measured from the mostsignficant digit).
|
|      Objects that are equal automatically fail.
|
|  assertNotAlmostEquals = assertNotAlmostEqual(self, first, second, places=None,msg=None, delta=None)
|
|  assertNotEqual(self, first, second, msg=None)
|      Fail if the two objects are equal as determinedby the '!='
|      operator.
|
|  assertNotEquals = assertNotEqual(self, first, second, msg=None)
|
|  assertNotIn(self, member, container, msg=None)
|      Just like self.assertTrue(a not in b), but witha nicer default message.
|
|  assertNotIsInstance(self, obj, cls, msg=None)
|      Included for symmetry with assertIsInstance.
|
|  assertNotRegexpMatches(self, text, unexpected_regexp, msg=None)
|      Fail the test if the text matches the regularexpression.
|
|  assertRaises(self, excClass, callableObj=None, *args, **kwargs)
|      Fail unless an exception of class excClass israised
|      by callableObj when invoked with arguments argsand keyword
|      arguments kwargs. If a different type ofexception is
|      raised, it will not be caught, and the testcase will be
|      deemed to have suffered an error, exactly asfor an
|      unexpected exception.
|
|      If called with callableObj omitted or None,will return a
|      context object used like this::
|
|           withself.assertRaises(SomeException):
|              do_something()
|
|      The context manager keeps a reference to theexception as
|      the 'exception' attribute. This allows you toinspect the
|      exception after the assertion::
|
|          withself.assertRaises(SomeException) as cm:
|             do_something()
|          the_exception =cm.exception
|         self.assertEqual(the_exception.error_code, 3)
|
|  assertRaisesRegexp(self, expected_exception, expected_regexp,callable_obj=None, *args, **kwargs)
|      Asserts that the message in a raised exceptionmatches a regexp.
|
|      Args:
|          expected_exception:Exception class expected to be raised.
|          expected_regexp: Regexp(re pattern object or string) expected
|                 to be found in error message.
|          callable_obj: Functionto be called.
|          args: Extra args.
|          kwargs: Extra kwargs.
|
|  assertRegexpMatches(self, text, expected_regexp, msg=None)
|      Fail the test unless the text matches theregular expression.
|
|  assertSequenceEqual(self, seq1, seq2, msg=None, seq_type=None)
|      An equality assertion for ordered sequences(like lists and tuples).
|
|      For the purposes of this function, a validordered sequence type is one
one
|      which can be indexed, has a length, and has anequality operator.
|
|      Args:
|          seq1: The firstsequence to compare.
|          seq2: The secondsequence to compare.
|          seq_type: The expecteddatatype of the sequences, or None if no
|                 datatype should be enforced.
|          msg: Optional messageto use on failure instead of a list of
|                 differences.
|
|  assertSetEqual(self, set1, set2, msg=None)
|      A set-specific equality assertion.
|
|      Args:
|          set1: The first set tocompare.
|          set2: The second set tocompare.
|          msg: Optional messageto use on failure instead of a list of
|                 differences.
|
|      assertSetEqual uses ducktyping to supportdifferent types of sets, and
|      is optimized for sets specifically (parametersmust support a
|      difference method).
|
|  assertTrue(self, expr, msg=None)
|      Check that the expression is true.
|
|  assertTupleEqual(self, tuple1, tuple2, msg=None)
|      A tuple-specific equality assertion.
|
|      Args:
|          tuple1: The first tupleto compare.
|          tuple2: The secondtuple to compare.
|          msg: Optional messageto use on failure instead of a list of
|                 differences.
3.8 搭建简易项目
前言
到unittest这里基本上可以搭建一个简易的项目框架了,我们可以用一条run_main.py脚本去控制执行所有的用例,并生成报告,发送邮件一系列的动作
一、新建工程
1.打开pycharm左上角File>New Project,在Location位置输入项目名称:D: est est_blog
2.创建之后,选择Opin in current window就可以了
二、项目结构
1.在测试工程下,创建文件夹,一定要选Python Package的方式创建,要不然后面导入自己写的模块会出现各种问题
2.在工程下创建以下几个文件
--test_case 这个文件夹放所有测试用例
----blog_home 可以按功能用例模块划分
---------test_home
---------test_home_1 测试用例以test开头命名
----blog_login
---------test_login
----blog_set
---------test_set
--test_report
--run_main.py 注意这个脚本放文件根目录

三、run_main
1.run_main.py这个脚本里面写主函数,控制执行所有的用例,最终我们只需要运行这个脚本就可以了
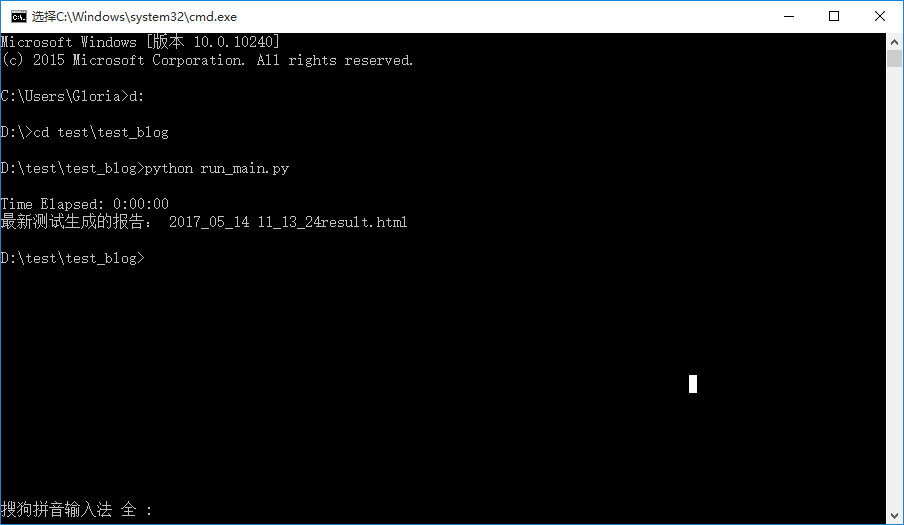
2.我们也可以在cmd里执行这个脚本文件,这样就不用依赖pycharm去执行了(后续用jenkins执行,也是同样道理,启动cmd执行脚本)
>>d:
>>cd test est_blog
>>python run_main.py
3.run_main.py源代码在下一章节。
3.8-1 生成报告的源码下载(兼容python2和3)

生成测试项目报告模板:
测试报告搞不出来的看这里:
3.9 run_main.py源码(兼容python2和3)
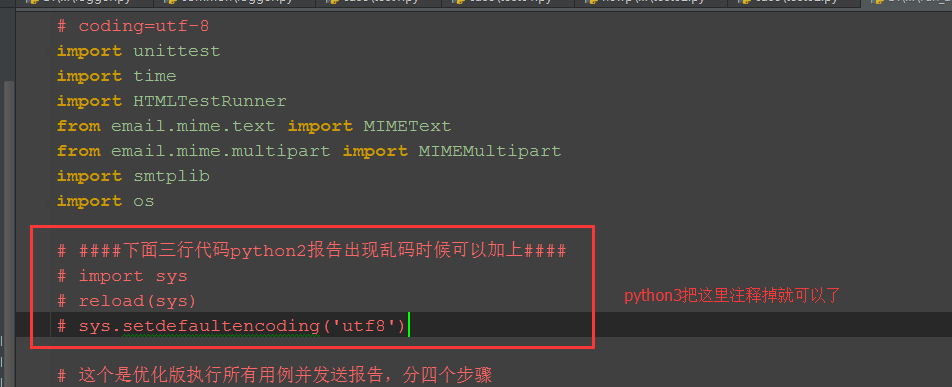
以下代码在python2和python3上都跑通过,python3只需注释掉上面红色框框区域代码就行(最后一步发送邮箱代码,我注释掉了)。
# coding=utf-8
import unittest
import time
import HTMLTestRunner
from email.mime.text import MIMEText
from email.mime.multipart import MIMEMultipart
import smtplib
import os
####下面三行代码python2报告出现乱码时候可以加上####
import sys
reload(sys)
sys.setdefaultencoding('utf8')


# 这个是优化版执行所有用例并发送报告,分四个步骤
# 第一步加载用例
# 第二步执行用例
# 第三步获取最新测试报告
# 第四步发送邮箱 (这一步不想执行的话,可以注释掉最后面那个函数就行)

def add_case(case_path, rule):
    '''加载所有的测试用例'''
    testunit = unittest.TestSuite()
    # 定义discover方法的参数
    discover = unittest.defaultTestLoader.discover(case_path,
                                                  pattern=rule,
                                                  top_level_dir=None)
    # discover方法筛选出来的用例,循环添加到测试套件中
    # for test_suite in discover:
    #     for test_case in test_suite:
    #         testunit.addTests(test_case)
    #         print testunit
    testunit.addTests(discover)  # 直接加载discover
    print(testunit)
    return testunit

def run_case(all_case, report_path):
    '''执行所有的用例, 并把结果写入测试报告'''
    now = time.strftime("%Y_%m_%d %H_%M_%S")
    report_abspath = os.path.join(report_path, now+"result.html")
    # report_abspath = "D:\web_project\report\"+now+"result.html"
    fp = open(report_abspath, "wb")
    runner = HTMLTestRunner.HTMLTestRunner(stream=fp,
                                           title=u'自动化测试报告,测试结果如下:',
                                           description=u'用例执行情况:')
    # 调用add_case函数返回值
    runner.run(all_case)
    fp.close()

def get_report_file(report_path):
    '''获取最新的测试报告'''
    lists = os.listdir(report_path)
    lists.sort(key=lambda fn: os.path.getmtime(os.path.join(report_path, fn)))
    print (u'最新测试生成的报告: '+lists[-1])
    # 找到最新生成的报告文件
    report_file = os.path.join(report_path, lists[-1])
    return report_file

def send_mail(sender, psw, receiver, smtpserver, report_file):
    '''发送最新的测试报告内容'''
    # 读取测试报告的内容
    with open(report_file, "rb") as f:
        mail_body = f.read()
    # 定义邮件内容
    msg = MIMEMultipart()
    body = MIMEText(mail_body, _subtype='html', _charset='utf-8')
    msg['Subject'] = u"自动化测试报告"
    msg["from"] = sender
    msg["to"] = psw
    # 加上时间戳
    # msg["date"] = time.strftime('%a, %d %b %Y %H_%M_%S %z')
    msg.attach(body)
    # 添加附件
    att = MIMEText(open(report_file, "rb").read(), "base64", "utf-8")
    att["Content-Type"] = "application/octet-stream"
    att["Content-Disposition"] = 'attachment; filename= "report.html"'
    msg.attach(att)
    # 登录邮箱
    smtp = smtplib.SMTP()
    # 连接邮箱服务器
    smtp.connect(smtpserver)
    # 用户名密码
    smtp.login(sender, psw)
    smtp.sendmail(sender, receiver, msg.as_string())
    smtp.quit()
    print('test report email has send out !')

if __name__ == "__main__":
    # 测试用例的路径、匹配规则
    case_path = "D:\test\newp\case"
    rule = "test*.py"
    all_case = add_case(case_path, rule)   # 1加载用例
    # 生成测试报告的路径
    report_path = "D:\test\newp\report"
    run_case(all_case, report_path)        # 2执行用例
    # 获取最新的测试报告文件
    report_file = get_report_file(report_path)  # 3获取最新的测试报告
    #邮箱配置
    sender = "yoyo@xxx.com"
    psw = "xxx"
    # 收件人多个时,中间用逗号隔开,如'a@xx.com,b@xx.com'
    receiver = "yoyo@xxx.com"
    smtp_server = 'smtp.xxx.com'
    # send_mail(sender, psw, receiver, smtp_server, report_file)  # 4最后一步发送报告,需要发邮件就取消注释。
3.10 练习题1:模块导入(登录方法)
以登录博客园为案例https://passport.cnblogs.com/user/signin
一、登录方法封装
1.我们可以把登录写成一个登录类,里面写个登录的方法,保存文件为login_pub.py
# coding:utf-8
'''
这里写了一个登录博客园的类,登录博客园方法
'''
class Login_Blog():
   '''登录类封装'''

   def __init__(self, driver):
       '''初始化driver参数'''
       self.driver = driver

   def input_user(self, username):
       '''输入用户名'''
       self.driver.find_element_by_id("input1").clear()
       self.driver.find_element_by_id("input1").send_keys(username)

   def input_psw(self,psw):
       '''输入密码'''
       self.driver.find_element_by_id("input2").clear()
       self.driver.find_element_by_id("input2").send_keys(psw)

   def click_button(self):
       '''点击登录按钮'''
       self.driver.find_element_by_id("signin").click()

   def login(self, username, psw):
       '''登录公共方法'''
       self.input_user(username)
       self.input_psw(psw)
       self.click_button()
2.调用登录公共方法
# coding:utf-8
from selenium import webdriver
import unittest
from login_pub import Login_Blog
login_url = "https://passport.cnblogs.com/user/signin"

class TetsLogin(unittest.TestCase):
   def setUp(self):
       self.driver = webdriver.Firefox()
       self.driver.get(login_url)
   def tearDown(self):
       self.driver.quit()
   def test_login(self):
       # 调用登录类里面的login方法
       Login_Blog(self.driver).login("xxx", "111")
       self.driver.find_element()  # 后面接着的操作省略了


if __name__ == "__main__":
   unittest.main()
3.11 练习题2:捕获异常
前言
在定位元素的时候,经常会遇到各种异常,为什么会发生这些异常,遇到异常又该如何处理呢?
本篇通过学习selenium的exceptions模块,了解异常发生的原因。
一、发生异常
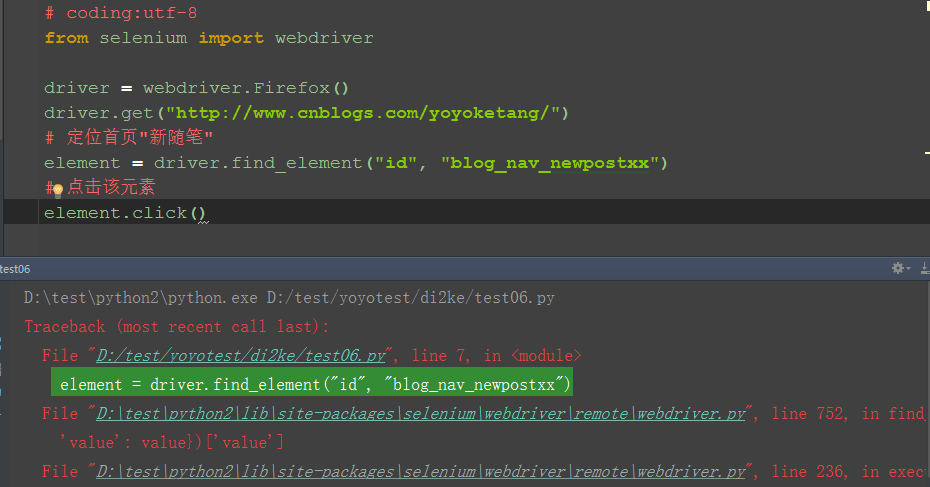
1.打开博客首页,定位“新随笔”元素,此元素id="blog_nav_newpost"
2.为了故意让它定位失败,我在元素属性后面加上xx
3.运行失败后如下图所示,程序在查找元素的这一行发生了中断,不会继续执行click事件了
二、捕获异常
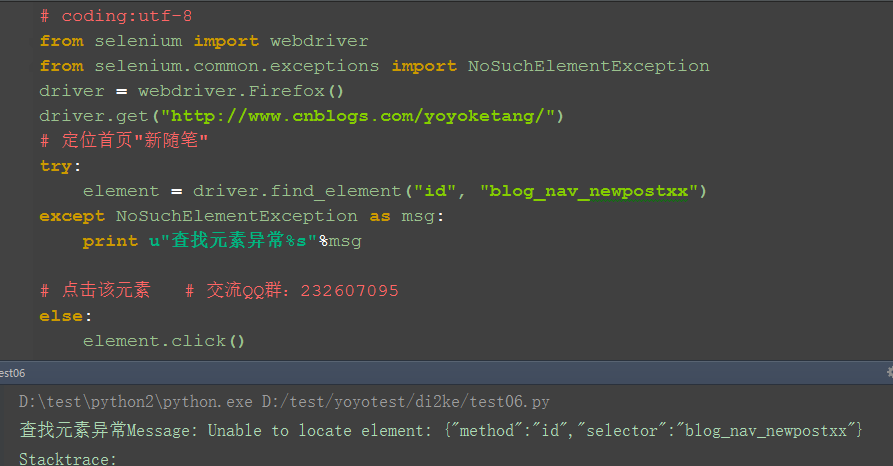
1.为了让程序继续执行,我们可以用try...except...捕获异常。捕获异常后可以打印出异常原因,这样以便于分析异常原因。
2.从如下异常内容可以看出,发生异常原因是:NoSuchElementException
selenium.common.exceptions.NoSuchElementException: Message: Unable to locate element: {"method":"id","selector":"blog_nav_newpostxx"}
3.从selenium.common.exceptions 导入 NoSuchElementException类。
三、参考代码:
# coding:utf-8
from selenium import webdriver
from selenium.common.exceptions import NoSuchElementException

driver = webdriver.Firefox()
driver.get("http://www.cnblogs.com/yoyoketang/")

# 定位首页"新随笔"
try:
    element = driver.find_element("id", "blog_nav_newpostxx")
except NoSuchElementException as msg:
    print u"查找元素异常%s"%msg
# 点击该元素
else:
    element.click()
四、selenium常见异常
1.NoSuchElementException:没有找到元素
2.NoSuchFrameException:没有找到iframe
3.NoSuchWindowException:没找到窗口句柄handle
4.NoSuchAttributeException:属性错误
5.NoAlertPresentException:没找到alert弹出框
6.ElmentNotVisibleException:元素不可见
7.ElementNotSelectableException:元素没有被选中
8.TimeoutException:查找元素超时
备注:其它异常与源码在Lib目录下:selenium/common/exceptions有兴趣的可以看看。
3.12 练习题3:异常后截图
前言
在执行用例过程中由于是无人值守的,用例运行报错的时候,我们希望能对当前屏幕截图,留下证据。
在写用例的时候,最后一步是断言,可以把截图的动作放在断言这里,那么如何在断言失败后截图呢?
一、截图方法
1.get_screenshot_as_file(self, filename)
--这个方法是获取当前window的截图,出现IOError时候返回False,截图成功返回True。
filename参数是保存文件的路径。
Usage:
driver.get_screenshot_as_file('/Screenshots/foo.png')
2.get_screenshot_as_base64(self)
--这个方法也是获取屏幕截图,保存的是base64的编码格式,在HTML界面输出截图的时候,会用到。
比如,想把截图放到html测试报告里。
Usage:
driver.get_screenshot_as_base64()
3.get_screenshot_as_png(self)
--这个是获取屏幕截图,保存的是二进制数据,很少用到。
Usage:
driver.get_screenshot_as_png()
二、异常后截图
1.为了能抛异常,把定位登录按钮的id换了个错的id。
2.给图片命名时候加个时间戳,避免同一个文件名称被覆盖掉。
3.文件路径,这里直接写的文件名称,就是跟当前的脚本同一个路径。如果图片输出到其它文件路径,需要些文件的绝对路径了。
4.截图的结果,如果没截到图返回False,截图成功会返回True。

三、selenium实例
1.在unittest框架里写用例的时候,我们希望在断言失败的时候,对当前屏幕截图。
2.如果加try...except捕获异常后结果,此时所有的测试用例都是通过的了,会影响测试结果。解决办法其实很简单,再把异常抛出来就行了。
3.参考代码:
# coding:utf-8
from selenium import webdriver
import time,unittest
from selenium.webdriver.support import expected_conditions as EC

class Login(unittest.TestCase):
    def setUp(self):
        url_login = "https://passport.cnblogs.com/user/signin"
        self.driver = webdriver.Firefox()
        self.driver.get(url_login)
    def test_01(self):
        '''前面输入账号密码,让正确运行到assert这一步,断言故意设置为Fals
e不成功'''
        try:
            self.driver.find_element_by_id("input1").send_keys(u"上海-悠悠")
            self.driver.find_element_by_id("input2").send_keys("xxx")
            # 登录id是错的,定位会抛异常
            self.driver.find_element_by_id("signin").click()
            # 判断登录成功页面是否有账号:"上海-悠悠"
            time.sleep(3)
            locator = ("id", "lnk_current_user")
            result = EC.text_to_be_present_in_element(locator,u"上海-悠悠")(self.driver)
            self.assertFalse(result)
        except Exception as msg:
            print(u"异常原因%s"%msg)
            # 图片名称可以加个时间戳
            nowTime = time.strftime("%Y%m%d.%H.%M.%S")
            self.driver.get_screenshot_as_file('%s.jpg' % nowTime)
            raise
    def tearDown(self):
        self.driver.quit()

if __name__ == "__main__":
    unittest.main()
4.运行结果:
异常原因True is not false
Failure
Traceback (most recent call last):
File "D: estyoyotketang est01.py", line 22, in test_01
self.assertFalse(result)
AssertionError: True is not false
3.13 练习题4:邮件发送(smtp)
前言
本篇总结了QQ邮箱和163邮箱发送邮件,邮件包含html中文和附件,可以发给多个收件人,专治各种不行,总之看完这篇麻麻再也不用担心我的邮件收不到了。
以下代码兼容python2和python3,运行无异常,放心大胆食用。
一、163邮箱
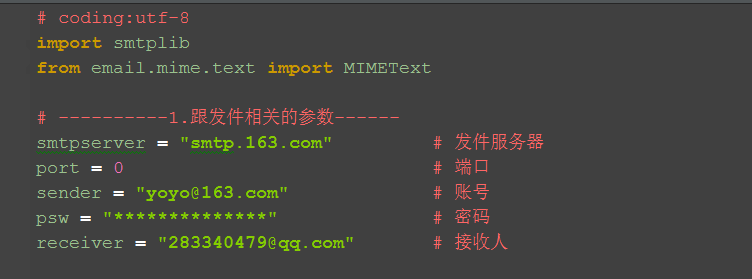
1.先导入smtplib库用来发送邮件,导入MIMEText库用来做纯文本的邮件模板
2.先准备几个跟发邮件相关的参数,每个邮箱的发件服务器都不一样,以163为例,百度搜到发件服务器为:smtp.163.com
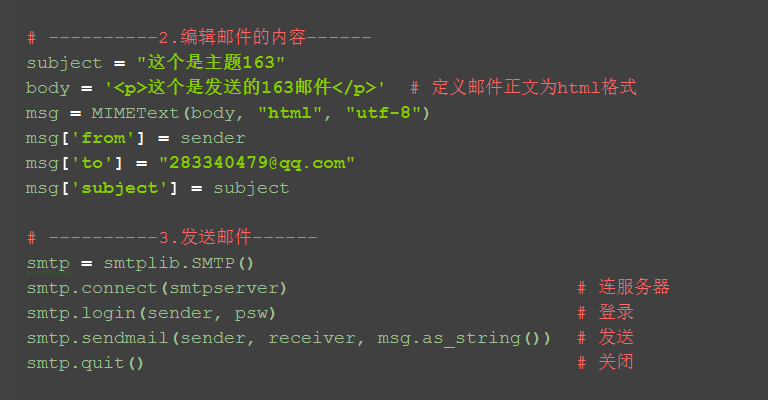
3.接下来就是写邮件的主题和正文内容,正文这里用html格式的
4.最后调用SMTP发件服务
5.参考代码:
# coding:utf-8
import smtplib
from email.mime.text import MIMEText

# ----------1.跟发件相关的参数------
smtpserver = "smtp.163.com"            # 发件服务器
port = 0                                            # 端口
sender = "yoyo@163.com"                # 账号
psw = "**************"                         # 密码
receiver = "283340479@qq.com"        # 接收人


# ----------2.编辑邮件的内容------
subject = "这个是主题163"
body = '<p>这个是发送的163邮件</p>'  # 定义邮件正文为html格式
msg = MIMEText(body, "html", "utf-8")
msg['from'] = sender
msg['to'] = "283340479@qq.com"
msg['subject'] = subject

# ----------3.发送邮件------
smtp = smtplib.SMTP()
smtp.connect(smtpserver)                                  # 连服务器
smtp.login(sender, psw)                                     # 登录
smtp.sendmail(sender, receiver, msg.as_string())  # 发送
smtp.quit()                                                         # 关闭
二、QQ邮件
1.QQ邮箱是需要SSL认证的,这种邮箱跟上面的就有点不一样了。
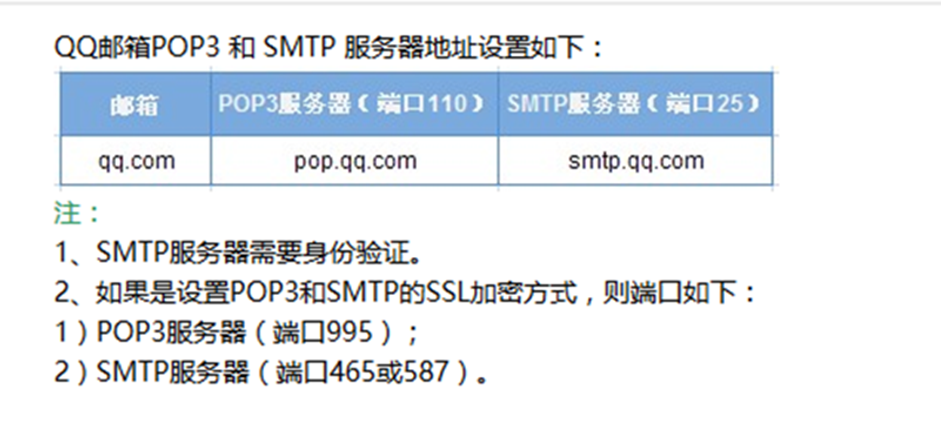
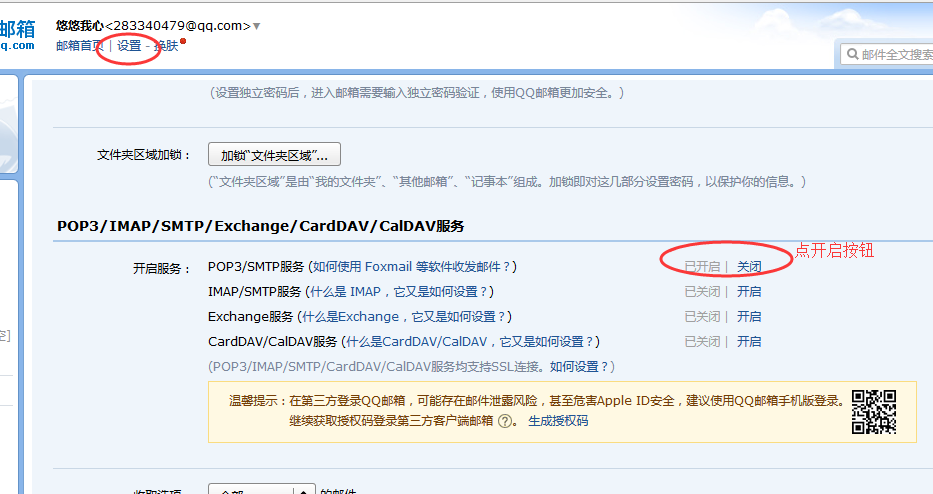
2.找到QQ邮箱授权码,打开QQ邮箱-设置-账号-POP3开启服务-开启
(如果已经开启了,不知道授权码,就点温馨提示里面的‘生成授权码’)
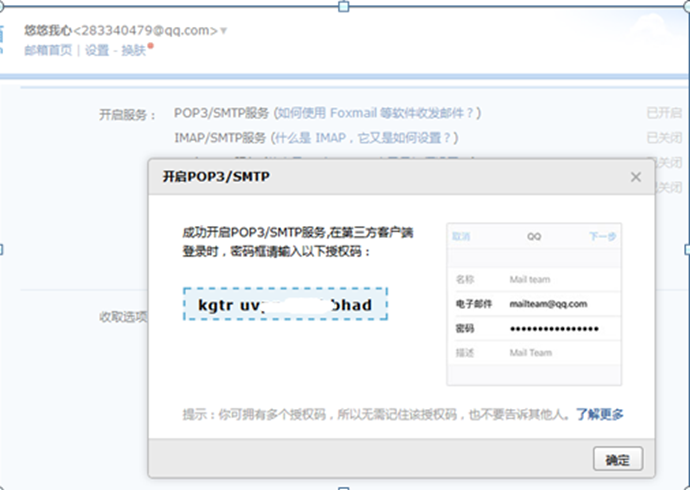
3.发验证短信获取授权码,照着提示发个短信,如何点我已发送,就会收到授权码了。

4.收到授权码后复制,保存下来,这个就可以当QQ邮箱的密码了。
5.QQ邮箱发送邮件代码,跟163有点不一样,如下图红色框框:
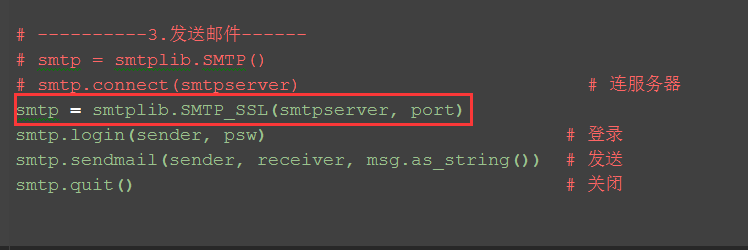
6.参考代码:
# coding:utf-8
import smtplib
from email.mime.text import MIMEText

# ----------1.跟发件相关的参数------
# smtpserver = "smtp.163.com"         # 发件服务器
smtpserver = "smtp.qq.com"
port = 465                                        # 端口
sender = "283340479@qq.com"         # 账号
psw = "**************"                         # 密码
receiver = "283340479@qq.com"        # 接收人


# ----------2.编辑邮件的内容------
subject = "这个是主题QQ"
body = '<p>这个是发送的QQ邮件</p>'     # 定义邮件正文为html格式
msg = MIMEText(body, "html", "utf-8")
msg['from'] = sender
msg['to'] = "283340479@qq.com"
msg['subject'] = subject

# ----------3.发送邮件------
# smtp = smtplib.SMTP()
# smtp.connect(smtpserver)                                 # 连服务器
smtp = smtplib.SMTP_SSL(smtpserver, port)
smtp.login(sender, psw)                                      # 登录
smtp.sendmail(sender, receiver, msg.as_string())  # 发送
smtp.quit()                                                        # 关闭
三、兼容163和QQ邮箱
1.如果想兼容上面两种方式发送邮件,只需把第三块内容稍微改下,如下所示
四、发送带附件
1.上面的MIMEText只能发送正文,无法带附件,发送带附件的需要导入另外一个模块MIMEMultipart
2.先读取要发送文件的内容,file_path是路径的参数名
3.下图红色框框file_name参数是发送的附件重新命名
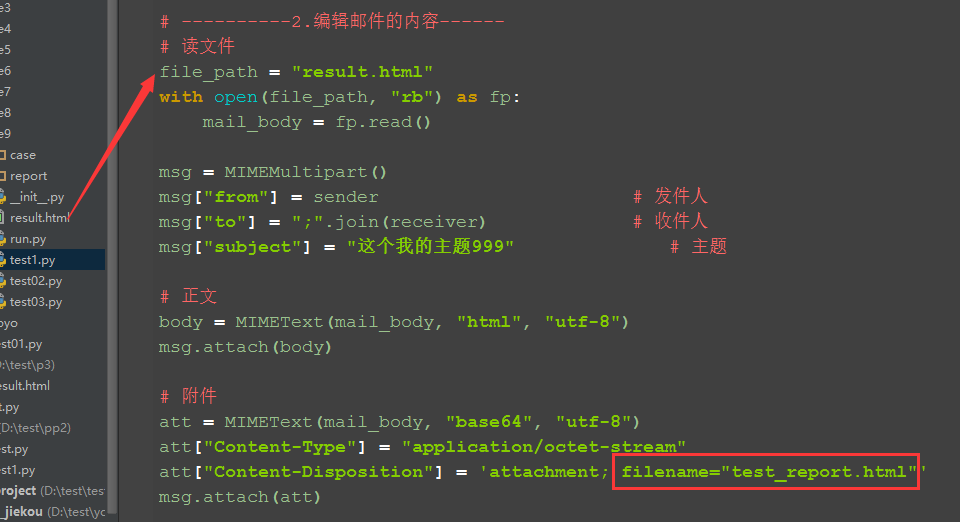
4.参考代码:
# coding:utf-8 import smtplib from email.mime.text import MIMEText from email.mime.multipart import MIMEMultipart
# ----------1.跟发件相关的参数------ smtpserver = "smtp.163.com" # 发件服务器 port = 0 # 端口 sender = "yoyo@163.com" # 账号 psw = "***********" # 密码 receiver = "283340479@qq.com" # 接收人
# ----------2.编辑邮件的内容------ # 读文件 file_path = "result.html" with open(file_path, "rb") as fp: mail_body = fp.read() msg = MIMEMultipart() msg["from"] = sender # 发件人 msg["to"] = receiver # 收件人 msg["subject"] = "这个我的主题" # 主题 # 正文 body = MIMEText(mail_body, "html", "utf-8") msg.attach(body) # 附件 att = MIMEText(mail_body, "base64", "utf-8") att["Content-Type"] = "application/octet-stream" att["Content-Disposition"] = 'attachment; filename="test_report.html"' msg.attach(att)
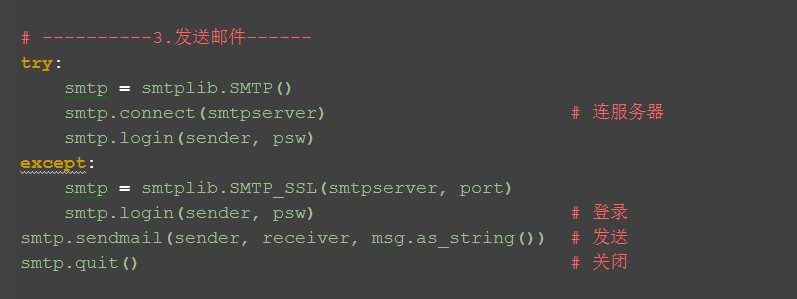
# ----------3.发送邮件------ try: smtp = smtplib.SMTP() smtp.connect(smtpserver) # 连服务器 smtp.login(sender, psw) except: smtp = smtplib.SMTP_SSL(smtpserver, port) smtp.login(sender, psw) # 登录 smtp.sendmail(sender, receiver, msg.as_string()) # 发送 smtp.quit()
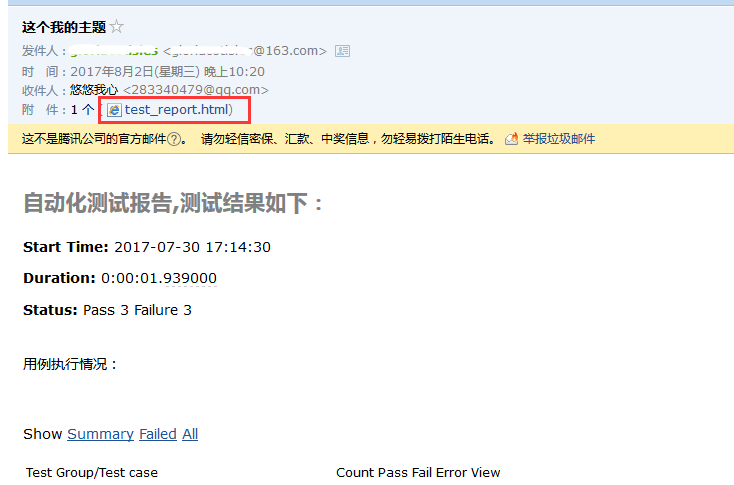
5.最后结果,有图有真相
五、发给多个收件人
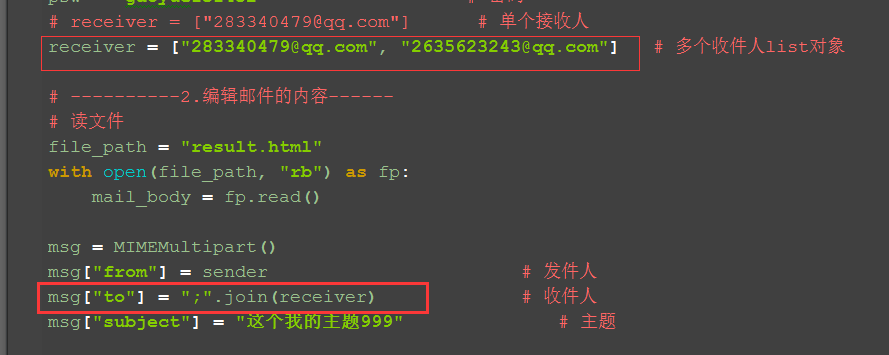
1.上面都是发给一个收件人,那么如何一次发给多个收件人呢?只需改两个小地方
2.把receiver参数改成list对象,单个多个都是可以收到的
3.msg["to"]这个参数不能用list了,得先把receiver参数转化成字符串,如下图所示
4.参考代码:
# coding:utf-8
import smtplib
from email.mime.text import MIMEText
from email.mime.multipart import MIMEMultipart

# ----------1.跟发件相关的参数------
smtpserver = "smtp.163.com"           # 发件服务器
port = 0                              # 端口
sender = "yoyo@163.com"     # 账号
psw = "*********"                  # 密码
# receiver = ["xxxx@qq.com"]      # 单个接收人也可以是list
receiver = ["xxxx@qq.com", "yoyo@qq.com"]   # 多个收件人list对象


# ----------2.编辑邮件的内容------
# 读文件
file_path = "result.html"
with open(file_path, "rb") as fp:
    mail_body = fp.read()
msg = MIMEMultipart()
msg["from"] = sender                       # 发件人
msg["to"] = ";".join(receiver)             # 多个收件人list转str
msg["subject"] = "这个我的主题999"              # 主题
# 正文
body = MIMEText(mail_body, "html", "utf-8")
msg.attach(body)
# 附件
att = MIMEText(mail_body, "base64", "utf-8")
att["Content-Type"] = "application/octet-stream"
att["Content-Disposition"] = 'attachment; filename="test_report.html"'
msg.attach(att)

# ----------3.发送邮件------
try:
    smtp = smtplib.SMTP()
    smtp.connect(smtpserver)                      # 连服务器
    smtp.login(sender, psw)
except:
    smtp = smtplib.SMTP_SSL(smtpserver, port)
    smtp.login(sender, psw)                       # 登录
smtp.sendmail(sender, receiver, msg.as_string())  # 发送
smtp.quit()                                       # 关闭
六:邮件收不到的几种原因:
1.Subject和正文内容不要用hello、hehe、test等单词
2.from(发件人)和to(收件人)不要为空,
(要不然会被认为是垃圾邮件)
3.找不到的话,先看下垃圾信箱,是不是跑到垃圾箱了
4.如果前几次可以收到,后来收不到了,需改下subject内容
(因为每次都是一个subject,系统也会拒收的,把subject内容设置为动态的是最好的)
5.部分邮箱是ssl加密了的,所以无法发送,如:qq邮箱
(用授权码去登录)
6.要是按照上面的步骤来报错了,说明代码抄错了,多检查几次。
(以上代码均在python2和python3上都测试通过了)
3.14 unittest之skip
前言
当测试用例写完后,有些模块有改动时候,会影响到部分用例的执行,这个时候我们希望暂时跳过这些用例。
或者前面某个功能运行失败了,后面的几个用例是依赖于这个功能的用例,如果第一步就失败了,后面的用例也就没必要去执行了,直接跳过就行,节省用例执行时间。
一、skip装饰器
skip装饰器一共有四个:
@unittest.skip(reason)
Unconditionally skip the decorated test. reason should describe why the test is being skipped.
翻译:无条件跳过用例,reason是说明原因。
@unittest.skipIf(condition, reason)
Skip the decorated test if condition is true.
翻译:condition为true的时候跳过。
@unittest.skipUnless(condition, reason)
Skip the decorated test unless condition is true.
翻译:condition为False的时候跳过。
@unittest.expectedFailure
Mark the test as an expected failure. If the test fails when run, the test is not counted as a failure.
翻译:断言的时候跳过。
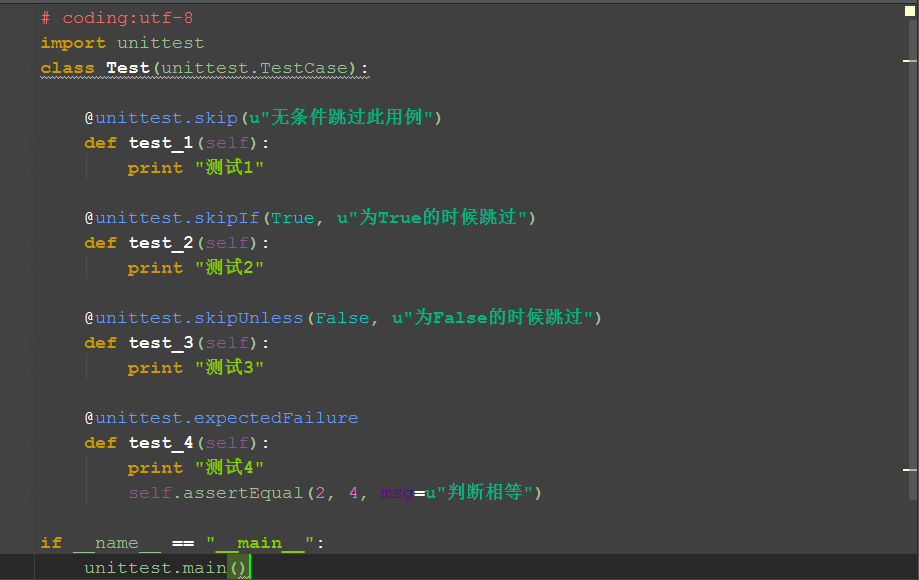
二、skip案例
运行结果:
测试1
测试4
.ssx
----------------------------------------------------------------------
Ran 4 tests in 0.003s
OK (skipped=2, expected failures=1)
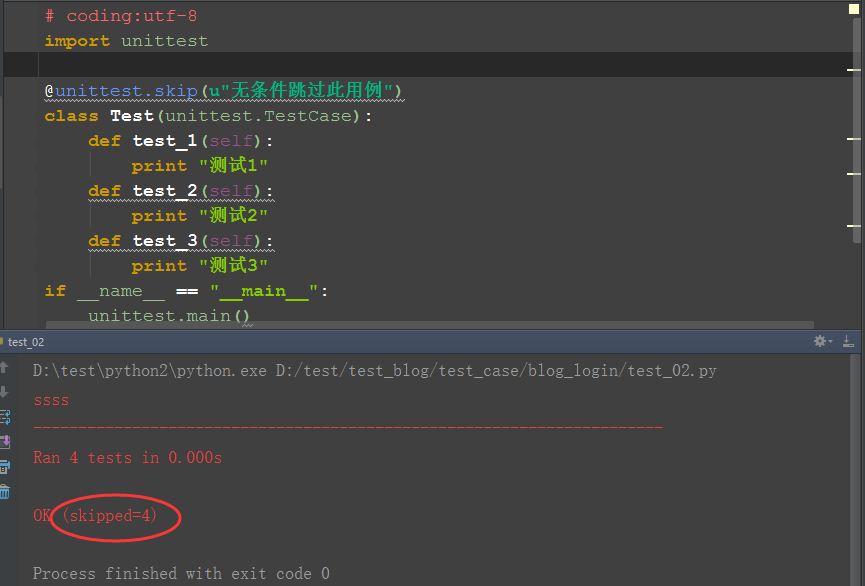
三、跳过整个测试类
四、参考代码:
# coding:utf-8
import unittest
class Test(unittest.TestCase):
    @unittest.skip(u"无条件跳过此用例")
    def test_1(self):
        print "测试1"
    @unittest.skipIf(True, u"为True的时候跳过")
    def test_2(self):
        print "测试2"
    @unittest.skipUnless(False, u"为False的时候跳过")
    def test_3(self):
       print "测试3"
    @unittest.expectedFailure
    def test_4(self):
        print "测试4"
        self.assertEqual(2, 4, msg=u"判断相等")
if __name__ == "__main__":
    unittest.main()