1. 什么是REST
REST,英文representational state transfer(表象性状态转变)或者表述性状态转移,REST是web服务的一种架构风格,使用HTTP、URI、XML、JSON、HTML等广泛流行的标准和协议,轻量级、跨平台、跨语言的架构设计,它是一种设计风格,是一种思想,而不是一种标准。只是提供了一组设计原则和约束条件。它主要用于客户端和服务器交互类的软件。基于这个风格设计的软件可以更简洁,更有层次,更易于实现缓存等机制。
Rest要求对资源定位更加准确,如下:
- 非REST方式:http://ip:port/queryUser.action?userType=student&id=001
- REST方式:http://ip:port/user/student/query/001
REST架构的主要原则
- 网络上的所有事物都被抽象为资源
- 每个资源都有一个唯一的资源标识符
- 同一个资源具有多种表现形式(xml,json等)
- 对资源的各种操作不会改变资源标识符
- 所有的操作都是无状态的
- 符合REST原则的架构方式即可称为RESTful
2. 发布REST服务
注意:REST 不等于WebService,JAX-RS 只是将REST 设计风格应用到Web 服务开发上。
2.1 需求
发布查询学生信息的服务,以json和xml数据格式返回。
2.2 服务端
第一步:导入jar包
第二步:创建学生pojo类,要加入@ XmlRootElement
import java.util.Date;
import javax.xml.bind.annotation.XmlRootElement;

@XmlRootElement(name = "student") // @XmlRootElement可以实现对象和XML数据之间的转换
public class Student {

    private long id;
    private String name;
    private Date birthday;
    ···
}
第三步:创建SEI接口(主要步骤,注意注解使用)
import java.util.List;
import javax.jws.WebService;
import javax.ws.rs.GET;import javax.ws.rs.Path;
import javax.ws.rs.PathParam;
import javax.ws.rs.Produces;
import javax.ws.rs.core.MediaType;
import com.zang.ws.rest.pojo.Student;

@WebService
@Path("/student") // @Path("/student")就是将请求路径中的“/student”映射到接口上
public interface StudentInterface {

    // 查询单个学生
    @GET // 指定请求方式,如果服务端发布的时候指定的是GET(POST),那么客户端访问时必须使用GET(POST)
    @Produces(MediaType.APPLICATION_XML) // 指定服务数据类型
    @Path("/query/{id}") // @Path("/query/{id}")就是将“/query”映射到方法上,“{id}”映射到参数上,多个参数,以“/”隔开,放到“{}”中
    public Student query(@PathParam("id") long id);

    // 查询多个学生
    @GET // 指定请求方式,如果服务端发布的时候指定的是GET(POST),那么客户端访问时必须使用GET(POST)
    @Produces({ "application/json;charset=utf-8", MediaType.APPLICATION_XML }) // 指定服务数据类型
    @Path("/queryList/{name}") // @Path("/queryList/{name}")就是将“/queryList”映射到方法上,“{name}”映射到参数上,多个参数,以“/”隔开,放到“{}”中
    public List<Student> queryList(@PathParam("name") String name);
}
第四步:创建SEI实现类
import java.util.ArrayList;
import java.util.Date;
import java.util.List;

import com.zang.ws.rest.pojo.Student;

public class StudentInterfaceImpl implements StudentInterface {

    @Override
    public Student query(long id) {
        Student st = new Student();
        st.setId(101);
        st.setName("小华");
        st.setBirthday(new Date());
        return st;
    }

    @Override
    public List<Student> queryList(String name) {
        Student s1 = new Student();
        s1.setId(101);
        s1.setName("小华");
        s1.setBirthday(new Date());

        Student s2 = new Student();
        s2.setId(102);
        s2.setName("小黄");
        s2.setBirthday(new Date());

        List<Student> list = new ArrayList<Student>();
        list.add(s1);
        list.add(s2);
        return list;
    }
}
第五步:发布服务,JAXRSServerFactoryBean发布服务,3个参数,1:服务实现类;2.设置资源类;3.设置服务地址
package com.zang.ws.rest.server;

import org.apache.cxf.jaxrs.JAXRSServerFactoryBean;

public class StudentServer {

    public static void main(String[] args) {
        // JAXRSServerFactoryBean发布REST的服务
        JAXRSServerFactoryBean jaxRSServerFactoryBean = new JAXRSServerFactoryBean();

        // 设置服务实现类
        jaxRSServerFactoryBean.setServiceBean(new StudentInterfaceImpl());
        // 设置资源类,如果有多个资源类,可以以“,”隔开。
        jaxRSServerFactoryBean.setResourceClasses(StudentInterfaceImpl.class);
        // 设置服务地址
        jaxRSServerFactoryBean.setAddress("http://127.0.0.1:12345/user");
        // 发布服务
        jaxRSServerFactoryBean.create();
    }
}
第六步:访问即可
http://127.0.0.1:12345/user/student/query/101 查询单个学生,返回XML数据
http://127.0.0.1:12345/user/student/queryList/101?_type=json 查询多个学生,返回JSON
http://127.0.0.1:12345/user/student/queryList/101?_type=xml 查询多个学生,返回XML
注意:
- 如果服务端发布时指定请求方式是GET(POST),客户端必须使用GET(POST)访问服务端,否则会报异常。
- 如果在同一方法上同时指定XML和JSON媒体类型,在GET请求下,默认返回XML,在POST请求下,默认返回JSON。
2.3 客户端
客户端主要获取服务端发布的数据并解析
测试POST请求,将StudentInterface接口中的queryList方法声明为@POST
import java.io.BufferedReader;
import java.io.IOException;
import java.io.InputStream;
import java.io.InputStreamReader;
import java.net.HttpURLConnection;
import java.net.URL;

public class HttpClient {

    public static void main(String[] args) throws IOException {
        //第一步:创建服务地址,不是WSDL地址
        URL url = new URL("http://127.0.0.1:12345/user/student/queryList/101");
        //第二步:打开一个通向服务地址的连接
        HttpURLConnection connection = (HttpURLConnection) url.openConnection();
        //第三步:设置参数
        //3.1发送方式设置:POST必须大写
        connection.setRequestMethod("POST");
        //3.2设置数据格式:content-type
        //3.3设置输入输出,因为默认新创建的connection没有读写权限,
        connection.setDoInput(true);

        //第五步:接收服务端响应,打印
        int responseCode = connection.getResponseCode();
        if(200 == responseCode){//表示服务端响应成功
            InputStream is = connection.getInputStream();
            InputStreamReader isr = new InputStreamReader(is);
            BufferedReader br = new BufferedReader(isr);

            StringBuilder sb = new StringBuilder();
            String temp = null;
            while(null != (temp = br.readLine())){
                sb.append(temp);
            }
            System.out.println(sb.toString());
            is.close();
            isr.close();
            br.close();
        }
    }
}
3. CXF+Spring整合发布REST的服务
3.1 服务端
第一步:创建web项目(引入jar包)
第二步:创建POJO类
第三步:创建SEI接口
第四步:创建SEI实现类
第五步:配置Spring配置文件,applicationContext.xml,<jaxrs:server>,设置1.服务地址;2.服务实现类
<?xml version="1.0" encoding="UTF-8"?>
<beans xmlns="http://www.springframework.org/schema/beans"
    xmlns:xsi="http://www.w3.org/2001/XMLSchema-instance" xmlns:jaxws="http://cxf.apache.org/jaxws"
    xmlns:jaxrs="http://cxf.apache.org/jaxrs" xmlns:cxf="http://cxf.apache.org/core"
    xsi:schemaLocation="http://www.springframework.org/schema/beans
                            http://www.springframework.org/schema/beans/spring-beans.xsd
                            http://cxf.apache.org/jaxrs http://cxf.apache.org/schemas/jaxrs.xsd
                            http://cxf.apache.org/jaxws http://cxf.apache.org/schemas/jaxws.xsd
                            http://cxf.apache.org/core http://cxf.apache.org/schemas/core.xsd">
    <!-- <jaxrs:server发布REST的服务 ,对JAXRSServerFactoryBean类封装-->
    <jaxrs:server address="/user">
        <jaxrs:serviceBeans>
            <ref bean="studentInterface"/>
        </jaxrs:serviceBeans>
    </jaxrs:server>

    <!-- 配置服务实现类 -->
    <bean name="studentInterface" class="cn.zang.ws.rest.server.StudentInterfaceImpl"/>
</beans>
第六步:配置web.xml
<?xml version="1.0" encoding="UTF-8"?>
<web-app xmlns:xsi="http://www.w3.org/2001/XMLSchema-instance" xmlns="http://java.sun.com/xml/ns/javaee" xsi:schemaLocation="http://java.sun.com/xml/ns/javaee http://java.sun.com/xml/ns/javaee/web-app_3_0.xsd" id="WebApp_ID" version="3.0">
  <display-name>ws_cxf_spring_rest_server</display-name>

  <!-- 设置spring的环境 -->
  <context-param>
      <!--contextConfigLocation是不能修改的  -->
      <param-name>contextConfigLocation</param-name>
      <param-value>classpath:applicationContext.xml</param-value>
  </context-param>
  <listener>
      <listener-class>org.springframework.web.context.ContextLoaderListener</listener-class>
  </listener>

  <!-- 配置CXF的Servlet -->
  <servlet>
      <servlet-name>CXF</servlet-name>
      <servlet-class>org.apache.cxf.transport.servlet.CXFServlet</servlet-class>
  </servlet>
  <servlet-mapping>
      <servlet-name>CXF</servlet-name>
      <url-pattern>/ws/*</url-pattern>
  </servlet-mapping>
</web-app>
第七步:发布到tomcat并访问
REST服务的使用说明书地址:
http://127.0.0.1:8089/ws_cxf_spring_rest_server/ws/user?_wadl
客户端使用ajax或其他方式都可以,这里不再重复。
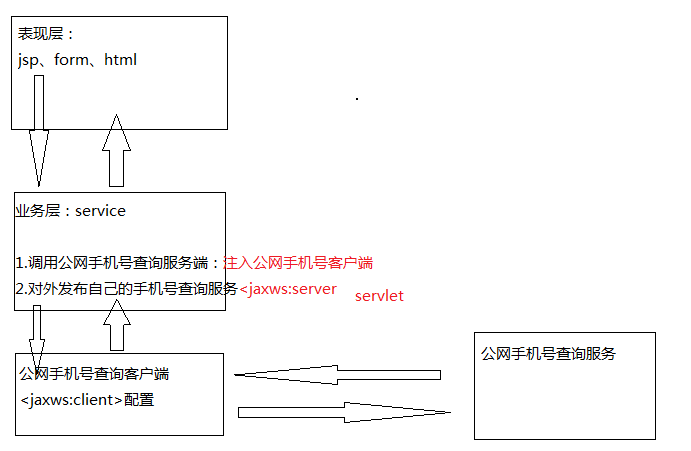
4. 案例整合
4.1 需求
- 集成公网手机号归属地查询服务
- 对外发布自己的手机号归属地查询服务
- 提供查询界面
4.2 开发
第一步:创建web项目(引入jar包)
第二步:生成公网客户端代码
wsdl2java -p com.zang.mobile -d . http://ws.webxml.com.cn/WebServices/MobileCodeWS.asmx?WSDL
第三步:创建SEI接口
import javax.jws.WebService;

@WebService
public interface MobileInterface {
    public String queryMobile(String phoneNum);
}
第四步:创建SEI实现类
import com.zang.mobile.MobileCodeWSSoap;

public class MobileInterfaceImpl implements MobileInterface {

    private MobileCodeWSSoap mobileClient;

    @Override
    public String queryMobile(String phoneNum) {
        return mobileClient.getMobileCodeInfo(phoneNum, "");
    }

    public MobileCodeWSSoap getMobileClient() {
        return mobileClient;
    }
    public void setMobileClient(MobileCodeWSSoap mobileClient) {
        this.mobileClient = mobileClient;
    }

}
第五步:创建queryMobile.jsp
<%@ page language="java" contentType="text/html; charset=utf-8" pageEncoding="utf-8"%> <!DOCTYPE html PUBLIC "-//W3C//DTD HTML 4.01 Transitional//EN" "http://www.w3.org/TR/html4/loose.dtd"> <html> <head> <meta http-equiv="Content-Type" content="text/html; charset=utf-8"> <title>手机号归属查询网站</title> </head> <body> <form action="queryMobile.action" method="post"> 手机号归属地查询:<input type="text" name="phoneNum"/> <input type="submit" value="查询"/><br/> 查询结果:${result} </form> </body> </html>
第六步:创建MobileServlet.java
import java.io.IOException;
import javax.servlet.ServletException;
import javax.servlet.http.HttpServlet;
import javax.servlet.http.HttpServletRequest;
import javax.servlet.http.HttpServletResponse;
import org.springframework.context.ApplicationContext;
import org.springframework.web.context.support.WebApplicationContextUtils;
import com.zang.mobile.server.MobileInterface;

public class MobileServlet extends HttpServlet{

    private MobileInterface mobileServer;

    public void doGet(HttpServletRequest request, HttpServletResponse response) throws ServletException, IOException {
        String phoneNum = request.getParameter("phoneNum");
        if(null != phoneNum && !"".equals(phoneNum)){
            ApplicationContext context = WebApplicationContextUtils.getWebApplicationContext(this.getServletContext());
            mobileServer = (MobileInterface) context.getBean("mobileServer");
            String result = mobileServer.queryMobile(phoneNum);
            request.setAttribute("result", result);
        }
        request.getRequestDispatcher("/WEB-INF/jsp/queryMobile.jsp").forward(request, response);
    }

    public void doPost(HttpServletRequest request, HttpServletResponse response) throws ServletException, IOException {
        this.doGet(request, response);
    }
}
第七步:配置spring配置文件,applicationContext.xml
<?xml version="1.0" encoding="UTF-8"?>
<beans xmlns="http://www.springframework.org/schema/beans"
    xmlns:xsi="http://www.w3.org/2001/XMLSchema-instance" xmlns:jaxws="http://cxf.apache.org/jaxws"
    xmlns:jaxrs="http://cxf.apache.org/jaxrs" xmlns:cxf="http://cxf.apache.org/core"
    xsi:schemaLocation="http://www.springframework.org/schema/beans
                            http://www.springframework.org/schema/beans/spring-beans.xsd
                            http://cxf.apache.org/jaxrs http://cxf.apache.org/schemas/jaxrs.xsd
                            http://cxf.apache.org/jaxws http://cxf.apache.org/schemas/jaxws.xsd
                            http://cxf.apache.org/core http://cxf.apache.org/schemas/core.xsd">
    <!-- <jaxws:server发布服务-->
    <jaxws:server address="/mobile" serviceClass="com.zang.mobile.server.MobileInterface">
        <jaxws:serviceBean>
            <ref bean="mobileServer"/>
        </jaxws:serviceBean>
    </jaxws:server>
    <!-- 配置服务实现类 -->
    <bean name="mobileServer" class="com.zang.mobile.server.MobileInterfaceImpl">
        <property name="mobileClient" ref="mobileClient"/>
    </bean>

    <!-- 配置公网客户端 -->
    <jaxws:client id="mobileClient" address="http://ws.webxml.com.cn/WebServices/MobileCodeWS.asmx"
        serviceClass="com.zang.mobile.MobileCodeWSSoap"/>

</beans>
第八步:配置web.xml
<?xml version="1.0" encoding="UTF-8"?>
<web-app xmlns:xsi="http://www.w3.org/2001/XMLSchema-instance" xmlns="http://xmlns.jcp.org/xml/ns/javaee" xsi:schemaLocation="http://xmlns.jcp.org/xml/ns/javaee http://xmlns.jcp.org/xml/ns/javaee/web-app_3_1.xsd" id="WebApp_ID" version="3.1">
  <display-name>cxf_rest_spring_mobile</display-name>

   <!-- 设置spring的环境 -->
  <context-param>
      <!--contextConfigLocation是不能修改的  -->
      <param-name>contextConfigLocation</param-name>
      <param-value>classpath:applicationContext.xml</param-value>
  </context-param>
  <listener>
      <listener-class>org.springframework.web.context.ContextLoaderListener</listener-class>
  </listener>

  <!-- 配置CXF的Servlet -->
  <servlet>
      <servlet-name>CXF</servlet-name>
      <servlet-class>org.apache.cxf.transport.servlet.CXFServlet</servlet-class>
  </servlet>
  <servlet-mapping>
      <servlet-name>CXF</servlet-name>
      <url-pattern>/ws/*</url-pattern>
  </servlet-mapping>
  <!-- 配置mobileServlet -->
  <servlet>
      <servlet-name>mobileServlet</servlet-name>
      <servlet-class>com.zang.mobile.server.servlet.MobileServlet</servlet-class>
  </servlet>
  <servlet-mapping>
      <servlet-name>mobileServlet</servlet-name>
      <url-pattern>*.action</url-pattern>
  </servlet-mapping>


  <welcome-file-list>
    <welcome-file>index.jsp</welcome-file>
  </welcome-file-list>
</web-app>
第九步:部署到tomcat下,并测试
测试服务是否发布成功

测试查询界面
