转载http://blog.csdn.net/zhangdaiscott/article/details/16939165
安装问题解决:
1 |
Cannot complete the install because one or more required items could not be found. |
2 |
Software being installed: Eclipse Git Team Provider 3.1.0.201310021548-r (org.eclipse.egit.feature.group 3.1.0.201310021548-r) |
3 |
Missing requirement: Git Team Provider UI 3.1.0.201310021548-r (org.eclipse.egit.ui 3.1.0.201310021548-r) requires 'bundle org.eclipse.team.core [3.6.100,4.0.0)' but it could not be found |
4 |
Cannot satisfy dependency: |
5 |
From: Eclipse Git Team Provider 3.1.0.201310021548-r (org.eclipse.egit.feature.group 3.1.0.201310021548-r) |
6 |
To: org.eclipse.egit.ui [3.1.0.201310021548-r] |
egit有多个版本,不同版本适合于不同版本的eclipse,默认Eclipse Marketplace里适合于最新版本的eclipse,可参考:http://wiki.eclipse.org/EGit/FAQ#WherecanIfindolderreleasesof_EGit.3F
eclipse3.7只能安装egit1.3版本。安装方法:help-install new software,地址填:http://download.eclipse.org/egit/updates-1.3
网络上的介绍一堆堆的,但是自己尝试了下,发现问题很多,就动手做个教程。
大纲
1.git客户端安装
2.ssh配置
3.egit安装配置
4.参考资料
Ps:为了增加乐趣,文章并没有按照大纲来描述,如果您急着搭建egit,请尽量按大纲顺序来配置,可以少走弯路
1.egit的安装
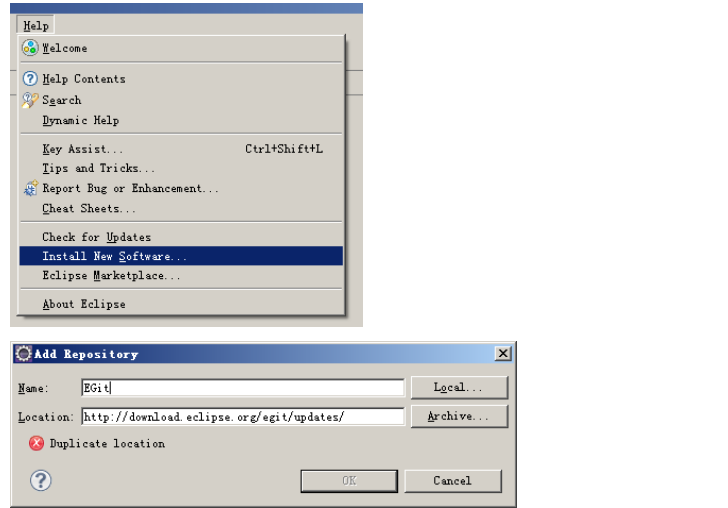
当然也可以选择在Eclipse Marketplace中搜索
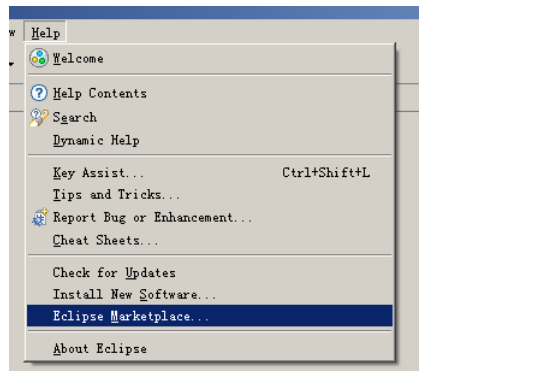

有经验的朋友肯定会想到是不是可以通过Link的方式来实现插件安装,好像这个真没有
还有一个要说明的是如果使用:http://download.eclipse.org/egit/updates.来安装,则要保证您的eclipse版本是最新的,否则会安装失败
低版本Eclipse安装EGit插件
本人的Eclipse是3.6版本的,正好不能使用上述方式,处理方法如下
打开http://wiki.eclipse.org/EGit/FAQ#Where_can_I_find_older_releases_of_EGit.3F
选择 http://download.eclipse.org/egit/updates-1.3(因为这个版本的发布时间跟Eclipse3.6发布时间相近,其他版本同理试试)

Next到底就OK了。
二、配置EGit
这里有个前提,就是首先电脑上必须安装有git的客户端
安装地址:http://code.google.com/p/msysgit/downloads/list?q=full+installer+official+git
安装之后,打开Eclipse

选择git客户端的安装路径,接着在Configuration中配置user Settings的user和email
这个用户名必须是github的用户,还没注册的,点击这里申请https://github.com/


到此,插件的配置结束
非常激动的开始创建一个DEMO试试

File > Team > Share Project 选择GIT
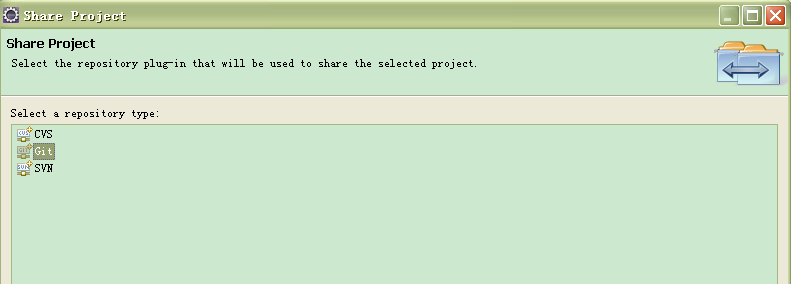
这里选中Git的时候,会提示设置HOME环境变量
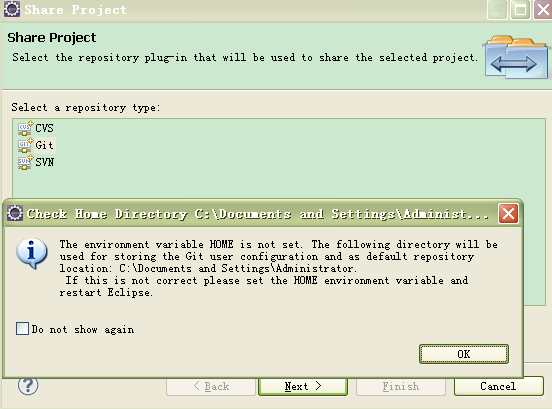
HOM-->%USERPROFILE%

接着就创建一个仓库

三、上传工程
首先需要登录github
创建一个空的仓库

点击Create a new repository
因为我已经创建过一个GitDemo,就不再演示
点击上传
提示exception caught during execution of ls-remote command
发现是没有私钥。
这里简单说明下egit的工作原理
事实上,熟悉CVS或则SVN的朋友肯定知道,当我们点击commit的时候,版本管理器会将我们修改的内容进行同步更新
但是egit却没有那么智能,事实上,GIT有个本地仓库的概念,也就是说当我们commit的时候,我们把更新的内容信息
同步到本地仓库,点击push的时候才将本地仓库中的更新内容提交到github
本地仓库路径window-->show view-->other-->Git Repositories


说多了,不知大家有没印象,最早配置EGit的User Settings的时候之后用户的名称,没有密码
Passwords aren't very secure, you already know this. If you use one that's easy to remember, it's easier to guess or brute-force (try many options until one works). If you use one that's random it's hard to remember, and thus you're more inclined to write the password down. Both of these are Very Bad Things™. This is why you're using ssh keys.
上述这段话是github给出的解释,通俗点说,github担心用户使用过于简单的密码造成安全隐患,或则是密码过于复杂造成用户难以记住带来的不必要麻烦
因此采用SSH keys的方式
四、SSH配置
如何生成属于自己的SSH kyes,操作如下
1.打开Git Bash
输入ssh -T git@github.com

发现没有RSA文件
接着输入
# ssh -T git@github.com

提示没有权限。
继续输入
ssh-keygen (一直enter)

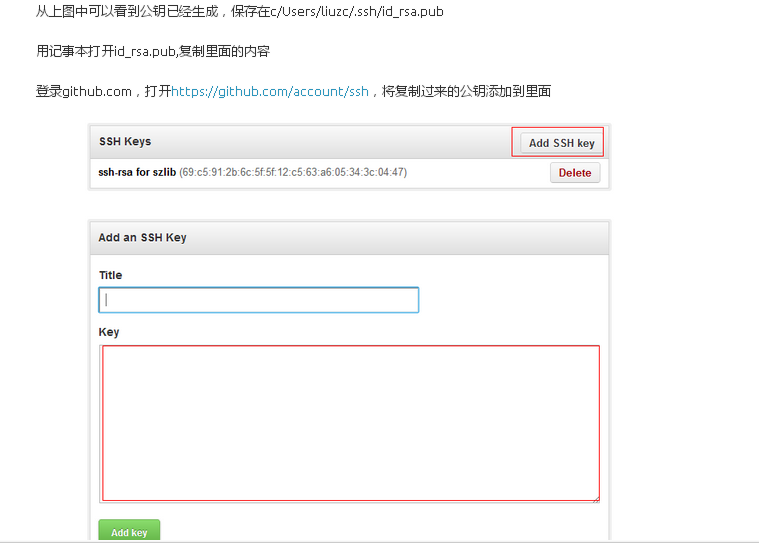
上述路径不是唯一的,大家自己把握之前HOME配置的路径
最后测试下

配置SSH2


简单解释下,之前上传的是SSH keys的公钥,而id_rsa中存放的就是我们的私钥,因此当我们上传(push)的时候只需要
输入公共的账号git即可
举个例子

提交后,就是Push

这里的ui就是我们之前在github创建的仓库地址


niext,点击finish完成push到服务器的操作

到此,EGit的安装配置结束
参考资料:
1.GIT安装配置:http://liuzhichao.com/p/624.html
2.如何删除repository(仓库)

3.开始egit的使用:http://wiki.eclipse.org/EGit/User_Guide/Getting_Started
4.更多参考:http://wiki.eclipse.org/EGit/User_Guide#Github_Tutorial
5.EGit与github的简化版本说明:http://gevin.me/182.html
6.关于SSH:https://help.github.com/articles/generating-ssh-keys
7.关于仓库:https://help.github.com/articles/creating-a-new-repository