一、路由和视图(基础二上补充)
(1)有参装饰器
路由采用的是有参装饰器实现的
@app.route("/index",methods=["GET","POST"])
def index():
    return render_template("index.html",user_dict = USER_DICT,user_list = USER_LIST,**context)
    def route(self, rule, **options):
        def decorator(f):
            endpoint = options.pop('endpoint', None)
            self.add_url_rule(rule, endpoint, f, **options)
            return f
        return decorator
执行流程,(1)先执行route函数,返回decorator,(2)执行index = decorator(index)
(2)两种方式对路由进行设置
装饰器方式
@app.route("/index",methods=["GET"])
def index():
    return "index"
函数调用方式
def hello():
    return "hello"
app.add_url_rule("/hello",view_func=hello,methods=["GET"])
(3)CBV
from flask import Flask,views
class Test(views.MethodView):
    methods = ["GET"]
    decorators = []

    def get(self):
        return "get"
    def post(self):
        return "post"

app.add_url_rule("/test",view_func=Test.as_view(name="test"))
(4)路由中的参数
            rule,                       URL规则
            view_func,                  视图函数名称
            defaults=None,              默认值,当URL中无参数,函数需要参数时,使用defaults={'k':'v'}为函数提供参数
            endpoint=None,              名称,用于反向生成URL,即: url_for('名称')
            methods=None,               允许的请求方式,如:["GET","POST"]


            strict_slashes=None,        对URL最后的 / 符号是否严格要求,
                                        如:
                                            @app.route('/index',strict_slashes=False),
                                                访问 http://www.xx.com/index/ 或 http://www.xx.com/index均可
                                            @app.route('/index',strict_slashes=True)
                                                仅访问 http://www.xx.com/index
            redirect_to=None,           重定向到指定地址
                                        如:
                                            @app.route('/index/<int:nid>', redirect_to='/home/<nid>')
                                            或
                                            def func(adapter, nid):
                                                return "/home/888"
                                            @app.route('/index/<int:nid>', redirect_to=func)
            subdomain=None,             子域名访问
                                                from flask import Flask, views, url_for

                                                app = Flask(import_name=__name__)
                                                app.config['SERVER_NAME'] = 'wupeiqi.com:5000'


                                                @app.route("/", subdomain="admin")
                                                def static_index():
                                                    """Flask supports static subdomains
                                                    This is available at static.your-domain.tld"""
                                                    return "static.your-domain.tld"


                                                @app.route("/dynamic", subdomain="<username>")
                                                def username_index(username):
                                                    """Dynamic subdomains are also supported
                                                    Try going to user1.your-domain.tld/dynamic"""
                                                    return username + ".your-domain.tld"


                                                if __name__ == '__main__':
                                                    app.run()
(5)使用正则表达式
1、创建类,继承自BaseConverter
2、添加到map中的转换器字典
3、使用
from flask import Flask,views
app = Flask(__name__)
# 1
from werkzeug.routing import BaseConverter
class RegexConverter(BaseConverter):
    def __init__(self,map,regex):
        super(RegexConverter,self).__init__(map)
        self.regex = regex
# 2 配置
app.url_map.converters["reg"] = RegexConverter
@app.route("/index/<reg('d+'):nid>",methods=["GET"])
def index(nid):
    print(nid,type(nid))
    return "index"
二:session源码解析
浏览器发起请求后,执行app的__call__方法,然后调用wagi_app方法。
    def __call__(self, environ, start_response):
        """The WSGI server calls the Flask application object as the
        WSGI application. This calls :meth:`wsgi_app` which can be
        wrapped to applying middleware."""
        return self.wsgi_app(environ, start_response)
environ:请求相关的所有数据
start_response:用于设置响应相关数据
def wsgi_app(self, environ, start_response):
 ctx = self.request_context(environ)
        error = None
        try:
            try:
                ctx.push()
                response = self.full_dispatch_request()
            except Exception as e:
                error = e
                response = self.handle_exception(e)
            except:
                error = sys.exc_info()[1]
                raise
            return response(environ, start_response)
        finally:
            if self.should_ignore_error(error):
                error = None
            ctx.auto_pop(error)
1、获取environ对其进行再次封装
2、从environ中获取名称为seesion的cookie,解密反序列化。
3、将这两个东西放到某一个地方
4、执行视图函数response = self.full_dispatch_request()
5、从某个地方获取session,加密,序列化,写cookie
6、将“某个位置”清空
上述过程具体对应到源码:
RequestContext(self, environ)
def __init__(self, app, environ, request=None):
    self.app = app
    if request is None:
        request = app.request_class(environ)
    self.request = request
    self.url_adapter = app.create_url_adapter(self.request)
    self.flashes = None
    self.session = None

    # Request contexts can be pushed multiple times and interleaved with
    # other request contexts.  Now only if the last level is popped we
    # get rid of them.  Additionally if an application context is missing
    # one is created implicitly so for each level we add this information
    self._implicit_app_ctx_stack = []

    # indicator if the context was preserved.  Next time another context
    # is pushed the preserved context is popped.
    self.preserved = False

    # remembers the exception for pop if there is one in case the context
    # preservation kicks in.
    self._preserved_exc = None

    # Functions that should be executed after the request on the response
    # object.  These will be called before the regular "after_request"
    # functions.
    self._after_request_functions = []

    self.match_request()
request_class = Request
请求源码执行的类流程图如下:

三:蓝图
目的:给开发人员提供一个目录结构
目录结构如图所示:

manage.py为程序执行的入口
from test_blueprint import create_app
app = create_app()
if __name__ == '__main__':
    app.run()
__init__.py实现app的实例化和蓝图的注册,使蓝图和app发生联系(注意:蓝图一定要注册到app里面去)
from flask import Flask
from .views.account import ac

def create_app():
    app = Flask(__name__)
    app.register_blueprint(ac)
    return app
views中实现具体的蓝图
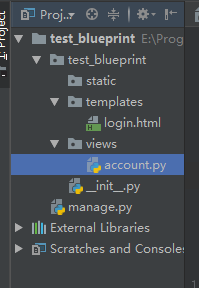
account.py内容:
from flask import Blueprint,render_template
ac = Blueprint("ac",__name__)
@ac.route("/login")
def login():
    return render_template("login.html")
@ac.route("/logout")
def logout():
    return "logout"
其他补充:
ac = Blueprint("ac",__name__,template_folder="tttt")
优先去templates中找,没有则去tttt目录中找。
app.register_blueprint(ac,url_prefix = "/acc")
注册某一具体的蓝图时,可以加上前缀。访问页面时,需要前缀和url的组合。
before_request 可以加在app全局,也可以加在单独的蓝图中。
四:上下文管理
1、threading.local 为每一个线程创建一个空间,让线程在里面存取数据;让线程与线程之间的数据进行隔离
import threading
import time
from threading import local
l = local()
def task(i):
    l.x = i
    time.sleep(1)
    print(l.x,i)
for i in range(10):
    t = threading.Thread(target=task,args=(i,))
    t.start()
2、根据字典自定义类似以threading.loccal的功能
threading.get_ident()获取线程的唯一标记
    DIC = {}
    def task(i):
        ident = threading.get_ident()
        if ident in DIC:
            DIC[ident]["XX"] = i
        else:
            DIC[ident] = {"XX":i}
        time.sleep(1)
        print(DIC[ident]["XX"],i)
    for i in range(10):
        t = threading.Thread(target=task, args=(i,))
        t.start()
实现对threading.local的扩展
import time
import threading
try:
    import greenlet
    get_ident = greenlet.getcurrent
except Exception as e:
    get_ident = threading.get_ident
class Local(object):
    DIC = {}
    def __setattr__(self, key, value):
        ident = get_ident()
        if ident in self.DIC:
            self.DIC[ident][key] = value
        else:
            self.DIC[ident] = {key: value}

    def __getattr__(self, item):
        ident = get_ident()
        if ident in self.DIC:
            return self.DIC[ident].get(item)
        return None
def task(i):
    l.x = i
    time.sleep(1)
    print(l.x, i)
if __name__ == '__main__':
    l = Local()
    for i in range(10):
        t = threading.Thread(target=task, args=(i,))
        t.start()