MyBatis
一,MyBatis 简洁
MyBatis 简介
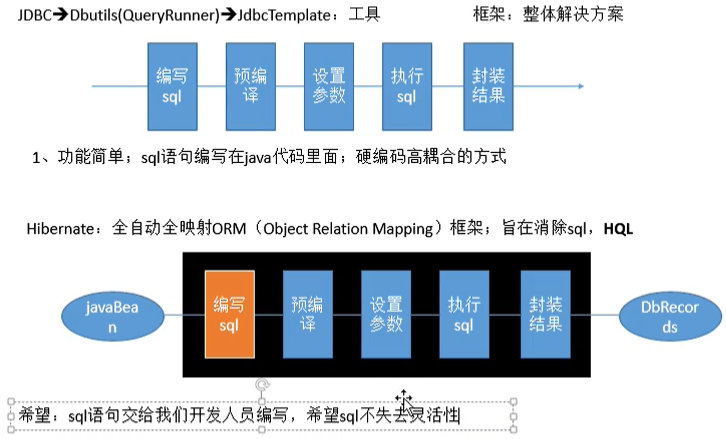
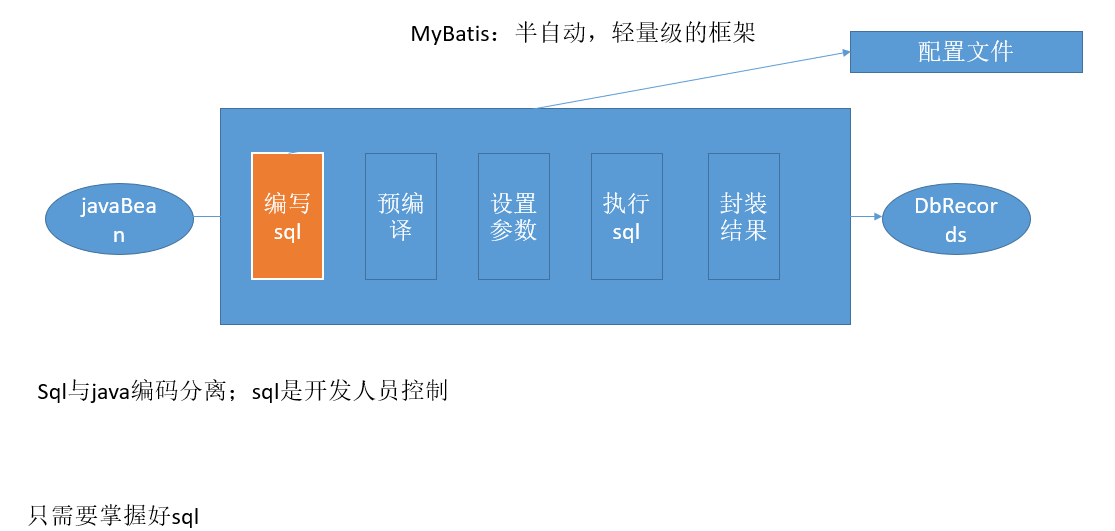
- MyBatis 是支持定制化 SQL,存储过程以及高级映射的优秀的持久层看框架。
- MyBatis 避免了几乎所有的 JDBC 代码和手动设置参数以及获取结果集。
- MyBatis 可以使用简单的 xml 或注解用于配置和原始映射,将接口和Java的 POJO(Plain Old Java Objects,普通的Java对象) 映射成数据库中的记录。
MyBatis 历史
-
原名是Apache的一个开源项目Ibatis,2010,6这个项目迁移到Google Code,在 iBatis3.x 正式更名为 MyBatis。
-
MyBatis 是一个基于Java 的持久层框架。iBatis提供的持久层框架包括SQL Maps 和 Data Access Object(DAO)。
-
官网地址:https://github.com/mybatis/mybatis-3/

为什么要使用MyBatis ?
-
MyBatis是一个半自动化的持久化层框架。
-
JDBC
SQL夹在Java代码块里,耦合度高导致硬编码内伤
维护不易且实际开发需求中sql是有变化,频繁修改的情况多见
-
Hibernate和JPA
长难复杂SQL,对于Hibernate而言处理也不容易
内部自动生产的SQL,不容易做特殊优化。
基于全映射的全自动框架,大量字段的POJO进行部分映射时比较困难。导致数据库性能下降。
-
对开发人员而言,核心sql还是需要自己优化
-
sql 和 java编码分开,功能边界清晰,一个专注业务、一个专注数据。
二,MyBatis - HelloWorld
HelloWorld
步骤:
-
创建一张测试表
-
导入jar包
log4j-1.2.15.jar (日志包,运行需要在类路径下放 log4j.xml文件)
mybatis-3.4.1.jar
mysql-connector-java-5.1.27.jar
-
创建对应的JavaBean
-
创建mybatis配置文件,sql映射文件
- mybatis全局配置文件,全局配置文件包含了影响mybatis行为至深的设置(settings)和属性(properties)信息,如数据库连接池信息等。指导着mybatis进行工作。我们可以参照官方文件的配置示例。
- sql映射文件,作用就相当于是定义Dao接口的实现类如何工作。这也是我们使用MyBatis是编写的最多的文件。
-
测试
- 根据全局配置文件,利用SqlSessionFactoryBuilder创建SqlSessionFactory.
- 使用SqlSessionFactory获取SqlSession对象。一个SqlSession对象代表和数据库的一次会话.
代码
-
根据数据库表创建JavaBean
public class Employees { private Integer id; private String lastName; private String gender; private String email; //省略set,get,toString,无参,有参,方法。 } -
全局配置文件 (mybatis.xml)
配置数据源和写好的sql映射文件注册到全局配置文件中
<?xml version="1.0" encoding="UTF-8" ?> <!--全局配置文件--> <!DOCTYPE configuration PUBLIC "-//mybatis.org//DTD Config 3.0//EN" "http://mybatis.org/dtd/mybatis-3-config.dtd"> <configuration> <environments default="development"> <environment id="development"> <transactionManager type="JDBC"/> <dataSource type="POOLED"> <!--数据源: 配置连接数据库信息 --> <property name="driver" value="com.mysql.jdbc.Driver"/> <property name="url" value="jdbc:mysql://localhost:3306/mybatis"/> <property name="username" value="root"/> <property name="password" value="root"/> </dataSource> </environment> </environments> <!--将我们写好的sql映射文件一定要注册到全局配置文件中--> <mappers> <mapper resource="confEmployeeMapper.xml"/> </mappers> </configuration> -
sql映射文件 (employeeMapper.xml)
<?xml version="1.0" encoding="UTF-8" ?> <!--sql映射文件--> <!DOCTYPE mapper PUBLIC "-//mybatis.org//DTD Mapper 3.0//EN" "http://mybatis.org/dtd/mybatis-3-mapper.dtd"> <mapper namespace="/"> <!--mapper:映射器标签 namespace属性=名称空间(以前随便写);指定为(dao层)接口的全类名--> <!-- id:唯一标识(dao层接口方法的名字) resultType:返回值类型 #{id}:从传递过来的参数中取出id值 --> <select id="selectEmp" resultType="com.cainiao.bean.Employees"> select id,last_name lastName,gender,email from employees where id = #{id} </select> </mapper> -
测试
/**
 * 1. 根据xml配置文件(全局配置文件)创建一个SqlSessionFactory对象
 * --->有数据源一些运行环境
 * 2. sql映射文件:配置了每一个sql,以及sql的封装规则等。
 * 3. 将sql映射文件注册在全局配置文件中
 * 4. 写代码:
 * ----4.1》根据全局配置文件得到SqlSessionFactory
 * ----4.2》使用sqlSession工厂,获取到SqlSession对象使用他来执行增删改查
 * ------->一个sqlSession就是代表和数据库的一次会话,用完关闭。
 * ----4.3》使用sql的唯一标识来告诉MyBatis执行那个sql。sql都是保存在sql映射文件中的。
 */
@Test
public void test1() throws IOException {
    //根据xml配置文件(全局配置文件)创建一个SqlSessionFactory对象
    String resource = "conf/mybatis.xml";
    InputStream inputStream = Resources.getResourceAsStream(resource);
    SqlSessionFactory sqlSessionFactory = new SqlSessionFactoryBuilder().build(inputStream);
    //2. 获取sqlSession实例,能直接执行已经映射的sql语句
    SqlSession session = sqlSessionFactory.openSession();
    //public <T> T selectOne(String statement, Object parameter)
    /*参数:
     * sql的唯一标示:statement Unique identifier matching the statement to use.(一般sql映射文件的映射标签的名称空间+id)
     * 执行sql要用的参数:parameter A parameter object to pass to the statement.
     * */
    Employees emp = session.selectOne("com.cainiao.EmployeeMapperDao.selectEmp", 1);
    System.out.println(emp);
    //关闭会话
    session.close();
}
(HelloWord升级)接口式编程
-
创建Dao接口
-
修改sql-Mapper文件(接口与配置文件动态绑定)
-
测试
使用SqlSession获取映射器(get.Mapper)进行操作
代码
-
dao接口
public interface EmployeeMapperDao { public Employees getEmpById(Integer id); } -
修改sql映射文件
修改:名称空间=dao层接口的全类名,select-id=方法的名字
<?xml version="1.0" encoding="UTF-8" ?> <!--sql映射文件--> <!DOCTYPE mapper PUBLIC "-//mybatis.org//DTD Mapper 3.0//EN" "http://mybatis.org/dtd/mybatis-3-mapper.dtd"> <mapper namespace="com.cainiao.dao.EmployeeMapperDao"> <!--namespace:名称空间(以前随便写);指定为(dao层)接口的全类名--> <!-- id:唯一标识(dao层接口方法的名字) resultType:返回值类型 #{id}:从传递过来的参数中取出id值 --> <select id="getEmpById" resultType="com.cainiao.bean.Employees"> select id,last_name lastName,gender,email from employees where id = #{id} </select> </mapper> -
测试
@Test
public void test2() throws IOException {
    //1. 获取SqlSessionFactory对象
    String resource = "conf/mybatis.xml";
    InputStream inputStream = Resources.getResourceAsStream(resource);
    SqlSessionFactory sqlSessionFactory = new SqlSessionFactoryBuilder().build(inputStream);
    //2. 获取SqlSession对象
    SqlSession session = sqlSessionFactory.openSession();
    //3. 获取接口实现对象
    //只要接口和xml动态绑定,会为接口自动的创建一个代理对象,代理对象去执行增删改查方法
    EmployeeMapperDao mapper = session.getMapper(EmployeeMapperDao.class);
    //System.out.println(mapper.getClass);//class $Proxy4 代理对象
    //4. 调用方法
    Employees empById = mapper.getEmpById(1);
    System.out.println(empById);
    //5. 资源关闭
    session.close();
}
小结
- 接口式编程
原生: Dao ---》 DaoImpl
mybatis: Mapper---》xxMapper.xml - SqlSession 代表和数据库的一次会话,用完必须关闭。
- SqlSession和connection一样都非线程安全的。每次使用都应该去获取新的对象。
- SqlSession 可以直接调用方法的 id进行数据库操作,但是我们一般还是推荐使用 SqlSession获取到 Dao接口的代理类,执行代理对象的方法,可以以更安全的进行类型检查操作.
- mapper接口没有实现类,但是mybatis会为这个接口生成一个代理对象。
将接口和xml进行绑定
EmployeeMapper mapper = session.getMapper(EmployeeMapper.class); - 两个重要的配置文件:
mybatis的全局配置文件:包含数据库连接池信息,事务管理信息等。。。系统运行环境信息
sql映射文件:保存了每一个sql语句的映射信息:将sql抽取出来。
三,MyBatis 全局配置文件
- configuration 配置标签,可以配置的标签
- properties 属性
- settings 设置
- typeAliases 类型命名
- typeHandlers 类型处理器
- objectFactory 对象工厂
- plugins 插件
- environments 环境
- environment 环境变量
- transactionManager 事务管理器
- dataSource 数据源
- environment 环境变量
- databaseIdProvider 数据库厂商标识
- mappers 映射器
- 在configuration标签里,标签都是有先后顺序的不能打乱否则出现异常
properties-》settings-》typeAliases-》typeHandlers-》objectFactory-》objectWrapperFactory
-》reflectorFactory-》plugins-》environments-》databaseIdProvider-》mappers
properties 属性
-
properties标签用来引入外部properties配置文件的内容。
属性:resource = 引入类路径下的资源
url = 引入网络路径或磁盘路径下的资源 -
示例:引入连接jdbc的配置信息
jdbc.driver=com.mysql.jdbc.Driver
jdbc.url=jdbc:mysql://localhost:3306/mybatis
jdbc.username=root
jdbc.password=root
<properties resource="confjdbc.properties"></properties>
settings 设置
-
settings 大标签:包含很多重要的设置项,它会改变MyBatis的运行时行为
setting 小标签:用来设置每一个设置项。
属性:name = 设置参数
value = 设置有效值设置参数 描述 有效值 默认值 cacheEnabled 该配置影响的所有映射其中配置的缓存的全局开关。 true | false TRUE lazyLoadingEnabled 延迟加载的全局开关,当开启时,所有管理对象都会延迟加载。特定关联关系中通过设置 fechType 属性来覆盖该项的开关状态。 true | false FALSE useColumnLabel 使用列标签代替列名。不同的驱动在这方面会有不同的表现,具体可参考相关驱动文档或通过测试这两种不同的模式来观察所用驱动的结果。 true | false TRUE defaultStatementTimeout 设置超时时间,他决定驱动等待数据库响应的秒数。 Any positive integer Not Set(null) mapUnderscoreToCameCase 是否开启自动驼峰命名规则(camel case)映射,即从经典数据库列名A_COLUMN到经典java属性aColumn的类似映射 true | false FALSE jdbcTypeForNull 设置数据库不能对null的处理。比如Oracle other | null | varchar OTHER logImpl 指定 mybatis所用日志的具体实现,未指定时将自动查找 SLE4J|LOG4J|LOG4J2|JDK_LOGGING 未设置 -
示例:映射下划线驼峰大小写,这样映射文件就不用起别名
<settings>
    <!--映射下划线到驼峰大小写-->
    <setting name="mapUnderscoreToCamelCase" value="true"/>
</settings>
typeAliases 别名处理器
-
类型别名是为 Java 类型设置一个短的名字,可以方便我们引用某个类
-
typeAliases 大标签:别名处理器,可以为我们的java类型起别名,别名不区分大小写。
-
typeAlias 小标签:为某个java类型起别名
属性:type = 指定要起别名的类型全类名;默认别名就是类名小写;employees
alias = 指定新的别名 -
package 小标签:为某个包下的所有类批量起别名
属性:name = 指定包名,为当前以及下面所有的后代的每一个类都起一个默认别名(类名小写)也可以使用@Alias注解为其指定一个别名。
-
-
一次性为一个类起别名,alias可以省略,就是默认别名(类名小写)。
<typeAliases>
<typeAlias type="com.cainiao.bean.Employees" alias="emp"/>
</typeAliases>
起别名可以在sql映射文件中设置返回类型值
<!-- resultType:返回值类型 --> <select id="getEmpById" resultType="emp"> select * from employees where id = #{id} </select> -
批量起别名,package标签
<typeAliases> <package name="com.cainiao.bean"/> </typeAliases> <com.cainiao.bean 中的 Java Bean,在没有注解的情况下,会使用 Bean 的首字母小写的非限定类名来作为它的别名。 比如com.cainiao.bean.Author 的别名为 author;若有注解,则别名为其注解值。见下面的例子package标签,批量起别名的情况下,使用@Alias注解为某个类型指定新的别名
@Alias("emp") //为这个类起别名 public class Employees {} -
MyBatis已经为许多常见的Java类型内建了响应的类型别名。他们都是大小写不敏感的,我们在起别名的时候收千万不要占用已有的别名。
- 基本数据类型的别名:_基本数据类型
- 包装数据类型的别名:(全部小写不允许有任何大写)包装数据类型
- 其他Date,BigDecimal,BigDecimal,Object,Map,HashMap,List,ArrayList,Collection,Iterator 别名全部小写不允许出现大写字母。
typeHandlers 类型处理器
-
类型处理器:Java类型和数据库类型一一映射的桥梁

-
日期类型处理,MyBatis3.4之前的版本需要我们手动注册这些处理器,以后的版本都是自动注册的
-
示例:
<typeHandlers> <typeHandler handler="org.apache.ibatis.type.InstantTypeHandler" /> <typeHandler handler="org.apache.ibatis.type.LocalOateTimeTypeHandler" /> </typeHandlers> -
自定义类型处理器
- 我们可以重写类型处理器或创建自己的类型处理器来处理不支持的或非标准的类型。
- 步骤
- 实现org.apache.ibatis.type.TypeHandler接口或者继承org.apache.ibatis.type.BaseTypeHandler
- 指定其映射某个JDBC类型(可选操作)
- 在mybatis全局配置文件中注册
plugins 插件
-
插件是MyBatis提供的一个非常强大的机制,我们可以通过插件来修改MyBatis的一些核心行为。插件通过动态代理机制,可以介入四大对象的任何一个方法的执行。后面会详细讲解。
-
四大对象
- Executor (update, query, flushStatements, commit, rollback, getTransaction, close, isClosed)
- ParameterHandler (getParameterObject, setParameters)
- ResultSetHandler (handleResultSets, handleOutputParameters)
- StatementHandler (prepare, parameterize, batch, update, query)
这些类中方法的细节可以通过查看每个方法的签名来发现,或者直接查看 mybatis发行包中的源代码,如果你想做的不仅仅是监控方法的调用,那么你最好相当了解重写的方法的行为.因为在试图修改或者重写已有的方法的行为时,很可能波坏 mybatis的核心模块,这些都是底层的类和方法,所以使用插件的时候要特别当心.
当通过 Mybatis 提供强大的机制,使用插件是非常简单的,只需要实现 Interceptor接口,并指明想要拦截的方法签名即可.
environments 环境
-
MyBatis可以配置多种环境,比如开发,测试,和生产环境,需要有不同的配置
-
可以通过environments标签中的 default 属性指定一个环境的标识符来快速的切换环境。
-
每种环江使用一个environment标签进行配置并指定唯一标识符。
-
environment 标签,配置一个具体的环境信息。必须和transactionManager和dataSource标签搭配使用。
属性:id = 代表当前环境的唯一标识 -
transactionManager 标签:事务管理器;
属性:type:事务管理的类型; JDBC | MANAGER | 自定义
我们在 Configuration 类中查看到注册很多别名,
【JDBC】就是
JdbcTransactionFactory.class的别名,
【MANAGER】是ManagedTransactionFactory.class的别名。
自定义事务管理器,实现TransactionFactory指定为全类名,type=全类名/别名。- dataSource 标签:数据源:
属性:type = UNPOOLED(不使用连接池) | POOLED(使用连接池) | JNDI(在EJB或应用服务器这类容器中查找指定的数据源)
在 Configuration 类中查看到
UNPOOLED, UnpooledDataSourceFactory.class
POOLED, PooledDataSourceFactory.class
JNDI, JndiDataSourceFactory.class
自定义数据源,实现 DataSourceFactory 接口,定义数据源的获取方式。
-
-
实际开发中 数据源 和 事务管理器的配置都是交给spring来做。
-
代码使用 properties属性连接数据库
<environments default="dev_mysql">
    <environment id="dev_mysql">
        <!--事务管理器-->
        <transactionManager type="JDBC"/>
        <!--数据源: 配置连接数据库信息 -->
        <dataSource type="POOLED">
            <property name="driver" value="${jdbc.driver}"/><!--从配置文件中去取出值-->
            <property name="url" value="${jdbc.url}"/>
            <property name="username" value="${jdbc.username}"/>
            <property name="password" value="${jdbc.password}"/>
        </dataSource>
    </environment>

	<environment id="dev_oracle">
        <transactionManager type="JDBC" />
        <dataSource type="POOLED">
            <property name="driver" value="${orcl.driver}" />
            <property name="url" value="${orcl.url}" />
            <property name="username" value="${orcl.username}" />
            <property name="password" value="${orcl.password}" />
        </dataSource>
	</environment>
</environments>
databaseIdProvider 环境
-
databaseIdProvider:支持多数据库厂商的
属性:type="DB_VENDOR" 在Configuration类中就是,VendorDatabaseIdProvider.class
作用:得到数据库厂商的标SQL Server识(驱动getDatabaseProductName),mybatis就能根据数据库厂商标识来执行不同的sql
标识:Mysql,Oracle,SQL Server,xxx- Property-name:数据库厂商标识
- Property-value:为标识起一个别名,方便SQL语句使用databaseId属性引用
-
引入不同的数据库
全局配置文件
<databaseIdProvider type="DB_VENDOR">
    <!--为不同的数据厂商起别名-->
    <property name="MySQL" value="mysql"/>
    <property name="Oracle" value="oracle"/>
    <property name="SQL Server" value="sqlserver"/>
</databaseIdProvider>
sql映射文件
databaseId:数据库厂商的别名
<select id="getEmpById" resultType="emp" databaseId="mysql"> select * from employees where id = #{id} </select> -
DB_VENDOR:
会通过 DatabaseMetaData#getDatabaseProductName() 返回的字符串进行设置。由于通常情况下这个字符串都非常长而且相同产品的不同版本会返回不同的值,所以最好通过设置属性别名来使其变短.
-
MyBatis匹配规则如下
- 如果没有配置databaseIdProvider标签,那么databaseId=null
- 如果配置了databaseIdProvider标签,使用标签配置的name去匹配数据库信息,匹配上设置databaseId=配置指定的值,否则依旧为null
- 如果databaseId不为null,他只会找到配置databaseId的sql语句
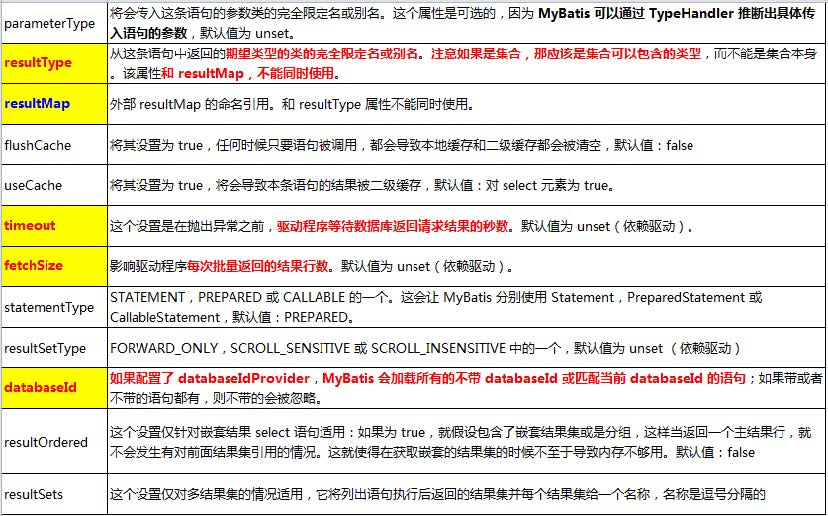
- MyBatis 会加载不带 databaseId 属性和带有匹配当前数据库databaseId 属性的所有语句。如果同时找到带有 databaseId 和不带databaseId 的相同语句,则后者会被舍弃。
mapper 映射
-
将我们写好的sql映射文件(EmployeeMapper.xml)一定要注册到全局配置文件(mybatis.xml)
-
mappers 大标签:将sql映射注册到全局配置中
mapper 小标签:注册一个sql映射
属性:- 注册配置文件
resource:引用类路径下的sql映射文件。
url:引用网络路径或者磁盘路径下的sql映射文件 - 注册接口
class:应用(注册)接口
1. 有sql映射文件,映射文件按必须和接口同名,并且放在接口同一目录下。
2. 没有slq映射文件,所有的sql都是利用注解写在接口上
复杂的Dao接口我们来写sql映射文件
不重要,简单的Dao接口为了开发快速可以使用注解
package 小标签:批量注册;这种方式要求sql映射文件必须和接口名相同并且在同一目录下
属性:name:包名路径。 - 注册配置文件
-
代码
<mappers>
    <!--配置文件 sql映射文件-->
    <mapper resource="confEmployeeMapper.xml"/>
    <!--注解 使用接口-->
    <mapper class="com.cainiao.dao.EmployeeMapperAnnotation"/>
    <!--批量注册,sql映射文件必须和接口名相同并且在同一目录下-->
    <!--<package name="com.cainiao.dao"/>-->
</mappers>
没有映射文件:使用接口+注解写在方法上(代替sql映射文件)
public interface EmployeeMapperAnnotation {
    //@Insert()
    @Select("select * from employees where id = #{id}")
    public Employees getEmpById(Integer id);
}
测试:只要把 SqlSession的 getMapper方法传入 EmployeeMapperAnnotation(注解代替sql映射文件)就可。
四,MyBatis 映射文件
- 映射文件指导者MyBatis如何进行数据库增删改查,有着非常重要的意义。
- cache:命名空间的二级缓存配置
- cache-ref:其他命名空间缓存配置的引用
- resultMap:自定义结果集映射
- ~
parameterMap:已废弃!老式风格的参数映射 - sql:抽取可重用语句块
- insert:映射插入语句
- update:映射更新语句
- delete:映射删除语句
- select:映射查询语句
insert,update,delete元素

映射文件获取主键方式
-
mysql支持则增主键,自增主键值的获取,mybatis也是利用statement.getGeneratedKeys()方法的
属性:- useGeneratedKeys="true":使用自增主键获取主键值策略。
- keyProperty="id":指定对应的主键属性,也就是mybatis获取到主键值以后,将这个值装给JavaBean的那个属性
-
示例代码
<insert id="addEmp" parameterType="com.cainiao.bean.Employees" useGeneratedKeys="true" keyProperty="id" databaseId="mysql"> insert into employees(last_name,gender,email) values(#{lastName},#{gender},#{email})</insert> -
Oracle不支持自增,Oracle使用序列来模拟自增,每次插入的数据的主键是从序列中拿到的值
-
可以使用selectKey 标签编写主键的查询语句
selectKey-keyProperty=查出主键值封装给JavaBean的那个属性值
selectKey-order="BEFORE" 当前sql插入sql之前运行
"AFTER" 当前sql在插入sql之后运行
selectKey-resultType="查出的数据的返回值类型"
-
-
示例代码
<insert id="addEmp" parameterType="com.cainiao.bean.Employees"
        useGeneratedKeys="true" keyProperty="id" databaseId="oracle">
    /*before运行顺序:
    ==》先运行selectKey查询id的sql;查询id值封装给JavaBean的id属性
    ==》在运行插入的sql;就可以取出id属性对应的值
    after运行顺序(了解):
    ==》先运行插入的slq(从序列中取出新值作为id)
    ==》在运行selectKey查询id的sql
    */
    <selectKey keyProperty="id" order="BEFORE" resultType="Integer">
        /*编写查询主键的sql语句*/
        select employees_seq.nextval from dual
    </selectKey>
    /*插入时的主键是从序列中拿到的*/
    insert into employees(EMPLOYEE_ID,LAST_NAME,EMAIL) values(#{id},#{lastName},#{email})
</insert>
selectKey 元素

参数(Parameters) 传递
-
单个参数
可以接收基本类型,对象类型,集合类型的值。这种情况MyBatis可直接使用这个参数,不需要经过任何处理。
#{参数名} = 取出参数值。
-
多个参数
任意多个参数,都会被MyBatis重新包装成一个Map传入。
key:param1,param2...paramN(或者参数的索引0,1)
value:传入的参数值
#{param1,...} = 就是从map中获取指定的key值。推荐使用命名参数。
-
异常:
org.apache.ibatis.binding.BindingException: Parameter 'id' not found.Available parameters are [0, 1, param1, param2]
-
操作:
方法:public Employees getEmpByIdAdnLastName(Integer id, String lastName);
取值:#{id},#{lastName}
-
-
修改:
<!--注意返回类型-->
<select id="getEmpByIdAdnLastName" resultType="com.cainiao.bean.Employees">
    select * from employees where id = #{param1} and last_name=#{param2}
</select>
-
-
命名参数
明确指定封装参数时map的key,使用注解:@Param("别名")
多个参数封装成一个map
key:使用@Param注解指定的值
value:参数值
#{指定的key} 取出对应的参数值 -
POJO
如果多个参数正好是我们业务逻辑的数据模型,我们就可以直接传入pojo。
#{属性名} :取出传入的pojo的属性值 -
Map
如果多个参数不是业务模型中的数据,没有对应的pojo,为了方便,我们也可以传入map
#{key} :取出map中对应的值示例:
public Employees getEmpMap(Map<String, Object> map);<select id="getEmpMap" resultType="com.cainiao.bean.Employees"> select * from employees where id = #{id} and last_name=#{lastName} </select>@Test public void test5() throws IOException { //1. 获取SqlSessionFactory对象 String resource = "conf/mybatis.xml"; InputStream inputStream = Resources.getResourceAsStream(resource); SqlSessionFactory sqlSessionFactory = new SqlSessionFactoryBuilder().build(inputStream); //2. 获取SqlSession对象,获取到的SqlSession不会自动提交 SqlSession session = sqlSessionFactory.openSession(); try { //3. 获取接口实现对象 EmployeeMapperDao mapper = session.getMapper(EmployeeMapperDao.class); //封装map Map<String, Object> map = new HashMap<>(); map.put("id", 1); map.put("lastName", "Always"); Employees emp = mapper.getEmpMap(map); System.out.println(emp); //4. 手动提交 session.commit(); } catch (Exception e) { e.printStackTrace(); } finally { //5. 关闭会话 session.close(); } } -
TO(Transfer Object)传输对象,如果多个参数不是业务模型中的数据,当时经常要使用推荐使用这个。
例如经常要用的分页查询:Page{Integer index; Integer size}
结合源码,mybatis怎么处理参数
-
getEmpByIdAdnLastName(@Param("id") Integer id, @Param("lastName") String lastName);
-
ParamNameResolver 解析参数封装map的
names:{0=id,1=lastName} //构造器的时候就确定好了
确定流程
-
获取每个标了param注解的参数的@Param的值:id,lastName。赋值给name;
-
每次解析一个参数给map中保存信息:(key:参数索引 , value:name的值)
name的值:标注了param注解:注解的值
没有标注注解:- 全局配置: useActualParamName(jdk1.8) : name=参数名
- ame=map.size(); 相当于当前元素的索引
-
{0=id,1=lastName,2=2}
-
==》参数args[1,"Always"]
public Object getNamedParams(Object[] args) {
        int paramCount = this.names.size();
        //1. 参数为null直接返回
        if (args != null && paramCount != 0) {
            //2. 如果没有param注解,并且只有一个元素。return:args[0] (单个元素直接返回)
            if (!this.hasParamAnnotation && paramCount == 1) {
                return args[(Integer)this.names.firstKey()];
            //3. 多个元素或者有Param标注
            } else {
                //map保存数据
                Map<String, Object> param = new ParamMap();
                int i = 0;
                //4. 遍历names集合: names:{0=id,1=lastName}
                for(Iterator i$ = this.names.entrySet().iterator(); i$.hasNext(); ++i) {
                    Entry<Integer, String> entry = (Entry)i$.next();
                    //names集合的value作为key ; names集合的key又作为key作为取值的参考。args[1,"Always"]
                    //{id=args[0] / 1,lastName=args[1] / Always}
                    param.put(entry.getValue(), args[(Integer)entry.getKey()]);

                    //add generic param names (param1,param2,...) param
                    //额外的将每一个参数也保存到map中,使用新的key : param1,param2...
                    //效果:有Param注解可以#{指定的key}, 或者param1
                    String genericParamName = "param" + String.valueOf(i + 1);
                    if (!this.names.containsValue(genericParamName)) {
                        param.put(genericParamName, args[(Integer)entry.getKey()]);
                    }
                }
                return param;
            }
        } else {
        //如果参数为空直接返回
            return null;
        }
    }
- 总结:参数多时会封装map,为了不混乱,我们可以使用@Param来指定封装时使用的key
#{key}就可以取出map的值
参数值的获取
-
#{} :可以获取map中的值或者pojo对象属性的值
-
${} :可以获取map中的值或者pojo对象属性的值
-
设置:
select * from employees where id=${id} and last_name=#{lastName} // Preparing: select * from employees where id=2 and last_name=? -
区别:
#{}:是以预编译的形式,将参数设置到sql语句中,PreparedStatement,防止sql注入
${}:取出的值直接拼装在slq语句中,会有安全问题
大多数情况下,我们取参数的值都应该去使用#{}

原生jdbc不支持占位符的地方我们就可以使用${}进行取值
    比如分表,排序,表名:按照年份分表拆分
    select * from ${year}_salary where xx;
	select * from employees order by${#_xx} ${order};
#{ } : 更丰富的用法
-
规定参数的一些规则:
javaType, jdbcType,mode存储过程), numericScale ,
resultMap, typeHandler, jdbcTypeName, expression(表达式:未来准备支持的功能) -
参数也可以指定一个特殊的数据类型:
- javaType 通常可以从参数对象中来去确定。
- 如果 null 被当作值来传递,对于所有可能为空的列,jdbcType需要被设置。
- 对于数值类型,numericScale 还可以设置小数点后保留的位数。
- mode 属性允许指定 in,out 或 inout参数。如果参数为 out 或 inout,参数对象属性的真实值将会被改变,就像在获取输出参数时所期望的那样。
-
jdbcType:通常需要在某种特定的条件下被设置:
在我们数据为null的时候,有些数据库可能不能识别mybatis对null的默认处理。比如Oracle(报错) JdbcType OTHER : 无效的类型:
因为mybatis对所有的null都映射的时原生jdbc的other类型,oracle不能正确的处理。
-
处理:由于全局配置中,jdbcTypeForNull=other。oracle不支持,两种办法
-
在sql映射文件中 email插入为null
insert into employees (employee_id,last_name,email) values(#{id},#{lastName},#{email,jdbcType=null}) -
在全局配置文件中
<settings>
    <settings name="jdbcTypeForNull" value="NULL">
</settings>
-
-
select元素
-
select元素来定义查询操作。
-
id:唯一标识符。
用来引用这条语句,需要和接口的方法名一致。
-
parameterType:参数类型。
可以不传,MyBatis会根据TypeHandler自动判断。
-
resultType:返回值类型。
别名或者全类名,如果返回的值集合,定义集合中元素的类型。不能和resultMap 同时使用
返回list
-
dao层
public List<Employees> getEmpByLastName(String lastName); -
sql映射文件
<!--resultType:返回值类型.如果返回的是一个集合,要写集合中元素的类型-->
<select id="getEmpByLastName" resultType="com.cainiao.bean.Employees">
    select * from employees where last_name like #{lastName}
</select>
返回map
一条记录的map
//返回一条记录的map:key就是列名,值就是对应的值。
public Map<String, Object> getEmpByIdReturnMap(Integer id);
<!--单个记录-->
<!--resultType=map 因为mybatis已经为经常使用的类起了别名-->
<select id="getEmpByIdReturnMap" resultType="map">
    select * from employees where id=#{id}
</select>
多条记录封装的map
//多条记录封装一个map:Map<Integer,employees>:键是这条记录的主键,值时记录封装后的JavaBean
@MapKey("id") //告诉mybatis,封装这个map的时候用哪个属性当作key
public Map<Integer, Employees> getEmpByLastNameMap(String lastName);
<!--多个记录-->
<!--resultType=map 因为mybatis已经为经常使用的类起了别名-->
<select id="getEmpByLastNameMap" resultType="map">
    select * from employees where last_name liek #{lastName}
</select>
自动映射
全局配置文件settings设置
- autoMappingBehavior默认是PARTIAL,开启自动映射的功能。唯一的要求是列名和JavaBean属性名一致。
- 如果autoMappingBehavior设置为null则会取消自动映射。
- 数据库字段名命名规则,POJO属性符合驼峰命名法,如 A_COLUMN->aColumn,我们可以开启自动驼峰命名规则映射功能,mapUnderscoreToCamelCase=true。
自定义resultMap,实现高级结果集映射
-
mapper标签-resultMap标签(外部resultMap)自定义某个JavaBean的封装规则。
属性:resultMap-type:自定义规则的Java类型
resultMap-id:id唯一方便引用。(select标签resultMap引用)
-
constructor :类在示例化时,用来注入结果到构造方法中
constructor-idArg:id参数;标记结果作为id可以帮助提高整体效能。
constructor-arg:注入到构造方法的一个普通结果。
-
id:(主键列的封装规则)一个id结果;标记结果作为id可以帮助提高整体效能。
id-property:映射到列的结果的字段或属性。
id-column:数据表的列名。
id-javaType:一个Java类的完全限定名,或一个类型的别名。如果映射到一个JavaBean,MyBatis通常可以判断类型。
id-jdbcType:jdbc类型是仅仅需要对插入,更新和删除操作可能为空的列进行处理。
id-typeHandler:类型处理器。使用这个属性,可以覆盖默认的类型处理器。这个属性值是类的完全限定名或者是一个类型处理器的实现,或者是类型别名。
-
result:(普通列的封装规则)注入到字段或JavaBean属性的普通结果。
和id一样的属性。
-
association:一个复杂的类型关联;许多结果将包成这种类型
嵌入结果映射值;结果映射自身的关联,或者参考一个
-
collection:复杂类型的集
嵌入结果映射;结果映射自身的集,或者参考一个
-
discriminator:鉴别器。使用结果值来决定使用那个结果映射
case:基于某些值的结果映射。嵌入结果映射。这种情况结果也映射它本身,因此可以包含很多相同的元素,或者它可以参照一个外部的结果映射。
-
自定义resultMap
-
dao层:根据id查询员工
public Employees getEmpById(Integer id); -
sql映射文件
<!--自定义某个JavaBean的封装规则
type:自定义规则的Java类型
id:id唯一,方便引用
-->
<resultMap id="MapEmp" type="com.cainiao.bean.Employees">
    <!--id:指定主键列的封装规则,底层会有优化
    id-column:指定那一列
    id-property:指定对应的JavaBean属性-->
    <!--查询字段的id列对应JavaBean的id属性-->
    <id column="id" property="id"/>
    <!--result:定义普通列封装规则-->
    <result column="last_name" property="lastName"/>
    <!--其它不指定的列会自动封装:我们只要写resultMap就把全部的映射规则都写上 -->
</resultMap>
<!--
resultMap:自定义规则:
resultType不能和resultMap一起使用-->
<select id="getEmpById" resultMap="MapEmp">
    select * from employees where id=#{id}
</select>
联合查询 association
-
创建部门表和与之对应的JavaBean。
-
查询Employees的同时查询员工对应的部门【sql映射文件一定要注册全局配置文件中】
employees ==》 department
根据员工id查询员工信息和部门信息
-
联合查询:级联属性封装结果集
<!--自定义结果集--> <resultMap id="empDif" type="com.cainiao.bean.Employees"> <!--查询字段的id列对应JavaBean的id属性--> <id column="id" property="id"/> <result column="last_name" property="lastName"/> <result column="gender" property="gender"/> <result column="email" property="email"/> <!--dept(部门对象)是员工的属性;--> <result column="id" property="dept.id"/> <result column="dept_name" property="dept.deptName"/> </resultMap> <!--查询语句--> <select id="getEmpAndDept" resultMap="empDif2"> SELECT e.*,d.* FROM dept d,employees e WHERE d.`id`=e.`dept_id` AND e.id=#{id}; </select> -
联合查询:嵌套结果集
查询语句(select标签)在上面
 <!--自定义结果集-->
<!--使用association定义关联的单个对象的封装规则-->
<resultMap id="empDif2" type="com.cainiao.bean.Employees">
    <!--查询字段的id列对应JavaBean的id属性-->
    <id column="id" property="id"/>
    <result column="last_name" property="lastName"/>
    <result column="gender" property="gender"/>
    <result column="email" property="email"/>
    <!--association可以指定联合的JavaBean对象
    property="dept" :指定那个属性是联合的对象
    javaType :指定这个属性对象的类型【不能省略】
    -->
    <association property="dept" javaType="dept">
        <id column="id" property="id"/>
        <result column="dept_name" property="deptName"/>
    </association>
</resultMap>
分段查询 association
-
使用association进行分布查询
- 先按照员工id查询员工信息
- 根据查询员工信息的(部门id)dept_id值去查询部门信息
- 部门设置到员工中。
-
sql映射文件
 <!--自定义结果集-->
    <resultMap id="empStep" type="com.cainiao.bean.Employees">
        <id column="id" property="id"/>
        <result column="last_name" property="lastName"/>
        <result column="gender" property="gender"/>
        <result column="email" property="email"/>
        <!--association定义关联对象的封装规则
            select:(mapper-namespace+select-id)表明当前属性是调用select指定的方法查询结果。
            column:指定将那一列的值传递给这个方法。
			此时没有写javaType因为在调用select属性哪里那个已经写了这个对象的类型。
        流程:使用select指定的方法(传入column指定的这列参数的值)查出对象,并封装给property
        -->
        <association property="dept" column="dept_id" select="com.cainiao.dao.DepartmentMapper.getDepById"/>
                <!--javaType="dept"-->
    </resultMap>
<!--查询语句-->
    <select id="getEmpByIdStep" resultMap="empStep"><!--使用自定义的resultMap-->
        select * from employees where id=#{id}
    </select>
分段查询&延迟加载
-
开启延迟加载(懒加载)(按需加载):
Employees ==》Department
我们每次查询Employees对象的时候,都将一起查询出来。
部门信息在我们使用的时候再去配置,分段查询的基础之上加上两个配置, -
全局配置文件配置
<!--2. settings标签:包含很多重要的设置项
setting标签:用来设置每一个设置项。
属性:name = 设置项名
     value = 设置项取值
-->
<settings>
    <!--映射下划线到驼峰大小写-->
    <setting name="mapUnderscoreToCamelCase" value="true"/>
    <!--懒加载开启-->
    <setting name="lazyLoadingEnabled" value="true"/>
    <!--属性按需加载加载:开启时,任一方法的调用都会加载该对象的所有延迟加载属性。 否则,每个延迟加载属性会按需加载-->
    <setting name="aggressiveLazyLoading" value="false"/>
</settings>
Collection 1 集合类型&嵌套结果集
-
查询部门的时候将部门对应的所有员工信息也查询出来【根据id查询部门下的员工】
直接查询出来
-
Collection-集合类型嵌套结果集。
<resultMap id="MyDept" type="dept">
    <id column="id" property="id"/>
    <result column="dept_name" property="deptName"/>
    <!--collection定义关联集合类型的属性的封装
        ofType:指定集合里面元素的类型或者类的别名 -->
    <collection property="emps" ofType="emp">
        property="emps"是部门的属性,类型是list
        <!--定义这个集合中元素的封装规则-->
        <id column="e_id" property="id"/>
        <result column="last_name" property="lastName"/>
        <result column="gender" property="gender"/>
        <result column="email" property="email"/>
        <!--<result column="dept_id" property="dept"/>-->
    </collection>
</resultMap>
<!--查询语句-->
<select id="getDeptByIDJoinEmp" resultMap="MyDept">
    SELECT d.*,e.`id` e_id,e.`last_name` last_name
    ,e.`gender` gender,e.`email` email
    FROM employees e,dept d
    WHERE e.`dept_id`=d.`id`
    AND d.`id`=#{id}
</select>
Collection 2 分布查询&延迟加载
- 根据id查询部门信息。单个
- 根据部门id()查询员工信息。集合
<resultMap id="MyDeptPlus" type="dept">
    <id column="id" property="id"/>
    <result column="dept_name" property="deptName"/>
<!--<collection property="emps" column="id"
                        select="com.cainiao.dao.EmployeesMappersPlus.getListEmpById"/>-->
    <!--扩列:多列的值传递过去
            将多列的值封装map传递;
            column="{key1=column1,key2=column2}"
            fetchType="lazy(默认:表示延迟加载) / eager(立即加载)"
            -->
    <collection property="emps" column="{dept_id=id}" fetchType="lazy"
                select="com.cainiao.dao.EmployeesMappersPlus.getListEmpById"/>
</resultMap> 查询语句Colletion 1 上面
扩列 多列值封装resultMap传递
- 分布查询的时候通过column指定,将对应的列的数据传递过去,我们有时需要传递多列数据。
- 使用 column="{key1=column1,key2=column2…}" 的形式
- association或者collection标签的 fetchType=eager/lazy 可以覆盖全局的延迟加载策略,指定立即加载(eager)或者延迟加载(默认lazy)
discriminator 鉴别器
-
discriminator:鉴别器:mybatis可以使用discriminator判断某列的值,然后根据某列的值改变封装行为
discriminator-column:指定判断的列。
discriminator-javaType:列值对应的Java类型 -
列:封装employees
如果查出的是女生:就把部门信息查询出来,否则不查询
如果是男生,就把last_name这一列的值赋值给email<resultMap id="MyEmpPlusDis" type="emp"> <id column="id" property="id"/> <result column="last_name" property="lastName"/> <result column="gender" property="gender"/> <result column="email" property="email"/> <!--column:指定判断的列。 javaType:列值对应的Java类型--> <discriminator javaType="string" column="gender"> <!--女生 resultType【不能缺省】:指定结果集的类型或者别名。resultMap二选一--> <!--case-value = ?。value对应的是数据库的值--> <case value="女" resultType="emp"> <association property="dept" column="dept_id" select="com.cainiao.dao.DepartmentMapper.getDepById"/> </case> <!--男生 --> <case value="男" resultType="emp"> <id column="id" property="id"/> <result column="email" property="lastName"/> <result column="last_name" property="email"/> <result column="gender" property="gender"/> </case> </discriminator> </resultMap> <select id="getEmpByIdStep" resultMap="MyEmpPlusDis"><!--使用自定义的resultMap--> select * from employees where id=#{id} </select>
五,MyBatis 动态sql
- 动态sql是MyBatis强大特性之一。极大的简化我们拼装SQL的操作。
- 动态sql元素和使用 jstl 或其他类型类似基于 xml 的文本处理器相似。
- MyBatsi采用功能强大的基于 ognl 的表达式来简化操作。
- if
- choose【when,otherwise】
- trim【where set】
- foreach
常用的 ognl表达式
-
e1 or e2 -
e1 and e2 -
e1 == e2,e1 eq e2 -
e1 != e2,e1 neq e2 -
e1 lt e2:小于 -
e1 lte e2:小于等于,其他gt(大于),gte(大于等于) -
e1 in e2 -
e1 not in e2 -
e1 + e2,e1 * e2,e1/e2,e1 - e2,e1%e2 -
!e,not e:非,求反 -
e.method(args)调用对象方法 -
e.property对象属性值 -
e1[ e2 ]按索引取值,List,数组和Map -
@class@method(args)调用类的静态方法 -
@class@field调用类的静态字段值
if 判断
-
if标签
if-test:判断表达式【ognl】
ognl会进行字符串与数字的转换判断【比如"1"转成 1】
-
查询员工:携带了那个字段查询条件就带上这个字段的值。
<select id="getEmpsByConditionIF" resultType="emp"> select * from employees where <!--test:判断表达式(ognl) c:if test--> <if test="id!=null"> <!--从参数中取值进行判断--> id=#{id} </if> <!--遇见特殊符号应该去写转义字符【"】双引号,【&】&与符号 --> <if test="lastName !=null && lastName!="""> and last_name like #{lastName} </if> <if test="email !=null and email.trim()!="""> and email =#{email} </if> <!--ognl会进行字符串与数字的转换判断--> <if test="'男'.equals(gender) or '女'.equals(gender)"> and gender=#{gender} </if> </select> -
查询的时候如果某些条件没带,可能sql拼装会有问题【例如如果id=null会报错】
解决
- 给 where后面加上【字段=值】,以后的条件都and xxx=#{xxx}
- mybatis使用where标签来将所有的查询条件包括在内。mybatis就会将where标签中拼装的sql,多出来的and或者or去掉。
【注意!!】如果and 在后,where只会去掉第一个多出来的and 或者or。
trim【where set】 截取
where 封装了查询条件
-
后面多出的 and或者or 。where标签不能解决。
-
使用trim标签自定义字符串截取的规则。
属性
prefix="" 前缀: trim标签中是整个字符串拼串 后的结果。
prefix给拼串后的整个字符串加一个前缀。
prefixOverrides=""
前缀覆盖:去掉整个字符串前面多余的字符。
suffix="" 后缀
suffix给拼串的整个字符串加一个后缀。
suffixOverrides=""
后缀覆盖:去掉整个字符串后面多余的字符。<select id="getEmpsByConditionTrim" resultType="emp"> select * from employees <!--自定义字符串截取的规则--> <trim prefix="where" suffixOverrides="and"> <if test="id!=null"> <!--从参数中取值进行判断--> id=#{id} and </if> <!--遇见特殊符号应该去写转义字符【"】双引号,【&】&与符号 --> <if test="lastName !=null && lastName!="""> last_name like #{lastName} and </if> <if test="email !=null and email.trim()!="""> email =#{email} and </if> <!--ognl会进行字符串与数字的转换判断--> <if test="'男'.equals(gender) or '女'.equals(gender)"> gender=#{gender} </if> </trim> </select>
set 封装了修改条件
set标签就相当于SQL语句中的set。
-
根据员工id更新每一列
<update id="updateEmp"> update employees <set> <if test="lastName!=null"> 【注意逗号】 last_name=#{lastName}, </if> <if test="gender!=null"> gender=#{gender}, </if> <if test="email!=null"> email=#{email}, </if> </set> where id=#{id} </update> -
trim标签一样的效果
<update id="updateEmp">
    update employees
    <trim prefix="set" suffixOverrides=",">
        <if test="lastName!=null">  【注意逗号】
            last_name=#{lastName},
        </if>
        <if test="gender!=null">
            gender=#{gender},
        </if>
        <if test="email!=null">
            email=#{email}
        </if>
    </trim>
    where id=#{id}
</update>
choose【when,otherwise】 分支选择
-
分支选择;带了break的switch-case
when test="ognl" ==>判断
otherwise test="ognl" ==>否则
-
列:查询员工:如果带了id就用id查,如果带了lastName就用lastName查;只会进入其中一个。
<select id="getEmpsByConditionChoose" resultType="emp">
    select * from employees
    <where>
        <!--如果带了id就用id查,如果带了lastName就用lastName查;只会进入其中一个。-->
        <choose>
            <!--如果id和lastname都不为空是根据id查询-->
            <when test="id!=null">
                id=#{id}
            </when>
            <when test="lastName!=null">
                last_name like#{lastName}
            </when>
            <when test="email!=null">
                email=#{email}
            </when>
            <otherwise>
                <!--1=1 查所有-->
                gender='女' <!--只查询性别为女的员工-->
            </otherwise>
        </choose>
    </where>
</select>
foreach 遍历
-
动态sql的另外一个常用的必要操作是需要对一个集合进行遍历,通常是在构建 in 条件语句的时候。
-
foreach 标签
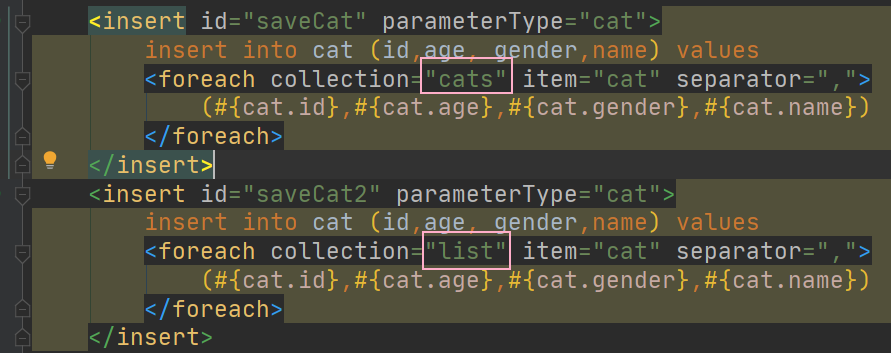
collection:属性有三个分别是 list【list类型】、array【数组】、map【map集合】。也可以在mapper接口使用@Param注解指定参数名。
item:将当前遍历出的元素赋值给指定的变量。
separator:每个元素之间的分隔符。
open:遍历出所有结果,拼接一个开始的字符。
close:遍历出所有结果,拼接一个结束的字符。
index:索引。遍历list的时候,index迭代的次数,item的值是本次迭代获取的元素。
遍历map的时候,index是key,item是value。
-
例:
dao
//多项:查询员工 id'在给定集合中的
//@Param 命名参数
public List<Employees> getEmpsByConditionForeach(@Param("ids")List<Integer> ids);
mapper
<select id="getEmpsByConditionForeach" resultType="emp">
    select * from employees
    <foreach collection="ids" item="item_id" separator="," open="where id in (" close=")" >
        #{item_id}
    </foreach>
</select>
foreach 批量保存MySQL
-
dao
//批量保存 @Param 命名参数,起别名
public void addEmps(@Param("emps") List<Employees> emps);
-
映射文件 第一种。mysql批量保存-可以foreach遍历。mysql支持values(),(),()...语法。
<insert id="addEmps"> insert into employees (last_name,email,gender,dept_id) values <foreach collection="emps" item="emp" separator=","> <!--多条记录,每条记录用括号,逗号分隔--> (#{emp.lastName},#{emp.email},#{emp.gender},#{emp.dept.id}) </foreach> </insert> -
映射文件 第二种。第二种,这种方式需要数据库连接allowMultiQueries=true的支持。
<!--mysql需要开启:allowMultiQueries 在一条语句中,允许使用“;”来分隔多条查询(真/假,默认值为“假”)。 No false 3.1.1-->
<insert id="addEmps">
    <foreach collection="emps" item="emp" separator=";">
        insert into employees (last_name,email,gender,dept_id)
        values (#{emp.lastName},#{emp.email},#{emp.gender},#{emp.dept.id})
    </foreach>
</insert>
这种分号分隔多个sql可以批量保存,修改删除等。
foreach 批量保存Oracle
-
Oracle不支持values(),(),()。
begin
    insert into employees(employees_id,last_name,email)
    values(employees_sql.nextval,"test_o1","test01@cainiao.com");
    insert into employees(employees_id,last_name,email)
    values(employees_sql.nextval,"test_o2","test02@cainiao.com");
end;
mapper
<insert id="addEmps" databaseId="oracle"> <foreach collection="emps" item="emp" open="begin" close="end;"> insert into employees(employees_id,last_name,email) values(employees_sql.nextval,#{emp.lastName},#{emp.email}); </foreach> </insert> -
Oracle支持的批量方式
-
多个insert放在begin - end 里面
-
利用中间表
insert into employees(employee_id,last_name,email)
    select employee_seq.nextval,lastName,email from{
        select 'test_a01' lastName,'test_a_01@163.com' email from dual
        union
        select 'test_a01' lastName,'test_a_01@163.com' email from dual
        union
        ...
}
mapper
<insert id="addEmps" databaseId="oracle"> <foreach collection="emps" item="emp" separator="union" open="insert into employees(employee_id,last_name,email) select employee_seq.nextval,lastName,email from{" close="}"> select #{emp.lastName} lastName,#{emp.email} email from dual </foreach> </insert> -
内置参数
-
不只是方法传递过来的参数可以被用来判断,取值。。。
-
mybatis默认还有两个内置参数:
-
_parameter:代表整个参数
注意:当使用@Param("别名")修饰变量后,就不能在使用"_parameter",可以使用别名 或param1 或0来获取变量中的值
单个参数:_parameter就是这个参数 多个参数:参数会被封装一个map:_parameter就代表这个map -
_databaseId:如果配置了databaseIdProvider标签【全局配置文件中】
_databaseId 就是代表当前数据的别名【全局配置文件中】
-
-
_parameter 示例
当使用@Param("employee")修饰变量后,就不能在使用"_parameter",可以使用employee或param1来获取变量中的值 <!--public List<Employee> getEmployeeTestInnerParameter(@Param("employee") Employee employee);--> 单个参数错误写法 <!--public List<Employee> getEmployeeTestInnerParameter(Employee employee);--> <select id="getEmployeeTestInnerParameter" resultType="com.ll.mybatis.entity.Employee"> select id, last_name, email, gender from tbl_employee <!--下面写法错误,list类型形参employee没有使用@param修饰,不能直接使用employee,mybatis会误认为是对象中的属性--> <if test="employee != null"> <!--<if test="_parameter!=null">--> <where> <if test="employee.lastName!=null"> last_name=#{employee.lastName} </if> <if test="employee.email!=null"> and email=#{employee.email} </if> </where> </if> </select> 单个参数正确写法 <!--public List<Employee> getEmployeeTestInnerParameter(Employee employee);--> <select id="getEmployeeTestInnerParameter" resultType="com.ll.mybatis.entity.Employee"> select id, last_name, email, gender from tbl_employee <if test="_parameter!=null"> <where> <!--获取属性_parameter可以省略--> <if test="_parameter.lastName!=null"> last_name=#{lastName} </if> <if test="email!=null"> and email=#{_parameter.email} </if> </where> </if> </select> -
_databaseId 示例:(mysql,oracle通用) 查询根据id查询员工,如果为null则查询全部
  <!--根据不同的数据库执行不同的内容-->
  <!--public List<Employee> getEmpsTestInnerParameter(Employee employee);-->
  <select id="getEmpsTestInnerParameter" resultType="emp">
      <if test="_databaseId=='oracle'">		Oracle
          select * from employees
      </if>
      <if test="_databaseId=='mysql'">		MySQL
          select * from employees
          <if test="_parameter!=null">
              <!--where last_name=#{lastName}-->  两种都可以
              where id=#{_parameter.id} <!--等同 对象.属性-->
          </if>
      </if>
  </select>
bind
-
可以将ognl表达式的值绑定到一个变量中,方便后来引用这个变量的值。
<select id="getEmpsTestInnerParameter" resultType="emp">
    <!--bind:可以将ognl表达式的值绑定到一个变量中,方便后来引用这个变量的值-->
    <!--将value 赋值给name-->
    <bind name="_lastName" value="'_'lastName+'%'"/>
    <if test="_databaseId=='mysql'">
        select * from employees
        <if test="_parameter!=null">
            where last_name like#{_lastName}  <!--拿值-->
        </if>
    </if>
</select>
sql 【include】
-
sql标签;抽取可重用的sql片段。方便后面引用
- slq抽取,经常将要查询的列名,或者插入用的列名,包括动态判断抽取出来方便引用。
- include来引用已经抽取的sql。
- include还可以自定义一些property,sql标签内部就能使用自定义的属性
include-property:取值的正确方式 ${prop}
#{不能使用这种方式 }
<sql id="insertColumn">
    <if test="_databaseId=='mysql'">
        last_name,gender,email
    </if>
</sql>
<insert id="">
    insert into employees
    (
        <!--引用外部定义的sql-->
        <include refid="insertColumn">
            <!--自定义property,取值 ${name},【#{}不能取值】-->
            <property name="temp" value="abc"/>
        </include>
    )
    values(#{lastName},#{gender},#{email},${temp})
</insert>
六,MyBatis 缓存机制
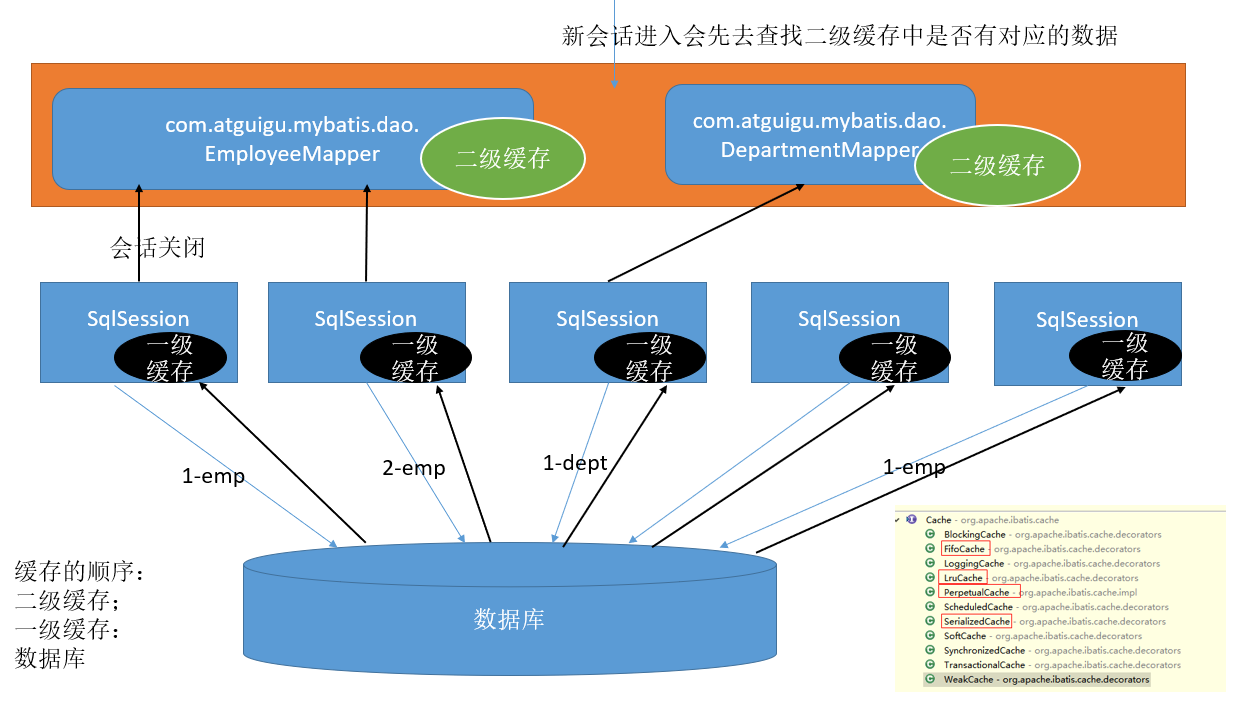
- MyBatis 包含一个非常强大的查询缓存特性,它可以非常方便地配置和定制。缓存可以极大地提升查询效率。
- MyBatis 系统中默认定义了两级缓存。
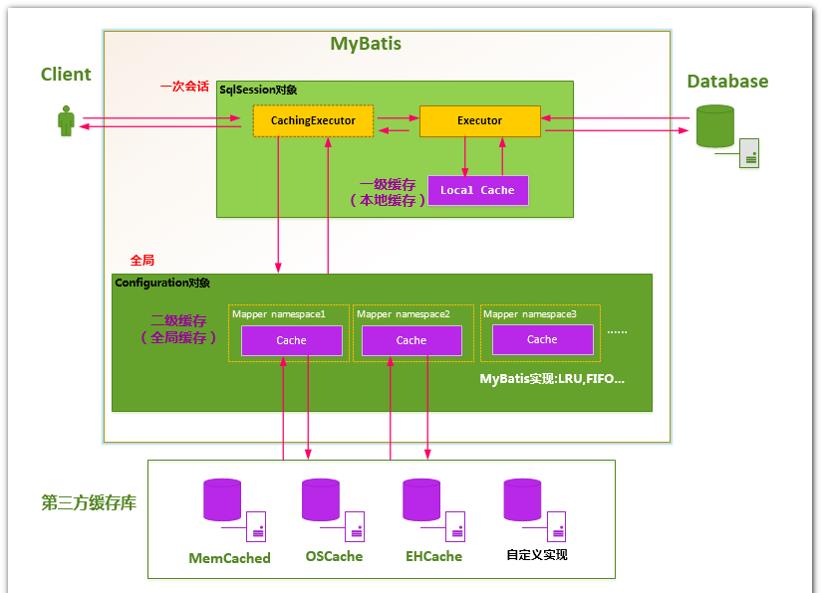
- 一级缓存【本地缓存】和二级缓存【全局缓存】
- 默认情况下,只有一级缓存(SqlSession级别地缓存称为本地缓存)开启。
- 二级缓存需要手动开启和配置,它是基于namespace级别地缓存。
- 为了提交扩展性。MyBatis定义了缓存接口 Cache。我们可以通过实现 Cache接口来自定义二级缓存。
一级缓存
-
一级缓存(local cache),及本地缓存,作用域默认为 SqlSession。当Session flush或close后,该 Session中的所有 Cache将被清空。
-
本地缓存不能被关闭,但可以调用 clearCache() 来清空本地缓存,或者改变缓存的作用域。
在 mybatis.xml中配置
localCacheScope MyBatis 利用本地缓存机制【local Cache】防止循环引用【circular references】和加速重复嵌套查询。默认值为SESSION,这种情况下会会缓存一个会话执行的所有查询。若设置值为STATEMENT,本地会话仅用在语句执行上,对相同SqlSession的不同调用将不会共享数据。 SESSION | STATEMENT SESSION -
同一次会话期间只要查询过的数据都会保存在当前 SqlSession 的也给Map中。
key:hashCode+查询的Sqlld+编写的sql查询语句+参数
-
一级缓存失效地情况【没有使用到当前一级缓存地情况。效果就是,还需要在向数据库发出查询】
1. SqlSession不同
2. SqlSession相同,查询条件不同。【当前一级缓存中还没有这个数据】
3. SqlSession相同,两次查询期间执行了增删改操作。【这次增删改可能对当前数据有影响】
4. SqlSession相同,手动清除了一级缓存【缓存清空】
	SqlSession-clearCache();//清空缓存
二级缓存
-
工作机制:
1. 一个会话,查询一条数据,这个数据就被放在当前会话地一级缓存中。 2. 如果会话关闭,一级缓存中地数据会被保存到二级缓存中。新的会话查询信息,就可以参照二级缓存中地内容。 3. SqlSession == EmployeesMapper==》Employees DepartmentMapper==》Department 不同namespace查询出的数据会放在自己对应地缓存中(map) -
使用步骤:
1. 开启全局二级缓存配置【在全局配置文件中】: <setting name="cacheEnabled" value="true"/> 2.去mapper.xml【sql映射文件】中配置使用二级缓存 使用<cache/>标签 <cache eviction="LRU" flushInterval="60000" readOnly="false" size="1024"></cache> 3. 我们的 POJO 需要实现序列化接口 serializable -
效果
数据会从二级缓存中获取
查询对的数据都会被默认先放在一级缓存中。
只有会话提交或者关闭以后,一级缓存中的数据才会被转移到二级缓存中。
case相关的属性
-
eviction:缓存的回收策略。
- LRU –最近最少使用的:移除最长时间不被使用的对象。
- FIFO –先进先出:按对象进入缓存的顺序来移除它们。
- SOFT –软引用:移除基于垃圾回收器状态和软引用规则的对象。
- WEAK –弱引用:更积极地移除基于垃圾收集器状态和弱引用规则的对象。
默认的是 LRU。
-
flushInterval:刷新间隔,单位毫秒
默认情况是不设置,也就是没有刷新间隔,缓存仅仅调用语句时刷新
-
readOnly:是否只读。
true:只读。mybatis认为所有从缓存中获取数据的操作都是只读操作,不会修改数据。
mybatis为了加快获取速度,直接会将数据在缓存中的引用交给用户。不安全,速度快。
false:非只读。mybatis觉得获取的数据可能会被修改。
mybatis会利用序列化&反序列的技术克隆一份新的数据给你。安全速度慢。 -
size:缓存存放多少元素。
-
type=""。指定自定义缓存的全类名。【用的是默认的】
自定义缓存的类实现Cache接口即可,将实现的类全类名写在type上即可。
缓存相关设置 / 属性
-
cacheEnabled=true【true默认】 开启缓存 。【mybatis 全局配置文件 settings】
false 关闭缓存【二级缓存关闭,一级缓存一直可用】
-
每个select 标签都有 useCache="true"
false:不使用缓存【一级缓存依然使用,二级缓存不使用】
-
每个增删改标签的:flushCache="true"【true默认】
每个增删改执行完以后就会清除缓存
flushCache="true",【一级缓存清空,二级缓存也清空】
查询标签:flushCache="false"【默认】
如果flushCache=true,每次查询之后都会清空缓存,缓存是没有被使用的。
-
SqlSession.clearCache(),只是清除当前 session 的一级缓存。【SqlSession 对象】
-
localCacheScope=SESSION【默认】:本地缓存作用域【一级缓存session】当前会话的所有数据保存在会话缓存中
STATEMENT:可以禁用一级缓存【mybatis 全局配置文件 settings】
第三方缓存整合
EhCache 是一个纯Java的进程内缓存框架,具有快速,精干等特点,是 Hibernate默认的 CacheProvider。
Mybatis 定义了 Cache接口方便我们进行自定义扩展
步骤
-
导入第三方缓存整合的适配包。官方有。。
ehcache-core-2.6.8.jar、mybatis-ehcache-1.0.3.jar、slf4j-api-1.6.1.jar、slf4j-log4j12-1.6.2.jar
-
类路径下放一个 ehcache.xml 文件
<?xml version="1.0" encoding="UTF-8"?> <ehcache xmlns:xsi="http://www.w3.org/2001/XMLSchema-instance" xsi:noNamespaceSchemaLocation="../config/ehcache.xsd"> <!-- 磁盘保存路径 --> <diskStore path="D:44ehcache" /> <defaultCache maxElementsInMemory="10000" maxElementsOnDisk="10000000" eternal="false" overflowToDisk="true" timeToIdleSeconds="120" timeToLiveSeconds="120" diskExpiryThreadIntervalSeconds="120" memoryStoreEvictionPolicy="LRU"> </defaultCache> </ehcache> <!-- 属性说明: l diskStore:指定数据在磁盘中的存储位置。 l defaultCache:当借助CacheManager.add("demoCache")创建Cache时,EhCache便会采用<defalutCache/>指定的的管理策略 以下属性是必须的: l maxElementsInMemory - 在内存中缓存的element的最大数目 l maxElementsOnDisk - 在磁盘上缓存的element的最大数目,若是0表示无穷大 l eternal - 设定缓存的elements是否永远不过期。如果为true,则缓存的数据始终有效,如果为false那么还要根据timeToIdleSeconds,timeToLiveSeconds判断 l overflowToDisk - 设定当内存缓存溢出的时候是否将过期的element缓存到磁盘上 以下属性是可选的: l timeToIdleSeconds - 当缓存在EhCache中的数据前后两次访问的时间超过timeToIdleSeconds的属性取值时,这些数据便会删除,默认值是0,也就是可闲置时间无穷大 l timeToLiveSeconds - 缓存element的有效生命期,默认是0.,也就是element存活时间无穷大 diskSpoolBufferSizeMB 这个参数设置DiskStore(磁盘缓存)的缓存区大小.默认是30MB.每个Cache都应该有自己的一个缓冲区. l diskPersistent - 在VM重启的时候是否启用磁盘保存EhCache中的数据,默认是false。 l diskExpiryThreadIntervalSeconds - 磁盘缓存的清理线程运行间隔,默认是120秒。每个120s,相应的线程会进行一次EhCache中数据的清理工作 l memoryStoreEvictionPolicy - 当内存缓存达到最大,有新的element加入的时候, 移除缓存中element的策略。默认是LRU(最近最少使用),可选的有LFU(最不常使用)和FIFO(先进先出) --> -
mapper.xml中使用自定义缓存。
<cache type="org.mybatis.caches.ehcache.EhcacheCache">
	<properties name="timeToIdleSeconds" value="3600"/> 。。。
</cache>
参照缓存:若想在命名空间中共享相同的缓存配置和实例。可以使用cache-ref 元素来引用另外一个缓存
<cache-ref namespace="com.cainiao.dao.Employees"/> -
流程图
七,MyBatis Spring整合
-
查看不同MyBatis版本整合Spring时使用的适配包;
-
官方整合示例,jpetstore
https://github.com/mybatis/jpetstore-6
八,MyBatis 逆向工程
-
MyBatis Generator
简称MBG,是一个专门为MyBatis框架使用者定制的代码生成器,可以快速的根据表生成对应的映射文件,接口,以及bean类。支持基本的增删改查,以及QBC风格的条件查询。但是表连接,存储过程等这些复杂sql的定义需要我们手工编写
MGB使用
-
使用步骤:
-
编写MBG的配置文件【重要几处配置】
-
jdbcConnection 配置数据库连接信息
-
javaModelGenerator 配置JavaBean映射文件生成策略
-
sqlMapGenerator 配置sql映射文件生成策略
-
javaClientGenerator 配置Mapper接口的生成策略
-
table 配置要逆向解析的数据表
tableName:表名
domainObjectName:对应的JavaBean名
-
-
运行代码生成器生成代码
import org.junit.Test; import org.mybatis.generator.api.MyBatisGenerator; import org.mybatis.generator.config.Configuration; import org.mybatis.generator.config.xml.ConfigurationParser; import org.mybatis.generator.internal.DefaultShellCallback; import java.io.File; import java.util.ArrayList; public class TestMgb { @Test public void test1() { try { ArrayList<String> warnigs = new ArrayList<>(); boolean overwrite = true; File configFile = new File("mbg.xml");//该项目下 ConfigurationParser cp = new ConfigurationParser(warnigs); Configuration config = cp.parseConfiguration(configFile); DefaultShellCallback callback = new DefaultShellCallback(overwrite); MyBatisGenerator myBatisGenerator = new MyBatisGenerator(config, callback, warnigs); myBatisGenerator.generate(null); } catch (Exception e) { e.printStackTrace(); } } } -
注意:
Context:标签
targetRuntime="MyBatis3" 可以生成带条件的增删改查
targetRuntime="MyBatis3Simple" 可以生成基本的增删改查
如果再次生成,建议将之前生成的数据删除,避免xml向后追加内容出现的问题。
-
mbg配置文件
<?xml version="1.0" encoding="UTF-8"?>
<!DOCTYPE generatorConfiguration
        PUBLIC "-//mybatis.org//DTD MyBatis Generator Configuration 1.0//EN"
        "http://mybatis.org/dtd/mybatis-generator-config_1_0.dtd">

<generatorConfiguration>
    <!--导入架包-->
    <!--<classPathEntry location="/Program Files/IBM/SQLLIB/java/db2java.zip" />-->
    <!--
    一个数据库一个 context
    targetRuntime="MyBatis3Simple" :生成简单版的crud
    targetRuntime="MyBatis3" :豪华版
    -->
    <context id="DB2Tables" targetRuntime="MyBatis3">

                <!-- 生成的Java文件的编码 -->
        <property name="javaFileEncoding" value="UTF-8"/>
        <!-- 格式化java代码 -->
        <property name="javaFormatter" value="org.mybatis.generator.api.dom.DefaultJavaFormatter" />
        <!-- 格式化XML代码 -->
        <property name="xmlFormatter" value="org.mybatis.generator.api.dom.DefaultXmlFormatter" />
        <!--添加分隔符-->
        <property name="beginningDelimiter" value="'"></property>
        <property name="endingDelimiter" value="'"></property>


        <!--默认生成getter/setter方法,使用插件忽略生成getter/setter方法-->
        <!--<plugin type="com.mybatis.plugin.IngoreSetterAndGetterPlugin" />-->
        <!--用于在实体类中实现java.io.Serializable接口-->
        <plugin type="org.mybatis.generator.plugins.SerializablePlugin"></plugin>
        <!--用于重写equals 和 hashCode 方法-->
        <plugin type="org.mybatis.generator.plugins.EqualsHashCodePlugin">
            <property name="useEqualsHashCodeFromRoot" value="true"/>
        </plugin>
        <!--用于生成 toString 方法-->
        <plugin type="org.mybatis.generator.plugins.ToStringPlugin">
            <property name="useToStringFromRoot" value="true"/>
        </plugin>

        <!--生成注释信息的配置-->
        <commentGenerator>
            <!--阻止生成注释,默认为false-->
            <property name="suppressAllComments" value="true"></property>
            <!--阻止生成的注释包含时间戳,默认为false-->
            <property name="suppressDate" value="true"></property>
            <!--注释是否添加数据库表的备注信息,默认为false-->
            <property name="addRemarkComments" value="true"></property>
        </commentGenerator>

        <!--jdbcConnection:指定如何连接到数据库-->
        <jdbcConnection
                driverClass="com.mysql.jdbc.Driver"
                connectionURL="jdbc:mysql://localhost:3306/test?allowMultiQueries=true"
                userId="root"
                password="root">
        </jdbcConnection>
        <!--Java类型解析器-->
        <javaTypeResolver>
            <!-- 默认为false,可以把数据库中的decimal以及numeric类型解析为Integer,
            为true时会解析为java.math.BigDecimal) -->
            <property name="forceBigDecimals" value="false"/>
        </javaTypeResolver>

        <!--生成实体类地址
        javaModelGenerator:指定JavaBean的生成策略
                targetPackage=目标报名
                targetProject=目标工程
        -->
        <javaModelGenerator targetPackage="com.zhiyou103.pojo" targetProject=".src">
            <property name="enableSubPackages" value="true"/>
            <!-- 是否针对string类型的字段在set的时候进行trim调用 -->
            <property name="trimStrings" value="true"/>
        </javaModelGenerator>
        <!--sqlMapGenerator:sql映射生成映射策略-->
        <sqlMapGenerator targetPackage="com.zhiyou103.mapper" targetProject=".src">
            <!-- 是否在当前路径下新加一层schema,
            如果为fase路径com.shop.dao.mapper,
             为true:com.shop.dao.mapper.[schemaName]
             这个情况主要是oracle中有,mysql中没有schema -->
            <property name="enableSubPackages" value="true"/>
        </sqlMapGenerator>
        <!--mapper接口生成位置
        javaClientGenerator:指定mapper接口所在的位子-->
        <javaClientGenerator type="XMLMAPPER" targetPackage="com.zhiyou103.dao" targetProject=".src">
            <property name="enableSubPackages" value="true"/>
        </javaClientGenerator>
        <!--指定要逆向分析那些表:根据表创建JavaBean-->
        <!--        <table tableName="" domainObjectName=""/>-->
        <table tableName="tab_class" domainObjectName="MyClass"/>
    </context>
</generatorConfiguration>
测试
@Test
public void test2() {
    try (SqlSession session = getSession()) {
        EmployeesMapper mapper = session.getMapper(EmployeesMapper.class);
        //1. 查询所有
        //xxxExample 就是封装查询条件的
        //mapper.selectByExample(null).forEach(e -> System.out.println(e.getLastName()));

        //2. 查询员工名字中含有a字母的,和员工性别是女的
        //select id,last_name,email,gender d_id from employees where last_name like ? and gender = ?
        //封装查询条件的 example
        EmployeesExample example = new EmployeesExample();
        //创建一个Criteria,这个Criteria就是拼装查询条件
        EmployeesExample.Criteria criteria = example.createCriteria();
        criteria.andLastNameLike("%e%");
        criteria.andGenderEqualTo("女");
        mapper.selectByExample(example).forEach(
                e -> System.out.println(e.getLastName())
        );
        //where (last_name like ? and gender = ?) or email like "?"
        EmployeesExample.Criteria criteria2 = example.createCriteria();
        criteria2.andEmailLike("%e%");
        example.or(criteria2);
    } catch (Exception e) {
        e.printStackTrace();
    }
}
九,MyBatis 工作原理
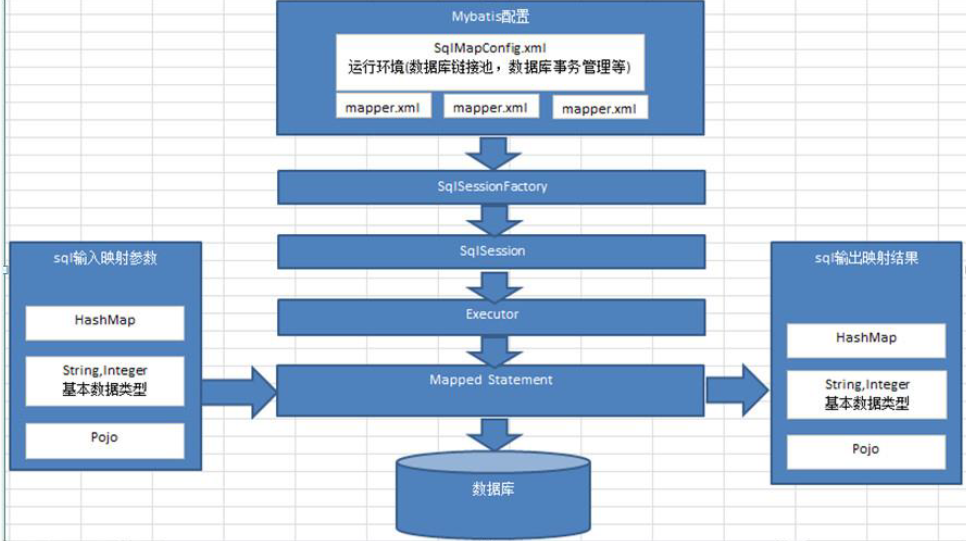
-
根据全局配置文件按获取 SqlSessionFactory 对象
-
SqlSessionFactoryBuilder。创建SqlSessionFactoryBuilder对象
-
build(inputStream)。
-
XmlConfigBuild。创建解析器parser
-
Configuratoion。解析每一个标签把详细信息保存在Configuration中【Configuration封装了所有配置文件的详细信息】
-
解析mapper.xml。
Mapper.xml中的每一个元素信息解析出来并保存在全局配置中,将增删改查标签的每一个属性都解析出来,封装成一个
MappedStatement:一个MappedStatement就代表一个增删改查标签的详细信息
-
返回Configuration
-
build(Configuration)
-
DefaultSqlSessionFactory。new DefaultSqlSession()
-
返回创建的DefaultSqlSession,包含了保存全局配置信息的Configuration
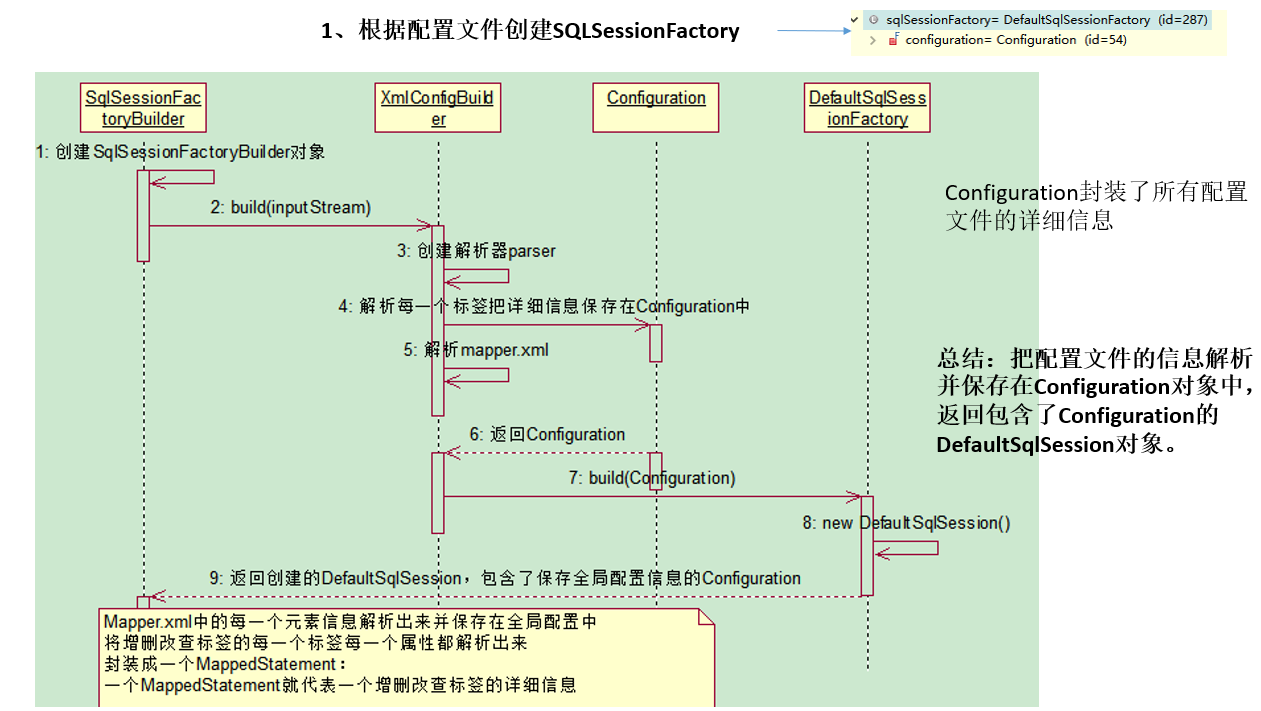
总结:把配置文件的信息解析并保存在Configuraton对象中,返回包含了Configuration的DefaultSqlSession对象。
-
-
获取SqlSession 对象
- DefaultSqlSessionFactory。调用openSession方法,就是调用
【openSessionFromDataSource(this.configuration.getDefaultExecutorType(), (TransactionIsolationLevel)null, false);】
-
openSessionFromConnection。获取一些配置信息,创建事务 tx;创建执行器 newExecutor
-
this.configuration.newExecutor ;创建Executor【使用来增删改查的】。
根据Executor在全局配置中的类型,创建出 BatchExecutor/ReuseExecutor/SimpleExecutor。
如果有二级缓存配置开启,就创建CachingExecutor(executor);
Executor executor = (Executor)this.interceptorChain.pluginAll(executor); 使用每一个拦截器 重新包装executor并返回。
-
new DefaultSqlSession(this.configuration, executor, autoCommit); 创建DefaultSqlSession,包含Configuration和Executor
-
返回DefaultSqlSession。
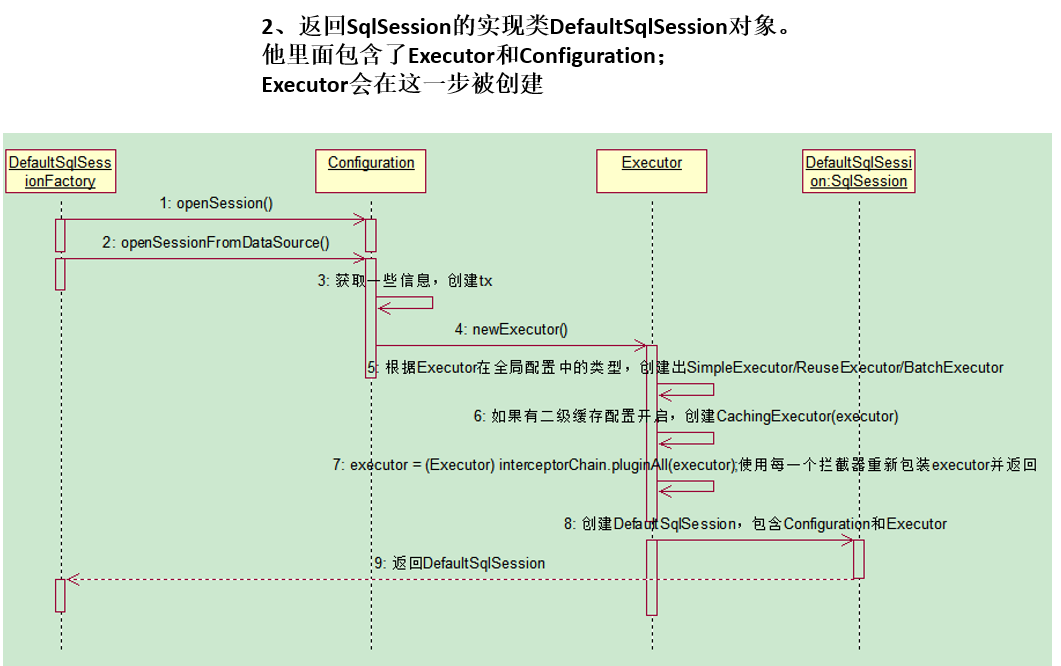
总结:返回DefaultSqlSession对象,包含Executor和Configuration;这一步会创建Executor对象。
-
获取接口的实现类【代理对象 MapperProxy】
会为接口自动创建一个代理对象,代理对象去执行增删改查的方法
-
DefaultSqlSession.getMapper((Class
type);。调用的是 configuration.getMapper(type, this); 【this就是本身】 -
Configuration.getMapper(Class
type, SqlSession sqlSession);。调用mapperRegistry.getMapper(type, sqlSession); -
MapperRegistry.getMapper(Class
type, SqlSession sqlSession);。
根据接口类型,创建映射器代理工厂【MapperProxyFactory】
MapperProxyFactory
mapperProxyFactory = (MapperProxyFactory)this.knownMappers.get(type); 判断MapperProxyFactory是否为空,
最终调用 mapperProxyFactory.newInstance(sqlSession);
- MapperProxyFactory.newInstance(SqlSession sqlSession)
创建MapperProxy【映射器代理】,它是一个InvocationHandler:
MapperProxy
mapperProxy = new MapperProxy(sqlSession, this.mapperInterface, this.methodCache); 调用 this.newInstance(MapperProxy
mapperProxy) 创建MapperProxy的代理对象并 返回:
Proxy.newProxyInstance(this.mapperInterface.getClassLoader(), new Class[]{this.mapperInterface}, mapperProxy);
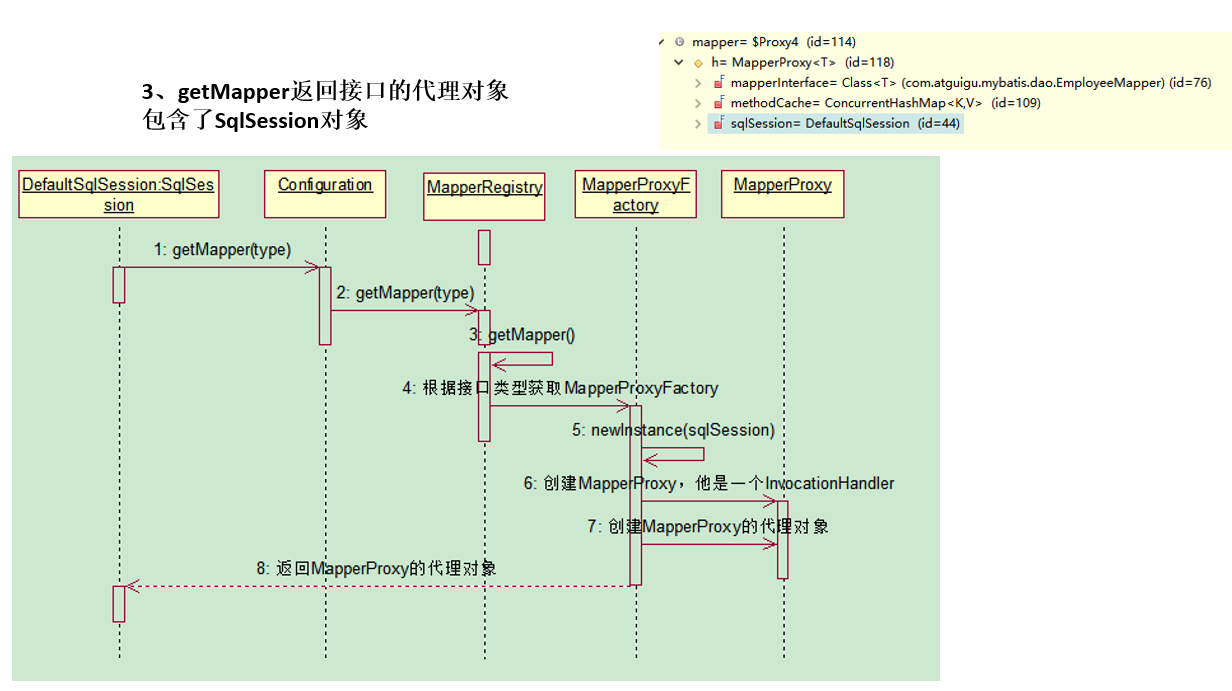
总结:getMapper,使用MapperProxyFactory创建一个MapperProxy的代理对象,代理对象里面包含了,DefaultSqlSession(Executor)
-
-
执行增删改查
- MapperProxy.invoke(Object proxy, Method method, Object[] args)
如果是Object不是接口的就直接执行,否则就
MapperMethod mapperMethod = this.cachedMapperMethod(method);
执行 mapperMethod.execute(this.sqlSession, args);
- MapperMethod.execute(SqlSession sqlSession, Object[] args)
先判断SqlCommand的类型是 增删改查类型。
查,包装参数为一个map或者直接返回
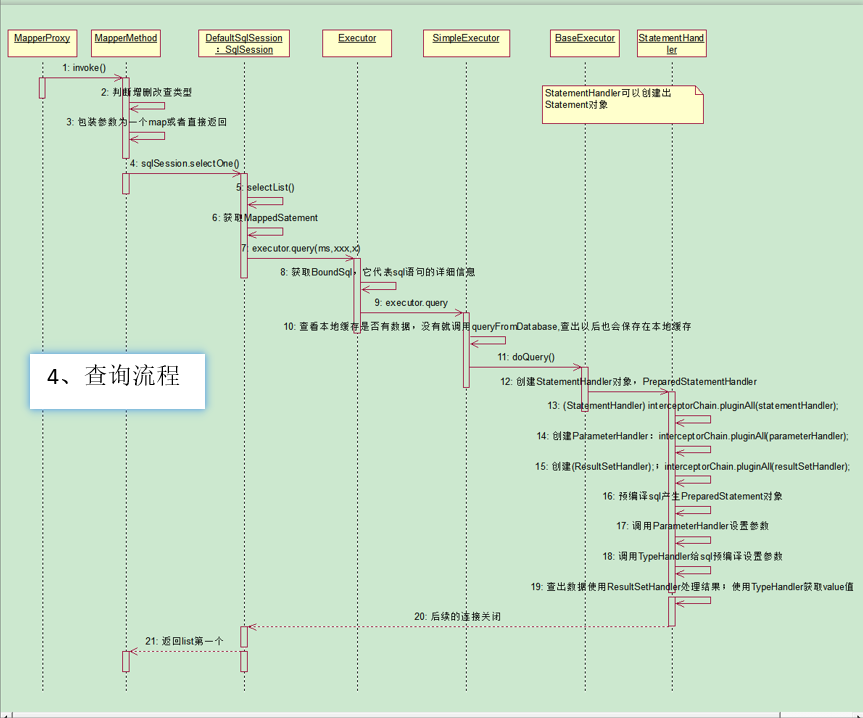
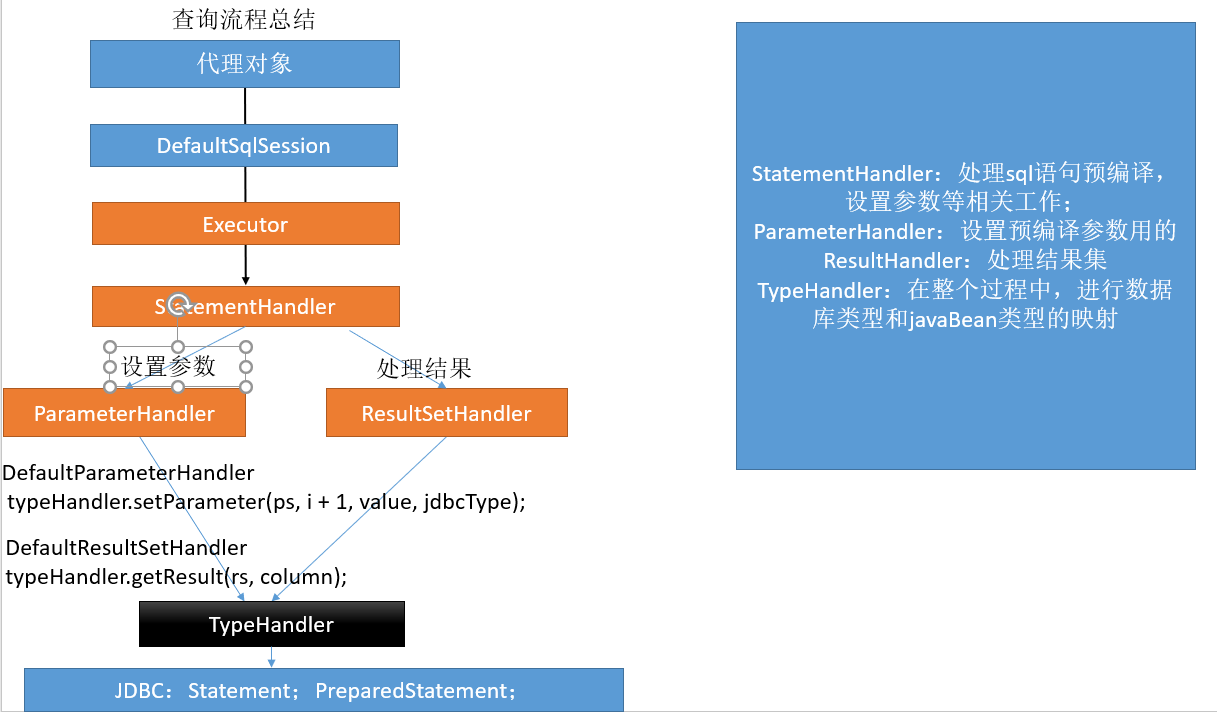
总结:代理对象-》DefaultSqlSession-》Executor-》StatementHandler:处理sql语句预编译,设置参数等相关工作-》ParameterHandler:设置预编译参数,ResultSetHandler:处理查询结果集-》TypeHandler:在整个过程中,进行数据库和JavaBean类型的映射。jdbc:Statement:PreparedStatement
-
总结:
-
根据配置文件(全局,sql映射)初始化Configuration对象
-
创建一个DefaultSqlSession对象
它里面包含Configuration以及
Executor(根据全局配置文件中的DefaultExecutorType创建出对应的Executor)
-
DefaultSqlSessio.getMapper()。拿到Mapper接口对应的MapperProxy
-
MapperProxy里面有(DefaultSqlSession)
-
执行增删改查方法:
- 调用DefaultSqlSession的增删改查(Executor)
- 会创建一个StatementHandler对象(同时也会创建出ParameterHandler和ResultSetHandler)
- 调用StatementHandler预编译参数以及设置参数值,调用ParameterHandler来给sql设置参数
- 调用StatemnetHandler的增删改查方法
- ResultSetHandler封装结果
-
返回结果
注意:四大对象每个创建的时候都有一个这样的代码
interceptorChain.pluginall(parameterHandler);
-
十,MyBatis 插件开发
- MyBatis 在四大对象的创建过程中,都会有插件进行介入。插件可以利用动态代理机制一层层的包装目标对象,而实现在目标对象执行目标方法之前进行拦截的效果。
- MyBatis 允许在已映射语句执行过程中的某一点进行拦截调用。
- 默认情况下,MyBatis 允许使用插件来拦截的方法调用包括
- Executor(update,query,flushStatements,commit,rollbacj,getTrasaction,close,isCosed)
- ParameterHandler(getParameterObject,setParameters)
- ResultSetHandler(handlerResultSet,HandleOutputParameters)
- StatementHandler(prepare,parameterize,batch,update,query)
插件开发
-
编写Interceptor的实现类
-
使用@Intercepts注解【里面是@Signature数组】完成插件签名
//@Intercepts,完成插件签名:告诉MyBatis当前插件用来拦截那个对象的那个方法 @Intercepts({ @Signature(type = StatementHandler.class, method = "parameterize", args = java.sql.Statement.class) }) public class MyFirstPlugin implements Interceptor { //intercept拦截,拦截目标对象的目标方法的执行 @Override public Object intercept(Invocation invocation) throws Throwable { //打印拦截的目标方法 System.out.println("MyFirstPlugin intercept:拦截方法:" + invocation.getMethod()); //执行目标方法:只有执行了proceed方法目标方法,给放行了,目标方法才会执行。 Object proceed = invocation.proceed(); //返回执行后的返回值 return proceed; } //plugin:包装目标对象的:包装:为目标对象创建一个代理对象。 @Override public Object plugin(Object target) { //Mybatis将要包装的对象 System.out.println("MyFirstPlugin plugin:包装的对象是:" + target); //我们可以借助Plugin的wrap方法来使用当前类Interceptor包装我们目标对象 Object wrap = Plugin.wrap(target, this); //返回当前target创建的动态代理 return wrap; } //setProperties:将插件注册的Property属性设置进来 @Override public void setProperties(Properties properties) { System.out.println("插件配置的信息是:" + properties); } } -
将写好的插件注册到全局配置文件中
    <!--plugins:注册插件-->
    <plugins>
        <!--interceptor就是插件的全类名-->
<!--        <plugin interceptor="com.com.cainiao.dao.MyFirstPlugin">-->
            <!--传入的key value,就会在setProperties方法包装成properties-->
<!--            <property name="username" value="root"/>-->
<!--            <property name="password" value="1234"/>-->
<!--        </plugin>-->
        <plugin interceptor="com.cainiao.dao.MySecondPlugin"/>
    </plugins>
插件原理
-
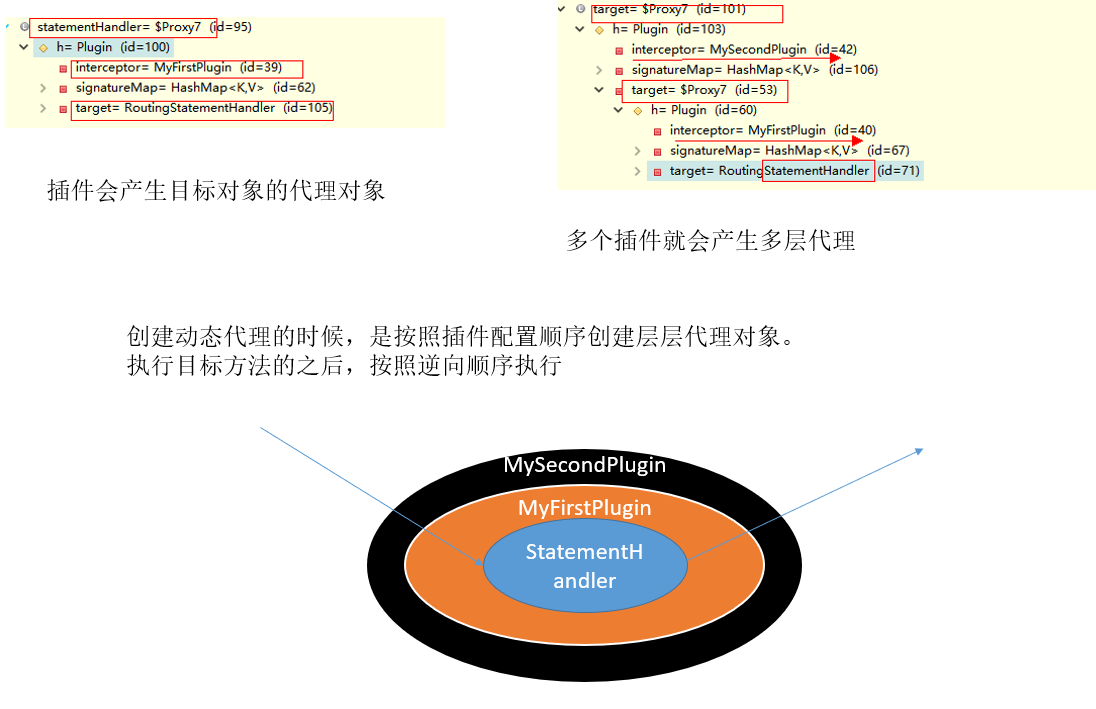
按照插件注解声明,按照插件配置顺序调用plugin方法,生成被拦截对象的动态代理。
-
多个插件依此生成目标对象的代理对象,层层包裹,先声明的先包裹;形成代理链
-
目标方法执行时依此从外到内执行插件的intercept方法
-
多个插件情况下,我们往往需要在某个插件中分离出目标对象。可以借助MyBatis提供的SystemMetaObject类来进行获取最后一层的h以及target属性的值
Interceptor接口
- intercept:拦截目标方法执行
- plugin:生成动态代理对象,可以使用MyBatis提供的Plugin类的wrap方法
- setProperties:注入插件配置时设置的属性
插件开发
-
动态的改变一下sql运行的参数,以前查询1号员工,实际从数据库查询3号员工
-
注意:将写好的插件注册到全局配置文件中
@Intercepts({
        @Signature(type = StatementHandler.class, method = "parameterize", args = java.sql.Statement.class)
})
public class MySecondPlugin implements Interceptor {
    @Override
    public Object intercept(Invocation invocation) throws Throwable {
        System.out.println("MySecondPlugin intercept:拦截方法:" + invocation.getMethod());
        //动态的改变一下sql运行的参数,以前查询1号员工,实际从数据库查询3号员工
        Object target = invocation.getTarget();
        System.out.println("当前拦截到的对象:" + target);
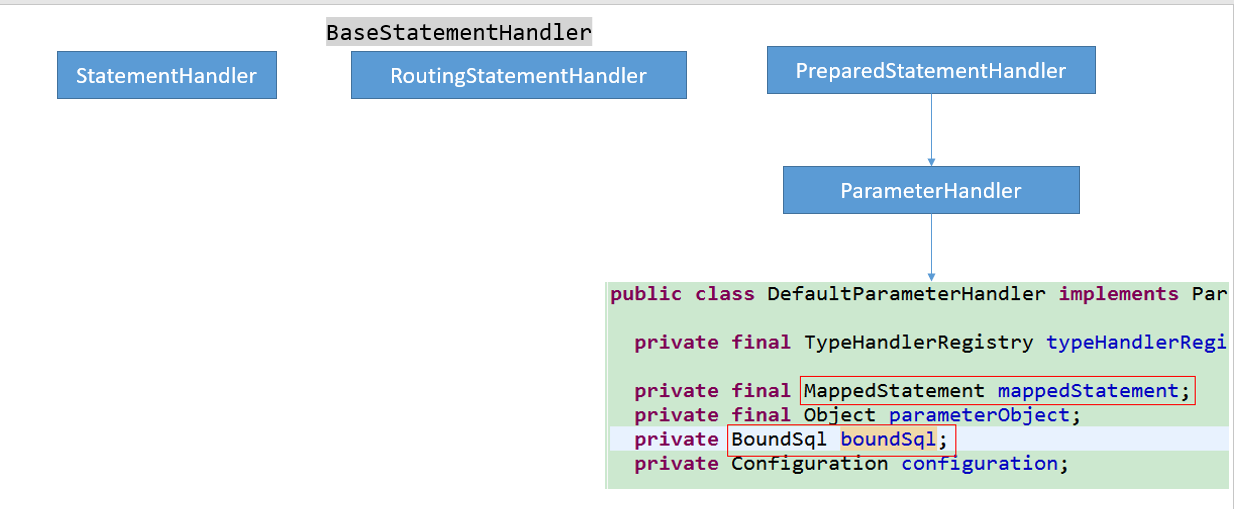
        /*StatementHandler=》RoutingStatementHandler。根据类型创建PreparedStatementHandler
         =》PreparedStatementHandler借助parameterHandler=》parameterHandler我们用的都是DefaultParameterHandler
         =》DefaultParameterHandler.parameterObject
         */
        //拿到:StatementHandler=》PreparedStatementHandler==》parameterObject
        //使用SystemMetaObject.forObject(),拿到target的元数据
        MetaObject metaObject = SystemMetaObject.forObject(target);
        //获取sql参数值
        Object value = metaObject.getValue("parameterHandler.parameterObject");
        System.out.println("sql语句用的参数是:" + value);
        //修改完sql语句要用的参数
        metaObject.setValue("parameterHandler.parameterObject", 3);

        //执行方法
        return invocation.proceed();
    }

    @Override
    public Object plugin(Object o) {
        System.out.println("MySecondPlugin plugin:包装的对象是:" + o);
        //我们可以借助Plugin的wrap方法来使用当前类Interceptor包装我们目标对象
        return Plugin.wrap(o, this);
    }
    @Override
    public void setProperties(Properties properties) { }
}
十一, 扩展
PageHelper插件进行分页
-
PageHelper是MyBatis中非常方便的第三方分页插件。
-
官方文档:
https://github.com/pagehelper/Mybatis-PageHelper/blob/master/README_zh.md
使用步骤
-
导入相关包 pagehelper-x.x.x.jar 和 jsqlparser-0.9.5.jar
-
在MyBatis全局配置文件中配置分页插件
<plugins> <!-- com.github.pagehelper为PageHelper类所在包名 --> <plugin interceptor="com.github.pagehelper.PageInterceptor"> <!-- 使用下面的方式配置参数,后面会有所有的参数介绍 --> <property name="param1" value="value1"/> </plugin> </plugins> -
使用PageHelper提供的方法进行分页
-
可以使用更强大的PageInfo封装返回结果
    @Test
    public void test2() throws IOException {
        //1. 获取SqlSessionFactory对象
        String resource = "conf/mybatis.xml";
        InputStream inputStream = Resources.getResourceAsStream(resource);
        SqlSessionFactory sqlSessionFactory = new SqlSessionFactoryBuilder().build(inputStream);
        //2. 获取SqlSession对象
        SqlSession session = sqlSessionFactory.openSession();
        //3. 获取接口实现对象
        //会为接口自动的创建一个代理对象,代理对象去执行增删改查方法
        EmployeeMapperDao mapper = session.getMapper(EmployeeMapperDao.class);

        //使用PageHelper实现分页查询
        Page<Object> page = PageHelper.startPage(5, 1);
        //4. 调用方法
        List<Employees> list = mapper.getEmp();
        ////用PageInfo对结果进行包装
        PageInfo<Employees> info = new PageInfo<>(list, 5);//navigatePages 页码数量

        list.forEach(System.out::println);
//        System.out.println("当前页码:" + page.getPageNum());
//        System.out.println("总记录数:" + page.getTotal());
//        System.out.println("每页记录数:" + page.getPageSize());
//        System.out.println("总页码:" + page.getPages());
        System.out.println("当前页码:" + info.getPageNum());
        System.out.println("总记录数:" + info.getTotal());
        System.out.println("每页记录数:" + info.getPageSize());
        System.out.println("总页码:" + info.getPages());
        System.out.println("是否第一页:" + info.isIsFirstPage());
        //等等等
        System.out.println("连续显示的页码");
        for (int i = 0; i < info.getNavigatepageNums().length; i++) {
            System.out.print(info.getNavigatepageNums()[i] + " ");
        }
        //5. 关闭会话
        session.close();
    }
批量操作
-
默认的 openSession() 方法没有参数,它会创建如下特性的。
- 会开启一个事务【也就是不自动提交】。
- 连接对象会从活动环境配置的数据源实例得到。
- 事务隔离级别将会使用驱动或数据的默认设置。
- 预处理语句不会复用,也不会批量判断更新。
-
openSession 方法的ExecutorType 类型的参数,枚举类型:
- ExecutorType.SIMPLE:这个执行器类型不做特殊的事情【这是默认装配的】。它为每个语句的执行创建一个新的预处理语句。
- ExecutorType.REUSE:这个执行器类型会复用预处理语句。
- ExecutorType.BATCH:这个执行器会批量执行所有更新语句。

-
批量操作我们是使用 MyBatis提供的 BatchExecutor进行的,它的底层就是通过 jdbc攒 sql的方式进行的。我们可以让它攒够一定数量后发给数据库一次。
@Test
public void test3() throws IOException {
    //1. 获取SqlSessionFactory对象
    String resource = "conf/mybatis.xml";
    InputStream inputStream = Resources.getResourceAsStream(resource);
    SqlSessionFactory sqlSessionFactory = new SqlSessionFactoryBuilder().build(inputStream);
    //2. 获取SqlSession对象
    //这个sqlSession就是可以批量操作的
    SqlSession session = sqlSessionFactory.openSession(ExecutorType.BATCH);
    //3. 获取接口实现对象
    //会为接口自动的创建一个代理对象,代理对象去执行增删改查方法
    EmployeeMapperDao mapper = session.getMapper(EmployeeMapperDao.class);
    /*
     * 批量【预编译sql 1次-》设置参数1w次】:Parameters:616c(String),b(String),1(String)
     * 非批量【预编译sql-》设置参数-》执行,各1w次】:Updates=》Preparing=》Parameters
     * */
    long begin = System.currentTimeMillis();
    for (int i = 0; i < 100000; i++) {
        Long aLong = mapper.addEmp(new Employees(null, "李四" + i, "男", i + "liSi33@163.com"));
    }
    long end = System.currentTimeMillis();
    System.out.println("共耗时:" + (end - begin) + "毫秒");//4293
    //提交
    session.commit();
    //关闭
    session.close();
}
与Spring整合
-
与Spring整合中,我们推荐,额外的配置一个可以专门用来批量操作的 sqlSession
在创建SqlSessionFactory对象中 <!--配置批量操作--> <bean id="sqlSession" class="org.mybatis.spring.SqlsessionTemplate"> <constructor-arg name="sqlSessionFactory" ref="sqlSessionFactoryBean"></constructor-arg> <constructor-arg name="executorType" value="BATCH"></constructor-arg> </bean> -
需要用到批量的时候,我们可以注入配置的这个批量 SqlSession。通过他获取到 mapper映射器进行操作。
-
注意:
- 批量操作是在 session.commit() 以后才发动 sql语句给数据库进行执行的。
- 如果我们想让其提前执行,以方便后续可能的查询操作获取数据,我们可以使用 sqlSession.flushStatements() 方法,让其直接冲刷到数据库进行执行。
存储过程
-
实际开发中,我们通常也会写一些存储过程,MyBatis也支持对存储过程的调用
-
一个最简单的存储过程
delimiter $$ create procedure test() begin select 'hello'; end $$ delimiter ; -
存储过程的调用
- select标签中statementType=“CALLABLE”
- 标签体中调用语法:
{call procedure_name(#{param1_info},#{param2_info})}
存储过程-游标处理-Oracle
-
MyBatis对存储过程的游标提供了一个JdbcType=CURSOR的支持,可以智能的把游标读取到的数据,映射到我们声明的结果集中
-
调用实例:
publicclassPageEmp {
private int start;
private int end;
private int count;
private List <Emp> emps;
} 省略set get tostring//
# 写一个存储过程 create or replace procedure hello_test( p_start in int, p_end in int, p_count out int, ref_cur out sys_refcursor) as begin select count(*) into p_count from emp; open ref_cur for select * from (select e.*,rownum as r1 from emp e where rownum<p_end) where r1>p_start; end hello_test#oracle 连接数据 orcl.driver=oracle.jdbc.OracleDriver orcl.url=jdbc:oracle:thin:@localhost:1521:orcl orcl.username=scott orcl.password=123456<!--全局配置文件--> <environment id="oracle_dev"> <transactionManager type="JDBC" /> <dataSource type="POOLED"> <property name="driver" value="${orcl.driver}" /> <property name="url" value="${orcl.url}" /> <property name="username" value="${orcl.username}" /> <property name="password" value="${orcl.password}" /> </dataSource> </environment> <databaseIdProvider type="DB_VENDOR"> <property name="MySQL" value="mysql"/> <property name="Oracle" value="oracle"/> </databaseIdProvider><!--sql映射文件--> <select id="getPage" parameterType="PageEmp" statementType="CALLABLE" databaseId="oracle"> {call PAGE_EMP( #{satrt,mode=in,jdbcType=integer}, #{end,mode=in,jdbcType=integer}, #{count,mode=out,jdbcType=integer}, #{emps,mode=out,jdbcType=cursor,javaType=ResultSet,resultMap=TestEmp} )} </select> <resultMap type="Emp" id="TestEmp"> <id column="empno" id="id"/> <!--等。。。--> </resultMap>
typeHandler处理枚举
- 我们可以通过自定义 TypeHandler的形式来在设置参数或者取出结果集的时候自定义参数封装策略。
- 步骤:
-
实现 TypeHandler接口或者继承 BaseTypeHandler
-
使用 @MappedTypes定义处理的 java类型
使用 @MappedJdbcTypes定义 jdbcType类型 -
在自定义结果集标签或者参数处理的时候声明使用自定义
TypeHandler进行处理
或者在全局配置 TypeHandler要处理的 javaType
-
测试实例
-
一个代表部门状态的枚举类
public enum EmpStatus {
    LOGIN(100, "用户登陆"),
    LOGOUT(200, "用户登出"),
    REMOVE(300, "用户不存在");

    private Integer code; //状态码
    private String msg; //提示信息
} //省略set,get,无参,有参,根据状态返回枚举对象
-
自定义TypeHandler
public class MyEnumStatusTypeHandler implements TypeHandler<EmpStatus> { //定义当前数据如何保存到数据库中 @Override public void setParameter(PreparedStatement ps, int i, EmpStatus empStatus, JdbcType jdbcType) throws SQLException { System.out.println("要保存的状态码 = " + empStatus.getCode()); ps.setString(i, empStatus.getCode().toString());//因为数据库中是varchar类型 } // 结果集的获取方法 @Override public EmpStatus getResult(ResultSet resultSet, String s) throws SQLException { //需要根据从数据库中拿到的枚举的状态码返回一个枚举对象 int setInt = resultSet.getInt(s); System.out.println("setInt,从数据库中获取的状态码 = " + setInt); return EmpStatus.getEmpsStatusByCode(setInt); } //结果集的获取方法 @Override public EmpStatus getResult(ResultSet resultSet, int i) throws SQLException { int setInt = resultSet.getInt(i); System.out.println("setInt,从数据库中获取的状态码 = " + setInt); return EmpStatus.getEmpsStatusByCode(setInt); } //存储过程的获取方法 @Override public EmpStatus getResult(CallableStatement cs, int i) throws SQLException { int setInt = cs.getInt(i); System.out.println("setInt,从数据库中获取的状态码 = " + setInt); return EmpStatus.getEmpsStatusByCode(setInt);//根据状态返回枚举对象 } } -
sql映射文件
<insert id="addEmp" parameterType="com.cainiao.bean.Employees" useGeneratedKeys="true" keyProperty="id"> insert into employees(last_name,gender,email,empStatus) values(#{lastName},#{gender},#{email},#{empStatus}) </insert> <resultMap id="MyEmpEnum" type="com.cainiao.bean.Employees"> <id column="id" property="id"/> <result column="empStatus" property="empStatus" typeHandler="XXX"/> </resultMap> -
全局映射文件
<typeHandlers>
    <!--1. 配置我们自定义的TypeHandler-->
    <typeHandler handler="com.cainiao.dao.MyEnumStatusTypeHandler" javaType="com.cainiao.bean.EmpStatus"/>
    <!--2. 也可以在处理某个字段的时候告诉MyBatis用什么类型处理器
        保存:【在sql映射文件】 #{empStatus,typeHandler = xxx【全类名,我们定义类型处理器】}
        查询:需要自定义【在sql映射文件】 resultMap:
            <resultMap id="MyEmpEnum" type="com.cainiao.bean.Employees">
                <id column="id" property="id"/>
                <result column="empStatus" property="empStatus" typeHandler="XXX"/>
            </resultMap>
        注意:如果在参数位置修改 TypeHandler,应该保证保存数据和查询数据用的TypeHandler是一样的。
        -->
</typeHandlers>
十二,扩展 Mybatis API
目录结构
-
在我们深入 Java api之前,理解关于 目录结构的最佳实践是很重要的。和其他框架一样,目录结构有一种最佳实践。
-
典型的应用目录结构
/my_application
  /bin
  /devlib
  /lib                <-- MyBatis *.jar 文件在这里。
  /src
    /org/myapp/
      /action
      /data           <-- MyBatis 配置文件在这里,包括映射器类、XML 配置、XML 映射文件。
        /mybatis-config.xml
        /BlogMapper.java
        /BlogMapper.xml
      /model
      /service
      /view
    /properties       <-- 在 XML 配置中出现的属性值在这里。
  /test
    /org/myapp/
      /action
      /data
      /model
      /service
      /view
    /properties
  /web
    /WEB-INF
      /web.xml
SqlSession
- 使用 mybatis的主要 Java接口就是
SqlSession。你可以通过这个接口来执行命令,获取映射器实例和管理事务。在介绍SqlSession接口之前,我们先了解如何获取一个SqlSession实例。SqlSession是由SessionFactory实例创建的。SqlSessionFactory对象包含创建SqlSession实例的各种方法。而SqlSessionFactory本身是由SqlSessionFacotryBuilder创建的,它可以从 xml,注解或 Java配置代码来创建 SqlSessionFactory
当 Mybatis与一些依赖注入框架(如spring 或者 guice)搭配使用时,SqlSession 将被依赖注入框架创建并注入,所以你不需要使用 SqlSessionFactoryBuilder 或者 SqlSessionFactory。
SqlSessionFactoryBuilder
-
SqlSessionFactoryBuilder的 build() 4种方法,每一种都允许你从不同的资中创建一个 SqlSessionFactory 实例。public class SqlSessionFactoryBuilder{//主要方法 public SqlSessionFactoryBuilder() {} 第一种 public SqlSessionFactory build(Reader reader) {} public SqlSessionFactory build(InputStream inputStream) {} 第二种 public SqlSessionFactory build(Reader reader, String environment) {} public SqlSessionFactory build(InputStream inputStream, String environment) {} 第三种 public SqlSessionFactory build(Reader reader, Properties properties) {} public SqlSessionFactory build(InputStream inputStream, Properties properties) {} 第四种 public SqlSessionFactory build(Reader reader, String environment, Properties properties) {} public SqlSessionFactory build(InputStream inputStream, String environment, Properties properties) {} 第五种方式 public SqlSessionFactory build(Configuration config) {} } -
第一种方法是最常用的,它接受一个指向 XML 文件(也就是之前讨论的 mybatis-config.xml 文件)的 InputStream 实例。可选的参数是 environment 和 properties。environment 决定加载哪种环境,包括数据源和事务管理器。比如:
<environments default="development"> <environment id="development"> <transactionManager type="JDBC"/> ... <dataSource type="POOLED"/> ... </environment> <environment id="production"> <transactionManager type="MANAGED"/> ... <dataSource type="JNDI"/> ... </environment> </environments> -
如果你调用了带 environment 参数的 build 方法,那么 MyBatis 将使用该环境对应的配置。当然,如果你指定了一个无效的环境,会收到错误。如果你调用了不带 environment 参数的 build 方法,那么就会使用默认的环境配置(在上面的示例中,通过 default="development" 指定了默认环境)。
-
如果你调用了接受 properties 实例的方法,那么 MyBatis 就会加载这些属性,并在配置中提供使用。绝大多数场合下,可以用 ${propName} 形式引用这些配置值。
回想一下,在 mybatis-config.xml 中,可以引用属性值,也可以直接指定属性值。因此,理解属性的优先级是很重要的。在之前的文档中,我们已经介绍过了相关内容,但为了方便查阅,这里再重新介绍一下:
如果一个属性存在于下面的多个位置,那么 MyBatis 将按照以下顺序来加载它们:
-
首先,读取在 properties 元素体中指定的属性;
-
其次,读取在 properties 元素的类路径 resource 或 url 指定的属性,且会覆盖已经指定了的重复属性;
-
最后,读取作为方法参数传递的属性,且会覆盖已经从 properties 元素体和 resource 或 url 属性中加载了的重复属性。
因此,通过方法参数传递的属性的优先级最高,resource 或 url 指定的属性优先级中等,在 properties 元素体中指定的属性优先级最低。
-
-
总结一下,前四个方法很大程度上是相同的,但提供了不同的覆盖选项,允许你可选地指定 environment 和/或 properties。以下给出一个从 mybatis-config.xml 文件创建 SqlSessionFactory 的示例:
String resource = "org/mybatis/builder/mybatis-config.xml"; InputStream inputStream = Resources.getResourceAsStream(resource); SqlSessionFactoryBuilder builder = new SqlSessionFactoryBuilder(); SqlSessionFactory factory = builder.build(inputStream); -
注意,这里我们使用了 Resources 工具类,这个类在 org.apache.ibatis.io 包中。Resources 类正如其名,会帮助你从类路径下、文件系统或一个 web URL 中加载资源文件。在略读该类的源代码或用 IDE 查看该类信息后,你会发现一整套相当实用的方法。这里给出一个简表:
URL getResourceURL(String resource) URL getResourceURL(ClassLoader loader, String resource) InputStream getResourceAsStream(String resource) InputStream getResourceAsStream(ClassLoader loader, String resource) Properties getResourceAsProperties(String resource) Properties getResourceAsProperties(ClassLoader loader, String resource) Reader getResourceAsReader(String resource) Reader getResourceAsReader(ClassLoader loader, String resource) File getResourceAsFile(String resource) File getResourceAsFile(ClassLoader loader, String resource) InputStream getUrlAsStream(String urlString) Reader getUrlAsReader(String urlString) Properties getUrlAsProperties(String urlString) Class classForName(String className) -
最后一个 build 方法接受一个 Configuration 实例。Configuration 类包含了对一个 SqlSessionFactory 实例你可能关心的所有内容。在检查配置时,Configuration 类很有用,它允许你查找和操纵 SQL 映射(但当应用开始接收请求时不推荐使用)。你之前学习过的所有配置开关都存在于 Configuration 类,只不过它们是以 Java API 形式暴露的。以下是一个简单的示例,演示如何手动配置 Configuration 实例,然后将它传递给 build() 方法来创建 SqlSessionFactory。
DataSource dataSource = BaseDataTest.createBlogDataSource(); TransactionFactory transactionFactory = new JdbcTransactionFactory(); Environment environment = new Environment("development", transactionFactory, dataSource); Configuration configuration = new Configuration(environment); configuration.setLazyLoadingEnabled(true); configuration.setEnhancementEnabled(true); configuration.getTypeAliasRegistry().registerAlias(Blog.class); configuration.getTypeAliasRegistry().registerAlias(Post.class); configuration.getTypeAliasRegistry().registerAlias(Author.class); configuration.addMapper(BoundBlogMapper.class); configuration.addMapper(BoundAuthorMapper.class); SqlSessionFactoryBuilder builder = new SqlSessionFactoryBuilder(); SqlSessionFactory factory = builder.build(configuration); -
现在你就获得一个可以用来创建 SqlSession 实例的 SqlSessionFactory 了。
SqlSessionFactory
SqlSessionFactory 有六个方法创建 SqlSession 实例。通常来说,当你选择其中一个方法时,你需要考虑以下几点:
- 事务处理:你希望在 session 作用域中使用事务作用域,还是使用自动提交(auto-commit)?(对很多数据库和/或 JDBC 驱动来说,等同于关闭事务支持)
- 数据库连接:你希望 MyBatis 帮你从已配置的数据源获取连接,还是使用自己提供的连接?
- 语句执行:你希望 MyBatis 复用 PreparedStatement 和/或批量更新语句(包括插入语句和删除语句)吗?
基于以上需求,有下列已重载的多个 openSession() 方法供使用。
SqlSession openSession()
SqlSession openSession(boolean autoCommit)
SqlSession openSession(Connection connection)
SqlSession openSession(TransactionIsolationLevel level)
SqlSession openSession(ExecutorType execType, TransactionIsolationLevel level)
SqlSession openSession(ExecutorType execType)
SqlSession openSession(ExecutorType execType, boolean autoCommit)
SqlSession openSession(ExecutorType execType, Connection connection)
Configuration getConfiguration();
默认的 openSession() 方法没有参数,它会创建具备如下特性的 SqlSession:
- 事务作用域将会开启(也就是不自动提交)。
- 将由当前环境配置的 DataSource 实例中获取 Connection 对象。
- 事务隔离级别将会使用驱动或数据源的默认设置。
- 预处理语句不会被复用,也不会批量处理更新。
相信你已经能从方法签名中知道这些方法的区别。向 autoCommit 可选参数传递 true 值即可开启自动提交功能。若要使用自己的 Connection 实例,传递一个 Connection 实例给 connection 参数即可。注意,我们没有提供同时设置 Connection 和 autoCommit 的方法,这是因为 MyBatis 会依据传入的 Connection 来决定是否启用 autoCommit。对于事务隔离级别,MyBatis 使用了一个 Java 枚举包装器来表示,称为 TransactionIsolationLevel,事务隔离级别支持 JDBC 的五个隔离级别(NONE、READ_UNCOMMITTED、READ_COMMITTED、REPEATABLE_READ 和 SERIALIZABLE),并且与预期的行为一致。
你可能对 ExecutorType 参数感到陌生。这个枚举类型定义了三个值:
ExecutorType.SIMPLE:该类型的执行器没有特别的行为。它为每个语句的执行创建一个新的预处理语句。ExecutorType.REUSE:该类型的执行器会复用预处理语句。ExecutorType.BATCH:该类型的执行器会批量执行所有更新语句,如果 SELECT 在多个更新中间执行,将在必要时将多条更新语句分隔开来,以方便理解。
提示 在 SqlSessionFactory 中还有一个方法我们没有提及,就是 getConfiguration()。这个方法会返回一个 Configuration 实例,你可以在运行时使用它来检查 MyBatis 的配置。
提示 如果你使用过 MyBatis 的旧版本,可能还记得 session、事务和批量操作是相互独立的。在新版本中则不是这样。上述三者都包含在 session 作用域内。你不必分别处理事务或批量操作就能得到想要的全部效果。
SqlSession
正如之前所提到的,SqlSession 在 MyBatis 中是非常强大的一个类。它包含了所有执行语句、提交或回滚事务以及获取映射器实例的方法。
SqlSession 类的方法超过了 20 个,为了方便理解,我们将它们分成几种组别。
语句执行方法
这些方法被用来执行定义在 SQL 映射 XML 文件中的 SELECT、INSERT、UPDATE 和 DELETE 语句。你可以通过名字快速了解它们的作用,每一方法都接受语句的 ID 以及参数对象,参数可以是原始类型(支持自动装箱或包装类)、JavaBean、POJO 或 Map。
<T> T selectOne(String statement, Object parameter)
<E> List<E> selectList(String statement, Object parameter)
<T> Cursor<T> selectCursor(String statement, Object parameter)
<K,V> Map<K,V> selectMap(String statement, Object parameter, String mapKey)
int insert(String statement, Object parameter)
int update(String statement, Object parameter)
int delete(String statement, Object parameter)
selectOne 和 selectList 的不同仅仅是 selectOne 必须返回一个对象或 null 值。如果返回值多于一个,就会抛出异常。如果你不知道返回对象会有多少,请使用 selectList。如果需要查看某个对象是否存在,最好的办法是查询一个 count 值(0 或 1)。selectMap 稍微特殊一点,它会将返回对象的其中一个属性作为 key 值,将对象作为 value 值,从而将多个结果集转为 Map 类型值。由于并不是所有语句都需要参数,所以这些方法都具有一个不需要参数的重载形式。
游标(Cursor)与列表(List)返回的结果相同,不同的是,游标借助迭代器实现了数据的惰性加载。
try (Cursor<MyEntity> entities = session.selectCursor(statement, param)) {
   for (MyEntity entity:entities) {
      // 处理单个实体
   }
}
insert、update 以及 delete 方法返回的值表示受该语句影响的行数。
<T> T selectOne(String statement)
<E> List<E> selectList(String statement)
<T> Cursor<T> selectCursor(String statement)
<K,V> Map<K,V> selectMap(String statement, String mapKey)
int insert(String statement)
int update(String statement)
int delete(String statement)
最后,还有 select 方法的三个高级版本,它们允许你限制返回行数的范围,或是提供自定义结果处理逻辑,通常在数据集非常庞大的情形下使用。
<E> List<E> selectList (String statement, Object parameter, RowBounds rowBounds)
<T> Cursor<T> selectCursor(String statement, Object parameter, RowBounds rowBounds)
<K,V> Map<K,V> selectMap(String statement, Object parameter, String mapKey, RowBounds rowbounds)
void select (String statement, Object parameter, ResultHandler<T> handler)
void select (String statement, Object parameter, RowBounds rowBounds, ResultHandler<T> handler)
RowBounds 参数会告诉 MyBatis 略过指定数量的记录,并限制返回结果的数量。RowBounds 类的 offset 和 limit 值只有在构造函数时才能传入,其它时候是不能修改的。
int offset = 100;
int limit = 25;
RowBounds rowBounds = new RowBounds(offset, limit);
数据库驱动决定了略过记录时的查询效率。为了获得最佳的性能,建议将 ResultSet 类型设置为 SCROLL_SENSITIVE 或 SCROLL_INSENSITIVE(换句话说:不要使用 FORWARD_ONLY)。
ResultHandler 参数允许自定义每行结果的处理过程。你可以将它添加到 List 中、创建 Map 和 Set,甚至丢弃每个返回值,只保留计算后的统计结果。你可以使用 ResultHandler 做很多事,这其实就是 MyBatis 构建 结果列表的内部实现办法。
从版本 3.4.6 开始,ResultHandler 会在存储过程的 REFCURSOR 输出参数中传递使用的 CALLABLE 语句。
它的接口很简单:
package org.apache.ibatis.session;
public interface ResultHandler<T> {
  void handleResult(ResultContext<? extends T> context);
}
ResultContext 参数允许你访问结果对象和当前已被创建的对象数目,另外还提供了一个返回值为 Boolean 的 stop 方法,你可以使用此 stop 方法来停止 MyBatis 加载更多的结果。
使用 ResultHandler 的时候需要注意以下两个限制:
- 使用带 ResultHandler 参数的方法时,收到的数据不会被缓存。
- 当使用高级的结果映射集(resultMap)时,MyBatis 很可能需要数行结果来构造一个对象。如果你使用了 ResultHandler,你可能会接收到关联(association)或者集合(collection)中尚未被完整填充的对象。
立即批量更新方法
当你将 ExecutorType 设置为 ExecutorType.BATCH 时,可以使用这个方法清除(执行)缓存在 JDBC 驱动类中的批量更新语句。
List<BatchResult> flushStatements()
事务控制方法
有四个方法用来控制事务作用域。当然,如果你已经设置了自动提交或你使用了外部事务管理器,这些方法就没什么作用了。然而,如果你正在使用由 Connection 实例控制的 JDBC 事务管理器,那么这四个方法就会派上用场:
void commit()
void commit(boolean force)
void rollback()
void rollback(boolean force)
默认情况下 MyBatis 不会自动提交事务,除非它侦测到调用了插入、更新或删除方法改变了数据库。如果你没有使用这些方法提交修改,那么你可以在 commit 和 rollback 方法参数中传入 true 值,来保证事务被正常提交(注意,在自动提交模式或者使用了外部事务管理器的情况下,设置 force 值对 session 无效)。大部分情况下你无需调用 rollback(),因为 MyBatis 会在你没有调用 commit 时替你完成回滚操作。不过,当你要在一个可能多次提交或回滚的 session 中详细控制事务,回滚操作就派上用场了。
提示 MyBatis-Spring 和 MyBatis-Guice 提供了声明式事务处理,所以如果你在使用 Mybatis 的同时使用了 Spring 或者 Guice,请参考它们的手册以获取更多的内容。
本地缓存
Mybatis 使用到了两种缓存:本地缓存(local cache)和二级缓存(second level cache)。
每当一个新 session 被创建,MyBatis 就会创建一个与之相关联的本地缓存。任何在 session 执行过的查询结果都会被保存在本地缓存中,所以,当再次执行参数相同的相同查询时,就不需要实际查询数据库了。本地缓存将会在做出修改、事务提交或回滚,以及关闭 session 时清空。
默认情况下,本地缓存数据的生命周期等同于整个 session 的周期。由于缓存会被用来解决循环引用问题和加快重复嵌套查询的速度,所以无法将其完全禁用。但是你可以通过设置 localCacheScope=STATEMENT 来只在语句执行时使用缓存。
注意,如果 localCacheScope 被设置为 SESSION,对于某个对象,MyBatis 将返回在本地缓存中唯一对象的引用。对返回的对象(例如 list)做出的任何修改将会影响本地缓存的内容,进而将会影响到在本次 session 中从缓存返回的值。因此,不要对 MyBatis 所返回的对象作出更改,以防后患。
你可以随时调用以下方法来清空本地缓存:
void clearCache()
确保 SqlSession 被关闭
void close()
对于你打开的任何 session,你都要保证它们被妥善关闭,这很重要。保证妥善关闭的最佳代码模式是这样的:
SqlSession session = sqlSessionFactory.openSession();
try (SqlSession session = sqlSessionFactory.openSession()) {
    // 假设下面三行代码是你的业务逻辑
    session.insert(...);
    session.update(...);
    session.delete(...);
    session.commit();
}
提示 和 SqlSessionFactory 一样,你可以调用当前使用的 SqlSession 的 getConfiguration 方法来获得 Configuration 实例。
Configuration getConfiguration()
使用映射器
<T> T getMapper(Class<T> type)
上述的各个 insert、update、delete 和 select 方法都很强大,但也有些繁琐,它们并不符合类型安全,对你的 IDE 和单元测试也不是那么友好。因此,使用映射器类来执行映射语句是更常见的做法。
我们已经在之前的入门章节中见到过一个使用映射器的示例。一个映射器类就是一个仅需声明与 SqlSession 方法相匹配方法的接口。下面的示例展示了一些方法签名以及它们是如何映射到 SqlSession 上的。
public interface AuthorMapper {
  // (Author) selectOne("selectAuthor",5);
  Author selectAuthor(int id);
  // (List<Author>) selectList(“selectAuthors”)
  List<Author> selectAuthors();
  // (Map<Integer,Author>) selectMap("selectAuthors", "id")
  @MapKey("id")
  Map<Integer, Author> selectAuthors();
  // insert("insertAuthor", author)
  int insertAuthor(Author author);
  // updateAuthor("updateAuthor", author)
  int updateAuthor(Author author);
  // delete("deleteAuthor",5)
  int deleteAuthor(int id);
}
总之,每个映射器方法签名应该匹配相关联的 SqlSession 方法,字符串参数 ID 无需匹配。而是由方法名匹配映射语句的 ID。
此外,返回类型必须匹配期望的结果类型,返回单个值时,返回类型应该是返回值的类,返回多个值时,则为数组或集合类,另外也可以是游标(Cursor)。所有常用的类型都是支持的,包括:原始类型、Map、POJO 和 JavaBean。
提示 映射器接口不需要去实现任何接口或继承自任何类。只要方法签名可以被用来唯一识别对应的映射语句就可以了。
提示 映射器接口可以继承自其他接口。在使用 XML 来绑定映射器接口时,保证语句处于合适的命名空间中即可。唯一的限制是,不能在两个具有继承关系的接口中拥有相同的方法签名(这是潜在的危险做法,不可取)。
你可以传递多个参数给一个映射器方法。在多个参数的情况下,默认它们将会以 param 加上它们在参数列表中的位置来命名,比如:#{param1}、#{param2}等。如果你想(在有多个参数时)自定义参数的名称,那么你可以在参数上使用 @Param("paramName") 注解。
你也可以给方法传递一个 RowBounds 实例来限制查询结果。
映射器注解
设计初期的 MyBatis 是一个 XML 驱动的框架。配置信息是基于 XML 的,映射语句也是定义在 XML 中的。而在 MyBatis 3 中,我们提供了其它的配置方式。MyBatis 3 构建在全面且强大的基于 Java 语言的配置 API 之上。它是 XML 和注解配置的基础。注解提供了一种简单且低成本的方式来实现简单的映射语句。
提示 不幸的是,Java 注解的表达能力和灵活性十分有限。尽管我们花了很多时间在调查、设计和试验上,但最强大的 MyBatis 映射并不能用注解来构建——我们真没开玩笑。而 C# 属性就没有这些限制,因此 MyBatis.NET 的配置会比 XML 有更大的选择余地。虽说如此,基于 Java 注解的配置还是有它的好处的。
注解如下表所示:
| 注解 | 使用对象 | XML 等价形式 | 描述 |
|---|---|---|---|
@CacheNamespace |
类 |
<cache> |
为给定的命名空间(比如类)配置缓存。属性:implemetation、eviction、flushInterval、size、readWrite、blocking、properties。 |
@Property |
N/A | <property> |
指定参数值或占位符(placeholder)(该占位符能被 mybatis-config.xml 内的配置属性替换)。属性:name、value。(仅在 MyBatis 3.4.2 以上可用) |
@CacheNamespaceRef |
类 |
<cacheRef> |
引用另外一个命名空间的缓存以供使用。注意,即使共享相同的全限定类名,在 XML 映射文件中声明的缓存仍被识别为一个独立的命名空间。属性:value、name。如果你使用了这个注解,你应设置 value 或者 name 属性的其中一个。value 属性用于指定能够表示该命名空间的 Java 类型(命名空间名就是该 Java 类型的全限定类名),name 属性(这个属性仅在 MyBatis 3.4.2 以上可用)则直接指定了命名空间的名字。 |
@ConstructorArgs |
方法 |
<constructor> |
收集一组结果以传递给一个结果对象的构造方法。属性:value,它是一个 Arg 数组。 |
@Arg |
N/A | <arg>``<idArg> |
ConstructorArgs 集合的一部分,代表一个构造方法参数。属性:id、column、javaType、jdbcType、typeHandler、select、resultMap。id 属性和 XML 元素 <idArg> 相似,它是一个布尔值,表示该属性是否用于唯一标识和比较对象。从版本 3.5.4 开始,该注解变为可重复注解。 |
@TypeDiscriminator |
方法 |
<discriminator> |
决定使用何种结果映射的一组取值(case)。属性:column、javaType、jdbcType、typeHandler、cases。cases 属性是一个 Case 的数组。 |
@Case |
N/A | <case> |
表示某个值的一个取值以及该取值对应的映射。属性:value、type、results。results 属性是一个 Results 的数组,因此这个注解实际上和 ResultMap 很相似,由下面的 Results 注解指定。 |
@Results |
方法 |
<resultMap> |
一组结果映射,指定了对某个特定结果列,映射到某个属性或字段的方式。属性:value、id。value 属性是一个 Result 注解的数组。而 id 属性则是结果映射的名称。从版本 3.5.4 开始,该注解变为可重复注解。 |
@Result |
N/A | <result>``<id> |
在列和属性或字段之间的单个结果映射。属性:id、column、javaType、jdbcType、typeHandler、one、many。id 属性和 XML 元素 <id> 相似,它是一个布尔值,表示该属性是否用于唯一标识和比较对象。one 属性是一个关联,和 <association> 类似,而 many 属性则是集合关联,和 <collection> 类似。这样命名是为了避免产生名称冲突。 |
@One |
N/A | <association> |
复杂类型的单个属性映射。属性: select,指定可加载合适类型实例的映射语句(也就是映射器方法)全限定名; fetchType,指定在该映射中覆盖全局配置参数 lazyLoadingEnabled; resultMap(available since 3.5.5), which is the fully qualified name of a result map that map to a single container object from select result; columnPrefix(available since 3.5.5), which is column prefix for grouping select columns at nested result map. 提示 注解 API 不支持联合映射。这是由于 Java 注解不允许产生循环引用。 |
@Many |
N/A | <collection> |
复杂类型的集合属性映射。属性: select,指定可加载合适类型实例集合的映射语句(也就是映射器方法)全限定名; fetchType,指定在该映射中覆盖全局配置参数 lazyLoadingEnabled resultMap(available since 3.5.5), which is the fully qualified name of a result map that map to collection object from select result; columnPrefix(available since 3.5.5), which is column prefix for grouping select columns at nested result map. 提示 注解 API 不支持联合映射。这是由于 Java 注解不允许产生循环引用。 |
@MapKey |
方法 |
供返回值为 Map 的方法使用的注解。它使用对象的某个属性作为 key,将对象 List 转化为 Map。属性:value,指定作为 Map 的 key 值的对象属性名。 |
|
@Options |
方法 |
映射语句的属性 | 该注解允许你指定大部分开关和配置选项,它们通常在映射语句上作为属性出现。与在注解上提供大量的属性相比,Options 注解提供了一致、清晰的方式来指定选项。属性:useCache=true、flushCache=FlushCachePolicy.DEFAULT、resultSetType=DEFAULT、statementType=PREPARED、fetchSize=-1、timeout=-1、useGeneratedKeys=false、keyProperty=""、keyColumn=""、resultSets="", databaseId=""。注意,Java 注解无法指定 null 值。因此,一旦你使用了 Options 注解,你的语句就会被上述属性的默认值所影响。要注意避免默认值带来的非预期行为。 The databaseId(Available since 3.5.5), in case there is a configured DatabaseIdProvider, the MyBatis use the Options with no databaseId attribute or with a databaseId that matches the current one. If found with and without the databaseId the latter will be discarded. 注意:keyColumn 属性只在某些数据库中有效(如 Oracle、PostgreSQL 等)。要了解更多关于 keyColumn 和 keyProperty 可选值信息,请查看“insert, update 和 delete”一节。 |
@Insert``@Update``@Delete``@Select |
方法 |
<insert>``<update>``<delete>``<select> |
每个注解分别代表将会被执行的 SQL 语句。它们用字符串数组(或单个字符串)作为参数。如果传递的是字符串数组,字符串数组会被连接成单个完整的字符串,每个字符串之间加入一个空格。这有效地避免了用 Java 代码构建 SQL 语句时产生的“丢失空格”问题。当然,你也可以提前手动连接好字符串。属性:value,指定用来组成单个 SQL 语句的字符串数组。 The databaseId(Available since 3.5.5), in case there is a configured DatabaseIdProvider, the MyBatis use a statement with no databaseId attribute or with a databaseId that matches the current one. If found with and without the databaseId the latter will be discarded. |
@InsertProvider``@UpdateProvider``@DeleteProvider``@SelectProvider |
方法 |
<insert>``<update>``<delete>``<select> |
允许构建动态 SQL。这些备选的 SQL 注解允许你指定返回 SQL 语句的类和方法,以供运行时执行。(从 MyBatis 3.4.6 开始,可以使用 CharSequence 代替 String 来作为返回类型)。当执行映射语句时,MyBatis 会实例化注解指定的类,并调用注解指定的方法。你可以通过 ProviderContext 传递映射方法接收到的参数、"Mapper interface type" 和 "Mapper method"(仅在 MyBatis 3.4.5 以上支持)作为参数。(MyBatis 3.4 以上支持传入多个参数) 属性:value、type、method、databaseId。 value and type 属性用于指定类名 (The type attribute is alias for value, you must be specify either one. But both attributes can be omit when specify the defaultSqlProviderType as global configuration)。 method 用于指定该类的方法名(从版本 3.5.1 开始,可以省略 method 属性,MyBatis 将会使用 ProviderMethodResolver 接口解析方法的具体实现。如果解析失败,MyBatis 将会使用名为 provideSql 的降级实现)。提示 接下来的“SQL 语句构建器”一章将会讨论该话题,以帮助你以更清晰、更便于阅读的方式构建动态 SQL。 The databaseId(Available since 3.5.5), in case there is a configured DatabaseIdProvider, the MyBatis will use a provider method with no databaseId attribute or with a databaseId that matches the current one. If found with and without the databaseId the latter will be discarded. |
@Param |
参数 |
N/A | 如果你的映射方法接受多个参数,就可以使用这个注解自定义每个参数的名字。否则在默认情况下,除 RowBounds 以外的参数会以 "param" 加参数位置被命名。例如 #{param1}, #{param2}。如果使用了 @Param("person"),参数就会被命名为 #{person}。 |
@SelectKey |
方法 |
<selectKey> |
这个注解的功能与 <selectKey> 标签完全一致。该注解只能在 @Insert 或 @InsertProvider 或 @Update 或 @UpdateProvider 标注的方法上使用,否则将会被忽略。如果标注了 @SelectKey 注解,MyBatis 将会忽略掉由 @Options 注解所设置的生成主键或设置(configuration)属性。属性:statement 以字符串数组形式指定将会被执行的 SQL 语句,keyProperty 指定作为参数传入的对象对应属性的名称,该属性将会更新成新的值,before 可以指定为 true 或 false 以指明 SQL 语句应被在插入语句的之前还是之后执行。resultType 则指定 keyProperty 的 Java 类型。statementType 则用于选择语句类型,可以选择 STATEMENT、PREPARED 或 CALLABLE 之一,它们分别对应于 Statement、PreparedStatement 和 CallableStatement。默认值是 PREPARED。 The databaseId(Available since 3.5.5), in case there is a configured DatabaseIdProvider, the MyBatis will use a statement with no databaseId attribute or with a databaseId that matches the current one. If found with and without the databaseId the latter will be discarded. |
@ResultMap |
方法 |
N/A | 这个注解为 @Select 或者 @SelectProvider 注解指定 XML 映射中 <resultMap> 元素的 id。这使得注解的 select 可以复用已在 XML 中定义的 ResultMap。如果标注的 select 注解中存在 @Results 或者 @ConstructorArgs 注解,这两个注解将被此注解覆盖。 |
@ResultType |
方法 |
N/A | 在使用了结果处理器的情况下,需要使用此注解。由于此时的返回类型为 void,所以 Mybatis 需要有一种方法来判断每一行返回的对象类型。如果在 XML 有对应的结果映射,请使用 @ResultMap 注解。如果结果类型在 XML 的 <select> 元素中指定了,就不需要使用其它注解了。否则就需要使用此注解。比如,如果一个标注了 @Select 的方法想要使用结果处理器,那么它的返回类型必须是 void,并且必须使用这个注解(或者 @ResultMap)。这个注解仅在方法返回类型是 void 的情况下生效。 |
@Flush |
方法 |
N/A | 如果使用了这个注解,定义在 Mapper 接口中的方法就能够调用 SqlSession#flushStatements() 方法。(Mybatis 3.3 以上可用) |
映射注解示例
这个例子展示了如何使用 @SelectKey 注解来在插入前读取数据库序列的值:
@Insert("insert into table3 (id, name) values(#{nameId}, #{name})")
@SelectKey(statement="call next value for TestSequence", keyProperty="nameId", before=true, resultType=int.class)
int insertTable3(Name name);
这个例子展示了如何使用 @SelectKey 注解来在插入后读取数据库自增列的值:
@Insert("insert into table2 (name) values(#{name})")
@SelectKey(statement="call identity()", keyProperty="nameId", before=false, resultType=int.class)
int insertTable2(Name name);
这个例子展示了如何使用 @Flush 注解来调用 SqlSession#flushStatements():
@Flush
List<BatchResult> flush();
这些例子展示了如何通过指定 @Result 的 id 属性来命名结果集:
@Results(id = "userResult", value = {
  @Result(property = "id", column = "uid", id = true),
  @Result(property = "firstName", column = "first_name"),
  @Result(property = "lastName", column = "last_name")
})
@Select("select * from users where id = #{id}")
User getUserById(Integer id);

@Results(id = "companyResults")
@ConstructorArgs({
  @Arg(column = "cid", javaType = Integer.class, id = true),
  @Arg(column = "name", javaType = String.class)
})
@Select("select * from company where id = #{id}")
Company getCompanyById(Integer id);
这个例子展示了如何使用单个参数的 @SqlProvider 注解:
@SelectProvider(type = UserSqlBuilder.class, method = "buildGetUsersByName")
List<User> getUsersByName(String name);

class UserSqlBuilder {
  public static String buildGetUsersByName(final String name) {
    return new SQL(){{
      SELECT("*");
      FROM("users");
      if (name != null) {
        WHERE("name like #{value} || '%'");
      }
      ORDER_BY("id");
    }}.toString();
  }
}
这个例子展示了如何使用多个参数的 @SqlProvider 注解:
@SelectProvider(type = UserSqlBuilder.class, method = "buildGetUsersByName")
List<User> getUsersByName(
    @Param("name") String name, @Param("orderByColumn") String orderByColumn);

class UserSqlBuilder {

  // 如果不使用 @Param,就应该定义与 mapper 方法相同的参数
  public static String buildGetUsersByName(
      final String name, final String orderByColumn) {
    return new SQL(){{
      SELECT("*");
      FROM("users");
      WHERE("name like #{name} || '%'");
      ORDER_BY(orderByColumn);
    }}.toString();
  }

  // 如果使用 @Param,就可以只定义需要使用的参数
  public static String buildGetUsersByName(@Param("orderByColumn") final String orderByColumn) {
    return new SQL(){{
      SELECT("*");
      FROM("users");
      WHERE("name like #{name} || '%'");
      ORDER_BY(orderByColumn);
    }}.toString();
  }
}
This example shows usage that share an sql provider class to all mapper methods using global configuration(Available since 3.5.6):
Configuration configuration = new Configuration();
configuration.setDefaultSqlProviderType(TemplateFilePathProvider.class); // Specify an sql provider class for sharing on all mapper methods
// ...
// Can omit the type/value attribute on sql provider annotation
// If omit it, the MyBatis apply the class that specified on defaultSqlProviderType.
public interface UserMapper {

  @SelectProvider // Same with @SelectProvider(TemplateFilePathProvider.class)
  User findUser(int id);

  @InsertProvider // Same with @InsertProvider(TemplateFilePathProvider.class)
  void createUser(User user);

  @UpdateProvider // Same with @UpdateProvider(TemplateFilePathProvider.class)
  void updateUser(User user);

  @DeleteProvider // Same with @DeleteProvider(TemplateFilePathProvider.class)
  void deleteUser(int id);
}
以下例子展示了 ProviderMethodResolver(3.5.1 后可用)的默认实现使用方法:
@SelectProvider(UserSqlProvider.class)
List<User> getUsersByName(String name);

// 在你的 provider 类中实现 ProviderMethodResolver 接口
class UserSqlProvider implements ProviderMethodResolver {
  // 默认实现中,会将映射器方法的调用解析到实现的同名方法上
  public static String getUsersByName(final String name) {
    return new SQL(){{
      SELECT("*");
      FROM("users");
      if (name != null) {
        WHERE("name like #{value} || '%'");
      }
      ORDER_BY("id");
    }}.toString();
  }
}
This example shows usage the databaseId attribute on the statement annotation(Available since 3.5.5):
@Select(value = "SELECT SYS_GUID() FROM dual", databaseId = "oracle") // Use this statement if DatabaseIdProvider provide "oracle"
@Select(value = "SELECT uuid_generate_v4()", databaseId = "postgres") // Use this statement if DatabaseIdProvider provide "postgres"
@Select("SELECT RANDOM_UUID()") // Use this statement if the DatabaseIdProvider not configured or not matches databaseId
String generateId();