In this chapter, we'll install a single-node Hadoop cluster backed by the Hadoop Distributed File System on Ubuntu.
Hadoop framework is written in Java!!
k@laptop:~$ cd ~

# Update the source list
k@laptop:~$ sudo apt-get update

# The OpenJDK project is the default version of Java
# that is provided from a supported Ubuntu repository.
k@laptop:~$ sudo apt-get install default-jdk

k@laptop:~$ java -version
java version "1.7.0_65"
OpenJDK Runtime Environment (IcedTea 2.5.3) (7u71-2.5.3-0ubuntu0.14.04.1)
OpenJDK 64-Bit Server VM (build 24.65-b04, mixed mode)
k@laptop:~$ sudo addgroup hadoop
Adding group `hadoop' (GID 1002) ...
Done.

k@laptop:~$ sudo adduser --ingroup hadoop hduser
Adding user `hduser' ...
Adding new user `hduser' (1001) with group `hadoop' ...
Creating home directory `/home/hduser' ...
Copying files from `/etc/skel' ...
Enter new UNIX password:
Retype new UNIX password:
passwd: password updated successfully
Changing the user information for hduser
Enter the new value, or press ENTER for the default
	Full Name []:
	Room Number []:
	Work Phone []:
	Home Phone []:
	Other []:
Is the information correct? [Y/n] Y
ssh has two main components:
- ssh : The command we use to connect to remote machines - the client.
- sshd : The daemon that is running on the server and allows clients to connect to the server.
The ssh is pre-enabled on Linux, but in order to start sshd daemon, we need to install sshfirst. Use this command to do that :
k@laptop:~$ sudo apt-get install ssh
This will install ssh on our machine. If we get something similar to the following, we can think it is setup properly:
k@laptop:~$ which ssh
/usr/bin/ssh

k@laptop:~$ which sshd
/usr/sbin/sshd
Hadoop requires SSH access to manage its nodes, i.e. remote machines plus our local machine. For our single-node setup of Hadoop, we therefore need to configure SSH access to localhost.
So, we need to have SSH up and running on our machine and configured it to allow SSH public key authentication.
Hadoop uses SSH (to access its nodes) which would normally require the user to enter a password. However, this requirement can be eliminated by creating and setting up SSH certificates using the following commands. If asked for a filename just leave it blank and press the enter key to continue.
k@laptop:~$ su hduser
Password:
hduser@laptop:~$ ssh-keygen -t rsa -P ""
Generating public/private rsa key pair.
Enter file in which to save the key (/home/hduser/.ssh/id_rsa):
Created directory '/home/hduser/.ssh'.
Your identification has been saved in /home/hduser/.ssh/id_rsa.
Your public key has been saved in /home/hduser/.ssh/id_rsa.pub.
The key fingerprint is:
50:6b:f3:fc:0f:32:bf:30:79:c2:41:71:26:cc:7d:e3 hduser@laptop
The key's randomart image is:
+--[ RSA 2048]----+
|        .oo.o    |
|       . .o=. o  |
|      . + .  o . |
|       o =    E  |
|        S +      |
|         . +     |
|          O +    |
|           O o   |
|            o..  |
+-----------------+


hduser@laptop:/home/k$ cat $HOME/.ssh/id_rsa.pub >> $HOME/.ssh/authorized_keys
The second command adds the newly created key to the list of authorized keys so that Hadoop can use ssh without prompting for a password.
We can check if ssh works:
hduser@laptop:/home/k$ ssh localhost
The authenticity of host 'localhost (127.0.0.1)' can't be established.
ECDSA key fingerprint is e1:8b:a0:a5:75:ef:f4:b4:5e:a9:ed:be:64:be:5c:2f.
Are you sure you want to continue connecting (yes/no)? yes
Warning: Permanently added 'localhost' (ECDSA) to the list of known hosts.
Welcome to Ubuntu 14.04.1 LTS (GNU/Linux 3.13.0-40-generic x86_64)
...
hduser@laptop:~$ wget http://mirrors.sonic.net/apache/hadoop/common/hadoop-2.6.0/hadoop-2.6.0.tar.gz
hduser@laptop:~$ tar xvzf hadoop-2.6.0.tar.gz
We want to move the Hadoop installation to the /usr/local/hadoop directory using the following command:
hduser@laptop:~/hadoop-2.6.0$ sudo mv * /usr/local/hadoop
[sudo] password for hduser:
hduser is not in the sudoers file.  This incident will be reported.
Oops!... We got:
"hduser is not in the sudoers file. This incident will be reported."
This error can be resolved by logging in as a root user, and then add hduser to sudo:
hduser@laptop:~/hadoop-2.6.0$ su k
Password:

k@laptop:/home/hduser$ sudo adduser hduser sudo
[sudo] password for k:
Adding user `hduser' to group `sudo' ...
Adding user hduser to group sudo
Done.
Now, the hduser has root priviledge, we can move the Hadoop installation to the /usr/local/hadoop directory without any problem:
k@laptop:/home/hduser$ sudo su hduser

hduser@laptop:~/hadoop-2.6.0$ sudo mv * /usr/local/hadoop
hduser@laptop:~/hadoop-2.6.0$ sudo chown -R hduser:hadoop /usr/local/hadoop
The following files will have to be modified to complete the Hadoop setup:
- ~/.bashrc
- /usr/local/hadoop/etc/hadoop/hadoop-env.sh
- /usr/local/hadoop/etc/hadoop/core-site.xml
- /usr/local/hadoop/etc/hadoop/mapred-site.xml.template
- /usr/local/hadoop/etc/hadoop/hdfs-site.xml
1. ~/.bashrc:
Before editing the .bashrc file in our home directory, we need to find the path where Java has been installed to set the JAVA_HOME environment variable using the following command:
hduser@laptop update-alternatives --config java
There is only one alternative in link group java (providing /usr/bin/java): /usr/lib/jvm/java-7-openjdk-amd64/jre/bin/java
Nothing to configure.
Now we can append the following to the end of ~/.bashrc:
hduser@laptop:~$ vi ~/.bashrc

#HADOOP VARIABLES START
export JAVA_HOME=/usr/lib/jvm/java-7-openjdk-amd64
export HADOOP_INSTALL=/usr/local/hadoop
export PATH=$PATH:$HADOOP_INSTALL/bin
export PATH=$PATH:$HADOOP_INSTALL/sbin
export HADOOP_MAPRED_HOME=$HADOOP_INSTALL
export HADOOP_COMMON_HOME=$HADOOP_INSTALL
export HADOOP_HDFS_HOME=$HADOOP_INSTALL
export YARN_HOME=$HADOOP_INSTALL
export HADOOP_COMMON_LIB_NATIVE_DIR=$HADOOP_INSTALL/lib/native
export HADOOP_OPTS="-Djava.library.path=$HADOOP_INSTALL/lib"
#HADOOP VARIABLES END

hduser@laptop:~$ source ~/.bashrc
note that the JAVA_HOME should be set as the path just before the '.../bin/':
hduser@ubuntu-VirtualBox:~$ javac -version
javac 1.7.0_75

hduser@ubuntu-VirtualBox:~$ which javac
/usr/bin/javac

hduser@ubuntu-VirtualBox:~$ readlink -f /usr/bin/javac
/usr/lib/jvm/java-7-openjdk-amd64/bin/javac
2. /usr/local/hadoop/etc/hadoop/hadoop-env.sh
We need to set JAVA_HOME by modifying hadoop-env.sh file.
hduser@laptop:~$ vi /usr/local/hadoop/etc/hadoop/hadoop-env.sh

export JAVA_HOME=/usr/lib/jvm/java-7-openjdk-amd64
Adding the above statement in the hadoop-env.sh file ensures that the value of JAVA_HOME variable will be available to Hadoop whenever it is started up.
3. /usr/local/hadoop/etc/hadoop/core-site.xml:
The /usr/local/hadoop/etc/hadoop/core-site.xml file contains configuration properties that Hadoop uses when starting up.
This file can be used to override the default settings that Hadoop starts with.
hduser@laptop:~$ sudo mkdir -p /app/hadoop/tmp
hduser@laptop:~$ sudo chown hduser:hadoop /app/hadoop/tmp
Open the file and enter the following in between the <configuration></configuration> tag:
hduser@laptop:~$ vi /usr/local/hadoop/etc/hadoop/core-site.xml

<configuration>
 <property>
  <name>hadoop.tmp.dir</name>
  <value>/app/hadoop/tmp</value>
  <description>A base for other temporary directories.</description>
 </property>

 <property>
  <name>fs.default.name</name>
  <value>hdfs://localhost:54310</value>
  <description>The name of the default file system.  A URI whose
  scheme and authority determine the FileSystem implementation.  The
  uri's scheme determines the config property (fs.SCHEME.impl) naming
  the FileSystem implementation class.  The uri's authority is used to
  determine the host, port, etc. for a filesystem.</description>
 </property>
</configuration>
4. /usr/local/hadoop/etc/hadoop/mapred-site.xml
By default, the /usr/local/hadoop/etc/hadoop/ folder contains
/usr/local/hadoop/etc/hadoop/mapred-site.xml.template
file which has to be renamed/copied with the name mapred-site.xml:
hduser@laptop:~$ cp /usr/local/hadoop/etc/hadoop/mapred-site.xml.template /usr/local/hadoop/etc/hadoop/mapred-site.xml
The mapred-site.xml file is used to specify which framework is being used for MapReduce.
We need to enter the following content in between the <configuration></configuration> tag:
<configuration>
 <property>
  <name>mapred.job.tracker</name>
  <value>localhost:54311</value>
  <description>The host and port that the MapReduce job tracker runs
  at.  If "local", then jobs are run in-process as a single map
  and reduce task.
  </description>
 </property>
</configuration>
5. /usr/local/hadoop/etc/hadoop/hdfs-site.xml
The /usr/local/hadoop/etc/hadoop/hdfs-site.xml file needs to be configured for each host in the cluster that is being used.
It is used to specify the directories which will be used as the namenode and the datanode on that host.
Before editing this file, we need to create two directories which will contain the namenode and the datanode for this Hadoop installation.
This can be done using the following commands:
hduser@laptop:~$ sudo mkdir -p /usr/local/hadoop_store/hdfs/namenode
hduser@laptop:~$ sudo mkdir -p /usr/local/hadoop_store/hdfs/datanode
hduser@laptop:~$ sudo chown -R hduser:hadoop /usr/local/hadoop_store
Open the file and enter the following content in between the <configuration></configuration> tag:
hduser@laptop:~$ vi /usr/local/hadoop/etc/hadoop/hdfs-site.xml

<configuration>
 <property>
  <name>dfs.replication</name>
  <value>1</value>
  <description>Default block replication.
  The actual number of replications can be specified when the file is created.
  The default is used if replication is not specified in create time.
  </description>
 </property>
 <property>
   <name>dfs.namenode.name.dir</name>
   <value>file:/usr/local/hadoop_store/hdfs/namenode</value>
 </property>
 <property>
   <name>dfs.datanode.data.dir</name>
   <value>file:/usr/local/hadoop_store/hdfs/datanode</value>
 </property>
</configuration>
Now, the Hadoop file system needs to be formatted so that we can start to use it. The format command should be issued with write permission since it creates current directory
under /usr/local/hadoop_store/hdfs/namenode folder:
hduser@laptop:~$ hadoop namenode -format
DEPRECATED: Use of this script to execute hdfs command is deprecated.
Instead use the hdfs command for it.

15/04/18 14:43:03 INFO namenode.NameNode: STARTUP_MSG:
/************************************************************
STARTUP_MSG: Starting NameNode
STARTUP_MSG:   host = laptop/192.168.1.1
STARTUP_MSG:   args = [-format]
STARTUP_MSG:   version = 2.6.0
STARTUP_MSG:   classpath = /usr/local/hadoop/etc/hadoop
...
STARTUP_MSG:   java = 1.7.0_65
************************************************************/
15/04/18 14:43:03 INFO namenode.NameNode: registered UNIX signal handlers for [TERM, HUP, INT]
15/04/18 14:43:03 INFO namenode.NameNode: createNameNode [-format]
15/04/18 14:43:07 WARN util.NativeCodeLoader: Unable to load native-hadoop library for your platform... using builtin-java classes where applicable
Formatting using clusterid: CID-e2f515ac-33da-45bc-8466-5b1100a2bf7f
15/04/18 14:43:09 INFO namenode.FSNamesystem: No KeyProvider found.
15/04/18 14:43:09 INFO namenode.FSNamesystem: fsLock is fair:true
15/04/18 14:43:10 INFO blockmanagement.DatanodeManager: dfs.block.invalidate.limit=1000
15/04/18 14:43:10 INFO blockmanagement.DatanodeManager: dfs.namenode.datanode.registration.ip-hostname-check=true
15/04/18 14:43:10 INFO blockmanagement.BlockManager: dfs.namenode.startup.delay.block.deletion.sec is set to 000:00:00:00.000
15/04/18 14:43:10 INFO blockmanagement.BlockManager: The block deletion will start around 2015 Apr 18 14:43:10
15/04/18 14:43:10 INFO util.GSet: Computing capacity for map BlocksMap
15/04/18 14:43:10 INFO util.GSet: VM type       = 64-bit
15/04/18 14:43:10 INFO util.GSet: 2.0% max memory 889 MB = 17.8 MB
15/04/18 14:43:10 INFO util.GSet: capacity      = 2^21 = 2097152 entries
15/04/18 14:43:10 INFO blockmanagement.BlockManager: dfs.block.access.token.enable=false
15/04/18 14:43:10 INFO blockmanagement.BlockManager: defaultReplication         = 1
15/04/18 14:43:10 INFO blockmanagement.BlockManager: maxReplication             = 512
15/04/18 14:43:10 INFO blockmanagement.BlockManager: minReplication             = 1
15/04/18 14:43:10 INFO blockmanagement.BlockManager: maxReplicationStreams      = 2
15/04/18 14:43:10 INFO blockmanagement.BlockManager: shouldCheckForEnoughRacks  = false
15/04/18 14:43:10 INFO blockmanagement.BlockManager: replicationRecheckInterval = 3000
15/04/18 14:43:10 INFO blockmanagement.BlockManager: encryptDataTransfer        = false
15/04/18 14:43:10 INFO blockmanagement.BlockManager: maxNumBlocksToLog          = 1000
15/04/18 14:43:10 INFO namenode.FSNamesystem: fsOwner             = hduser (auth:SIMPLE)
15/04/18 14:43:10 INFO namenode.FSNamesystem: supergroup          = supergroup
15/04/18 14:43:10 INFO namenode.FSNamesystem: isPermissionEnabled = true
15/04/18 14:43:10 INFO namenode.FSNamesystem: HA Enabled: false
15/04/18 14:43:10 INFO namenode.FSNamesystem: Append Enabled: true
15/04/18 14:43:11 INFO util.GSet: Computing capacity for map INodeMap
15/04/18 14:43:11 INFO util.GSet: VM type       = 64-bit
15/04/18 14:43:11 INFO util.GSet: 1.0% max memory 889 MB = 8.9 MB
15/04/18 14:43:11 INFO util.GSet: capacity      = 2^20 = 1048576 entries
15/04/18 14:43:11 INFO namenode.NameNode: Caching file names occuring more than 10 times
15/04/18 14:43:11 INFO util.GSet: Computing capacity for map cachedBlocks
15/04/18 14:43:11 INFO util.GSet: VM type       = 64-bit
15/04/18 14:43:11 INFO util.GSet: 0.25% max memory 889 MB = 2.2 MB
15/04/18 14:43:11 INFO util.GSet: capacity      = 2^18 = 262144 entries
15/04/18 14:43:11 INFO namenode.FSNamesystem: dfs.namenode.safemode.threshold-pct = 0.9990000128746033
15/04/18 14:43:11 INFO namenode.FSNamesystem: dfs.namenode.safemode.min.datanodes = 0
15/04/18 14:43:11 INFO namenode.FSNamesystem: dfs.namenode.safemode.extension     = 30000
15/04/18 14:43:11 INFO namenode.FSNamesystem: Retry cache on namenode is enabled
15/04/18 14:43:11 INFO namenode.FSNamesystem: Retry cache will use 0.03 of total heap and retry cache entry expiry time is 600000 millis
15/04/18 14:43:11 INFO util.GSet: Computing capacity for map NameNodeRetryCache
15/04/18 14:43:11 INFO util.GSet: VM type       = 64-bit
15/04/18 14:43:11 INFO util.GSet: 0.029999999329447746% max memory 889 MB = 273.1 KB
15/04/18 14:43:11 INFO util.GSet: capacity      = 2^15 = 32768 entries
15/04/18 14:43:11 INFO namenode.NNConf: ACLs enabled? false
15/04/18 14:43:11 INFO namenode.NNConf: XAttrs enabled? true
15/04/18 14:43:11 INFO namenode.NNConf: Maximum size of an xattr: 16384
15/04/18 14:43:12 INFO namenode.FSImage: Allocated new BlockPoolId: BP-130729900-192.168.1.1-1429393391595
15/04/18 14:43:12 INFO common.Storage: Storage directory /usr/local/hadoop_store/hdfs/namenode has been successfully formatted.
15/04/18 14:43:12 INFO namenode.NNStorageRetentionManager: Going to retain 1 images with txid >= 0
15/04/18 14:43:12 INFO util.ExitUtil: Exiting with status 0
15/04/18 14:43:12 INFO namenode.NameNode: SHUTDOWN_MSG:
/************************************************************
SHUTDOWN_MSG: Shutting down NameNode at laptop/192.168.1.1
************************************************************/
Note that hadoop namenode -format command should be executed once before we start using Hadoop.
If this command is executed again after Hadoop has been used, it'll destroy all the data on the Hadoop file system.
Now it's time to start the newly installed single node cluster.
We can use start-all.sh or (start-dfs.sh and start-yarn.sh)
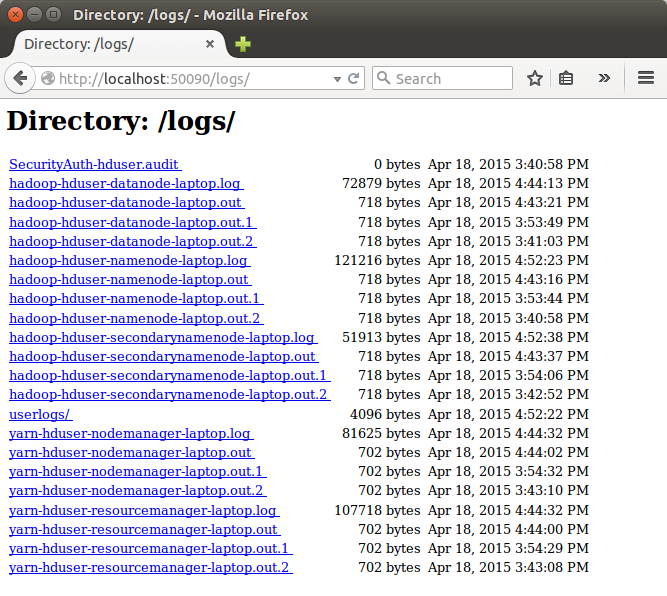
k@laptop:~$ cd /usr/local/hadoop/sbin

k@laptop:/usr/local/hadoop/sbin$ ls
distribute-exclude.sh    start-all.cmd        stop-balancer.sh
hadoop-daemon.sh         start-all.sh         stop-dfs.cmd
hadoop-daemons.sh        start-balancer.sh    stop-dfs.sh
hdfs-config.cmd          start-dfs.cmd        stop-secure-dns.sh
hdfs-config.sh           start-dfs.sh         stop-yarn.cmd
httpfs.sh                start-secure-dns.sh  stop-yarn.sh
kms.sh                   start-yarn.cmd       yarn-daemon.sh
mr-jobhistory-daemon.sh  start-yarn.sh        yarn-daemons.sh
refresh-namenodes.sh     stop-all.cmd
slaves.sh                stop-all.sh

k@laptop:/usr/local/hadoop/sbin$ sudo su hduser

hduser@laptop:/usr/local/hadoop/sbin$ start-all.sh
hduser@laptop:~$ start-all.sh
This script is Deprecated. Instead use start-dfs.sh and start-yarn.sh
15/04/18 16:43:13 WARN util.NativeCodeLoader: Unable to load native-hadoop library for your platform... using builtin-java classes where applicable
Starting namenodes on [localhost]
localhost: starting namenode, logging to /usr/local/hadoop/logs/hadoop-hduser-namenode-laptop.out
localhost: starting datanode, logging to /usr/local/hadoop/logs/hadoop-hduser-datanode-laptop.out
Starting secondary namenodes [0.0.0.0]
0.0.0.0: starting secondarynamenode, logging to /usr/local/hadoop/logs/hadoop-hduser-secondarynamenode-laptop.out
15/04/18 16:43:58 WARN util.NativeCodeLoader: Unable to load native-hadoop library for your platform... using builtin-java classes where applicable
starting yarn daemons
starting resourcemanager, logging to /usr/local/hadoop/logs/yarn-hduser-resourcemanager-laptop.out
localhost: starting nodemanager, logging to /usr/local/hadoop/logs/yarn-hduser-nodemanager-laptop.out
We can check if it's really up and running:
hduser@laptop:/usr/local/hadoop/sbin$ jps
9026 NodeManager
7348 NameNode
9766 Jps
8887 ResourceManager
7507 DataNode
The output means that we now have a functional instance of Hadoop running on our VPS (Virtual private server).
Another way to check is using netstat:
hduser@laptop:~$ netstat -plten | grep java
(Not all processes could be identified, non-owned process info
 will not be shown, you would have to be root to see it all.)
tcp        0      0 0.0.0.0:50020           0.0.0.0:*               LISTEN      1001       1843372     10605/java
tcp        0      0 127.0.0.1:54310         0.0.0.0:*               LISTEN      1001       1841277     10447/java
tcp        0      0 0.0.0.0:50090           0.0.0.0:*               LISTEN      1001       1841130     10895/java
tcp        0      0 0.0.0.0:50070           0.0.0.0:*               LISTEN      1001       1840196     10447/java
tcp        0      0 0.0.0.0:50010           0.0.0.0:*               LISTEN      1001       1841320     10605/java
tcp        0      0 0.0.0.0:50075           0.0.0.0:*               LISTEN      1001       1841646     10605/java
tcp6       0      0 :::8040                 :::*                    LISTEN      1001       1845543     11383/java
tcp6       0      0 :::8042                 :::*                    LISTEN      1001       1845551     11383/java
tcp6       0      0 :::8088                 :::*                    LISTEN      1001       1842110     11252/java
tcp6       0      0 :::49630                :::*                    LISTEN      1001       1845534     11383/java
tcp6       0      0 :::8030                 :::*                    LISTEN      1001       1842036     11252/java
tcp6       0      0 :::8031                 :::*                    LISTEN      1001       1842005     11252/java
tcp6       0      0 :::8032                 :::*                    LISTEN      1001       1842100     11252/java
tcp6       0      0 :::8033                 :::*                    LISTEN      1001       1842162     11252/java
$ pwd
/usr/local/hadoop/sbin

$ ls
distribute-exclude.sh  httpfs.sh                start-all.sh         start-yarn.cmd    stop-dfs.cmd        yarn-daemon.sh
hadoop-daemon.sh       mr-jobhistory-daemon.sh  start-balancer.sh    start-yarn.sh     stop-dfs.sh         yarn-daemons.sh
hadoop-daemons.sh      refresh-namenodes.sh     start-dfs.cmd        stop-all.cmd      stop-secure-dns.sh
hdfs-config.cmd        slaves.sh                start-dfs.sh         stop-all.sh       stop-yarn.cmd
hdfs-config.sh         start-all.cmd            start-secure-dns.sh  stop-balancer.sh  stop-yarn.sh
We run stop-all.sh or (stop-dfs.sh and stop-yarn.sh) to stop all the daemons running on our machine:
hduser@laptop:/usr/local/hadoop/sbin$ pwd
/usr/local/hadoop/sbin
hduser@laptop:/usr/local/hadoop/sbin$ ls
distribute-exclude.sh  httpfs.sh                start-all.cmd      start-secure-dns.sh  stop-balancer.sh    stop-yarn.sh
hadoop-daemon.sh       kms.sh                   start-all.sh       start-yarn.cmd       stop-dfs.cmd        yarn-daemon.sh
hadoop-daemons.sh      mr-jobhistory-daemon.sh  start-balancer.sh  start-yarn.sh        stop-dfs.sh         yarn-daemons.sh
hdfs-config.cmd        refresh-namenodes.sh     start-dfs.cmd      stop-all.cmd         stop-secure-dns.sh
hdfs-config.sh         slaves.sh                start-dfs.sh       stop-all.sh          stop-yarn.cmd
hduser@laptop:/usr/local/hadoop/sbin$
hduser@laptop:/usr/local/hadoop/sbin$ stop-all.sh
This script is Deprecated. Instead use stop-dfs.sh and stop-yarn.sh
15/04/18 15:46:31 WARN util.NativeCodeLoader: Unable to load native-hadoop library for your platform... using builtin-java classes where applicable
Stopping namenodes on [localhost]
localhost: stopping namenode
localhost: stopping datanode
Stopping secondary namenodes [0.0.0.0]
0.0.0.0: no secondarynamenode to stop
15/04/18 15:46:59 WARN util.NativeCodeLoader: Unable to load native-hadoop library for your platform... using builtin-java classes where applicable
stopping yarn daemons
stopping resourcemanager
localhost: stopping nodemanager
no proxyserver to stop
Let's start the Hadoop again and see its Web UI:
hduser@laptop:/usr/local/hadoop/sbin$ start-all.sh
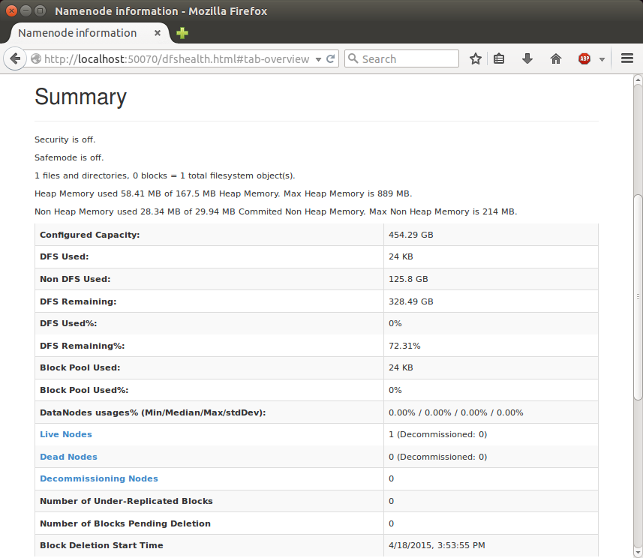
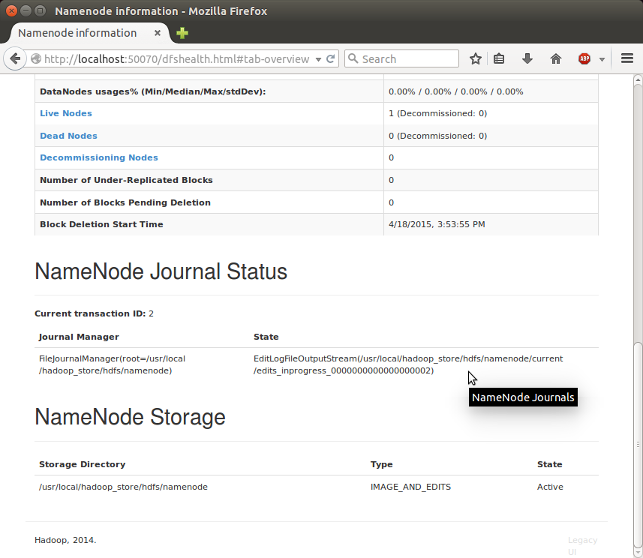
http://localhost:50070/ - web UI of the NameNode daemon

SecondaryNameNode
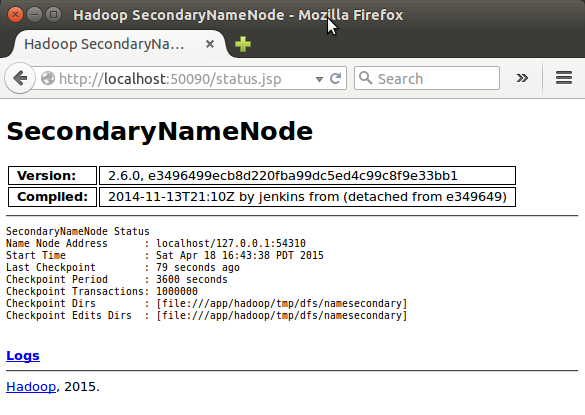
(Note) I had to restart Hadoop to get this Secondary Namenode.
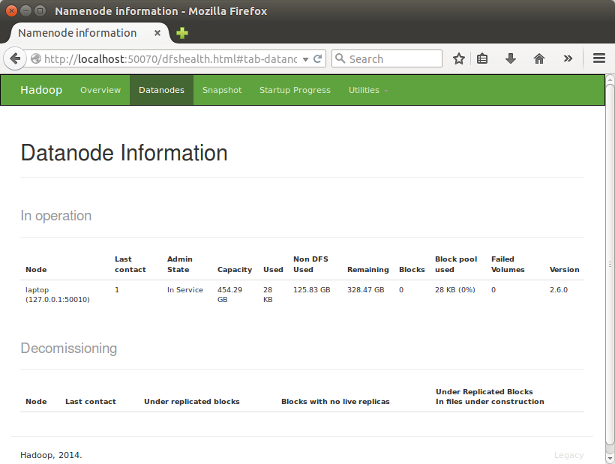
DataNode
原文链接http://www.bogotobogo.com/Hadoop/BigData_hadoop_Install_on_ubuntu_single_node_cluster.php