1. Curator安装
Curator是Elasticsearch提供的一个可用来管理索引和快照的命令行工具,它是一个Python程序,可以直接通过pipy库安装:
安装pip:pip install elasticsearch-curator
用-U更新到最新版本: pip install -U elasticsearch-curator
安装特定版本:pip install -U elastcisearch-curator==X.Y.Z
将curator安装到/home/user/.local/bin/curator:
pip install --user elastcisearch-curator
注:安装Curator需要先安装Python及Python的匹配命令,10.45.157.130上Curator已安装,可以直接使用。
2. Curator运行
Curator是一个命令行工具,本节会主要介绍如何使用命令行使用Curator。
可以通过curator --help 命令查看curator的用法,返回结果如下:
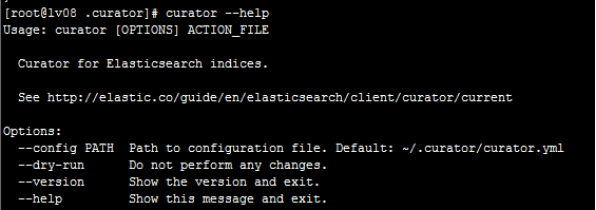
一般我们用到的命令是:
curator [--config CONFIG.YML] [--dry-run] ACTION_FILE.YML
--config CONFIG.YML是配置文件,如果不写在curator路径下会有一个默认的配置文件,主要的就是写action_file.yml脚本
curator.yml 配置文件,主要是配一下host ip和端口号:
client:
  hosts:
    - 10.45.157.94
  port: 9200
  url_prefix:
  use_ssl: False
  certificate:
  client_cert:
  client_key:
  ssl_no_validate: False
  http_auth:
  timeout: 30
  master_only: False

logging:
  loglevel: INFO
  logfile:
  logformat: default
  blacklist: ['elasticsearch', 'urllib3']
运行时有两种方法:
1、只模拟,并不真的做操作,这样方便我们调试:
curator --config /root/.curator/curator.yml --dry-run
/root/.curator/action_file.yml
2、去掉--dry-run,真正的运行命令
curator --config /root/.curator/curator.yml /root/.curator/action_file.yml
如果需要将结果打印到日志中,后面可跟日志文件的路径和名称:
Curator --config /root/.curator/curator.yml /root/.curator/action_file.yml
>> /root/.curator/test.log
同理,我们可以用同样的方法查看并学习其它命令,如:
curator_cli --help
curator_cli [OPTIONS] COMMAND [ARGS]
列出所有的索引:
curator_cli --host "10.45.157.*" --port "9200" show_indices --filter_list '{"filtertype":"none"}'
curator_cli show_indices --help
3. Rollover的使用
Rollover即滚动索引,用于将满足一定时间或数据的索引滚动到新索引。例如:创建一个logs-0001的索引,它有一个别名是logs_write
curl -XPUT 'http://host:9200/logs-test-0001/'?pretty -d'{
"aliases":{
"logs_write":{}
}
}'
然后我们给这个logs_write创建了一个rollover规则,即这个索引文档不超过1000个或者最多保存7天的数据,超过会自动切换别名到logs-000002,你也可以设置索引的setting、mapping等参数,剩下的es会自动帮你处理。
curl -XPOST 'http://host:9200/logs_write/_rollover'?pretty -d'{

"conditions":{

    "max_age":"1m",

"max_docs":1000

  },

  "settings":{

    "index.number_of_shards":2,

"refresh_interval":"1s"

  }

}'
4. 定时任务的创建
crontab命令用于设置周期性被执行的指令。该命令从标准输入设备读取指令,并将其存放于“crontab”文件中,以供之后读取和执行。
基本格式 :
* * * * * command
分 时 日 月 周 命令
第1列表示分钟1~59 每分钟用*或者 */1表示
第2列表示小时1~23(0表示0点)
第3列表示日期1~31
第4列表示月份1~12
第5列标识号星期0~6(0表示星期天)
第6列要运行的命令
“*”代表取值范围内的数字,
“/”代表”每”,
“-”代表从某个数字到某个数字,
“,”分开几个离散的数字
用法:
cat /etc/crontab 查看/etc/crontab文件
crontab -e 或者以root用户运行:crontab -u root -e
如果要每周一到周六的8点执行一次命令:
0 8 * * 1-6 你要运行的命令 >> /你的路径/create-Index.log 2>&1
例如:每分钟执行一次curator --config /root/.curator/curator.yml /root/.curator/action_file.yml命令:
PATH=/sbin:/bin:/usr/sbin:/usr/bin:/usr/local/bin
*/1 * * * * curator --config /root/.curator/curator.yml /root/.curator/action_file.yml>>/root/.curator/create-Index.log 2>&1
//将日志打印到/root/.curator/目录下的create-Index.log中,其中2>&1 表示执行结果及错误信息
:wq存盘退出
列出某个用户cron服务的详细内容:crontab -l
重启:service crond restart
删除所有任务调度工作:crontab -r
5. 示例
现在以按照规定时间自动建立新索引,并将数据写入到新索引中,再进行查询为例,具体流程如下:
1、首先先写索引模板(自动匹配以logs-开头的所有索引)
curl -XPOST 'host:9200/_template/logs_template?pretty' -d'{
  "template": "logs-*",
  "order": 0,
  "settings": {
    "number_of_shards": 2,
    "number_of_replicas": 1
  },
  "mappings":{
    "type1":{
      "_all": {
        "enabled": false
      },
      "_field_names": {
        "enabled": false
      },
      "properties":{
      "id":{
      "type":"integer",
      "index":"not_analyzed"
      },
      "name":{
      "type":"keyword",
      "index":"not_analyzed"
      },
      "gender":{
      "type":"integer",
      "index":"not_analyzed"
      },
      "age":{
      "type":"integer",
      "index":"not_analyzed"
      },
      "enter_time":{
      "type":"date",
      "index":"not_analyzed"
      }
      }
    }
  }
}'
2、以logs-当前日期建立一个索引,如今天为2017.7.20,会建立一个"logs-2017.07.20-1"的索引指定别名logs_write
curl -XPUT 'http://host:9200/%3Clogs-%7Bnow%2Fd%7D-1%3E/'?pretty -d'{
"aliases":{
"logs_write":{}
 }
}'
3、写action_file.yml文件,使用rollover让其每满1分钟便可新建一个索引
actions:
  1:
    action: rollover
    description: >-
        Rollover the index associated with index 'name', which should be in the form of prefix-000001 (or similar), or prefix-YYYY.MM.DD-1.
    options:
      name: logs_write
      conditions:
        max_age: 10s
        max_docs: 10000
      extra_settings:
        index.number_of_shards: 2
        index.number_of_replicas: 1
      timeout_override:
      continue_if_exception: False
      disable_action: False
4、运行curator,如果满1分钟,下次运行时会创建"logs-2017.07.20-000002"索引

5、用crontab建立定时任务,让其每分钟运行一次curator
PATH=/sbin:/bin:/usr/sbin:/usr/bin:/usr/local/bin
*/1 * * * * curator --config /root/.curator/curator.yml /root/.curator/action_file.yml>>/root/.curator/create-Index.log 2>&1
//将日志打印到/root/.curator/目录下的create-Index.log中,其中2>&1 表示执行结果及错误信息
有时需要重启一下crontab:service crond restart
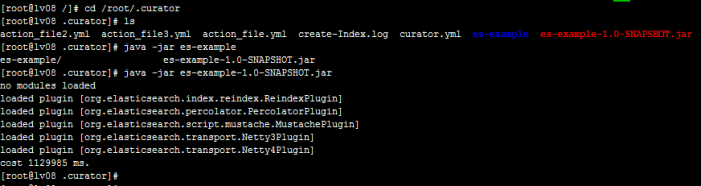
6、将批量写数据的程序打包成jar包,放到你的目录下,再次目录下运行java -jar 你的jar包名称,即可往索引中批量写入数据
7、数据查询,可将自动创建的索引放入一个别名中
 actions:
  1:
    action: alias
    description: >-
      Add/Remove selected indices to or from the specified alias,
      with a prefix of logs- to 'logs_all'
    options:
      name: logs_all
      warn_if_no_indices: False
      disable_action: False
    add:
      filters:
      - filtertype: pattern
        kind: prefix
        value: logs-
        exclude:
直接用别名进行查询即可。
6. 定期删除索引
利用curator删除索引的执行文件如下:
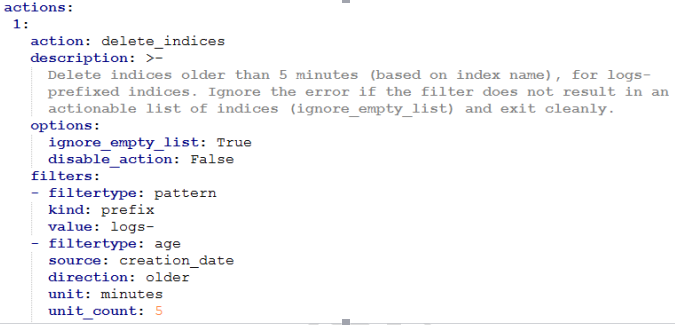
主要的配置是filtertype部分,即过滤出你要删除的索引。上例中,有两个filtertype,一个是以logs-为开头的前缀,另一个是创建时间为5分钟之前,所以,此执行文件会删除5分钟之前创建的,并且名字以logs-为前缀的所有索引。
当filtertype为age时,时间计算单位unit可以是:seconds、minutes、hours、days、weeks、mouths、years。
写好执行文件,利用crontab创建定时任务的过程与上面相同。
7.补充
命令删除索引:
curator delete indices --index .marvel- --older-than 3 --time-unit days --timestring %Y.%m.%d --dry-run //索引名是.marvel-开头的,时间格式是%Y.%m.%d,删除三天前的索引。并使用调试模式(--dry-run),只模拟删除,并不真的做操作,这样方便我们调试,如果换成正式的语句,去掉--dry-run即可
创建索引的action_file.yml 执行文件:
actions:
  1:
    action: create_index
    description: Create the index as named, with the specified extra settings.
    options:
      name: '<test10-{now/d}>' //索引名字
      extra_settings:
        settings:
          number_of_shards: 2
          number_of_replicas: 1
        mappings:
          type1:            //索引类型
             _all:
                enabled: false
             properties: //前面的空格要对其,不然会报错
                field1:
                   type: string   //如果写成type:string就会报错
                   index: not_analyzed
      disable_action: False
注意:冒号后面需要加一个空格再写属性,不然会出现异常,无法解析map,会当成一个字符串
如果有两个action操作,依次往下写即可:
actions:
  1:
    action: create_index
    description: Create the index as named, with the specified extra settings.
    options:
      name: '<logstash-{now/d}>'
      extra_settings:
        settings:
          number_of_shards: 2
          number_of_replicas: 1
      disable_action: True
  2:
    action: rollover
    description: >-
        Rollover the index associated with index 'name', which should be in the form of prefix-000001 (or similar), or prefix-YYYY.MM.DD-1.
    options:
      name: logs_write
      conditions:
        max_age: 1m
        max_docs: 100000
      extra_settings:
        index.number_of_shards: 3
        index.number_of_replicas: 1
      timeout_override:
      continue_if_exception: False
      disable_action: False
别名操作:如果今日是7.13,现有三个索引logstash-2017.07.05、logstash-2017.07.12、logstash-2017.07.13,第一个是属于上周的,第二个和第三个是属于本周的,下面的例子会将上周的索引放入别名last_week中,如果last_week不存在会创建这个别名;如果last_week存在,并且logstash-2017.07.12索引也在里面,它会从last_week别命中删除logstash-2017.07.12,只放时间是上周的索引。add和remove可以都有或者有一个(但如果两个都有时,就要有对应的索引,不然会报错,比如如果没有remove中的range_from是-2,而不存在两周前的索引,就会报错)
actions:
  1:
    action: alias
    description: >-
      Alias indices from last week, with a prefix of logstash- to 'last_week',
      remove indices from the previous week.
    options:
      name: last_week
      warn_if_no_indices: False
      disable_action: False
    add:
      filters:
      - filtertype: pattern
        kind: prefix
        value: logstash-
        exclude:
      - filtertype: period
        source: name
        range_from: -1
        range_to: -1
        timestring: '%Y.%m.%d'
        unit: weeks
        week_starts_on: sunday
    remove:
      filters:
      - filtertype: pattern
        kind: prefix
        value: logstash-
      - filtertype: period
        source: name
        range_from: 0
        range_to: 0
        timestring: '%Y.%m.%d'
        unit: weeks
        week_starts_on: sunday