vue 发布自己的组件库-vue版本v3.x
一.需求:
当遇到自己其他项目使用自己做的比较好的组件时常规的做法是ctrl+c 和ctrl+v,这种办法倒没有很大的问题,只不过当组件优化更新时,每个项目都要这么干,是不是很lower。于是经过查询一堆的资料后,发现可以发布自己的组件来达到共享的目的。需求明确后,就开始如下操作,你将会拥有自己的组件库,雷同elementui方式一样使用了。是不是很爽。
二.初始化vue项目:
vite方式初始化vue3.x项目 https://www.cnblogs.com/zlp520/p/14694599.html
三.准备文件夹及文件:
1.在src文件夹下新建components文件夹;
2.在components文件夹下新建组件文件夹里面的(ZlpAction.vue)组件文件和index.js文件
图标识的是一个组件,多个组件雷同:

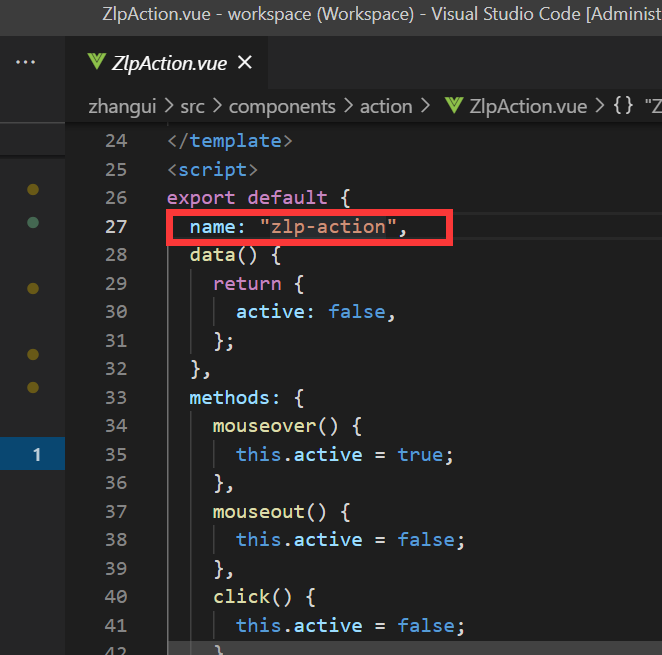
组件文件如下图:和常规组件开发一样,注意name必须有,并且必须规范
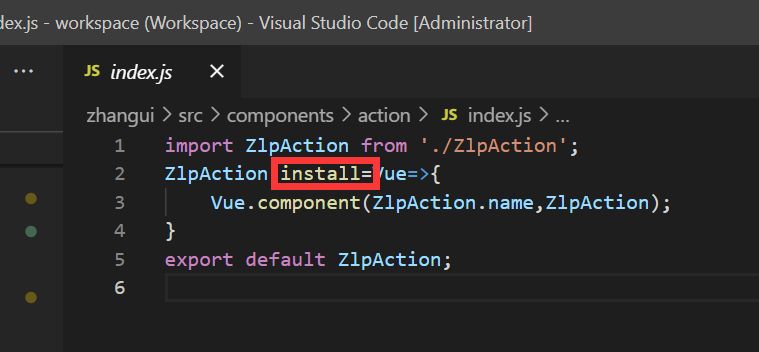
组件install的js,index.js如下图:
3.在根目录下新建index.js入口文件,index.js是为了暴露组件
根目录:index.js简略内容如下:
import info from './package.json'
import action from './src/components/action'
import actionItem from './src/components/actionItem'

const components = [
    action,
    actionItem]


const install = Vue => {
    components.forEach(item => {
        Vue.component(item.name, item)
    });
}

//引用文件方式时,会使用,类似jquery方式引入
if (typeof window !== 'undefined' && window.Vue) {
    install(window.Vue);
}

//按需导出
export {
    action,
    actionItem
}

//完整导出
export default {
    name: info.name,
    author: info.author,
    version: info.version,
    description: info.description,
    install,
    action,
    actionItem
}
四.配置:
webpack.config.js配置
var path = require('path')
var webpack = require('webpack')

module.exports = {
  // entry: './src/main.js',
  entry:process.env.NODE_ENV=='development'? './src/main.js':'./index.js',
  output: {
    path: path.resolve(__dirname, './dist'),
    publicPath: '/dist/',
    filename: 'index.js',
    library:'index',
    libraryTarget: 'umd', // 指定输出格式
    umdNamedDefine:true
  },
  module: {
    rules: [
      {
        test: /.css$/,
        use: [
          'vue-style-loader',
          'css-loader'
        ],
      },
      {
        test: /.scss$/,
        use: [
          'vue-style-loader',
          'css-loader',
          'sass-loader'
        ],
      },
      {
        test: /.sass$/,
        use: [
          'vue-style-loader',
          'css-loader',
          'sass-loader?indentedSyntax'
        ],
      },
      {
        test: /.vue$/,
        loader: 'vue-loader',
        options: {
          loaders: {
            // Since sass-loader (weirdly) has SCSS as its default parse mode, we map
            // the "scss" and "sass" values for the lang attribute to the right configs here.
            // other preprocessors should work out of the box, no loader config like this necessary.
            'scss': [
              'vue-style-loader',
              'css-loader',
              'sass-loader'
            ],
            'sass': [
              'vue-style-loader',
              'css-loader',
              'sass-loader?indentedSyntax'
            ]
          }
          // other vue-loader options go here
        }
      },
      {
        test: /.js$/,
        loader: 'babel-loader',
        exclude: /node_modules/
      },
      {
        test: /.(png|jpg|gif|svg)$/,
        loader: 'file-loader',
        options: {
          name: '[name].[ext]?[hash]'
        }
      }
    ]
  },
  resolve: {
    alias: {
      'vue$': 'vue/dist/vue.esm.js'
    },
    extensions: ['*', '.js', '.vue', '.json']
  },
  devServer: {
    historyApiFallback: true,
    noInfo: true,
    overlay: true
  },
  performance: {
    hints: false
  },
   //devtool: '#eval-source-map'
}

if (process.env.NODE_ENV === 'production') {
   //module.exports.devtool = '#source-map'
  // http://vue-loader.vuejs.org/en/workflow/production.html
  module.exports.plugins = (module.exports.plugins || []).concat([
    new webpack.DefinePlugin({
      'process.env': {
        NODE_ENV: '"production"'
      }
    }),
    new webpack.optimize.UglifyJsPlugin({
      sourceMap: true,
      compress: {
        warnings: false
      }
    }),
    new webpack.LoaderOptionsPlugin({
      minimize: true
    })
  ])
}
else{
  module.exports.devtool='#eval-source-map'
}
pack.json配置:
五.测试:
打包:npm run build
npm官网地址:https://www.npmjs.com/
先去官网注册账号,密码,邮箱,下面需要使用此信息
六.发布:
1.登录命令:npm login
2.输入账号、密码、邮箱
3.发布命令:npm publish(发布前切记更改pack.json文件中的版本号)
七.常见错误:
下载安装使用:
错误1:
Cannot read property 'name' of undefined
按需导入时,组件未获取到,原因是:没有按需导入的方式,导出组件;
错误2:
生产环境导入组件失败,提示未注册组件
原因是:未配置webpack.config.js未配置此属性 libraryTarget: 'umd', // 指定输出格式