通常你可以在 xml 配置文件中,声明一个 bean 或者 component ,然后 Spring 容器会检查和注册你的 bean 或 component 。
实际上,Spring 支持自动扫描 bean 或 component ,你可以不必再在 xml 文件中繁琐的声明 bean ,Spring 会自动扫描、检查你指定包的 bean 或 component 。
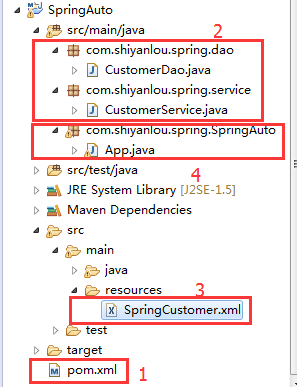
1.修改 pom.xml 文件,添加 Spring 的部署
    <!-- springAuto -->
    <dependency>
       <groupId>org.springframework</groupId>
       <artifactId>spring-core</artifactId>
       <version>4.2.0.RELEASE</version>
    </dependency>
    <dependency>
       <groupId>org.springframework</groupId>
       <artifactId>spring-context</artifactId>
       <version>4.2.0.RELEASE</version>
    </dependency>
2.手动配置 component
先看一下正常手动配置一个 bean 。 DAO 层,创建 CustomerDao.java
package com.shiyanlou.spring.dao;

public class CustomerDao {

    @Override
    public String toString() {
        return "Hello,this is CustomerDao";
    }

}
Service层,创建 CustomerService.java
package com.shiyanlou.spring.service;

import com.shiyanlou.spring.dao.CustomerDao;

public class CustomerService {
    CustomerDao customerDao;

    public CustomerDao getCustomerDao() {
        return customerDao;
    }

    public void setCustomerDao(CustomerDao customerDao) {
        this.customerDao = customerDao;
    }

    @Override
    public String toString() {
        return "CustomerService [customerDao=" + customerDao + "]";
    }


}
3.创建并配置 SpringCustomer.xml 文件
<?xml version="1.0" encoding="UTF-8"?>
<beans xmlns="http://www.springframework.org/schema/beans"
    xmlns:xsi="http://www.w3.org/2001/XMLSchema-instance"
    xsi:schemaLocation="http://www.springframework.org/schema/beans
    http://www.springframework.org/schema/beans/spring-beans-2.5.xsd">

    <bean id="customerService" class="com.shiyanlou.spring.service.CustomerService">
        <property name="customerDao" ref="customerDao" />
    </bean>

    <bean id="customerDao" class="com.shiyanlou.spring.dao.CustomerDao" />

</beans>
4.创建 App.java 文件
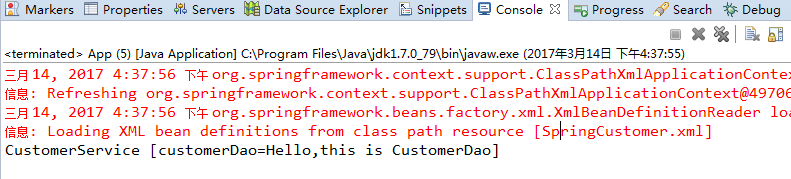
package com.shiyanlou.spring.SpringAuto;

import org.springframework.context.ApplicationContext;
import org.springframework.context.support.ClassPathXmlApplicationContext;

import com.shiyanlou.spring.service.CustomerService;

public class App
{
    public static void main( String[] args )
    {
        ApplicationContext context =
                new ClassPathXmlApplicationContext(new String[] {"SpringCustomer.xml"});
        CustomerService cust = (CustomerService) context.getBean("customerService");
        System.out.println(cust);

    }
}
实验结果:
2 自动扫描组件
用注释 @Component 来表示这个 Class 是一个自动扫描组件。
Customer.java类
package com.shiyanlou.spring.dao;

import org.springframework.stereotype.Component;

@Component
public class CustomerDao {

    @Override
    public String toString() {
        return "Hello,this is CustomerDao";
    }

}
CustomerService.java类
package com.shiyanlou.spring.service;

import org.springframework.beans.factory.annotation.Autowired;
import org.springframework.stereotype.Component;

import com.shiyanlou.spring.dao.CustomerDao;

@Component
public class CustomerService {

    @Autowired
    CustomerDao customerDao;

    public CustomerDao getCustomerDao() {
        return customerDao;
    }

    public void setCustomerDao(CustomerDao customerDao) {
        this.customerDao = customerDao;
    }

    @Override
    public String toString() {
        return "CustomerService [customerDao=" + customerDao + "]";
    }


}
3.SpringApplication.xml文件
<?xml version="1.0" encoding="UTF-8"?>
<beans xmlns="http://www.springframework.org/schema/beans"
    xmlns:xsi="http://www.w3.org/2001/XMLSchema-instance"
    xmlns:context="http://www.springframework.org/schema/context"
    xsi:schemaLocation="
              http://www.springframework.org/schema/context
                http://www.springframework.org/schema/context/spring-context.xsd
            http://www.springframework.org/schema/beans
            http://www.springframework.org/schema/beans/spring-beans.xsd">

     <context:component-scan base-package="com.shiyanlou.spring" />

</beans>

<!--
注意:以上 xml 文件中,加入了 context:component-scan 标签, 中也加入了标签,
这样就将 Spring 的自动扫描特性引入, base-package 表示组件的存放位置,
Spring 将扫描对应文件夹下的 bean(用 @Component 注释过的),将这些 bean 注册到容器中。
 -->
4.App.java与手动时一致(略)
实验结果:
与手动配置时一致
3 自定义扫描组件名称
上例中,默认情况下,Spring 将把组件 Class 的第一个字母变成小写,来作为自动扫描组件的名称,例如将 CustomerService 转变为 customerservice ,你可以用 customerService 这个名字调用组件,如下:
CustomerService cust = (CustomerService)context.getBean("customerService");
也可以像下面这样,创建自定义的组件名称:
@Service("AAA")
public class CustomerService
...
可以调用自己定义的组件了,如下:
CustomerService cust = (CustomerService)context.getBean("AAA");
4 自动扫描组件的注释类型
有 4 种注释类型,分别是:
- @Component ——表示一个自动扫描 component
- @Repository ——表示持久化层的 DAO component
- @Service ——表示业务逻辑层的 Service component
- @Controller ——表示表示层的 Controller component
在项目中,我们可以将所有自动扫描组件都用 @Component 注释,Spring 将会扫描所有用 @Component 注释过得组件。 实际上,@Repository 、 @Service 、 @Controller 三种注释是为了加强代码的阅读性而创造的,可以在不同的应用层中,用不同的注释,我们可以在上一个项目的基础上改一下注释,如下
DAO 层:
package com.shiyanlou.spring.dao;

import org.springframework.stereotype.Repository;

@Repository
public class CustomerDAO
{
    @Override
    public String toString() {
        return "Hello , This is CustomerDAO";
    }
}
Service 层:
package com.shiyanlou.spring.services;

import org.springframework.beans.factory.annotation.Autowired;
import org.springframework.stereotype.Service;

import com.shiyanlou.spring.dao.CustomerDAO;

@Service
public class CustomerService
{
    @Autowired
    CustomerDAO customerDAO;

    @Override
    public String toString() {
        return "CustomerService [customerDAO=" + customerDAO + "]";
    }
}
5 自动扫描中过滤组件
1 Filter Component - include
下例演示了用“ filter ”自动扫描注册组件,这些组件只要匹配定义的“ regex ”的命名规则,Class 前就不需要用 @Component 进行注释。 DAO 层,CustomerDAO.java 如下:
package com.shiyanlou.spring.dao;

public class CustomerDAO
{
    @Override
    public String toString() {
        return "Hello , This is CustomerDAO";
    }
}
Service 层,CustomerService.java如下:
package com.shiyanlou.spring.services;

import org.springframework.beans.factory.annotation.Autowired;
import com.shiyanlou.spring.dao.CustomerDAO;

public class CustomerService
{
    @Autowired
    CustomerDAO customerDAO;

    @Override
    public String toString() {
        return "CustomerService [customerDAO=" + customerDAO + "]";
    }

}
SpringFiltering.xml 配置如下:
 <beans xmlns="http://www.springframework.org/schema/beans"
    xmlns:xsi="http://www.w3.org/2001/XMLSchema-instance"
    xmlns:context="http://www.springframework.org/schema/context"
    xsi:schemaLocation="
            http://www.springframework.org/schema/context
            http://www.springframework.org/schema/context/spring-context.xsd
            http://www.springframework.org/schema/beans
            http://www.springframework.org/schema/beans/spring-beans.xsd">

    <context:component-scan base-package="com.shiyanlou.spring" >

        <context:include-filter type="regex"
                       expression="com.shiyanlou.spring.dao.*DAO.*" />

        <context:include-filter type="regex"
                       expression="com.shiyanlou.spring.services.*Service.*" />

    </context:component-scan>

</beans>
以上 xml 文件中,所有文件名字,只要包含 DAO 和 Service( DAO.,Service. )关键字的,都将被检查注册到 Spring 容器中
创建App.java并运行如下:
package com.shiyanlou.spring.common;

import org.springframework.context.ApplicationContext;
import org.springframework.context.support.ClassPathXmlApplicationContext;

import com.lei.customer.services.CustomerService;

public class App
{
    public static void main( String[] args )
    {
        ApplicationContext context =
        new ClassPathXmlApplicationContext(new String[] {"Spring-AutoScan.xml"});

        CustomerService cust = (CustomerService)context.getBean("customerService");
        System.out.println(cust);

    }
}
运行结果与之前相同。
2 Filter Component——exclude
也可以用 exclude ,制定组件避免被 Spring 发现并被注册到容器中。以下配置排除用 @Service 注释过的组件:
<context:component-scan base-package="com.shiyanlou.spring" >
        <context:exclude-filter type="annotation"
            expression="org.springframework.stereotype.Service" />
</context:component-scan>
以下配置排除包含 DAO 关键字的组件:
<context:component-scan base-package="com.lei" >
        <context:exclude-filter type="regex"
            expression="com.shiyanlou.spring.dao.*DAO.*" />
</context:component-scan>
三、 自动装配 Bean
所谓自动装配,就是将一个 Bean 注入到其他 Bean 的 Property 中,类似于以下:
<bean id="customer" class="com.lei.common.Customer" autowire="byName" />
Spring 支持 5 种自动装配模式,如下:
- no —— 默认情况下,不自动装配,通过
refattribute手动设定。 - buName —— 根据 Property 的 Name 自动装配,如果一个 bean 的 name ,和另一个 bean 中的 Property 的 name 相同,则自动装配这个 bean 到 Property 中。
- byType —— 根据 Property 的数据类型( Type )自动装配,如果一个 bean 的数据类型,兼容另一个 bean 中 Property 的数据类型,则自动装配。
- constructor —— 根据构造函数参数的数据类型,进行 byType 模式的自动装配。
- autodetect —— 如果发现默认的构造函数,用 constructor 模式,否则,用 byType 模式。
下例中演示自动装配,Customer.java 如下:
package com.shiyanlou.spring.autowire.common;

public class Customer
{
    private Person person;

    public Customer(Person person) {
        this.person = person;
    }

    public void setPerson(Person person) {
        this.person = person;
    }
    //...
}
Person.java 如下
package com.shiyanlou.spring.autowire.common;

public class Person
{
    //...
}
1 Auto-Wiring no
默认情况下,需要通过 ref 来装配 bean ,如下:
<bean id="customer" class="com.shiyanlou.spring.autowire.common.Customer">
    <property name="person" ref="person" />
</bean>
 <bean id="person" class="com.shiyanlou.spring.autowire.common.Person" />
Auto-Wiring byName
根据属性 Property 的名字装配 bean ,这种情况,Customer 设置了 autowire="byName" ,Spring 会自动寻找与属性名字 person 相同的 bean ,找到后,通过调用 setPerson(Person person) 将其注入属性。
<bean id="customer" class="com.shiyanlou.spring.autowire.common.Customer" autowire="byName" />
<bean id="person" class="com.shiyanlou.spring.autowire.common.Person" />
如果根据 Property name 找不到对应的 bean 配置,如下
<bean id="customer" class="com.shiyanlou.spring.autowire.common.Customer" autowire="byName" />
<bean id="person_another" class="com.shiyanlou.spring.autowire.common.Person" />
Customer 中 Property 名字是 person ,但是配置文件中找不到 person ,只有 person_another ,这时就会装配失败,运行后,Customer 中 person=null 。
3 Auto-Wiring byType
根据属性 Property 的数据类型自动装配,这种情况,Customer 设置了 autowire="byType" ,Spring 会自动寻找与属性类型相同的 bean ,找到后,通过调用 setPerson(Person person) 将其注入。
<bean id="customer" class="com.shiyanlou.spring.autowire.common.Customer" autowire="byType" />
<bean id="person" class="com.shiyanlou.spring.autowire.common.Person" />
如果配置文件中有两个类型相同的 bean 会怎样呢?如下:
<bean id="customer" class="com.shiyanlou.spring.autowire.common.Customer" autowire="byType" />
<bean id="person" class="com.shiyanlou.spring.autowire.common.Person" />
<bean id="person_another" class="com.shiyanlou.spring.autowire.common.Person" />
一旦配置如上,有两种相同数据类型的 bean 被配置,将抛出 UnsatisfiedDependencyException 异常,见以下: Exception in thread "main" org.springframework.beans.factory.UnsatisfiedDependencyException: 所以,一旦选择了 byType 类型的自动装配,请确认你的配置文件中每个数据类型定义一个唯一的 bean 。
4 Auto-Wiring constructor
这种情况下,Spring 会寻找与参数数据类型相同的 bean ,通过构造函数 public Customer(Person person) 将其注入。
<bean id="customer" class="com.shiyanlou.spring.autowire.common.Customer" autowire="constructor" />
<bean id="person" class="com.shiyanlou.spring.autowire.common.Person" />
注意:项目中 autowire 结合 dependency-check 一起使用是一种很好的方法,这样能够确保属性总是可以成功注入。如下:
<bean id="customer" class="com.shiyanlou.spring.autowire.common.Customer" autowire="autodetect" dependency-check="objects" />
<bean id="person" class="com.shiyanlou.spring.autowire.common.Person" />