本文主要总结一下spring的所有用法,更多原理篇在后续章节。涵盖内容如下所列:
- 什么是Ioc/DI、AOP、Spring容器
- Ioc/DI基于xml、xml和注解混合、以及纯注解的不同实现
- AOP基于xml、xml和注解混合、以及纯注解的不同实现
- 声明式事务基于xml、xml和注解混合、以及纯注解的不同实现
emmm.........That's All , let's go.
一、spring简介
老规矩,甭管啥,先上图:
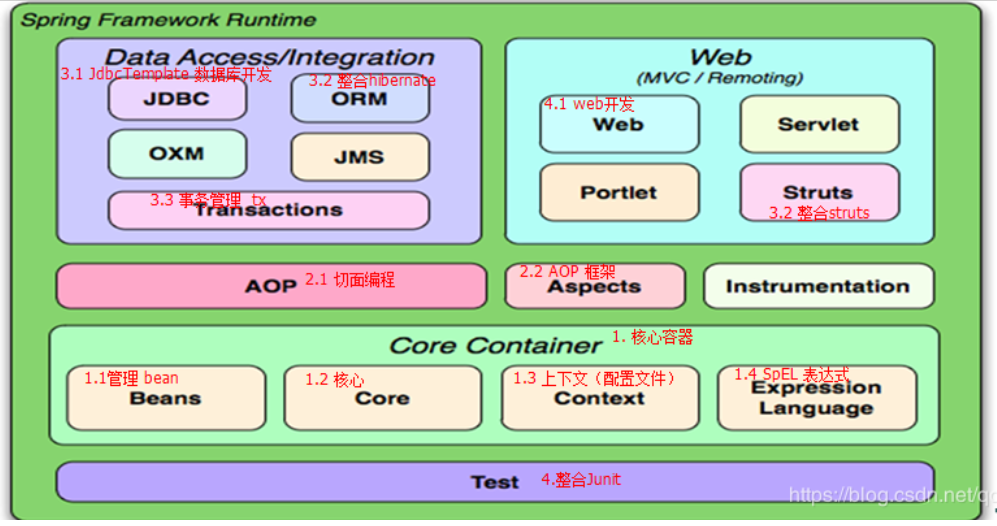
Ioc(核心中的核心):Inverse of control,控制反转。对象的创建权利由程序反转给Spring框架。
DI:Dependency Injection,依赖注入。在Spring框架负责创建对象Bean时,动态的将依赖度的对象注入到Bean组件中!
AOP:Aspect Oriented Programming,面向切面编程。在不修改目标对象的源代码情况下,增强Ioc容器中Bean的功能。
Spring容器:指的就是Ioc容器,装载Bean对象的容器。底层就是一个BeanFactory。
二、Ioc、DI
A、Bean的基础使用方式(无参数版本)
spring容器默认通过无参构造方法创建Bean对象。
1、applicationContext.xml配置(多余的命名空间不必在意o(* ̄︶ ̄*)o):
<?xml version="1.0" encoding="UTF-8"?>
<beans xmlns="http://www.springframework.org/schema/beans"
    xmlns:xsi="http://www.w3.org/2001/XMLSchema-instance"
    xmlns:context="http://www.springframework.org/schema/context"
    xmlns:aop="http://www.springframework.org/schema/aop"
    xsi:schemaLocation="http://www.springframework.org/schema/beans
        http://www.springframework.org/schema/beans/spring-beans.xsd
        http://www.springframework.org/schema/context
        http://www.springframework.org/schema/context/spring-context.xsd
        http://www.springframework.org/schema/aop
        http://www.springframework.org/schema/aop/spring-aop.xsd">
     <!-- id是Bean的名称,class是类全限定名,init-method是初始化对象前执行的方法,destroy-method是销毁对象后执行的方法(容器销毁对象就销毁),还有未罗列的scope代表作用域-->
     <bean id="userService" class="service.UserServiceImpl" init-method="init" destroy-method="destroy" />
</beans>
2、Bean类定义如下:
package service;

public class UserServiceImpl implements UserService{

    //无参构造
    public UserServiceImpl() {
    }

    @Override
    public void saveUser() {
        System.out.println("保存用户成功!");
    }
    public void init() {
        System.out.println("初始化操作");
    }
    public void destroy() {
        System.out.println("销毁操作:释放资源等");
    }
}
3、测试代码:
@org.junit.Test
    public void xmlTest() {
        //一般使用ApplicationContext,由于需要关闭容器使用了AbstractApplicationContext
//        ApplicationContext context = new ClassPathXmlApplicationContext("applicationContext.xml");
        AbstractApplicationContext context = new ClassPathXmlApplicationContext("applicationContext.xml");

//        UserService us = (UserService)context.getBean("userService");//也可以通过bean的名称实例化
        UserService us = context.getBean(UserService.class);

        us.saveUser();
        context.close();//关闭容器才会销毁对象,测试destroy()方法
    }
4、输出结果为:
初始化操作
保存用户成功!
销毁操作:释放资源等
B、Bean的基础使用方式(有基础类型参数版本)
1、xml配置:(此时值是必传的,否则会报错)


<?xml version="1.0" encoding="UTF-8"?>
<beans xmlns="http://www.springframework.org/schema/beans"
    xmlns:xsi="http://www.w3.org/2001/XMLSchema-instance"
    xmlns:context="http://www.springframework.org/schema/context"
    xmlns:aop="http://www.springframework.org/schema/aop"
    xsi:schemaLocation="http://www.springframework.org/schema/beans
        http://www.springframework.org/schema/beans/spring-beans.xsd
        http://www.springframework.org/schema/context
        http://www.springframework.org/schema/context/spring-context.xsd
        http://www.springframework.org/schema/aop
        http://www.springframework.org/schema/aop/spring-aop.xsd">

     <!-- 1、通过构造器注入属性值 -->
     <bean id="userService" class="service.UserServiceImpl" init-method="init" destroy-method="destroy">
         <constructor-arg name="id" value="1" />
         <constructor-arg name="name" value="王麻子"/>
     </bean>
    <!-- 2、通过setter方法注入属性值
     <bean id="userService" class="service.UserServiceImpl" init-method="init" destroy-method="destroy">
        <property name="id" value="1" />
        <property name="name" value="2" />
     </bean> -->
</beans>
2、Bean类:
package service;

public class UserServiceImpl implements UserService{

    private String id ;
    private String name ;

    //构造方法
    public UserServiceImpl(String id, String name) {
        super();
        this.id = id;
        this.name = name;
    }

    //setter
    public void setId(String id) {
        this.id = id;
    }
    public void setName(String name) {
        this.name = name;
    }

    @Override
    public void saveUser() {
        System.out.println("保存用户User[id="+id+",name="+name+"]成功!");
    }
    public void init() {
        System.out.println("初始化操作");
    }
    public void destroy() {
        System.out.println("销毁操作:释放资源等");
    }
}
3、测试代码不变(同上)。
4、测试结果:
初始化操作
保存用户User[id=1,name=王麻子]成功!
销毁操作:释放资源等
C、xml方式的Ioc、DI(有引用类型参数版本)
1、xml配置:
<?xml version="1.0" encoding="UTF-8"?>
<beans xmlns="http://www.springframework.org/schema/beans"
    xmlns:xsi="http://www.w3.org/2001/XMLSchema-instance"
    xmlns:context="http://www.springframework.org/schema/context"
    xmlns:aop="http://www.springframework.org/schema/aop"
    xsi:schemaLocation="http://www.springframework.org/schema/beans
        http://www.springframework.org/schema/beans/spring-beans.xsd
        http://www.springframework.org/schema/context
        http://www.springframework.org/schema/context/spring-context.xsd
        http://www.springframework.org/schema/aop
        http://www.springframework.org/schema/aop/spring-aop.xsd">

    <!-- 通过setter方法注入属性值  -->
     <bean id="userService" class="service.UserServiceImpl" init-method="init" destroy-method="destroy">
        <property name="id" value="1" />
        <property name="name" value="王麻子" />
        <property name="userDao" ref="userDao" /><!-- 通过ref动态注入userDao -->
     </bean>
     <!-- 注入对象 -->
     <bean id="userDao" class="dao.UserDaoImpl"></bean>
</beans>
2、Bean类(增加引用类型):
package service;

import dao.UserDao;

public class UserServiceImpl implements UserService{

    private String id ;
    private String name ;
    private UserDao userDao ;//通过spring容器动态注入值

    //setter
    public void setId(String id) {
        this.id = id;
    }
    public void setName(String name) {
        this.name = name;
    }
    public void setUserDao(UserDao userDao) {
        this.userDao = userDao;
    }

    @Override
    public void saveUser() {
        userDao.saveUser(id, name);//调用注入对象的方法
    }
    public void init() {
        System.out.println("初始化操作");
    }
    public void destroy() {
        System.out.println("销毁操作:释放资源等");
    }
}
3、测试代码不变。
4、测试结果:
初始化操作
UserDao=>保存用户User[id=1,name=王麻子]成功!
销毁操作:释放资源等
D、xml与注解混合方式的Ioc、DI
1、配置类:
<?xml version="1.0" encoding="UTF-8"?>
<beans xmlns="http://www.springframework.org/schema/beans"
    xmlns:xsi="http://www.w3.org/2001/XMLSchema-instance"
    xmlns:context="http://www.springframework.org/schema/context"
    xmlns:aop="http://www.springframework.org/schema/aop"
    xsi:schemaLocation="http://www.springframework.org/schema/beans
        http://www.springframework.org/schema/beans/spring-beans.xsd
        http://www.springframework.org/schema/context
        http://www.springframework.org/schema/context/spring-context.xsd
        http://www.springframework.org/schema/aop
        http://www.springframework.org/schema/aop/spring-aop.xsd">

    <!-- 开启注解并扫描指定包中带有注解的类 -->
    <context:component-scan base-package="dao;service" />
</beans>
2、Bean类:
注:此处使用@@PropertySource注入基础类型的值
@Service
@PropertySource("classpath:other.properties")
public class UserServiceImpl implements UserService{

    @Value("${id}")
    private String id ;
    @Value("${name}")
    private String name ;
    @Resource
    private UserDao userDao ;//通过spring容器动态注入值

    //setter
    public void setId(String id) {
        this.id = id;
    }
    public void setName(String name) {
        this.name = name;
    }
    public void setUserDao(UserDao userDao) {
        this.userDao = userDao;
    }

    @Override
    public void saveUser() {
        userDao.saveUser(id, name);//调用注入对象的方法
    }
    @PostConstruct
    public void init() {
        System.out.println("初始化操作");
    }
    @PreDestroy
    public void destroy() {
        System.out.println("销毁操作:释放资源等");
    }
}
3、other.properties文件内容:
id=1
name=Jhon
4、测试代码不变
5、测试结果:
初始化操作
UserDao=>保存用户User[id=1,name=Jhon]成功!
销毁操作:释放资源等
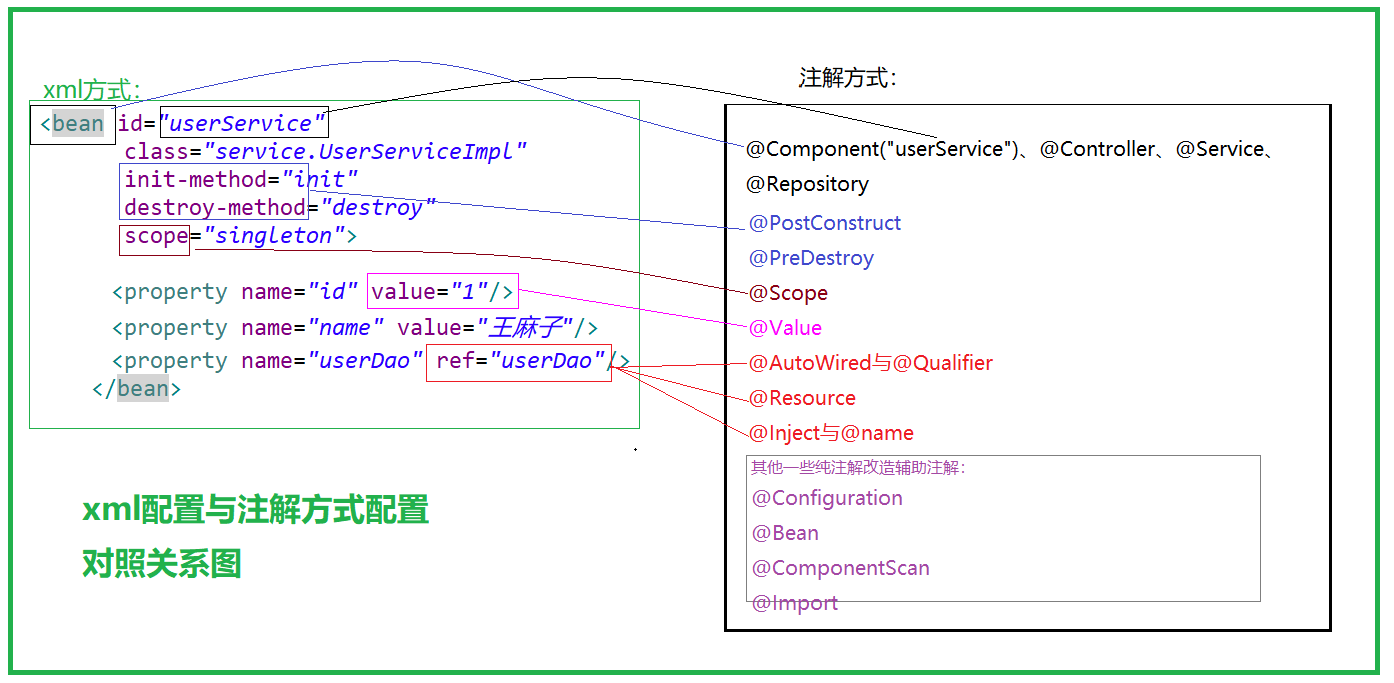
Controller&Service&Repository注解:
他们三个都是针对@Component的衍生注解。
@Controller:一般用于表现层。
@Service:一般用于业务层。
@Repository:一般用于持久层。
Autowired&Resource&Inject注解:
三个都是动态装配引用对象的注解。一般使用@Resource即可。
@Autowired是Spring自带的注解,默认是按照类型(byType)装配。如果需要按照名称(byName)装配,需要结合@Qualifier注解一起使用。
@Resource是属于J2EE JSR250的注解,默认是按照名称装配。可以通过@Resource的name属性指定名称,如果没有指定name属性,以字段名首字母小写按照名称查找,当找不到与名称匹配的bean时会自动按照类型进行装配。如果name一旦指出,则只按照名称查找。
@Inject是属于J2EE JSR330的注解。默认按照类型进行装配。如果需要按照名称进行装配,则需要配合@Named注解一起使用。
E、纯注解方式的Ioc、DI
有点饿,想吃饭了,省点时间直接盗用别人的一张图吧。如下(主要讲的是纯注解方式需要面对的问题。也就是纯注解方式相较注解和xml混合方式主要解决了哪些事):

基于以上问题,新引入了几个注解:
@Configuration
@Bean
@ComponentScan
@Import
具体使用,直接看代码吧。
1、配置文件直接干掉。
2、新增配置类:
package configuration;

import org.springframework.context.annotation.ComponentScan;
import org.springframework.context.annotation.Configuration;
import org.springframework.context.annotation.Import;
import org.springframework.context.annotation.PropertySource;

@Configuration
@ComponentScan("dao;service")//扫描包
@Import({OtherConfiguration.class})//导入其他配置类,可以有多个。和允许有多个xml一个道理
public class SpringConfiguration {

    public SpringConfiguration() {
        System.out.println("spring 容器开始启动。。。。");
    }

//    @Bean
//    @Scope("prototype")
//    public SqlSessionFactory userService() {
//        //pass 这里边主要负责实例化spring容器本身需要的一些对象。
//    }

}
@PropertySource("classpath:other.properties")
class OtherConfiguration {
    public OtherConfiguration() {
        System.out.println("OtherConfiguration构造方法:负责加载其他配置信息。。。");
    }
}
3、Bean类:
@Service
public class UserServiceImpl implements UserService{

    @Value("${id}")
    private String id ;
    @Value("${name}")
    private String name ;
    @Resource
    private UserDao userDao ;//通过spring容器动态注入值

    //setter
    public void setId(String id) {
        this.id = id;
    }
    public void setName(String name) {
        this.name = name;
    }
    public void setUserDao(UserDao userDao) {
        this.userDao = userDao;
    }

    @Override
    public void saveUser() {
        userDao.saveUser(id, name);//调用注入对象的方法
    }
    @PostConstruct
    public void init() {
        System.out.println("初始化操作");
    }
    @PreDestroy
    public void destroy() {
        System.out.println("销毁操作:释放资源等");
    }
}
4、测试代码:
@org.junit.Test
    public void annotationTest() {
        //此处使用注解类AnnotationConfigApplicationContext实例化容器
        AbstractApplicationContext context = new AnnotationConfigApplicationContext(SpringConfiguration.class);
        UserService us = context.getBean(UserService.class);
        us.saveUser();
        context.close();
    }
5、测试结果:
spring 容器开始启动。。。。
初始化操作
OtherConfiguration构造方法:负责加载其他配置信息。。。
UserDao=>保存用户User[id=1,name=Jhon]成功!
销毁操作:释放资源等
总结:
虽然使用注解看起来很方便,但是很明显它的缺点是配置与业务代码存在严重耦合。但也不是说注解就是个笑话。总有一些时候,注解使用会更好一些,比如在spring boot中注解就扮演着很重要的角色。(具体情况具体考量,老铁)
二、AOP的使用
通常情况下,程序扩展功能需要修改原有的代码,这样很不方便。而且也使得代码内容显得不够纯粹,比如:业务代码中夹杂有日志统计、柜员复核等一些无关的代码。
解决这一问题:一个很常用的解决方案就是使用动态代理。
spring中的AOP就是使用动态代理技术,来实现代码功能的横向增强。
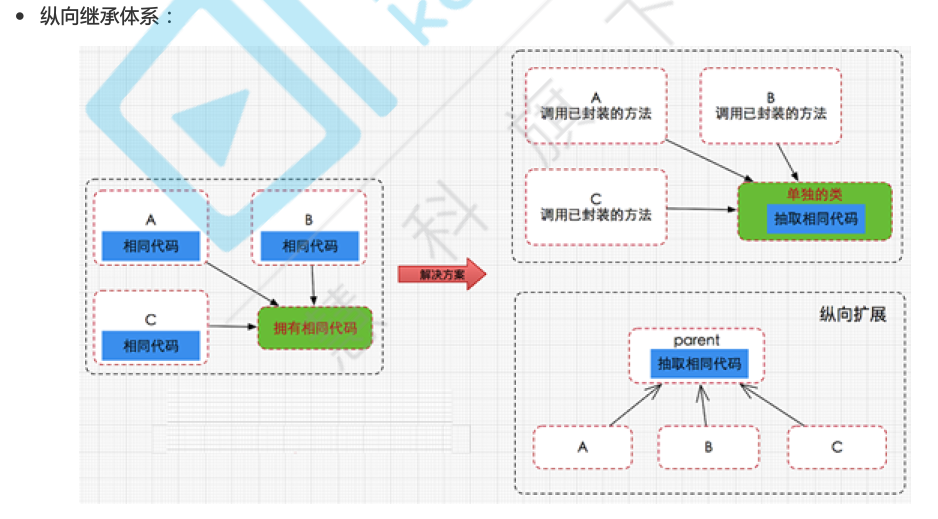
纵向抽取机制:

名词解释:
- JoinPoint(连接点)
- 所谓连接点是指那些被拦截到的点。在spring中,这些点值的是方法,因为spring只支持方法类型的连接点。
- PointCut(切入点)
- 所谓切入点是指我们要对那些JoinPoint进行拦截的定义。
- Advice(通知/增强)
- 所谓通知是指拦截到JoinPoint后所要做的事情。通知分为前置通知、后置通知、环绕通知、最终通知、异常通知。(切面要完成的功能)
- Introduction(引介)
- 引介是一种特殊的通知在不修改类代码的前提下,Introduction可以在运行期间动态的为类添加一些方法或Field。
- Target(目标对象)
- 代理的目标对象。
- Weaving(织入)
- 把增强应用到目标对象来创建新的代理对象的过程。
- Proxy(代理)
- 被AOP织入增强后产生的代理类。
- Aspect(切面)
- 切入点和通知的结合。
- Advisor(通知器、顾问)
- 和Aspect很相似。
A:使用xml实现AOP
1、编写通知类:
package advice;

public class LogAdvice {

    public void log() {
        System.out.println("记录日志。。。。。。");
    }
}
2、AOP配置:
其中切入点的配置使用表达式表示,格式为:
execution([修饰符] 返回值类型 包名.类名.方法名(参数))
①修饰符可省略
②返回值可以用*表示所有。或者使用具体值如:void,int,User等
③包名:
包名可以用*代替。如果是多级包名,想省略中间的*,可以使用..。如*..*可以表示com.a.service,也可以表示com.a.b.service
④类名:
类名可以使用*,表示任意;*Service,表示已Service结尾的类。
⑤参数:
也可以使用*表示,如果是多个参数可以用..表示。
<!-- 配置通知、增强 -->
    <bean id="logAdvice" class="advice.LogAdvice"></bean>
    <!-- AOP切面配置 -->
    <aop:config>
        <aop:aspect ref="logAdvice">
            <aop:after method="log" pointcut="execution (* service.*.*(..))"/>
        </aop:aspect>
    </aop:config>
3、其他不变。测试结果为:
初始化操作
UserDao=>保存用户User[id=1,name=Jhon]成功!
记录日志。。。。。。
销毁操作:释放资源等
B:使用xml与注解混合方式实现AOP
1、配置文件
<?xml version="1.0" encoding="UTF-8"?>
<beans xmlns="http://www.springframework.org/schema/beans"
    xmlns:xsi="http://www.w3.org/2001/XMLSchema-instance"
    xmlns:context="http://www.springframework.org/schema/context"
    xmlns:aop="http://www.springframework.org/schema/aop"
    xsi:schemaLocation="http://www.springframework.org/schema/beans
        http://www.springframework.org/schema/beans/spring-beans.xsd
        http://www.springframework.org/schema/context
        http://www.springframework.org/schema/context/spring-context.xsd
        http://www.springframework.org/schema/aop
        http://www.springframework.org/schema/aop/spring-aop.xsd">

    <!-- 开启注解并扫描指定包中带有注解的类 -->
    <context:component-scan base-package="dao;service;advice" />
    <!-- 开启切面自动扫描功能 -->
    <aop:aspectj-autoproxy />
</beans>
2、切面类。(此时是切面类而不是通知类)
@Component//注意这个注解不要漏了
@Aspect//注解此类为一个切面(所以里边会定义切入点与通知)
public class LogAspect {

    @After("execution(* *.*.*())")//值为切入点表达式
    public void log() {
        System.out.println("记录日志。。。。。。");
    }

    @Around("LogAspect.fn()")//环绕通知测试
    public Object testAround(ProceedingJoinPoint pjp) {
        try {
            System.out.println("环绕前.....");
            Object obj = pjp.proceed();
            System.out.println("环绕后.....");
            return obj ;
        } catch (Throwable e) {
            e.printStackTrace();
        }
        return null;
    }

    @Before(value="LogAspect.fn()")//引用如下定义的通用切入点
    public void testBefore() {
        System.out.println("方法执行前。。。");
    }

    @Pointcut("execution(void service.UserServiceImpl.saveUser())")//定义一个通用的切入点
    public void fn() {}
}
3、其他不变。测试结果:
环绕前.....
方法执行前。。。
UserDao=>保存用户User[id=1,name=Jhon]成功!
环绕后.....
记录日志。。。。。。
C:纯注解方式实现AOP
配置类上加入如下注解即可:
@EnableAspectJAutoProxy
public class SpringConfiguration {
    .......
}
三、声明式事务的配置
由于事务的测试需要数据库的支撑,所以在没有整合Mybatis之前无法直接测试事务。
Spring中的事务也只是做个配置,最终还是交由数据库管理事务。因此,此章节仅仅写下示例配置:
<!-- 配置数据源 -->
    <bean id="dataSource" class=".......">
        <property name="driverClass" value="..."></property>
        <property name="url" value="..."></property>
        <property name="username" value="..."></property>
        <property name="password" value="..."></property>
    </bean>
    <!-- 配置事务管理器 -->
    <bean id="transactionManager"
    class="org.springframework.jdbc.datasource.DatasourceTransactionManager">
        <!-- 注入数据源 -->
        <property name="dataSource" ref="dataSource"></property>
    </bean>
    <!-- 事务通知 -->
    <tx:advice id="advice" transaction-manager="transactionManager">
        <!-- 配置事务相关属性 -->
        <tx:attributes>
            <tx:method name="query" read-only="true"/>
            <tx:method name="add" propagation="REQUIRED"/>
        </tx:attributes>
    </tx:advice>
    <!-- 配置aop -->
    <aop:config>
        <aop:advisor advice-ref="advice" pointcut="execution(* *.service.*(..))"/>
    </aop:config>