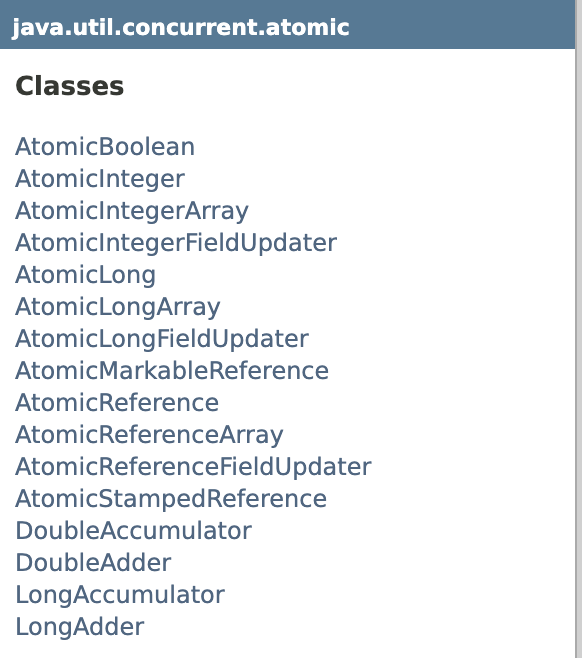
接下来我们来介绍18罗汉以及LongAdder底层实现原理
(1). 基本类型原子类(AtomicInteger、AtomicBoolean、AtomicLong)
(2). 数组类型原子类 (AtomicIntegerArray、AtomicLongArray、AtomicReferenceArray)
(3). 引用类型原子类 (AtomicReference、AtomicStampedReference、AtomicMarkableReference)
(4). 对象的属性修改原子类 (AtomicIntegerFieldUp dater、AtomicLongFieldUpdater、AtomicRefere nceFieldUpdater)
(5). 原子操作增强类(DoubleAccumulator 、DoubleAdder 、LongAccumulator 、LongAdder)
(6). 第17位罗汉:Striped64 第18位罗汉: Number
基本类型原子类
AtomicInteger、AtomicBoolean、AtomicLong
常用API
- public final int get() 获取当前的值
- public final int getAndSet(int newValue) 获取到当前的值,并设置新的值
- public final int getAndIncrement() 获取当前的值,并自增
- public final int getAndDecrement() 获取到当前的值,并自减
- public final int getAndAdd(int delta) 获取到当前的值,并加上预期的值
- public final int incrementAndGet( ) 返回的是加1后的值
- boolean compareAndSet(int expect,int update) 如果输入的数值等于预期值,返回true
应用场景
-
保证原子
public class AtomicIntegerDemo { AtomicInteger atomicInteger=new AtomicInteger(0); public void addPlusPlus(){ atomicInteger.incrementAndGet(); } public static void main(String[] args) throws InterruptedException { CountDownLatch countDownLatch=new CountDownLatch(10); AtomicIntegerDemo atomic=new AtomicIntegerDemo(); // 10个线程进行循环100次调用addPlusPlus的操作,最终结果是10*100=1000 for (int i = 1; i <= 10; i++) { new Thread(()->{ try{ for (int j = 1; j <= 100; j++) { atomic.addPlusPlus(); } }finally { countDownLatch.countDown(); } },String.valueOf(i)).start(); } //(1). 如果不加上下面的停顿3秒的时间,会导致还没有进行i++ 1000次main线程就已经结束了 //try { TimeUnit.SECONDS.sleep(3); } catch (InterruptedException e) {e.printStackTrace();} //(2). 使用CountDownLatch去解决等待时间的问题 countDownLatch.await(); System.out.println(Thread.currentThread().getName()+" "+"获取到的result:"+atomic.atomicInteger.get()); } } -
AtomicBoolean可以作为中断标识停止线程的方式
AtomicLong的底层是CAS+自旋锁的思想,适用于低并发的全局计算,高并发后性能急剧下降,原因如下:N个线程CAS操作修改线程的值,每次只有一个成功过,其他N-1失败,失败的不停的自旋直到成功,这样大量失败自旋的情况,一下子cpu就打高了(AtomicLong的自旋会成为瓶颈)
在高并发的情况下,我们使用LoadAdder
数组类型原子类
AtomicIntegerArray、AtomicLongArray、AtomicReferenceArray
public class AtomicIntegerArrayDemo {
    public static void main(String[] args) {
        //(1). 创建一个新的AtomicIntegerArray,其长度与从给定数组复制的所有元素相同。
        int[]arr2={1,2,3,4,5};
        AtomicIntegerArray array=new AtomicIntegerArray(arr2);
        //(2). 创建给定长度的新AtomicIntegerArray,所有元素最初为零。
        //AtomicIntegerArray array=new AtomicIntegerArray(5);

        for (int i = 0; i < arr.length; i++) {
            System.out.print(arr[i]);
        }
        array.getAndSet(0,1111);
        System.out.println("============");
        System.out.println("将数字中位置为0位置上的元素改为:"+array.get(0));
        System.out.println("数组位置为1位置上的旧值是:"+array.get(1));
        System.out.println("将数组位置为1位置上的数字进行加1的处理");
        array.getAndIncrement(1);
        System.out.println("数组位置为1位置上的新值是:"+array.get(1));
    }
}
引用类型原子类
AtomicReference、AtomicStampedReference、AtomicMarkableReference
可以用来实现自旋锁,AtomicStampedReference可以解决ABA问题
AtomicMarkableReference
- 原子更新带有标志位的引用类型对象
- 解决是否修改(它的定义就是将状态戳简化位true|false),类似一次性筷子
- 状态戳(true/false)原子引用
- 不建议用它解决ABA问题
AtomicStampedReference和AtomicMarkableReference区别
- stamped – version number 版本号,修改一次+1
- Markable – true、false 是否修改过
    static AtomicMarkableReference<Integer> markableReference = new AtomicMarkableReference<>(100,false);

    public static void main(String[] args){
        System.out.println("=AtomicMarkableReference不关心引用变量更改过几次,只关心是否更改过==");
        new Thread(() -> {
            boolean marked = markableReference.isMarked();
            System.out.println(Thread.currentThread().getName()+"	 1次版本号"+marked);
            try { TimeUnit.MILLISECONDS.sleep(100); } catch (InterruptedException e) { e.printStackTrace(); }
            markableReference.compareAndSet(100,101,marked,!marked);
            System.out.println(Thread.currentThread().getName()+"	 2次版本号"+markableReference.isMarked());
            markableReference.compareAndSet(101,100,markableReference.isMarked(),!markableReference.isMarked());
            System.out.println(Thread.currentThread().getName()+"	 3次版本号"+markableReference.isMarked());
        },"线程A").start();

        new Thread(() -> {
            boolean marked = markableReference.isMarked();
            System.out.println(Thread.currentThread().getName()+"	 1次版本号"+marked);
            //暂停几秒钟线程
            try { TimeUnit.MILLISECONDS.sleep(100); } catch (InterruptedException e) { e.printStackTrace(); }
            markableReference.compareAndSet(100,2020,marked,!marked);
            System.out.println(Thread.currentThread().getName()+"	"+markableReference.getReference()+"	"+markableReference.isMarked());
        },"线程B").start();
    }
对象的属性修改原子类
AtomicIntegerFieldUpdater、AtomicLongFieldUpdater、AtomicReferenceFieldUpdater
使用目的:以一种线程安全的方式操作非线程安全对象内的某些字段(是否可以不要锁定整个对象,减少锁定的范围,只关注长期、敏感性变化的某一个字段,而不是整个对象,已达到精确加锁+节约内存的目的)
使用
- 更新的对象属性必须使用
volatile修饰符 - 因为对象的属性修改类型原子类都是抽象类,所以每次使用都必须使用静态方法newUpdater( )创建一个更新器,并且需要设置想要更新的类和属性
Demo1
@Data
class User {
    private static AtomicIntegerFieldUpdater<User> updater = AtomicIntegerFieldUpdater.newUpdater(User.class, "id");

    private volatile int id;//这里用Integer会报错,Integer必须使用AtomicReferenceFieldUpdater

    public void test() {
        int i = updater.incrementAndGet(this);
        System.out.println(i);
    }
}
Demo2 多线程并发调用一个类的初始化方法,如果未被初始化过,将执行初始化工作,要求只能初始化一次
@Data
class MyVar {
    private volatile Boolean isInit = Boolean.FALSE;
    AtomicReferenceFieldUpdater<MyVar, Boolean> updater = AtomicReferenceFieldUpdater.newUpdater(MyVar.class, Boolean.class, "isInit");

    public void init() {
        if (updater.compareAndSet(this, Boolean.FALSE, Boolean.TRUE)) {
            System.out.println(Thread.currentThread().getName() + "	 start init");
            try {
                TimeUnit.SECONDS.sleep(3);
            } catch (InterruptedException e) {
                e.printStackTrace();
            }
            System.out.println(Thread.currentThread().getName() + "	 end init");
        } else {
            System.out.println(Thread.currentThread().getName()+"	 fail init");
        }
    }
}
既然有了AtomicInteger了为什么又要写一个AtomicIntegerFieldUpdater呢?
- 对于AtomicIntegerFieldUpdater是static final类型也就是说即使创建了100个对象AtomicIntegerField也只存在一个不会占用对象的内存,但是AtomicInteger会创建多个AtomicInteger对象,占用的内存比AtomicIntegerFieldUpdater大,所以对于熟悉dubbo源码的人都知道,dubbo有个实现轮询负载均衡策略的类AtomicPositiveInteger用的就是AtomicIntegerFieldUpdate,在netty底层大量使用了这个类
原子操作增强类
DoubleAccumulator 、DoubleAdder 、LongAccumulator 、LongAdder
常用API
| 方法 | 说明 |
|---|---|
| void add(long x) | 将当前的value加x |
| void increment( ) | 将当前的value加1 |
| void decrement( ) | 将当前value减1 |
| long sum( ) | 返回当前的值,特别注意,在存在并发的情况下,sum不保证返回精确值 |
| long longvale() | 等价于long sum( ) |
| void reset() | 将value重置为0,可用于替换重新new一个LongAdder,但次方法只可以在没有并发更新的情况下使用 |
| long sumThenReset() | 获取当前value,并将value重置为0 |
LongAdder只能用来计算加法、减法,且从零开始计算
LongAccumulator提供了自定义的函数操作
public class LongAdderDemo {
    public static void main(String[] args) {
        // LongAdder只能做加减法,不能做乘除法
        LongAdder longAdder=new LongAdder();
        longAdder.increment();
        longAdder.increment();
        longAdder.increment();
        longAdder.decrement();

        System.out.println(longAdder.longValue());//4
        System.out.println("========");
        //LongAccumulator (LongBinaryOperator accumulatorFunction, long identity)
        //LongAccumulator longAccumulator=new LongAccumulator((x,y)->x+y,0);
        LongAccumulator longAccumulator=new LongAccumulator(new LongBinaryOperator() {
            @Override
            public long applyAsLong(long left, long right) {
                return left*right;
            }
        },5);
        longAccumulator.accumulate(1);
        longAccumulator.accumulate(2);
        longAccumulator.accumulate(3);
        System.out.println(longAccumulator.longValue());//30
    }
}
【参考】volatile 解决多线程内存不可见问题。对于一写多读,是可以解决变量同步问题,但 是如果多写,同样无法解决线程安全问题。
说明:如果是 count++操作,使用如下类实现:AtomicInteger count = new AtomicInteger(); count.addAndGet(1); 如果是 JDK8,推荐使用 LongAdder 对象,比 AtomicLong 性能更好(减少乐观锁的重试次数)。
——阿里巴巴Java开发手册
如何证明LongAdder对象比AtomicLong性能更好?
通过测试代码(测试代码附在最后)我们发现结果是:
sync结果:50000000,耗时:2203
atomicInteger结果:50000000,耗时:819
atomicLong结果:50000000,耗时:836
longAdder结果:50000000,耗时:106
longAccumulator结果:50000000,耗时:148
该组数据测试环境为Windows 11 Build 22000.100,OpenJDK16.0.3,AMD 4800U
在5000w的自增中,性能排序为LongAdder>LongAccumulator>>>>atomicInteger>atomicLong>synchronized
同时原子类的性能随着线程数的增加,在总量不变的前提下,性能急剧下降,就是CAS存在的缺陷了.
同时一个有趣的现象,在我的M1 MacBook上不管使用哪个JDK,AtomicInteger耗时居然比同步要久,这应该跟M1的CPU架构有关系,暂未做深究。
同时附上一个国外关于LongAdder和AtomicLong对比的文章Java 8 Performance Improvements: LongAdder vs AtomicLong | Palomino Labs Blog
引言
在并发量比较低的情况下,线程冲突的概率比较小,自旋的次数不会很多。但是,高并发情况下,N个线程同时进行自旋操作,N-1个线程失败,导致CPU打满场景,此时AtomicLong的自旋会成为瓶颈,这就是LongAdder引入的初衷——解决高并发环境下AtomicLong的自旋瓶颈问题。
LongAddr源码
public class LongAdder extends Striped64 implements Serializable
abstract class Striped64 extends Number
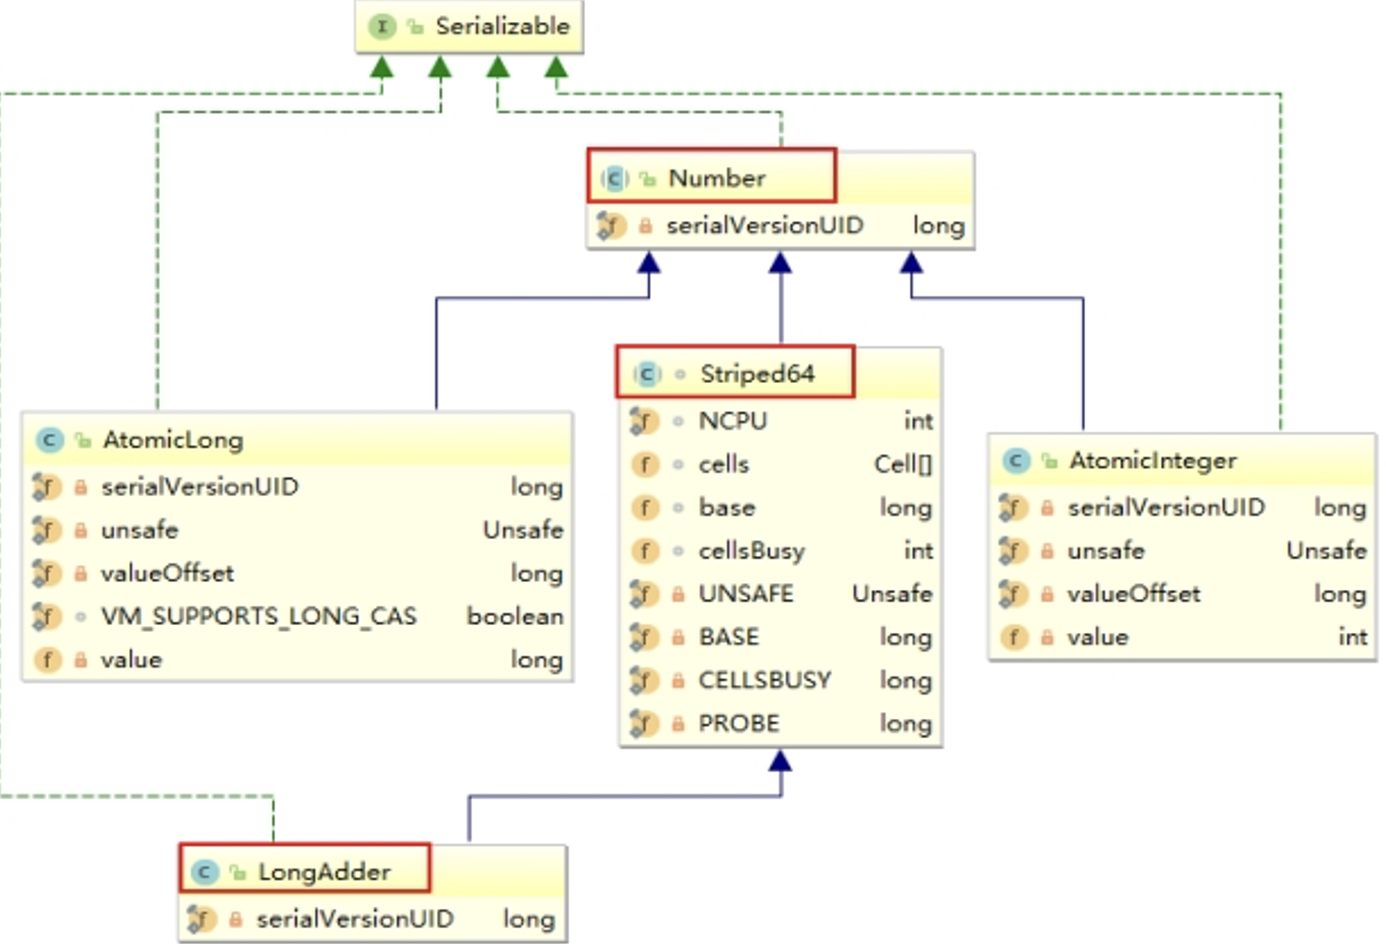
首先明确的是,LongAdder继承于Striped64,而Striped64继承于Number。我们来看下Java官方文档对LongAdder的描述
This class is usually preferable to
AtomicLongwhen multiple threads update a common sum that is used for purposes such as collecting statistics, not for fine-grained synchronization control. Under low update contention, the two classes have similar characteristics. But under high contention, expected throughput of this class is significantly higher, at the expense of higher space consumption.
总结来说就是LongAdder相比AtomicLong效率的提升是使用空间换时间。
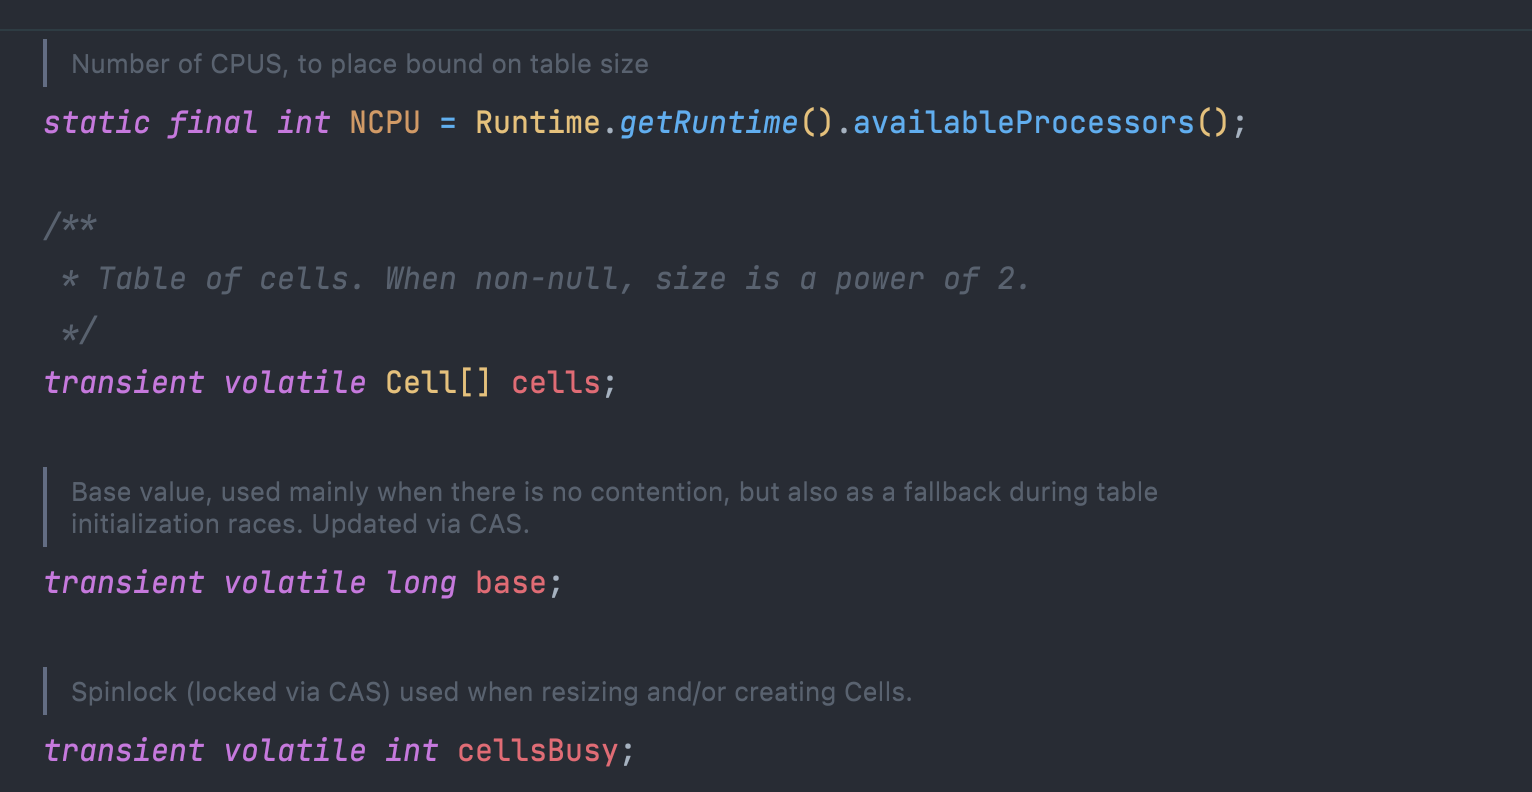
在Striped64.java中定义了以上四个变量,
- NCPU:当前计算机CPU数量,即cells数据的最大长度,cells扩容时会用到
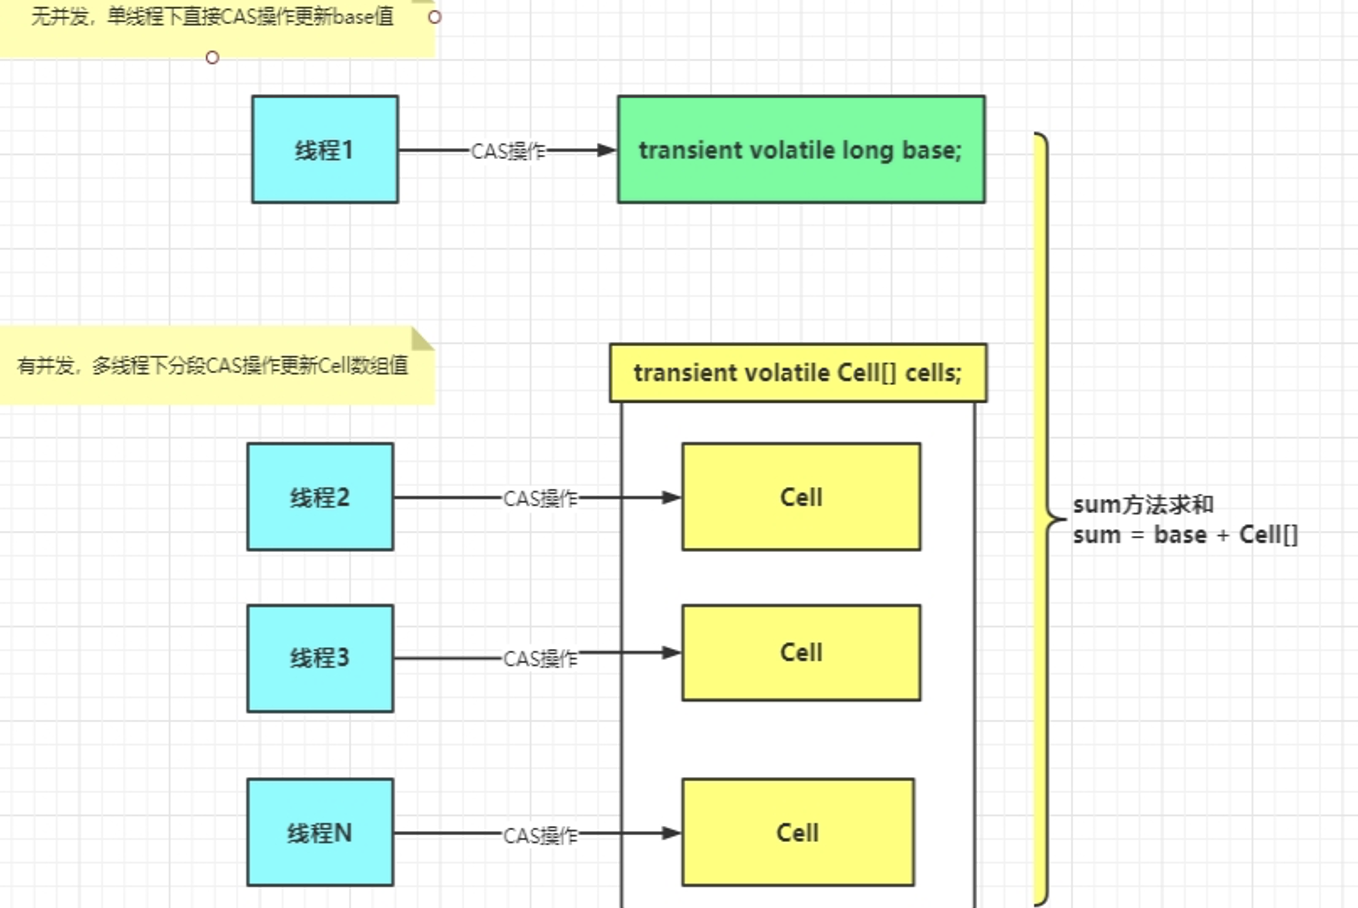
- cells:Cell(Striped64的一个内部类)数组,长度为2的幂次方,方便位运算,竞争条件下(高并发下),累加各个线程自己的槽Cell[i]中
- base:类似于AtomicLong中全局的value值。在没有竞争情况下数据直接累加到base上,或者cells扩容时,也需要将数据写入到base上
- cellsBusy:初始化cells或者扩容cells需要获取锁,0表示无锁状态,1表示其他线程已经持有了锁
- collide:表示扩容意向,false一定不会扩容,true可能会扩容
- casCellsBusy:通过CAS操作修改cellsBusy的值,CAS成功代表获取锁,返回true
- getProbe( ):获取当前线程的hash值
- advanceProbe( ):重置当前线程的hash值
LongAdder为什么这么快呢?
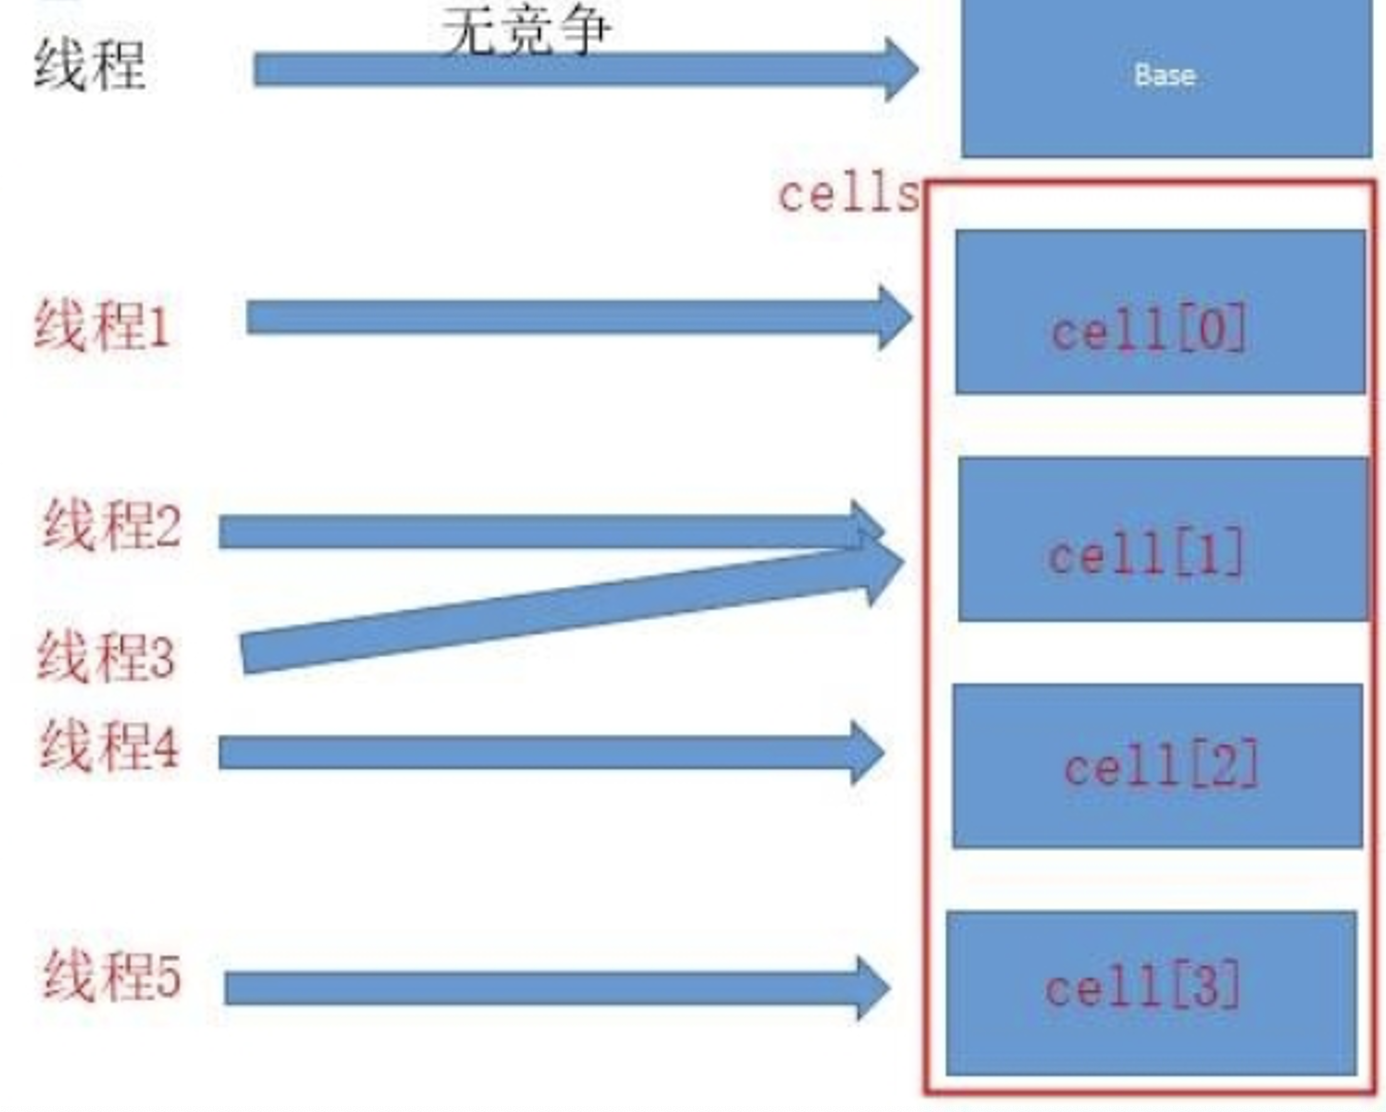
分散热点:LongAdder在无竞争的情况,跟AtomicLong一样,对同一个base进行操作,当出现竞争关系时则采用化整为零的做法,从空间换时间,用一个数组cells,将一个value拆分进这个数组cells。多个线程需要同时对value进行操作时候,可以对线程id进行hash得到hash值,再根据hash值映射到这个数组cells的某个下标,再对该下标所对应的值进行CAS自增操作。当所有线程操作完毕,将数组cells的所有值和无竞争值base都加起来作为最终结果
生活类比
AtomicLong相当于是我们去超市买了一个小物件,我们可以把它放到自己的口袋中,但是,如果我们需要在超市买很多东西,自己的口袋这个时候就装不下去了,我们可以使用LongAdder,它的一个核心思想是分散热点,base(相当于口袋)+cell数组(相当于袋子,数组中有两个元素,就相当于两个袋子装东西)
那么LongAdder的出现是否意味着AtomicLong已经一无是处了呢?
- 从API的角度我们会发现,LongAdder的API和AtomicLong的API还是有比较大的差异,而且AtomicLong提供的功能更丰富,尤其是addAndGet、decrementAndGet、compareAndSet这些方法。addAndGet、decrementAndGet除了单纯的做自增自减外,还可以立即获取增减后的值,而LongAdder则需要做同步控制才能精确获取增减后的值。如果业务需求需要精确的控制计数,则使用AtomicLong比较合适;
- 低并发、一般的业务尝尽下AtomicLong(数据准确)是足够了,如果并发量很多,存在大量写多读少的情况,那LongAdder(数据最终一致性,不保证强一致性)可能更合适
sum( )会将所有cell数组中的value和base累加作为返回值,核心的思想就是将之前AtomicLong一个value的更新压力分散到多个value中去,从而降级更新热点
 $$
value=Base+sum_{i=0}^{n} Cell[i]
$$
$$
value=Base+sum_{i=0}^{n} Cell[i]
$$
longAdder.increment( )
底层调用的add(1L),
    /**
     * Adds the given value.
     *
     * @param x the value to add
     */
    public void add(long x) {
        // cs是striped64中的cells数组属性
        // b是striped64中的base属性
        // v是当前线程hash到的cell中要存储的值
        // m是cells的长度减1,hash时作为掩码使用
        // c是当前线程hash到的cell
        Cell[] cs; long b, v; int m; Cell c;
        // 首次首线程(cs = cells) != null)一定是false,
        // 此时走casBase方法,以CAS的方式更新base值,且只有当CAS失败时,才会走到if中
        // 即 想进入这个if中,需要满足以下两个条件任意一个
        //      条件1:cells不为空,说明出现过竞争,cell[]已创建
        //      条件2:cas操作base失败,说明其他线程先一步修改了base正在出现竞争
        if ((cs = cells) != null || !casBase(b = base, b + x)) {
            // true无竞争 fasle表示竞争激烈,多个线程hash到同一个cell,可能要扩容
            boolean uncontended = true;
            // 条件1:cells为空,说明正在出现竞争,外层的if是从!casBase(b = base, b + x))=true进来的
            // 会通过调用longAccumulate(x, null, uncontended)新建一个数组,默认长度是2
            //
            // 条件2:默认会新建一个数组长度为2的数组,m = cs.length - 1) < 0 应该不会出现,
            //
            // 条件3:当前线程所在的cell为空,说明当前线程还没有更新过cell,应初始化一个cell。
            //      a = as[getProbe() & m]) == null,如果cell为空,进行一个初始化的处理
            //
            // 条件4:如果是true表示更新当前线程所在的cell失败,说明现在竞争很激烈,多个线程hash到同一个Cell,应扩容
            //  (如果是cell中通过c.cas(v = c.value, v + x)返回的结果是true,说明竞争不激烈,这个条件也就为false,也就不需要扩容操作,)
            if (cs == null || (m = cs.length - 1) < 0 ||
                (c = cs[getProbe() & m]) == null ||
                !(uncontended = c.cas(v = c.value, v + x)))
                longAccumulate(x, null, uncontended);
        }
    }
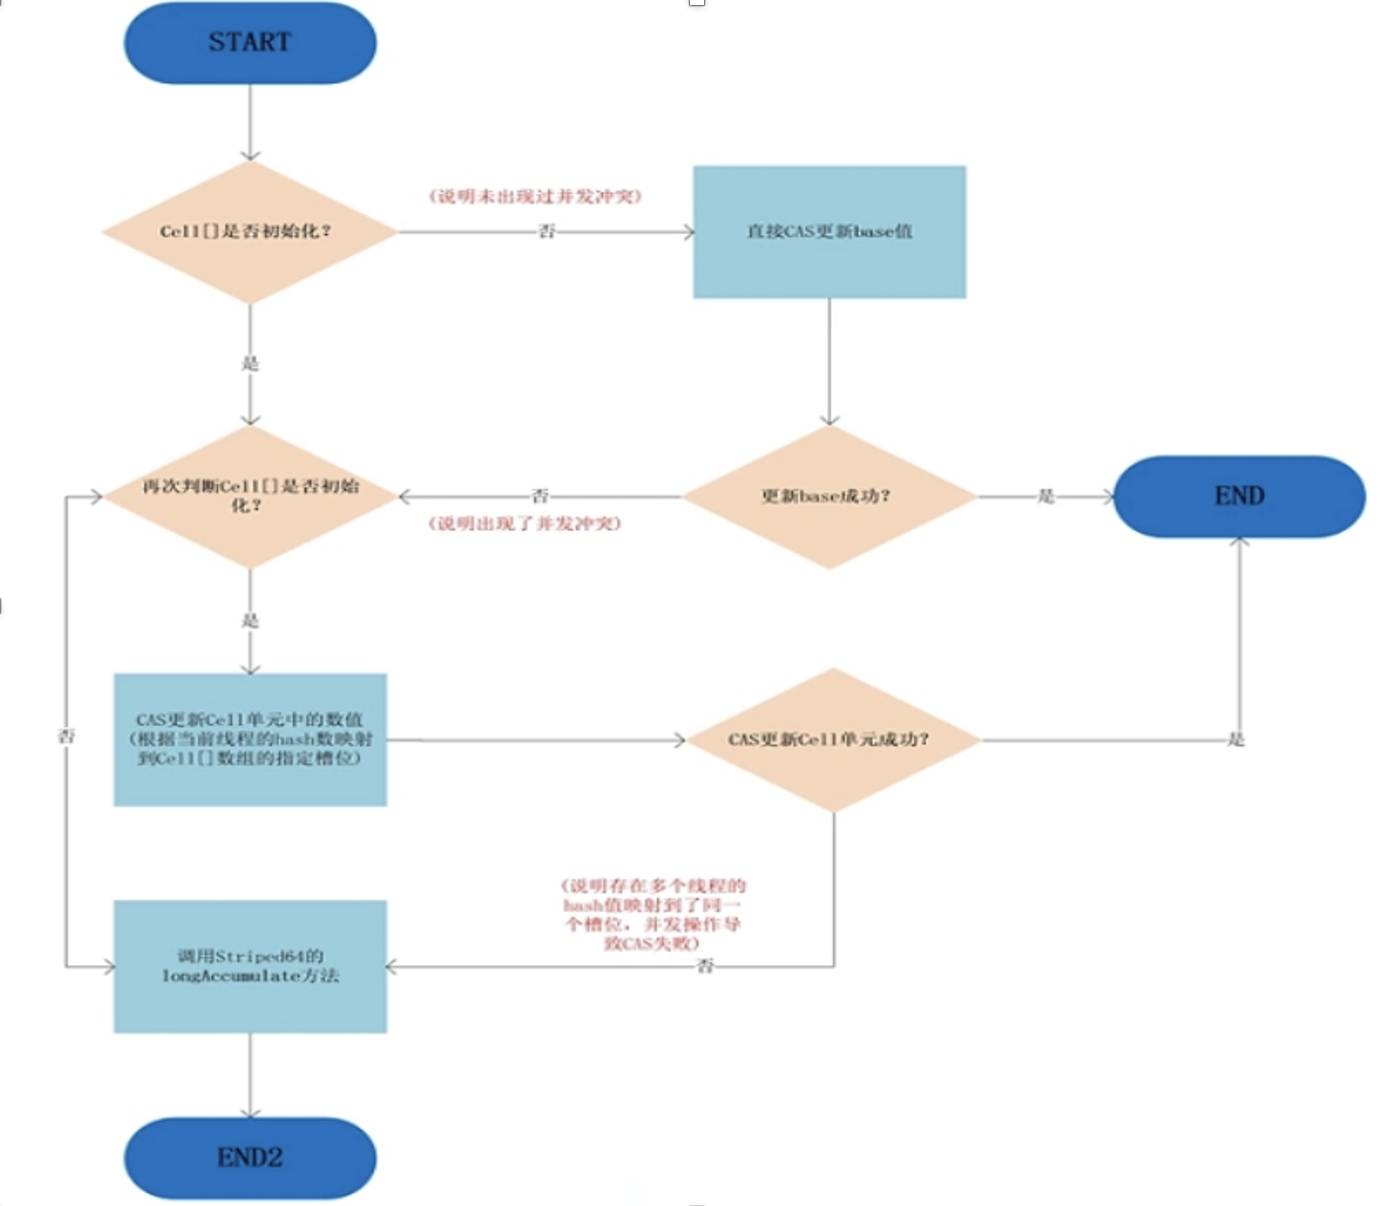
- 最初无竞争时只更新base;
- 如果更新base失败后,首次新建一个Cell[]数组
- 当多个线程竞争同一个Cell比较激烈时,可能就要对Cell[]扩容
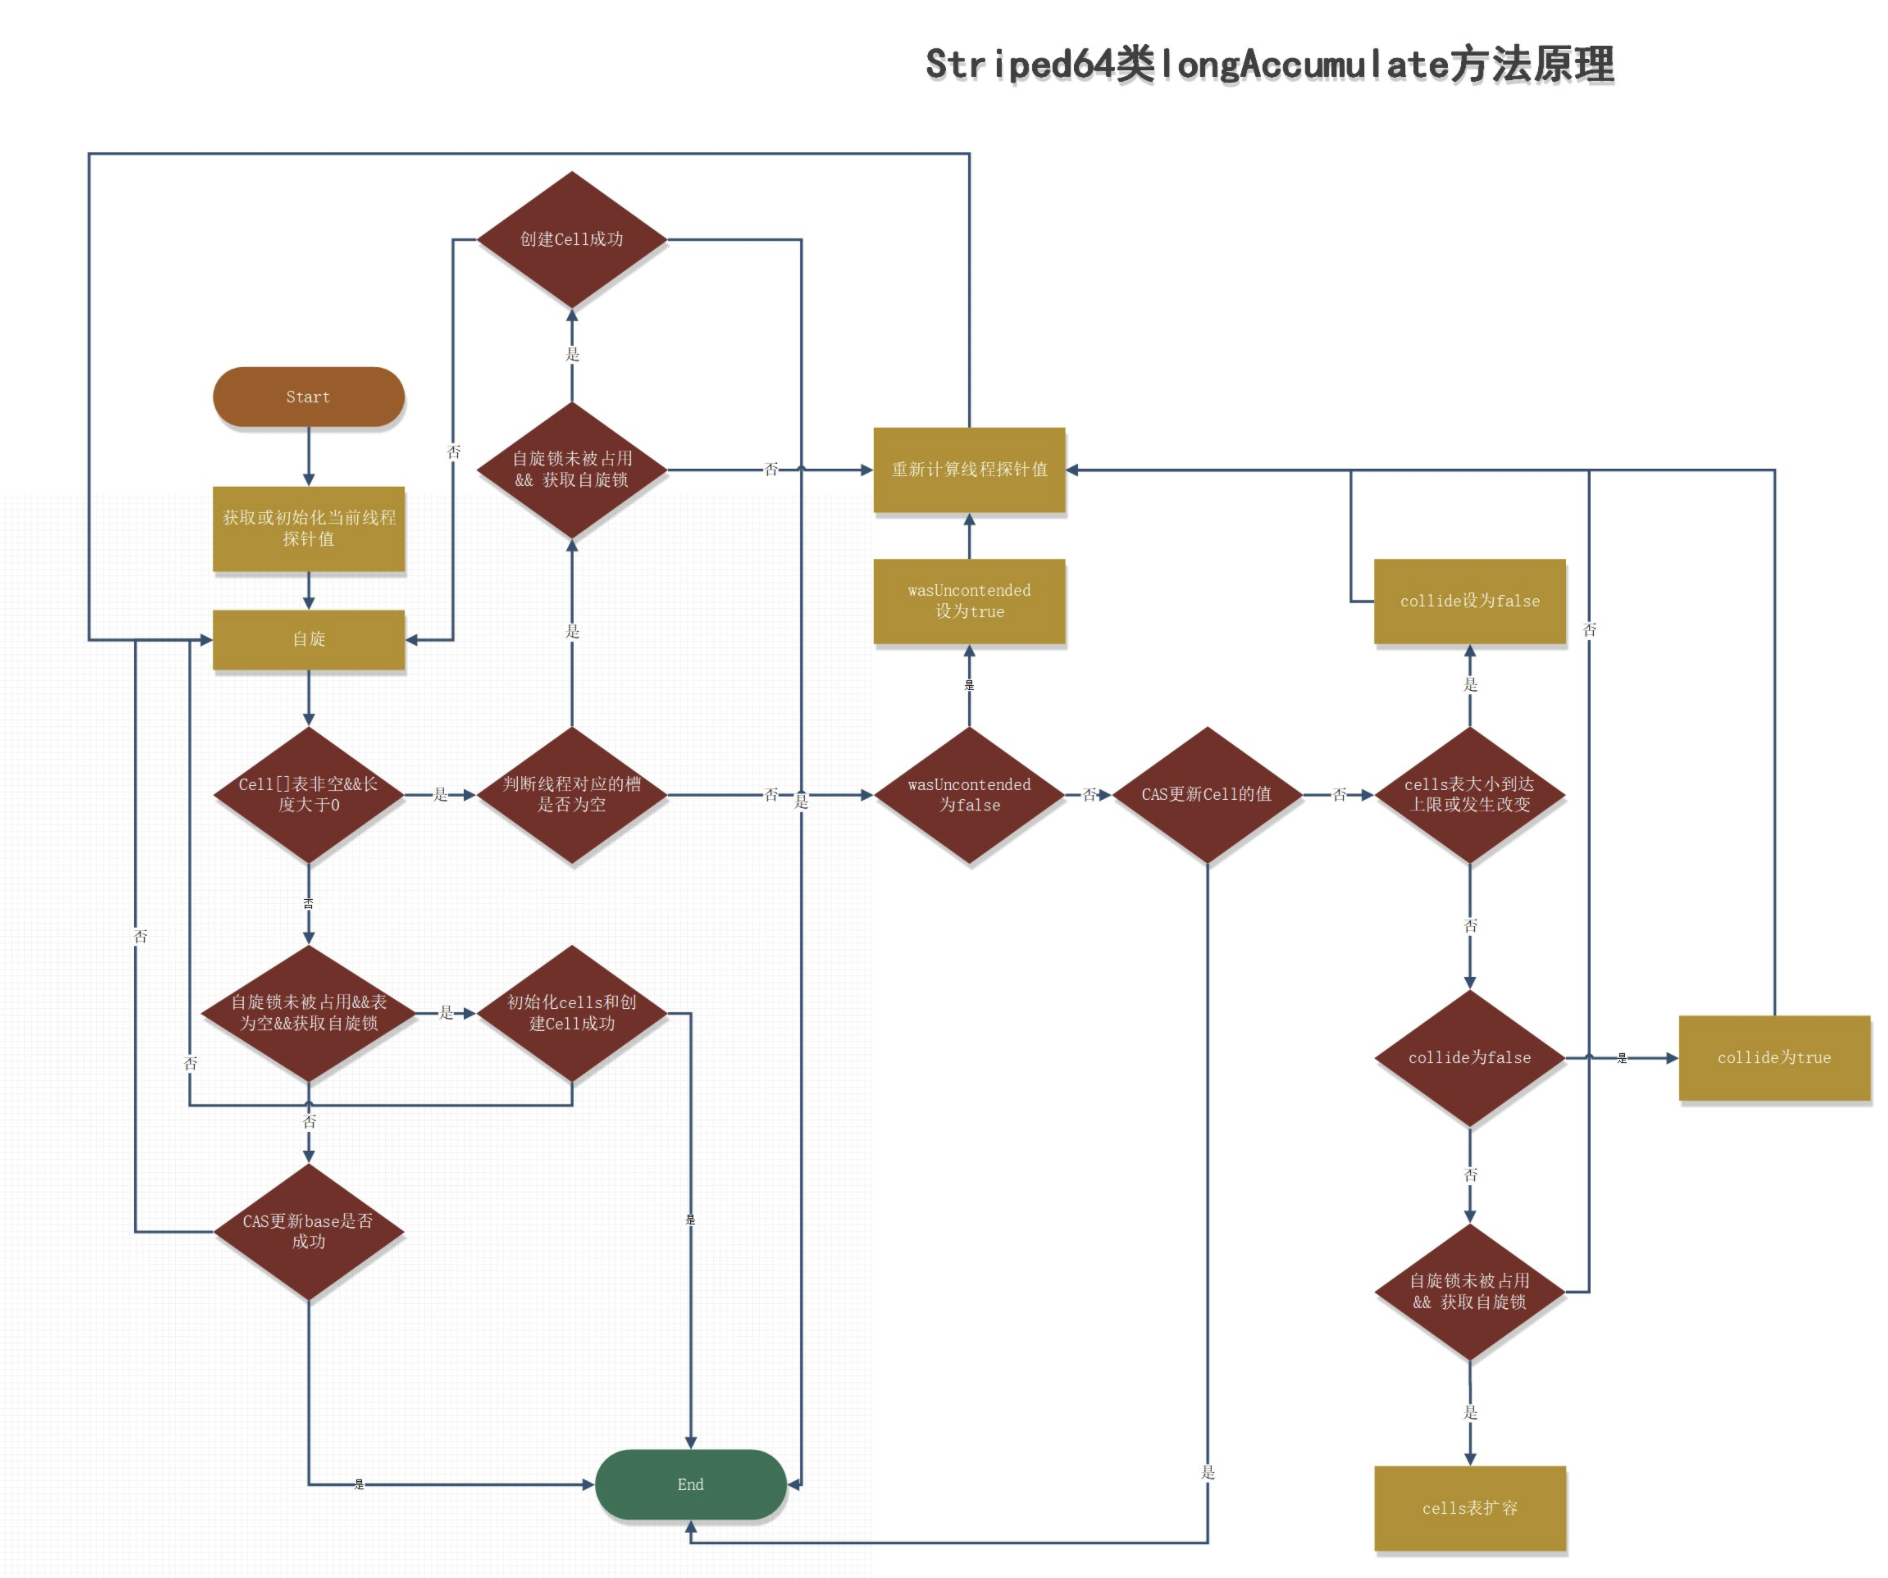
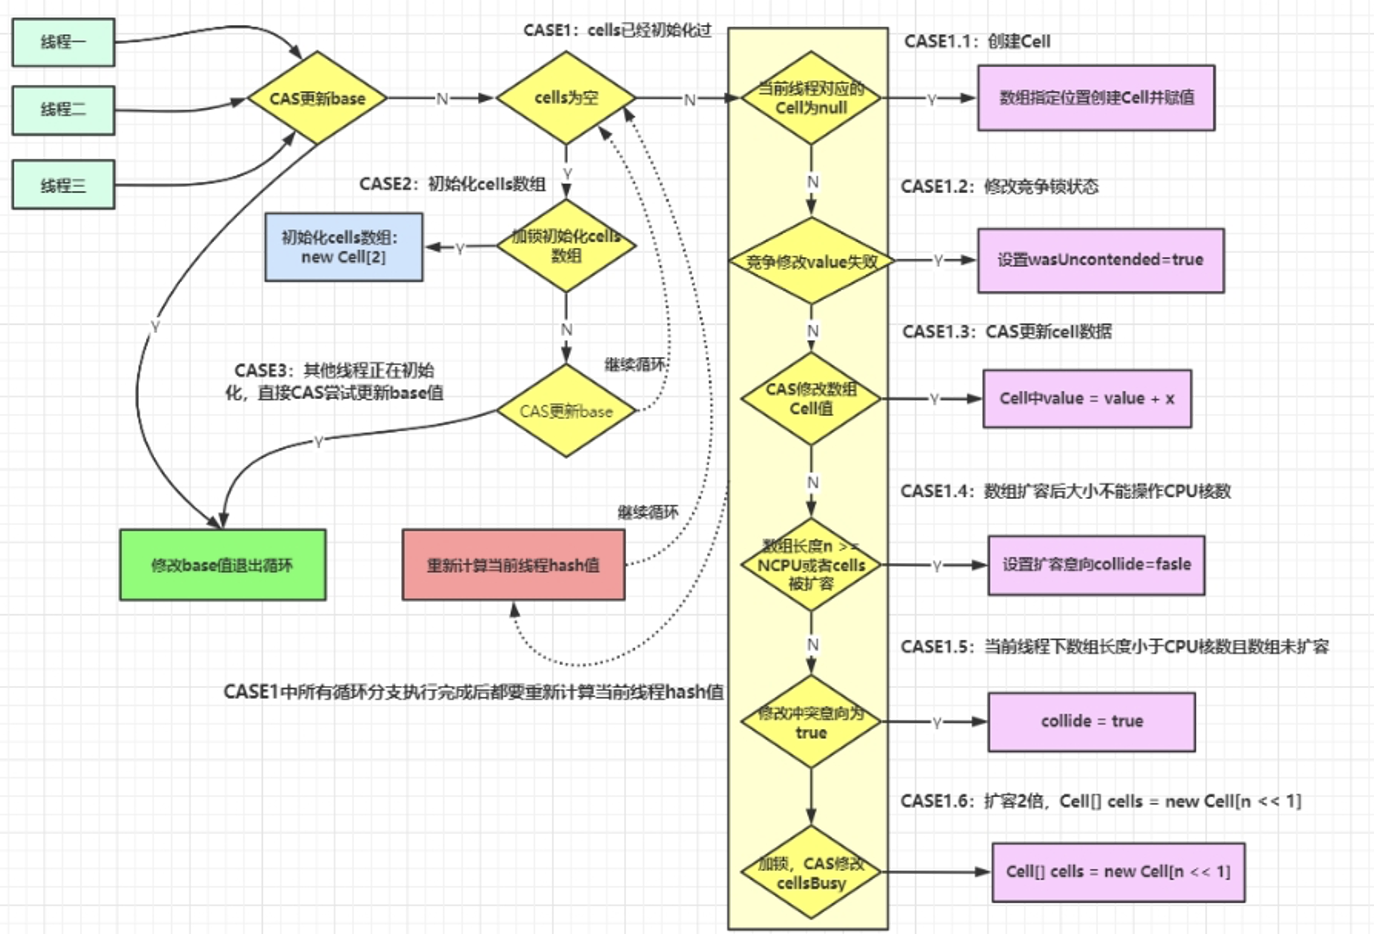
详解longAccumulate方法:
    final void longAccumulate(long x, LongBinaryOperator fn,
                              boolean wasUncontended) {
        // 存储线程的probe值
        int h;
        // 如果getProbe()方法返回0,说明当前线程对应的hash值未初始化
        if ((h = getProbe()) == 0) {
            // 使用ThreadLocalRandom为当前线程重新计算一个hash值,强制初始化
            ThreadLocalRandom.current(); // force initialization
            // 重新获取probe值,hash值被重置就好比一个全新的线程一样,所以设置了wasUncontended竞争状态为true
            h = getProbe();
            // 重新计算了当前线程的hash后认为此次不算是一次竞争,都未初始化,肯定还不存在竞争激烈
            // wasUncontended竞争状态设置为true
            wasUncontended = true;
        }
        boolean collide = false;                // True if last slot nonempty
        done: for (;;) {
            Cell[] cs; Cell c; int n; long v;
            // CASE1:cells已经被初始化了
            if ((cs = cells) != null && (n = cs.length) > 0) {
                // 这一层if判断当前线程的hash值运算后映射得到的Cell单元为null,说明该Cell没有被使用
                // 则将Cell数据放入数组中,跳出循环,如果不为空则继续循环
                if ((c = cs[(n - 1) & h]) == null) {
                    // Cell[]数组没有正在扩容
                    if (cellsBusy == 0) {       // Try to attach new Cell
                        // 先创建一个Cell
                        Cell r = new Cell(x);   // Optimistically create
                        // 尝试加锁,加锁后cellsBusy=1
                        if (cellsBusy == 0 && casCellsBusy()) {
                            try {               // Recheck under lock
                                Cell[] rs; int m, j;
                                // 将cell单元赋值到Cell[]数组上
                                // 在有锁的情况下再检测一遍之前的判断
                                if ((rs = cells) != null &&
                                    (m = rs.length) > 0 &&
                                    rs[j = (m - 1) & h] == null) {
                                    rs[j] = r;
                                    break done;
                                }
                            } finally {
                                cellsBusy = 0;
                            }
                            continue;           // Slot is now non-empty
                        }
                    }
                    collide = false;
                }
                // wasUncontended表示cells初始化后,当前线程竞争修改失败
                // wasUncontended=false,表示竞争激烈,
                // 需要扩容!!!!!!!!!!!!!!!!!!!
                // 这里只是重新设置了这个值为true,
                // 紧接着执行advanceProbe(h)重置当前线程的hash,重新循环
                else if (!wasUncontended)       // CAS already known to fail
                    wasUncontended = true;      // Continue after rehash
                // 说明当前线程对应的数组中有了数据,也重置过hash值
                // 这时通过CAS操作尝试对当前数中的value值进行累加x操作,x默认为1,如果CAS成功则直接跳出循环
                else if (c.cas(v = c.value,
                               (fn == null) ? v + x : fn.applyAsLong(v, x)))
                    break;
                // 如果n大于CPU最大数量,不可扩容,并通过下面的h=advanceProbe(h)方法修改线程的probe再重新尝试
                else if (n >= NCPU || cells != cs)
                    // 扩容标识设置为false,标识永远不会再扩容
                    collide = false;            // At max size or stale
                // 如果扩容意向collide是false则修改它为true,然后重新计算当前线程的hash值继续循环
                // (此时数组长度必定小于cpu核数,因为上一层if没进去)
                else if (!collide)
                    collide = true;
                // 锁状态为0并且将锁状态修改为1(持有锁)
                else if (cellsBusy == 0 && casCellsBusy()) {
                    try {
                        if (cells == cs)        // Expand table unless stale
                            // 按位左移1位来操作,扩容大小为之前容量的两倍
                            cells = Arrays.copyOf(cs, n << 1);
                    } finally {
                        cellsBusy = 0;
                    }
                    collide = false;
                    continue;                   // Retry with expanded table
                }
                h = advanceProbe(h);
            }
            // CASE2:cells没有加锁且没有初始化,则尝试对他进行加锁(CAS自旋锁),并初始化cells数组(首次新建)
            // 对应LongAdder的add进入if条件:cs == null
            //
            // cellsBusy: 初始化cells或者扩容cells需要获取锁,0表示无锁状态,1表示其他线程已经持有了锁
            // cells == as == null  是成立的
            // casCellsBusy:通过CAS操作修改cellsBusy的值,CAS成功代表获取锁,
            else if (cellsBusy == 0 && cells == cs && casCellsBusy()) {
                try {
                    // 外层中进行了判断,这里再次判断,双端检锁,
                    // 不double check的话,就存在可能会再次new一个cell数组,上一个线程对应数组中的值会被篡改
                    if (cells == cs) {
                        Cell[] rs = new Cell[2];
                        rs[h & 1] = new Cell(x);
                        cells = rs;
                        break done;
                    }
                } finally {
                    cellsBusy = 0;
                }
            }
            // Fall back on using base
            // CASE3:cells正在初始化,则尝试直接在基数base上进行累加操作
            // 多个线程尝试CAS修改失败,会走到这个分支
            // 也即其他线程正在初始化或正在更新其他cell的值
            else if (casBase(v = base,
                             (fn == null) ? v + x : fn.applyAsLong(v, x)))
                break done;
        }
    }
一图流
为什么sum会不精确?
- sum执行时,并没有限制对base和cells的更新(一句要命的话)。所以LongAdder不是强一致性,它是最终一致性的
- 首先,最终返回的sum局部变量,初始被赋值为base,而最终返回时,很可能base已经被更新了,而此时局部变量sum不会更新,造成不一致
- Î其次,这里对cell的读取也无法保证是最后一次写入的值。所以,sum方法在没有并发的情况下,可以获得正确的结果

附:测试代码
public class LongAdderDemo {
    private static final int SIZE_THREAD = 50;
    private static final int _1w = 10000000;
    public static void main(String[] args) throws InterruptedException {
        CountDownLatch countDownLatch1 = new CountDownLatch(SIZE_THREAD);
        CountDownLatch countDownLatch2 = new CountDownLatch(SIZE_THREAD);
        CountDownLatch countDownLatch3 = new CountDownLatch(SIZE_THREAD);
        CountDownLatch countDownLatch4 = new CountDownLatch(SIZE_THREAD);
        CountDownLatch countDownLatch5 = new CountDownLatch(SIZE_THREAD);
        MyVar sync = new MyVar();
        long start1 = System.currentTimeMillis();
        for (int i = 0; i < SIZE_THREAD; i++) {
            new Thread(() -> {
                try {
                    for (int j = 0; j < _1w; j++) {
                        sync.addSync();
                    }
                } finally {
                    countDownLatch1.countDown();
                }
            }, String.valueOf(i)).start();
        }
        countDownLatch1.await();
        System.out.println("sync结果:" + sync.getSync() + ",耗时:" + (System.currentTimeMillis() - start1));

        MyVar atomicInteger = new MyVar();
        long start2 = System.currentTimeMillis();
        for (int i = 0; i < SIZE_THREAD; i++) {
            new Thread(() -> {
                try {
                    for (int j = 0; j < _1w; j++) {
                        atomicInteger.atomicInteger();
                    }
                } finally {
                    countDownLatch2.countDown();
                }
            }, String.valueOf(i)).start();
        }
        countDownLatch2.await();
        System.out.println("atomicInteger结果:" + atomicInteger.getAtomicInteger().get() + ",耗时:" + (System.currentTimeMillis() - start2));


        MyVar atomicLong = new MyVar();
        long start3 = System.currentTimeMillis();
        for (int i = 0; i < SIZE_THREAD; i++) {
            new Thread(() -> {
                try {
                    for (int j = 0; j < _1w; j++) {
                        atomicLong.atomicLong();
                    }
                } finally {
                    countDownLatch3.countDown();
                }
            }, String.valueOf(i)).start();
        }
        countDownLatch3.await();
        System.out.println("atomicLong结果:" + atomicLong.getAtomicLong().get() + ",耗时:" + (System.currentTimeMillis() - start3));

        MyVar longAdder = new MyVar();
        long start4 = System.currentTimeMillis();
        for (int i = 0; i < SIZE_THREAD; i++) {
            new Thread(() -> {
                try {
                    for (int j = 0; j < _1w; j++) {
                        longAdder.longAdder();
                    }
                } finally {
                    countDownLatch4.countDown();
                }
            }, String.valueOf(i)).start();
        }
        countDownLatch4.await();
        System.out.println("longAdder结果:" + longAdder.getLongAdder().longValue() + ",耗时:" + (System.currentTimeMillis() - start4));


        MyVar longAccumulator = new MyVar();
        long start5 = System.currentTimeMillis();
        for (int i = 0; i < SIZE_THREAD; i++) {
            new Thread(() -> {
                try {
                    for (int j = 0; j < _1w; j++) {
                        longAccumulator.longAccumulator();
                    }
                } finally {
                    countDownLatch5.countDown();
                }
            }, String.valueOf(i)).start();
        }
        countDownLatch5.await();
        System.out.println("longAccumulator结果:" + longAccumulator.getLongAccumulator().longValue() + ",耗时:" + (System.currentTimeMillis() - start5));
    }
}


@Data
class MyVar {
    private int sync = 0;
    public synchronized void addSync() {
        sync++;
    }

    private AtomicInteger atomicInteger = new AtomicInteger(0);

    public void atomicInteger() {
        atomicInteger.incrementAndGet();
    }

    private AtomicLong atomicLong = new AtomicLong();

    public void atomicLong() {
        atomicLong.incrementAndGet();
    }

    private LongAdder longAdder = new LongAdder();

    public void longAdder() {
        longAdder.increment();
    }

    private LongAccumulator longAccumulator = new LongAccumulator(Long::sum, 0);

    public void longAccumulator() {
        longAccumulator.accumulate(1);
    }
}