Hive 其实是一个客户端,类似于navcat、plsql 这种,不同的是Hive 是读取 HDFS 上的数据,作为离线查询使用,离线就意味着速度很慢,有可能跑一个任务需要几个小时甚至更长时间都有可能。
在日常开发中 Hive 用的还是挺广泛的,常做一些统计工作,就我自己工作来看其实 80% 的工作由 Hive 的基础部分就能完成了,只有很少的情况需要用到一些复杂查询或者调优工作。
本文着重挑选出一些易于被忽略基础知识,篇幅较多,建议收藏,分次阅读,后台文档中有详细的知识点说明,需要深入了解 Hive 的去文末下载即可。
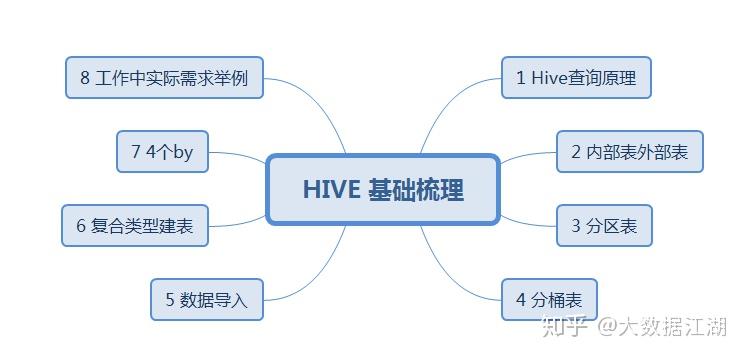
本文涉及的内容主要是:
在开始内容之前先来简单看下 Hive 原理:
01 Hive 查询原理
Hive 其实是将 hql 转成 MR 程序去跑,这里我们不去深入底层了解到底是怎么转换的,就简单看下Hive查询过程:
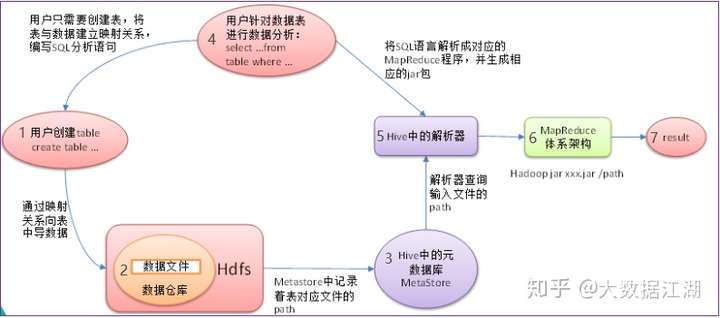
1 根据HDFS上数据格式,创建hive表
2 通过映射关系将HDFS数据导入到表中
3 此时hive表对应的元数据信息记录到 mysql 中,元数据可不是指的HDFS上的数据,它是指 hive 表的一些参数。
4 写 select 语句时,根据表与数据的映射关系去写对应的查询语句
5 在执行查询操作时 ,先从元数据库中找到 对应表对应的文件位置,
再通过 hive 的 解析器、编译器、优化器 执行器 将 sql 语句 转换成 MR 程序,运行在 Yarn 上,最终得到结果。
PS:Hive 里有三种查询方式,分别是bin/hive (客户端)、jdbc、webui,一般的使用jdbc方式居多。(后台文档中有详细操作方式,为方便后续执行sql,建议先搭好环境。)
02内部表外部表区别
Hive 表与常规的数据库表不同,它分为内部表和外部表,它们的区别在创建表和删除表时有所不同。
- 创建表时:
- 内部表会移动数据到指定位置 ,将数据文件移动到默认位置,一般都是/usr/hive/warehouse/ 目录下
- 外部表不会移动数据,数据在哪就是哪
2. 删除表时:
- 内部表删除,数据一起删除
- 外部表不会删除数据
所以区别就很明显了,一般工作中使用外部表做为数据映射,而统计出的结果一般多使用内部表,因为内部表仅仅用于储存结果或者关联,与 HDFS 数据无关。
Question:
那么怎么区分表是外部表或者是内部表呢?
Answer:
- 对于已经创建的表可以使用:
desc formatted 表名即可查看。
- 对于新建表:
使用建表语句时即可区分,其中带 EXTERNAL 的是外部表,不带的则是内部表。
建表语句如下:
CREATE [EXTERNAL] TABLE [IF NOT EXISTS] table_name
[(col_name data_type [COMMENT col_comment], ...)] -- 列名 列字段类型
[COMMENT table_comment] -- 注释
[PARTITIONED BY (col_name data_type [COMMENT col_comment], ...)] -- 分区字段
[CLUSTERED BY (col_name, col_name, ...) -- 分桶
[SORTED BY (col_name [ASC|DESC], ...)] INTO num_buckets BUCKETS] -- 排序字段
[ROW FORMAT row_format] row format delimited fields terminated by “分隔符”
[STORED AS file_format] -- 以什么形式存储
[LOCATION hdfs_path] -- 对应HDFS文件路径
03 Hive 分区表
分区表几乎是必用的,一般以自然年月为分区,这样数据比较好管理。而且在执行查询语句时可以指定查询分区数据,
- 不加分区的 sql 情况 :
select a1,a2 .. from table1;
这样会扫描全表数据,假如数据量比较大,那要等执行结果估计猴年马月了。
- 添加分区情况 :
select a1,a2 .. from table1 where (year = '2019' and month='12');
这样的话就只会查询2019年12月的数据了,善用分区会大大提升查询效率。
那分区怎么创建呢?
在建表语句中的分区那行加上就是了,
[PARTITIONED BY (col_name data_type [COMMENT col_comment], ...)] -- 分区字段
就这么简单。
举个例子,一个分区字段的分区表就不说了,多个分区分区表 sql 如下:
create table student (id string,name string, age int)
partitioned by (year string,month string,day string)
row format delimited fields terminated by ' ';
分区划分:
分区分为静态分区和动态分区。
- 静态分区需要人为指定分区,并且需要明确分区字段,举例 sql 如下:
1 创建分区表:
create table order_partition(
order_number string,
order_price double,
order_time string
)
partitioned BY(month string)
row format delimited fields terminated by ' ';
2 准备数据 在 order.txt 中内容如下:
10001 100 2019-03-02
10002 200 2019-03-02
10003 300 2019-03-02
10004 400 2019-03-03
10005 500 2019-03-03
10006 600 2019-03-03
10007 700 2019-03-04
10008 800 2019-03-04
10009 900 2019-03-04
3 将本地文件加载到 表中
load data local inpath '/bigdata/install/hivedatas/order.txt' overwrite into table order_partition partition(month='2019-03');
这里再最后指定分区为 2019-03 ,所以以上所有内容都会在 2019-03 这个分区中。分区可以手动添加、删除。
4 查询结果
select * from order_partition where month='2019-03';
结果为:
分区
10001 100.0 2019-03-02 2019-03
10002 200.0 2019-03-02 2019-03
10003 300.0 2019-03-02 2019-03
10004 400.0 2019-03-03 2019-03
10005 500.0 2019-03-03 2019-03
10006 600.0 2019-03-03 2019-03
10007 700.0 2019-03-04 2019-03
10008 800.0 2019-03-04 2019-03
10009 900.0 2019-03-04 2019-03
- 动态分区则可以将数据自动导入表的不同分区中,与静态分区不同的是 动态分区只需要指定分区字段,不需要明确分区字段的值。
例如:
1 创建分区表:
--创建普通表
create table t_order(
order_number string,
order_price double,
order_time string
)row format delimited fields terminated by ' ';
--创建目标分区表
create table order_dynamic_partition(
order_number string,
order_price double
)partitioned BY(order_time string)
row format delimited fields terminated by ' ';
2 准备数据 order_created.txt内容,内容同静态分区
10001 100 2019-03-02
10002 200 2019-03-02
10003 300 2019-03-02
10004 400 2019-03-03
10005 500 2019-03-03
10006 600 2019-03-03
10007 700 2019-03-04
10008 800 2019-03-04
10009 900 2019-03-04
3 向普通表t_order加载数据
load data local inpath '/bigdata/install/hivedatas/order_partition.txt' overwrite into table t_order;
这里没有手动指明分区字段的值,而是根据分区字段有内部自己判断数据落在哪个分区中。
4 动态加载数据到分区表中
要想进行动态分区,需要设置参数:
//开启动态分区功能
hive> set hive.exec.dynamic.partition=true;
//设置hive为非严格模式
hive> set hive.exec.dynamic.partition.mode=nonstrict;
//加载数据
hive> insert into table order_dynamic_partition partition(order_time) select order_number,order_price,order_time from t_order;
5、查看分区
hive> show partitions order_dynamic_partition;
2019-03-02
2019-03-03
2019-03-04
04 Hive分桶表
分桶表一般在超大数据时才会使用,分桶将整个数据内容按某列属性值取hash值进行区分,具有相同hash值的数据进入到同一个文件中,意味着原本属于一个文件的数据经过分桶后会落到多个文件中。
例如:
- 创建分桶表之前要设置一些参数:
1 开启分桶
set hive.enforce.bucketing = true
2 设置桶个数
set mapreduce.job.reduces = 4;
- 创建分桶表:
// 1 创建分桶表
create table user_bucket_demo(id int,name string)
cluster by (id)
into 4 buckets
row format delimited fields terminated by ' '
// 2 创建普通表
create table user_demo(id int,name string)
row format delimited fields terminated by ' '
// 3 加载本地数据到普通表
load data local inpath '/home/hadoop/data/02/user_bucket.txt' into table user_demo;
注意:
//使用这个方式 加载数据到分桶表,数据不会分桶
load data local inpath '/home/hadoop/data/02/user_bucket.txt' into table user_bucket_demo;
// 4 正确的分桶表加载数据方式:
insert into user_bucket_demo select * from user_demo;
// 5 查看结果
select * from user_bucket_demo tablesample(bucket 1 out of 2)
-- 需要的总桶数=4/2=2个
-- 先从第1个桶中取出数据
-- 再从第1+2=3个桶中取出数据
tablesample(buket x out of y) 函数说明:
- x表示从第几个桶开始取数据
- y表示桶数的倍数,一共需要从 ==桶数/y== 个桶中取数据
05 Hive数据导入
数据导入一般是初始化的工作,一般将表与 HDFS 路径映射好之后,后续的分区数据会自动与表做好映射。所以这块一般来说用的不多,在自己测试时使用的居多吧。
数据导入方式如下:
- load 方式加载数据
这种方式在之前分区表时已经使用过了。
load data [local] inpath 'dataPath' [overwrite ] into table student [partition (partcol1=val1,…)];
添加 local 表示从本地加载,不添加表示从 HDFS 上加载
添加 overwrite 表示 覆盖原表数据 ,不添加 overwrite 表示追加
添加 partition 表示向某个分区添加数据
- 查询方式加载数据
insert overwrite table yourTableName partition(month = '201806') select column1,column2 from otherTable;
- 查询语句中创建表并加载数据
create table yourTableName as select * from otherTable;
- 使用location 指定加载数据路径(常用)
1 创建表,并指定HDFS上路径
create external table score (s_id string,c_id string,s_score int) row format delimited fields terminated by ' ' location '/myscore';
2 上传数据到 HDFS 上,可在 Hive客户端通过 dfs 命令操作 HDFS
//创建 HDFS 路径
dfs -mkdir -p /myscore;
//上传数据到 HDFS 上,测试数据在文末。
dfs -put /bigdata/install/hivedatas/score.csv /myscore;
//查看结果
3 select * from score;
注意:
如果查询不到数据 可使用 :
msck repair table score;
进行表的修复,说白了就是建立我们表与我们数据文件之间的一个关系映射
06 使用复合数据类型建表
Hive 中复合数据类型有 Array、Map、Struct 这三种。
Array 代表数组,类型相同的数据
Map 映射 k--v 对
Struct 则存储类型不同的一组数据
创建表时除需要指定每行的分隔符(row format),要是有复合类型的还需要指定复合类型的分隔符。
复合数据建表语句:
create table tablename (id string,name string,...)
row format delimited fields terminated by ' '
Collection items terminated by ' ' -- array 分隔符 Array、Struct
Map keys terminated by ':' -- map 分隔符
语句说明
建表:
Array/Struct/map 创建表时使用 分割符都为 Collection items terminated by ''
map 如果是多个 map, 多个 KV 使用 Collection items terminated by ' '
map KV 间 使用 map keys terminated by ':'
查询使用:
array -- select locations[0]
map -- info['name']
struct -- info.name info.age
测试案例:
- Array
准备测试数据文档 t_array.txt,多个字段使用“,”拼接
数据:
1 zhangsan beijing,shanghai
2 lisi shanghai,tianjin
建表:
create table t_array(
id string,
name string,
locations array<string>
)
row format delimited fields terminated by ' ' collection items terminated by ',';
加载数据到表中
load data local inpath '/home/hadoop/data/01/t_array.txt' into table t_array;
测试查询结果:
1 简单查询:
select id,locations[0],locations[1] from t_array;
2 查询数组中元素个数
select size(locations) from t_array
3 查询locations中包含 beijing 的信息
select * from t_array
where array_contains(address,'beijing')
- Map
准备测试数据文档t_map.txt
数据:
1 name:zhangsan#age:30
2 name:lisi#age:40
建表:
create table t_map
(id string,info map<string,string>)
row format delimited fields terminated by ' '
collection items terminated by '#' --- 表示多个 KV 之间拼接的符号
map keys terminated by ':' ----- 表示一个 KV 间的分隔符
加载数据:
load data local inpath '/home/hadoop/data/01/t_map.txt' into table t_map;
查询结果:
1 简单查询:
select id,info['name'],info['age'] from t_map;
2 查询 map 的所有 key 值:
select map_keys(info) from t_map;
3 查询 map_values 所有 value 值:
select map_values(info) from t_map;
- Struct
准备测试数据文档t_struct.txt
数据:
1 zhangsan:30:beijing
2 lisi:40:shanghai
建表:
create table t_struct(id string,info struct<name:string,age:int,address:string>)
row format delimited fields terminated by ' ' --字段间分隔符
collection items terminated by ':' -- struct间分隔符
加载数据:
load data local inpath '' into table t_struct;
查询结果:
select id,info.name,info.age,info.address from t_struct;
07 Hive 中 4 个 by 的区别
order by 全局排序,不论 reduce 个数是几,结果全局有序
sort by 每个 reduce 内有序,当reduce个数为1时,结果同 order by 是 全局有序,当 reduce 个数大于1,则每个reduce内有序
distribute by + sort by 使用,分区排序,与 sort by 区别在于可以指定分区字段,将map端查询结果hash相同的结果分发到对应的reduce,每个reduce 内有序
cluster by 当 distribute by + sort by 字段相同时,可换成 cluster by
08 实际需求-表连接时使用分区查询
Hive表连接与常规数据库的表连接使用方法一样,关键字还是 inner join ,left join 等等,下面看一下实际工作中用到的需求。
需求如下:
Hive 中一张存储文章表,
字段说明:
title --标题
content -- 内容
pubtime --发布时间
serviceId --文章类型
表分区字段 --year month
查询文章发布时间 2019年11月份 11-18号,标题与内容相同,并且标题大于 30 的文章 ,文章类型在 1-5
结果使用子查询 + 自连接查相同文章
注意:一定要使用分区,不然程序会卡死。
结果 sql 如下:
select t1.id, t1.title,t1.content, t1.pubtime,t1.serviceId
from (select id, title,content, pubtime,serviceId from article_info where (year = '2019' and month = '11')) t1
inner join (select id, url, content, pubtime,serviceId from article_info where (year = '2019' and month = '11')) t2
on t1.id = t2.id
where t1.pubtime >= '2019-11-11 00:00:00' and t1.pubtime <='2019-11-18 23:59:59'
and length(t1.title) < 30 and t1.serviceId in (1,2,3,4,5) and t1.title = t2.content
需求并不难,其实 hive 就是需要多练,在实际工作中有需求才好发挥。
09资料领取
关注公众号"大数据江湖"后台回复 “Hive学习文档”,即可领取详细资料。
ps: 我还整理了一些 Hive 常用函数,需要的可以去看一下
大数据江湖:HIVE 常用函数总结zhuanlan.zhihu.com
Hive 语法与常用的 sql 类似,可能一些复杂的查询需要借助函数来完成,常用函数总结在 “阅读原文”中,sql 也原本就是熟能生巧的东西,只要多多练习,相信我们在工作中都能够得心应手。
https://zhuanlan.zhihu.com/p/103413663