文件目录如下:基本导航顺序: root -> First -> Second -> Third。其中,FirstViewController作为 navigation堆栈的rootview

1、创建navigation。
如果是想直接把navigation导航作为项目一开始的跟视图,把RootViewController.h文件里的nav属性放到AppDelegate.h里即可,再把RootViewController.m文件里的action的代码复制到 AppDelegate.m里的didFinishLaunchingWithOptions 方法里,最后把 self.window.rootViewController 设置 UINavigationController类型的属性nav即可
在RootViewController.h文件
 1 #import <UIKit/UIKit.h>
 2 @class FirstViewController;
 3
 4 @interface RootViewController : UIViewController
 5
 6 @property (strong, nonatomic) UINavigationController *nav;
 7
 8 - (IBAction)btnClick:(UIButton *)sender;
 9
10 @end
在RootViewController.m 文件里的随意一个自定义action里:
 1 - (IBAction)btnClick:(UIButton *)sender {
 2
 3     //创建一个viewcontroller
 4     FirstViewController *fristview =[[[FirstViewController alloc] init] autorelease];
 5
 6
 7     //初始化UINavigationController(方式一)
 8     self.nav = [[[UINavigationController alloc] initWithRootViewController:fristview] autorelease];
 9
10
11     //初始化UINavigationController(方式二)
12   //  self.nav = [[[UINavigationController alloc] init] autorelease];
13   //  [self.nav pushViewController:fristview animated:YES];
14
15
16     //初始化UINavigationController(方式三,失败,xib文件加载失败,原因暂时不明)
17    // self.nav = [[[UINavigationController alloc] initWithNibName:@"FirstViewController" bundle:nil] autorelease];
18
19
20     //跳转到FirstView页面
21     [self presentViewController:self.nav animated:YES completion:nil];
22
23
24     //这种写法一般用于往view里添加一些小控件,如button  label textField之类的,不适宜用于页面跳转
25     // [self.view addSubview:self.nav.view];
26
27
28 }
2、设置viewcontroller的navigationItem属性和 toolbar、toolbarItem
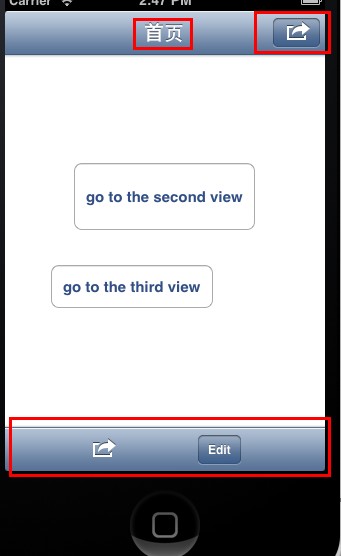
(1)firstViewcontroller的navigation属性和toolbarItem属性。代码在firstviewcontroller.m的viewdidLoad方法里
每个viewcontroller都有一个navigationItem属性(只在被加载到导航堆栈里才有效),navigationItem属性里又有5个属性:UIBarButtonItem类型的leftBarButtonItem、rightBarButtonItem和backBarButtonItem,NSString类型的title(或者viewcontroller属性的titleView)、prompt。
 1 - (void)viewDidLoad
 2 {
 3     [super viewDidLoad];
 4     // Do any additional setup after loading the view from its nib.
 5
 6     //下面两句代码的效果一样,但貌似设置了navigationItem.title 后 title就会被不起作用了
 7     self.navigationItem.title =  @"首页123";
 8     self.title = @"首页";
 9
10     //在title上面再加多一行,但这样子就会造成导航栏的宽度变宽
11   //  self.navigationItem.prompt = @"prompt";
12
13     //设置rightbarbuttonitem
14     UIBarButtonItem *rightbar = [[[UIBarButtonItem alloc] initWithBarButtonSystemItem:UIBarButtonSystemItemAction target:self action:@selector(btnClick:)] autorelease];
15
16     self.navigationItem.rightBarButtonItem = rightbar;
17
18     //修改backbarbuttonitem的title.这个backbarbutton是显示在下一个push进来的view的tabbar的左边的
19     //action可以设置为nil,这是的动作就是默认的动作,也就是返回到这个view
20     self.navigationItem.backBarButtonItem = [[[UIBarButtonItem alloc] initWithTitle:@"back" style:UIBarButtonItemStylePlain target:self action:nil] autorelease];
21
22
23
24     //设置toolbar是否可见(对整个navigation堆栈里的view起作用,起全局作用)
25     self.navigationController.toolbarHidden = NO;
26
27     UIBarButtonItem *three = [[UIBarButtonItem alloc] initWithBarButtonSystemItem:UIBarButtonSystemItemAction target:nil action:nil];
28     UIBarButtonItem *four = [[UIBarButtonItem alloc] initWithBarButtonSystemItem:UIBarButtonSystemItemEdit target:nil action:nil];
29     UIBarButtonItem *flexItem = [[UIBarButtonItem alloc] initWithBarButtonSystemItem:UIBarButtonSystemItemFlexibleSpace target:nil action:nil];
30
31     //toolbar是整个navigation堆栈里的view共同的,但toolbar上面的items却是每个view单独拥有的
32     //现在只是设置了当前view的toolbaritem,与其他view的toolbaritme是没有关系的
33     [self setToolbarItems:[NSArray arrayWithObjects:flexItem, three, flexItem, four, flexItem, nil]];
34
35     [three release];
36     [four release];
37     [flexItem release];
38
39
40 }
页面效果如下:
(2)、secondviewcontroller的navigationItem和toolbarItem
代码在viewdidLoad方法里
 1 - (void)viewDidLoad
 2 {
 3     [super viewDidLoad];
 4     // Do any additional setup after loading the view from its nib.
 5
 6     //设置左右barbutton
 7     UIBarButtonItem *rightbar = [[[UIBarButtonItem alloc] initWithBarButtonSystemItem:UIBarButtonSystemItemAction target:self action:@selector(gotoThird:)] autorelease];
 8
 9     UIBarButtonItem *leftbar = [[[UIBarButtonItem alloc] initWithBarButtonSystemItem:UIBarButtonSystemItemAction target:self action:@selector(gotoThird:)] autorelease];
10
11     self.navigationItem.rightBarButtonItem = rightbar;
12     self.navigationItem.leftBarButtonItem = leftbar;
13
14     //当前view在navigation堆栈里不是rootview,所以把该viewpush到navigation堆栈里时,tabbar左边会显示backbarbutton
15     //如果给当前view设置了leftbarbutton,会把把backbarbutton覆盖掉,想同时显示两者,需如下设置:
16     self.navigationItem.leftItemsSupplementBackButton = YES;
17
18
19
20     //设置当前view的toolbar可见.因为有可能从一个toolbar不可见的view导航到当前view
21     self.navigationController.toolbarHidden = NO;
22
23 }
效果如下:

(3)、thirdviewcontroller的navigationItem和toolbaritem
 1 - (void)viewDidLoad
 2 {
 3     [super viewDidLoad];
 4     self.title = @"第三页";
 5     // Do any additional setup after loading the view from its nib.
 6
 7     //隐藏当前view的toolbar
 8     self.navigationController.toolbarHidden = YES;
 9
10     //设置toolbar
11     UIBarButtonItem *rightbar = [[[UIBarButtonItem alloc] initWithBarButtonSystemItem:UIBarButtonSystemItemDone target:self action:@selector(goToRootView)] autorelease];
12
13     self.navigationItem.rightBarButtonItem = rightbar;
14
15    // NSArray *array = @[@"排骨", @"牛排"];
16
17     //设置titleview,会覆盖title
18     UISegmentedControl *segment = [[[UISegmentedControl alloc] initWithItems:@[@"排骨", @"牛扒"] ] autorelease];
19     segment.segmentedControlStyle = UISegmentedControlSegmentCenter;
20
21     self.navigationItem.titleView = segment;
22 }
效果如下: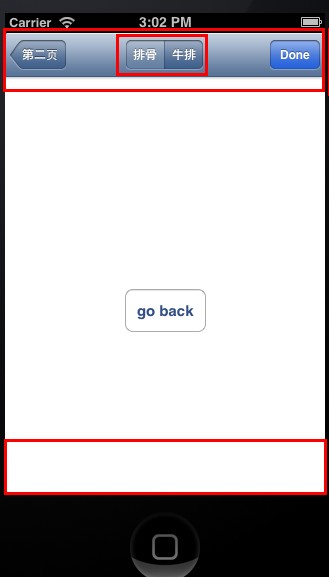
barButtonItem的style及效果对应如下:
