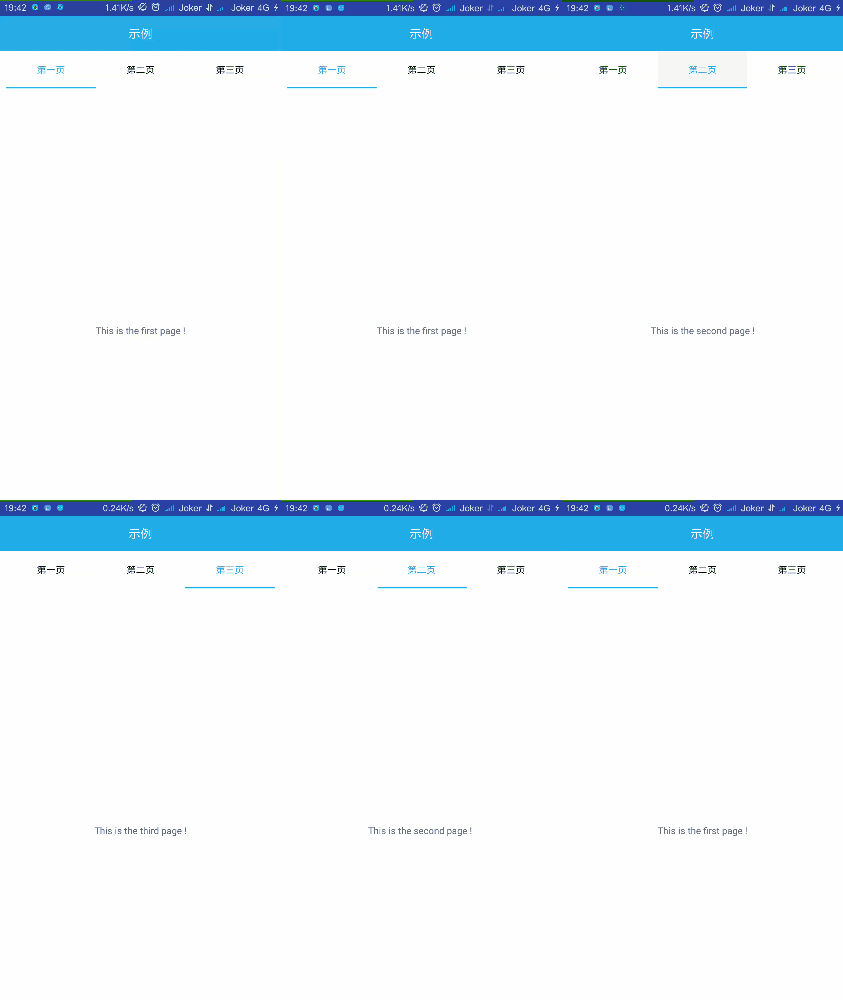
今天介绍一下ViewPager与TabLayout的简单用法
1.准备#
在一切开始之前,你懂得,先导库,老方法,在build.gradle直接添加下面这一句
implementation 'com.android.support:design:27.1.1'
可能版本有差异,具体视情况而定,知识是活的
2.设计布局
(1).主布局
<?xml version="1.0" encoding="utf-8"?>
<android.support.constraint.ConstraintLayout
xmlns:android="http://schemas.android.com/apk/res/android"
xmlns:app="http://schemas.android.com/apk/res-auto"
xmlns:tools="http://schemas.android.com/tools"
android:layout_width="match_parent"
android:layout_height="match_parent"
tools:context=".MainActivity">

<TextView
    android:id="@+id/title"
    android:layout_width="match_parent"
    android:layout_height="45dp"
    android:background="@android:color/holo_blue_light"
    android:gravity="center"
    android:text="示例"
    android:textColor="@android:color/white"
    android:textSize="18sp" />

<android.support.design.widget.TabLayout
    android:id="@+id/tabs"
    android:layout_width="match_parent"
    android:layout_height="wrap_content"
    android:layout_marginLeft="8dp"
    android:layout_marginRight="8dp"
    app:layout_constraintTop_toBottomOf="@+id/title"
    android:layout_marginTop="0dp"
    app:tabIndicatorColor="@android:color/holo_blue_light"
    app:tabSelectedTextColor="@android:color/holo_blue_light"
    app:tabTextColor="@android:color/black"
    tools:ignore="NotSibling" />
<android.support.v4.view.ViewPager
    android:id="@+id/view"
    app:layout_constraintTop_toBottomOf="@+id/tabs"
    android:layout_width="match_parent"
    android:layout_height="wrap_content"/>
</android.support.constraint.ConstraintLayout>
这次采用的依旧是谷歌最新的ConstraintLayout布局,里面的控件很少,第一个TextView的作用就是一个示例,告诉你当前在第几页,第二个是TabLayout,不是TableLayout,不要搞错了哈,不然又要怪我了,这里的很多属性都已经配置好了,比如下划线的颜色,选择之后的字体颜色,以及未被选择时的字体颜色。第三个是ViewPager,用来切换布局的。
(2).三个分布局
1.layout_first
<?xml version="1.0" encoding="utf-8"?>
<android.support.constraint.ConstraintLayout
xmlns:android="http://schemas.android.com/apk/res/android"
android:id="@+id/First"
android:layout_width="match_parent"
android:layout_height="match_parent"
xmlns:app="http://schemas.android.com/apk/res-auto">

<TextView
    android:layout_width="match_parent"
    android:layout_height="match_parent"
    android:text="This is the first page !"
    android:gravity="center"/>
</android.support.constraint.ConstraintLayout>
2.layout_second
<?xml version="1.0" encoding="utf-8"?>
<android.support.constraint.ConstraintLayout
xmlns:android="http://schemas.android.com/apk/res/android"
android:id="@+id/Second"
android:layout_width="match_parent"
android:layout_height="match_parent"
xmlns:app="http://schemas.android.com/apk/res-auto">

<TextView
    android:layout_width="match_parent"
    android:layout_height="match_parent"
    android:text="This is the second page !"
    android:gravity="center"/>
</android.support.constraint.ConstraintLayout>
3.layout_third
<?xml version="1.0" encoding="utf-8"?>
<android.support.constraint.ConstraintLayout
xmlns:android="http://schemas.android.com/apk/res/android"
android:id="@+id/Third"
android:layout_width="match_parent"
android:layout_height="match_parent"
xmlns:app="http://schemas.android.com/apk/res-auto">

<TextView
    android:layout_width="match_parent"
    android:layout_height="match_parent"
    android:text="This is the third page !"
    android:gravity="center"/>
</android.support.constraint.ConstraintLayout>
以上三个布局比较简单,我就不介绍了
3.界面逻辑
(1).配置适配器
package com.project.software.myapplication;

import android.support.annotation.NonNull;
import android.support.v4.view.PagerAdapter;
import android.view.View;
import android.view.ViewGroup;

import java.util.List;

public class ViewPaperAdapter extends PagerAdapter {

private List<View>mViewList;
private List<String>mTitleLists;

public ViewPaperAdapter(List<View>mViewList,List<String>mTitleLists){
    this.mViewList = mViewList;
    this.mTitleLists = mTitleLists;
}

@Override
public int getCount() {
    return mViewList.size();      //页卡数
}

@Override
public boolean isViewFromObject(@NonNull View view, @NonNull Object object) {
    return view == object;       //官方推荐
}

@NonNull
@Override
public Object instantiateItem(@NonNull ViewGroup container, int position) {
    container.addView(mViewList.get(position));           //添加页卡
    return mViewList.get(position);
}

@Override
public void destroyItem(@NonNull ViewGroup container, int position, @NonNull Object object) {
    container.removeView(mViewList.get(position));         //删除页卡
}

public CharSequence getPageTitle(int position){
    return mTitleLists.get(position);             //页卡标题
}
}
上面的代码便是ViewPaperAdapter中的内容,他继承自PagerAdapter这个适配器,通过这个适配器,才有可能实现左右切换呦。
(2).主页逻辑
package com.project.software.myapplication;

import android.support.design.widget.TabLayout;
import android.support.v4.view.LayoutInflaterCompat;
import android.support.v4.view.ViewPager;
import android.support.v7.app.AppCompatActivity;
import android.os.Bundle;
import android.view.LayoutInflater;
import android.view.View;

import java.util.ArrayList;
import java.util.List;

public class MainActivity extends AppCompatActivity {

private TabLayout mTabLayout;
private ViewPager mViewPager;
private LayoutInflater mInflater;
private View view1;
private View view2;
private View view3;
private List<String>mTitleList = new ArrayList<>();
private List<View>mViewList = new ArrayList<>();

@Override
protected void onCreate(Bundle savedInstanceState) {
    super.onCreate(savedInstanceState);
    setContentView(R.layout.activity_main);
    init();
}

private void init() {
    mViewPager = findViewById(R.id.view);
    mTabLayout = findViewById(R.id.tabs);
    mInflater = LayoutInflater.from(this);
    view1 = mInflater.inflate(R.layout.layout_first,null);
    view2 = mInflater.inflate(R.layout.layout_second,null);
    view3 = mInflater.inflate(R.layout.layout_third,null);
    mViewList.add(view1);
    mViewList.add(view2);
    mViewList.add(view3);
    mTitleList.add("第一页");
    mTitleList.add("第二页");
    mTitleList.add("第三页");
    mTabLayout.setTabMode(TabLayout.MODE_FIXED);//设置tab模式,当前为系统默认模式
    mTabLayout.addTab(mTabLayout.newTab().setText(mTitleList.get(0)));//添加选项卡
    mTabLayout.addTab(mTabLayout.newTab().setText(mTitleList.get(1)));
    mTabLayout.addTab(mTabLayout.newTab().setText(mTitleList.get(2)));
    ViewPaperAdapter mAdapter = new ViewPaperAdapter(mViewList,mTitleList);
    mViewPager.setAdapter(mAdapter);//给ViewPager设置适配器
    mTabLayout.setupWithViewPager(mViewPager);  //将TabLayout和ViewPager关联起来。
    mTabLayout.setTabsFromPagerAdapter(mAdapter);//给Tabs设置适配器
}
}
上面代码的注释很详细,不过多介绍,但是将TabLayout和ViewPager关联在一起很重要哦,如果没有这句,emmmmm,你可以动手试一下结果。
最后,将那个难看的标题栏去掉,老规矩,在manifests里直接修改
android:theme="@style/Theme.AppCompat.Light.NoActionBar"
有的同学就问了:没有标题栏岂不是更丑?没错,但是仔细回顾一下,我们已经在主布局文件里面加了一个假的标题栏呦。
最最最后,放图示效果:

Over