

2.具体使用解析
2.1 本地Service
这是最普通、最常用的后台服务Service。
2.1.1 使用步骤
- 步骤1:新建子类继承Service类
需重写父类的onCreate()、onStartCommand()、onDestroy()和onBind()方法
- 步骤2:构建用于启动Service的Intent对象
- 步骤3:调用startService()启动Service、调用stopService()停止服务
- 步骤4:在AndroidManifest.xml里注册Service
例子:
- 步骤1:新建子类继承Service类
需重写父类的onCreate()、onStartCommand()、onDestroy()和onBind()
public class MyService extends Service {


//启动Service之后,就可以在onCreate()或onStartCommand()方法里去执行一些具体的逻辑
//由于这里作Demo用,所以只打印一些语句
    @Override
    public void onCreate() {
        super.onCreate();
        System.out.println("执行了onCreat()");
    }

    @Override
    public int onStartCommand(Intent intent, int flags, int startId) {
        System.out.println("执行了onStartCommand()");
        return super.onStartCommand(intent, flags, startId);


    }

    @Override
    public void onDestroy() {
        super.onDestroy();
        System.out.println("执行了onDestory()");
    }

    @Nullable
    @Override
    public IBinder onBind(Intent intent) {
        return null;
    }
}
步骤2:在主布局文件设置两个Button分别用于启动和停止Service
activity_main.xml
<?xml version="1.0" encoding="utf-8"?>
<RelativeLayout xmlns:android="http://schemas.android.com/apk/res/android"
    xmlns:tools="http://schemas.android.com/tools"
    android:layout_width="match_parent"
    android:layout_height="match_parent"
    android:paddingBottom="@dimen/activity_vertical_margin"
    android:paddingLeft="@dimen/activity_horizontal_margin"
    android:paddingRight="@dimen/activity_horizontal_margin"
    android:paddingTop="@dimen/activity_vertical_margin"
    tools:context="scut.carson_ho.demo_service.MainActivity">

    <Button
        android:layout_centerInParent="true"
        android:id="@+id/startService"
        android:layout_width="wrap_content"
        android:layout_height="wrap_content"
        android:text="启动服务" />

    <Button
        android:layout_centerInParent="true"
        android:layout_below="@+id/startService"
        android:id="@+id/stopService"
        android:layout_width="wrap_content"
        android:layout_height="wrap_content"
        android:text="停止服务" />
</RelativeLayout>
步骤3:构建Intent对象,并调用startService()启动Service、stopService停止服务
public class MainActivity extends AppCompatActivity implements View.OnClickListener {

    private Button startService;
    private Button stopService;

    @Override
    protected void onCreate(Bundle savedInstanceState) {
        super.onCreate(savedInstanceState);
        setContentView(R.layout.activity_main);

        startService = (Button) findViewById(R.id.startService);
        stopService = (Button) findViewById(R.id.stopService);

        startService.setOnClickListener(this);
        startService.setOnClickListener(this);
    }

    @Override
    public void onClick(View v) {
        switch (v.getId()) {

            //点击启动Service Button
            case R.id.startService:
                //构建启动服务的Intent对象
                Intent startIntent = new Intent(this, MyService.class);
                //调用startService()方法-传入Intent对象,以此启动服务
                startService(startIntent);

            //点击停止Service Button
            case R.id.stopService:
                //构建停止服务的Intent对象
                Intent stopIntent = new Intent(this, MyService.class);
                //调用stopService()方法-传入Intent对象,以此停止服务
                stopService(stopIntent);

        }
    }
}
步骤4:在AndroidManifest.xml里注册Service
AndroidManifest.xml


2.2 可通信的服务Service
- 上面介绍的Service是最基础的,但只能单机使用,即无法与Activity通信
- 接下来将在上面的基础用法上,增设“与Activity通信”的功能,即使用绑定Service服务(Binder类、bindService()、onBind()、unbindService()、onUnbind())
2.2.1 实例Demo
接下来我将用一个实例Demo进行可通信的服务Service说明
- 步骤1:在新建子类继承Service类,并新建一个子类继承自Binder类、写入与Activity关联需要的方法、创建实例
public class MyService extends Service {

    private MyBinder mBinder = new MyBinder();

    @Override
    public void onCreate() {
        super.onCreate();
        System.out.println("执行了onCreat()");
    }

    @Override
    public int onStartCommand(Intent intent, int flags, int startId) {
        System.out.println("执行了onStartCommand()");
        return super.onStartCommand(intent, flags, startId);


    }

    @Override
    public void onDestroy() {
        super.onDestroy();
        System.out.println("执行了onDestory()");
    }

    @Nullable
    @Override
    public IBinder onBind(Intent intent) {
        System.out.println("执行了onBind()");
        //返回实例
        return mBinder;
    }


    @Override
    public boolean onUnbind(Intent intent) {
        System.out.println("执行了onUnbind()");
        return super.onUnbind(intent);
    }

    //新建一个子类继承自Binder类
    class MyBinder extends Binder {

        public void service_connect_Activity() {
            System.out.println("Service关联了Activity,并在Activity执行了Service的方法");

        }
    }
}
步骤2:在主布局文件再设置两个Button分别用于绑定和解绑Service
<?xml version="1.0" encoding="utf-8"?>
<RelativeLayout xmlns:android="http://schemas.android.com/apk/res/android"
    xmlns:tools="http://schemas.android.com/tools"
    android:layout_width="match_parent"
    android:layout_height="match_parent"
    android:paddingBottom="@dimen/activity_vertical_margin"
    android:paddingLeft="@dimen/activity_horizontal_margin"
    android:paddingRight="@dimen/activity_horizontal_margin"
    android:paddingTop="@dimen/activity_vertical_margin"
    tools:context="scut.carson_ho.demo_service.MainActivity">

    <Button
        android:layout_centerInParent="true"
        android:id="@+id/startService"
        android:layout_width="wrap_content"
        android:layout_height="wrap_content"
        android:text="启动服务" />

    <Button
        android:layout_centerInParent="true"
        android:layout_below="@+id/startService"
        android:id="@+id/stopService"
        android:layout_width="wrap_content"
        android:layout_height="wrap_content"
        android:text="停止服务" />

    <Button
        android:layout_centerInParent="true"
        android:layout_below="@id/stopService"
        android:id="@+id/bindService"
        android:layout_width="wrap_content"
        android:layout_height="wrap_content"
        android:text="绑定服务" />

    <Button
        android:layout_centerInParent="true"
        android:layout_below="@id/bindService"
        android:id="@+id/unbindService"
        android:layout_width="wrap_content"
        android:layout_height="wrap_content"
        android:text="解绑服务"
        />
</RelativeLayout>
步骤3:在Activity通过调用MyBinder类中的public方法来实现Activity与Service的联系
即实现了Activity指挥Service干什么Service就去干什么的功能public class MainActivity extends AppCompatActivity implements View.OnClickListener { private Button startService; private Button stopService; private Button bindService; private Button unbindService; private MyService.MyBinder myBinder; //创建ServiceConnection的匿名类 private ServiceConnection connection = new ServiceConnection() { //重写onServiceConnected()方法和onServiceDisconnected()方法 //在Activity与Service建立关联和解除关联的时候调用 @Override public void onServiceDisconnected(ComponentName name) { } //在Activity与Service解除关联的时候调用 @Override public void onServiceConnected(ComponentName name, IBinder service) { //实例化Service的内部类myBinder //通过向下转型得到了MyBinder的实例 myBinder = (MyService.MyBinder) service; //在Activity调用Service类的方法 myBinder.service_connect_Activity(); } }; @Override protected void onCreate(Bundle savedInstanceState) { super.onCreate(savedInstanceState); setContentView(R.layout.activity_main); startService = (Button) findViewById(R.id.startService); stopService = (Button) findViewById(R.id.stopService); startService.setOnClickListener(this); stopService.setOnClickListener(this); bindService = (Button) findViewById(R.id.bindService); unbindService = (Button) findViewById(R.id.unbindService); bindService.setOnClickListener(this); unbindService.setOnClickListener(this); } @Override public void onClick(View v) { switch (v.getId()) { //点击启动Service case R.id.startService: //构建启动服务的Intent对象 Intent startIntent = new Intent(this, MyService.class); //调用startService()方法-传入Intent对象,以此启动服务 startService(startIntent); break; //点击停止Service case R.id.stopService: //构建停止服务的Intent对象 Intent stopIntent = new Intent(this, MyService.class); //调用stopService()方法-传入Intent对象,以此停止服务 stopService(stopIntent); break; //点击绑定Service case R.id.bindService: //构建绑定服务的Intent对象 Intent bindIntent = new Intent(this, MyService.class); //调用bindService()方法,以此停止服务 bindService(bindIntent,connection,BIND_AUTO_CREATE); //参数说明 //第一个参数:Intent对象 //第二个参数:上面创建的Serviceconnection实例 //第三个参数:标志位 //这里传入BIND_AUTO_CREATE表示在Activity和Service建立关联后自动创建Service //这会使得MyService中的onCreate()方法得到执行,但onStartCommand()方法不会执行 break; //点击解绑Service case R.id.unbindService: //调用unbindService()解绑服务 //参数是上面创建的Serviceconnection实例 unbindService(connection); break; default: break; } } }
2.3 前台Service
前台Service和后台Service(普通)最大的区别就在于:
- 前台Service在下拉通知栏有显示通知(如下图),但后台Service没有;

TT9$TN8IK1SAPDT%~0IRLS2.png
- 前台Service优先级较高,不会由于系统内存不足而被回收;后台Service优先级较低,当系统出现内存不足情况时,很有可能会被回收
2.3.1 具体使用
用法很简单,只需要在原有的Service类对onCreate()方法进行稍微修改即可,如下图:
@Override
    public void onCreate() {
        super.onCreate();
        System.out.println("执行了onCreat()");

        //添加下列代码将后台Service变成前台Service
        //构建"点击通知后打开MainActivity"的Intent对象
        Intent notificationIntent = new Intent(this,MainActivity.class);
        PendingIntent pendingIntent = PendingIntent.getActivity(this,0,notificationIntent,0);

        //新建Builer对象
        Notification.Builder builer = new Notification.Builder(this);
        builer.setContentTitle("前台服务通知的标题");//设置通知的标题
        builer.setContentText("前台服务通知的内容");//设置通知的内容
        builer.setSmallIcon(R.mipmap.ic_launcher);//设置通知的图标
        builer.setContentIntent(pendingIntent);//设置点击通知后的操作

        Notification notification = builer.getNotification();//将Builder对象转变成普通的notification
        startForeground(1, notification);//让Service变成前台Service,并在系统的状态栏显示出来

    }
2.3.2 测试结果
运行后,当点击Start Service或Bind Service按钮,Service就会以前台Service的模式启动(通知栏上有通知),如下图

点击启动服务
2.4 远程Service
具体请看我写的另外一篇文章:Android:远程服务Service(含AIDL & IPC讲解)
3. 使用场景
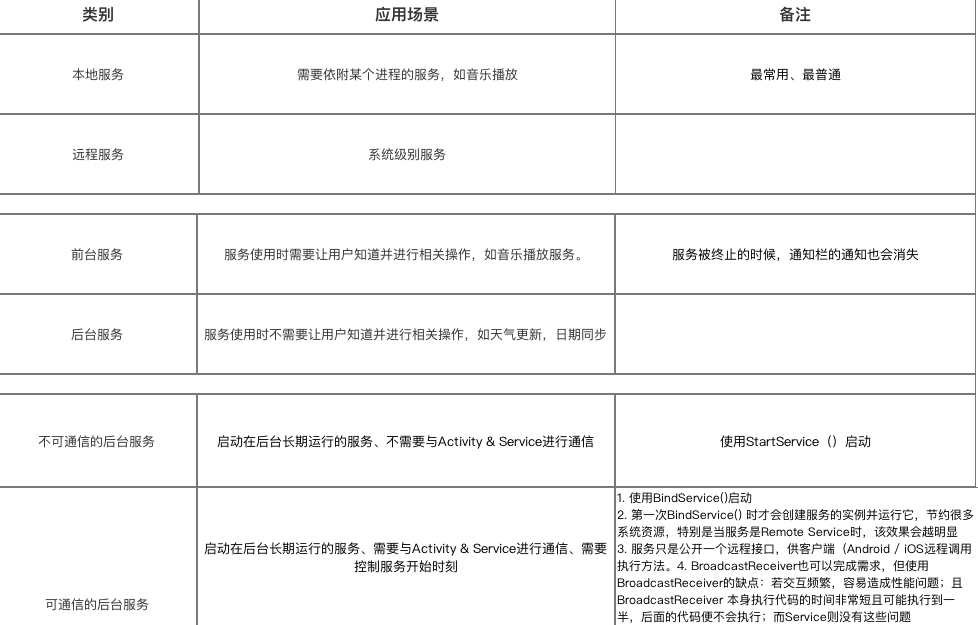
- 通过上述描述,你应该对Service类型及其使用非常了解;
- 那么,我们该什么时候用哪种类型的Service呢?
-
各种Service的使用场景请看下图:

