开源项目推荐
Pepper Metrics是我与同事开发的一个开源工具(https://github.com/zrbcool/pepper-metrics),其通过收集jedis/mybatis/httpservlet/dubbo/motan的运行性能统计,并暴露成prometheus等主流时序数据库兼容数据,通过grafana展示趋势。其插件化的架构也非常方便使用者扩展并集成其他开源组件。
请大家给个star,同时欢迎大家成为开发者提交PR一起完善项目。
从一个最简单的Spring Boot Web项目聊起
我们知道,用spring-boot写一个web项目非常容易,pom继承spring-boot-parent然后引入依赖spring-boot-starter-web,再写一个这样的主启动类,然后就可以去写Controller了,十分简单,就像这样:
@SpringBootApplication
public class SampleApplication {
    public static void main(String[] args) {
        SpringApplication.run(SampleApplication.class, args);
    }
}
// 然后再写一个Controller声明一个Rest服务
@RestController
@RequestMapping("/perf")
public class PerfController {
    @RequestMapping("/trace")
    public Object trace() {
        Object result = yourLogic();
        return result;
    }
}
聊聊SpringApplication.run
可是我们思考过,这背后spring-boot到底做了什么使我们的工作如此简单,它如何将spring、spring-mvc、tomcat整合到一起的呢?接下来我们以项目启动角度来分析整个初始化过程。
PS:下面代码分析过程中,着重于流程的串接,调用到某个变量时,作者会直接给出这个变量的具体实现,读者也许会产生困惑,但是不要停下来,先想当然的按照作者的思路把流程捋完,后面会针对各个主要的变量初始化及选择实现的过程进行逐个解释。
从SpringApplication.run说起:
方法定义如下
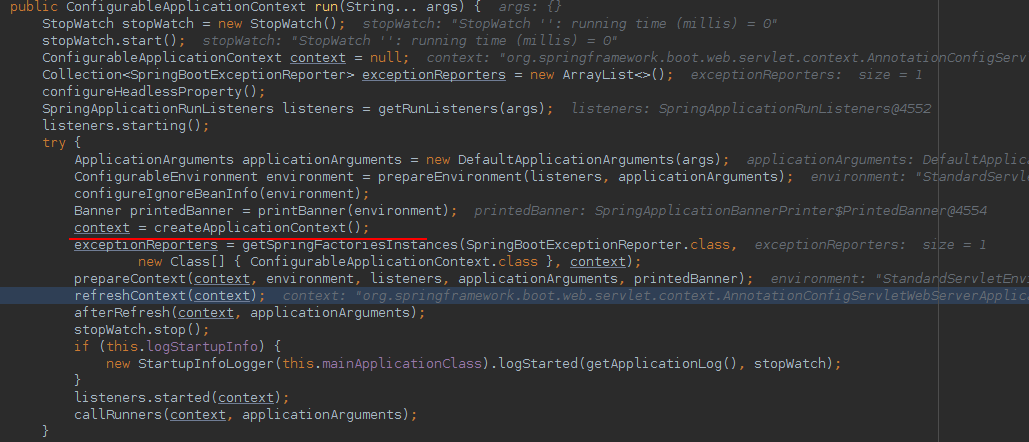
public static ConfigurableApplicationContext run(Class<?>[] primarySources, String[] args) {
    return new SpringApplication(primarySources).run(args);
}
public ConfigurableApplicationContext run(String... args) {
    StopWatch stopWatch = new StopWatch();
    stopWatch.start();
    ConfigurableApplicationContext context = null;
    Collection<SpringBootExceptionReporter> exceptionReporters = new ArrayList<>();
    configureHeadlessProperty();
    SpringApplicationRunListeners listeners = getRunListeners(args);
    listeners.starting();
    try {
        ApplicationArguments applicationArguments = new DefaultApplicationArguments(args);
        ConfigurableEnvironment environment = prepareEnvironment(listeners, applicationArguments);
        configureIgnoreBeanInfo(environment);
        Banner printedBanner = printBanner(environment);
        context = createApplicationContext();//1)
        exceptionReporters = getSpringFactoriesInstances(SpringBootExceptionReporter.class,
                new Class[] { ConfigurableApplicationContext.class }, context);
        prepareContext(context, environment, listeners, applicationArguments, printedBanner);
        refreshContext(context);//2)
        afterRefresh(context, applicationArguments);
        stopWatch.stop();
        if (this.logStartupInfo) {
            new StartupInfoLogger(this.mainApplicationClass).logStarted(getApplicationLog(), stopWatch);
        }
        listeners.started(context);
        callRunners(context, applicationArguments);
    }
    catch (Throwable ex) {
        handleRunFailure(context, ex, exceptionReporters, listeners);
        throw new IllegalStateException(ex);
    }

    try {
        listeners.running(context);
    }
    catch (Throwable ex) {
        handleRunFailure(context, ex, exceptionReporters, null);
        throw new IllegalStateException(ex);
    }
    return context;
}
我们来分解下这个run方法
先看1)context = createApplicationContext()
负责创建spring主容器,这个方法内部是根据具体项目运行时依赖的类来动态选择实现的,如果是web项目则会选择AnnotationConfigServletWebServerApplicationContext,至于选择的规则及原因,这里先忽略,后面会专门介绍(时空门:ServletWebServerApplicationContext)。
接下来我们重点看2)refreshContext(context)方法
其方法内部最终调用了((AbstractApplicationContext) applicationContext).refresh()方法,我们把这个方法展开
@Override
public void refresh() throws BeansException, IllegalStateException {
    synchronized (this.startupShutdownMonitor) {
        prepareRefresh();
        ConfigurableListableBeanFactory beanFactory = obtainFreshBeanFactory();
        prepareBeanFactory(beanFactory);
        try {
            postProcessBeanFactory(beanFactory);
            invokeBeanFactoryPostProcessors(beanFactory);
            registerBeanPostProcessors(beanFactory);
            initMessageSource();
            initApplicationEventMulticaster();
            onRefresh();//3)
            registerListeners();
            finishBeanFactoryInitialization(beanFactory);
            finishRefresh();
        }
        catch (BeansException ex) {
            if (logger.isWarnEnabled()) {
                logger.warn("Exception encountered during context initialization - " +
                        "cancelling refresh attempt: " + ex);
            }
            destroyBeans();
            cancelRefresh(ex);
            throw ex;
        }
        finally {
            resetCommonCaches();
        }
    }
}
实际上,这里我们的调用已经到了spring-context包,其实跟spring-boot已经没啥关系了,这其实就是一个标准的SpringApplicationContext的标准启动过程中refresh()部分,我们不是对spring启动过程分解,所以我们只关注与tomcat,spring-mvc结合的部分。
直接看3)onRefresh()方法,因为AnnotationConfigServletWebServerApplicationContext是ServletWebServerApplicationContext的子类,所以流程进入ServletWebServerApplicationContext的onRefresh()方法
@Override
protected void onRefresh() {
    super.onRefresh();
    try {
        createWebServer();//4)
    }
    catch (Throwable ex) {
        throw new ApplicationContextException("Unable to start web server", ex);
    }
}
可以看到这个4)createWebServer(),是我们的关键
private void createWebServer() {
    WebServer webServer = this.webServer;
    ServletContext servletContext = getServletContext();
    if (webServer == null && servletContext == null) {
        ServletWebServerFactory factory = getWebServerFactory();//5)
        this.webServer = factory.getWebServer(getSelfInitializer());//6)
    }
    else if (servletContext != null) {
        try {
            getSelfInitializer().onStartup(servletContext);
        }
        catch (ServletException ex) {
            throw new ApplicationContextException("Cannot initialize servlet context", ex);
        }
    }
    initPropertySources();
}
其中:
5)ServletWebServerFactory factory = getWebServerFactory();
上面这句获取到的具体实现是TomcatServletWebServerFactory(时空门:TomcatServletWebServerFactory)
6)this.webServer = factory.getWebServer(getSelfInitializer());
先看6)中的getSelfInitializer()方法:
private org.springframework.boot.web.servlet.ServletContextInitializer getSelfInitializer() {
    return this::selfInitialize;
}
private void selfInitialize(ServletContext servletContext) throws ServletException {
    prepareWebApplicationContext(servletContext);
    registerApplicationScope(servletContext);
    WebApplicationContextUtils.registerEnvironmentBeans(getBeanFactory(), servletContext);
    for (ServletContextInitializer beans : getServletContextInitializerBeans()) {
        beans.onStartup(servletContext);
    }
}
这块有点意思,返回的是一个this::selfInitialize,方法定义是返回org.springframework.boot.web.servlet.ServletContextInitializer,我们看下它是什么定义
@FunctionalInterface
public interface ServletContextInitializer {
	void onStartup(ServletContext servletContext) throws ServletException;
}
@FunctionalInterface是java8中lambda支持的一种函数式接口selfInitialize这段逻辑在后面过程当中会被调用。
继续看6)中this.webServer = factory.getWebServer(...),我们看下实现:
@Override
public WebServer getWebServer(ServletContextInitializer... initializers) {
    Tomcat tomcat = new Tomcat();
    File baseDir = (this.baseDirectory != null) ? this.baseDirectory : createTempDir("tomcat");
    tomcat.setBaseDir(baseDir.getAbsolutePath());
    Connector connector = new Connector(this.protocol);
    tomcat.getService().addConnector(connector);
    customizeConnector(connector);
    tomcat.setConnector(connector);
    tomcat.getHost().setAutoDeploy(false);
    configureEngine(tomcat.getEngine());
    for (Connector additionalConnector : this.additionalTomcatConnectors) {
        tomcat.getService().addConnector(additionalConnector);
    }
    prepareContext(tomcat.getHost(), initializers);//7)
    return getTomcatWebServer(tomcat);
}
可以看到在里面创建了Tomcat实例作为webServer的内部实现,然后向Tomcat的Service容器注入Connector,然后设置默认Host容器的AutoDeploy属性及其他的Tomcat初始化工作,最重要的一行是7)
我们来看一下:
protected void prepareContext(Host host, ServletContextInitializer[] initializers) {
    File documentRoot = getValidDocumentRoot();
    TomcatEmbeddedContext context = new TomcatEmbeddedContext();
    if (documentRoot != null) {
        context.setResources(new LoaderHidingResourceRoot(context));
    }
    ...//省略我们不关注的部分代码
    ServletContextInitializer[] initializersToUse = mergeInitializers(initializers);//8)
    host.addChild(context);//将context加入host作为host的子容器
    configureContext(context, initializersToUse);//9)
    postProcessContext(context);
}
我们可以看到其调用host.addChild(context)将context加入host作为host的子容器,然后
其中8)查找所有ServletContextInitializer实现并合并为一个数组,然后调用9)configureContext方法,我们来看一下:
protected void configureContext(Context context, ServletContextInitializer[] initializers) {
    TomcatStarter starter = new TomcatStarter(initializers);//10)
    if (context instanceof TomcatEmbeddedContext) {
        TomcatEmbeddedContext embeddedContext = (TomcatEmbeddedContext) context;
        embeddedContext.setStarter(starter);
        embeddedContext.setFailCtxIfServletStartFails(true);
    }
    context.addServletContainerInitializer(starter, NO_CLASSES);//11)
    ...//忽略
}
10)创建了TomcatStarter对象,并将starter加入context的conainerInitializer列表,见11),这样在tomcat的容器启动过程中就会调用到这个TomcatStarter实例。
我们来看下TomcatStarter做了什么
class TomcatStarter implements ServletContainerInitializer {
    ...
	private final ServletContextInitializer[] initializers;
	...
	TomcatStarter(ServletContextInitializer[] initializers) {
		this.initializers = initializers;
	}
    ...
	@Override
	public void onStartup(Set<Class<?>> classes, ServletContext servletContext) throws ServletException {
		try {
			for (ServletContextInitializer initializer : this.initializers) {
				initializer.onStartup(servletContext);
			}
		}
		catch (Exception ex) {
			this.startUpException = ex;
			if (logger.isErrorEnabled()) {
				logger.error("Error starting Tomcat context. Exception: " + ex.getClass().getName() + ". Message: "
						+ ex.getMessage());
			}
		}
	}
    ...
}
可以看到TomcatStarter相当于hook了context启动的事件,然后调用所有注入的initializers的onStartup方法,似曾相识是吗?这就是前面说的@FunctionalInterface函数接口,接下来我们就深入看下前面提到的那个initializer的onStartup的具体内容
//ServletWebServerApplicationContext类当中
private org.springframework.boot.web.servlet.ServletContextInitializer getSelfInitializer() {
    return this::selfInitialize;
}
private void selfInitialize(ServletContext servletContext) throws ServletException {
    prepareWebApplicationContext(servletContext);
    registerApplicationScope(servletContext);
    WebApplicationContextUtils.registerEnvironmentBeans(getBeanFactory(), servletContext);
    for (ServletContextInitializer beans : getServletContextInitializerBeans()) {
        beans.onStartup(servletContext);
    }
}
可以看到其对getServletContextInitializerBeans()的每个ServletContextInitializer均调用了onStartup方法
protected Collection<ServletContextInitializer> getServletContextInitializerBeans() {
    return new ServletContextInitializerBeans(getBeanFactory());
}
看看new ServletContextInitializerBeans(getBeanFactory())做了什么
@SafeVarargs
public ServletContextInitializerBeans(ListableBeanFactory beanFactory,
        Class<? extends ServletContextInitializer>... initializerTypes) {
    this.initializers = new LinkedMultiValueMap<>();
    this.initializerTypes = (initializerTypes.length != 0) ? Arrays.asList(initializerTypes)
            : Collections.singletonList(ServletContextInitializer.class);
    addServletContextInitializerBeans(beanFactory);
    addAdaptableBeans(beanFactory);
    List<ServletContextInitializer> sortedInitializers = this.initializers.values().stream()
            .flatMap((value) -> value.stream().sorted(AnnotationAwareOrderComparator.INSTANCE))
            .collect(Collectors.toList());
    this.sortedList = Collections.unmodifiableList(sortedInitializers);
    logMappings(this.initializers);
}
可以看到其从beanFactory中获取spring容器中所有的ServletContextInitializer实现,这里关于集成的部分在ServletRegistrationBean中,ServletRegistrationBean的注入过程参考:时空门:Dispatcherservletregistrationbean
private void addServletContextInitializerBeans(ListableBeanFactory beanFactory) {
    for (Class<? extends ServletContextInitializer> initializerType : this.initializerTypes) {
        for (Entry<String, ? extends ServletContextInitializer> initializerBean : getOrderedBeansOfType(beanFactory,
                initializerType)) {
            addServletContextInitializerBean(initializerBean.getKey(), initializerBean.getValue(), beanFactory);
        }
    }
}
private void addServletContextInitializerBean(String beanName, ServletContextInitializer initializer,
        ListableBeanFactory beanFactory) {
    if (initializer instanceof ServletRegistrationBean) {
        Servlet source = ((ServletRegistrationBean<?>) initializer).getServlet();
        addServletContextInitializerBean(Servlet.class, beanName, initializer, beanFactory, source);
    }
    else if (initializer instanceof FilterRegistrationBean) {
        Filter source = ((FilterRegistrationBean<?>) initializer).getFilter();
        addServletContextInitializerBean(Filter.class, beanName, initializer, beanFactory, source);
    }
    else if (initializer instanceof DelegatingFilterProxyRegistrationBean) {
        String source = ((DelegatingFilterProxyRegistrationBean) initializer).getTargetBeanName();
        addServletContextInitializerBean(Filter.class, beanName, initializer, beanFactory, source);
    }
    else if (initializer instanceof ServletListenerRegistrationBean) {
        EventListener source = ((ServletListenerRegistrationBean<?>) initializer).getListener();
        addServletContextInitializerBean(EventListener.class, beanName, initializer, beanFactory, source);
    }
    else {
        addServletContextInitializerBean(ServletContextInitializer.class, beanName, initializer, beanFactory,
                initializer);
    }
}
然后流程就顺了,我们会调用到ServletRegistrationBean的onStartup方法,最终会调用到servletContext.addServlet的Servlet3.0的标准将DispatchServlet注入到servlet容器中拦截所有的请求。
见下面代码:
//RegistrationBean
@Override
public final void onStartup(ServletContext servletContext) throws ServletException {
    String description = getDescription();
    if (!isEnabled()) {
        logger.info(StringUtils.capitalize(description) + " was not registered (disabled)");
        return;
    }
    register(description, servletContext);
}
//DynamicRegistrationBean
@Override
protected final void register(String description, ServletContext servletContext) {
    D registration = addRegistration(description, servletContext);
    if (registration == null) {
        logger.info(
                StringUtils.capitalize(description) + " was not registered " + "(possibly already registered?)");
        return;
    }
    configure(registration);
}
//ServletRegistrationBean
@Override
protected ServletRegistration.Dynamic addRegistration(String description, ServletContext servletContext) {
    String name = getServletName();
    return servletContext.addServlet(name, this.servlet);
}
至此所有集成完毕,启动过程交给tomcat完成。
没讲完的故事:各个依赖的组件是如何初始化的
TomcatServletWebServerFactory
spring-boot-autoconfigure/META-INF/spring.factories中有一段配置:
...
# Auto Configure
org.springframework.boot.autoconfigure.EnableAutoConfiguration=
org.springframework.boot.autoconfigure.web.servlet.ServletWebServerFactoryAutoConfiguration,
...
然后我们来看下ServletWebServerFactoryAutoConfiguration类
@Configuration
@AutoConfigureOrder(Ordered.HIGHEST_PRECEDENCE)
@ConditionalOnClass(ServletRequest.class)
@ConditionalOnWebApplication(type = Type.SERVLET)
@EnableConfigurationProperties(ServerProperties.class)
@Import({ ServletWebServerFactoryAutoConfiguration.BeanPostProcessorsRegistrar.class,
		ServletWebServerFactoryConfiguration.EmbeddedTomcat.class,
		ServletWebServerFactoryConfiguration.EmbeddedJetty.class,
		ServletWebServerFactoryConfiguration.EmbeddedUndertow.class })
public class ServletWebServerFactoryAutoConfiguration {
    ...
}
其中@Import部分引入了ServletWebServerFactoryConfiguration.EmbeddedTomcat.class,深入看一下
@Configuration
class ServletWebServerFactoryConfiguration {
	@Configuration
	@ConditionalOnClass({ Servlet.class, Tomcat.class, UpgradeProtocol.class })
	@ConditionalOnMissingBean(value = ServletWebServerFactory.class, search = SearchStrategy.CURRENT)
	public static class EmbeddedTomcat {
		@Bean
		public TomcatServletWebServerFactory tomcatServletWebServerFactory() {
			return new TomcatServletWebServerFactory();
		}
	}
	...
}
这块Spring Boot根据@ConditionalOnClass判断当前运行时环境是否符合条件,即包含了tomcat的jar包,如果满足则创建TomcatServletWebServerFactory的Bean实例加入spring容器管理,后面有用。
ServletWebServerApplicationContext
实际启动时,启动的是其子类AnnotationConfigServletWebServerApplicationContext,我们来看下SpringApplication类,实际上SpringApplication在运行时根据情况决定使用哪种ApplicationContext
查看createApplicationContext()方法
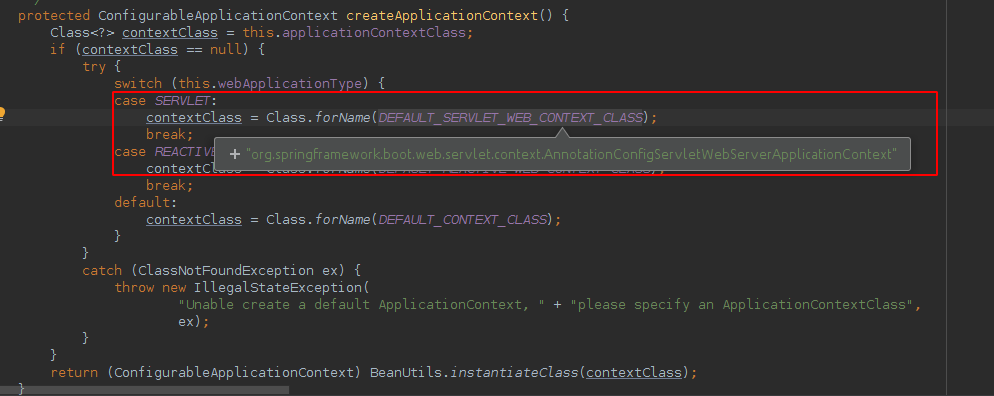
那么这个this.webApplicationType又是哪来的值呢?
我们看下这个构造方法
public SpringApplication(ResourceLoader resourceLoader, Class<?>... primarySources) {
    this.resourceLoader = resourceLoader;
    Assert.notNull(primarySources, "PrimarySources must not be null");
    this.primarySources = new LinkedHashSet<>(Arrays.asList(primarySources));
    this.webApplicationType = WebApplicationType.deduceFromClasspath();
    setInitializers((Collection) getSpringFactoriesInstances(ApplicationContextInitializer.class));
    setListeners((Collection) getSpringFactoriesInstances(ApplicationListener.class));
    this.mainApplicationClass = deduceMainApplicationClass();
}
WebApplicationType.deduceFromClasspath()用来自动识别这个值,看下实现:
static WebApplicationType deduceFromClasspath() {
    if (ClassUtils.isPresent(WEBFLUX_INDICATOR_CLASS, null) && !ClassUtils.isPresent(WEBMVC_INDICATOR_CLASS, null)
            && !ClassUtils.isPresent(JERSEY_INDICATOR_CLASS, null)) {
        return WebApplicationType.REACTIVE;
    }
    for (String className : SERVLET_INDICATOR_CLASSES) {
        if (!ClassUtils.isPresent(className, null)) {
            return WebApplicationType.NONE;
        }
    }
    return WebApplicationType.SERVLET;
}
可以看到它是通过判断classloader中是否有Servlet相关的class来判断的,所以是运行时判断的。
DispatcherServletRegistrationBean
DispatcherServletRegistrationBean是保证我们的DispatcherServlet被注入到Servlet容器并生效的关键,我们来看下它是如何初始化的
spring-boot-autoconfigure/META-INF/spring.factories中有一段配置:
# Auto Configure
org.springframework.boot.autoconfigure.EnableAutoConfiguration=
org.springframework.boot.autoconfigure.web.servlet.DispatcherServletAutoConfiguration,
看看实现
@AutoConfigureOrder(Ordered.HIGHEST_PRECEDENCE)
@Configuration
@ConditionalOnWebApplication(type = Type.SERVLET)
@ConditionalOnClass(DispatcherServlet.class)
@AutoConfigureAfter(ServletWebServerFactoryAutoConfiguration.class)
public class DispatcherServletAutoConfiguration {
	@Configuration
	@Conditional(DispatcherServletRegistrationCondition.class)
	@ConditionalOnClass(ServletRegistration.class)
	@EnableConfigurationProperties(WebMvcProperties.class)
	@Import(DispatcherServletConfiguration.class)
	protected static class DispatcherServletRegistrationConfiguration {

		private final WebMvcProperties webMvcProperties;

		private final MultipartConfigElement multipartConfig;

		public DispatcherServletRegistrationConfiguration(WebMvcProperties webMvcProperties,
				ObjectProvider<MultipartConfigElement> multipartConfigProvider) {
			this.webMvcProperties = webMvcProperties;
			this.multipartConfig = multipartConfigProvider.getIfAvailable();
		}

		@Bean(name = DEFAULT_DISPATCHER_SERVLET_REGISTRATION_BEAN_NAME)
		@ConditionalOnBean(value = DispatcherServlet.class, name = DEFAULT_DISPATCHER_SERVLET_BEAN_NAME)
		public DispatcherServletRegistrationBean dispatcherServletRegistration(DispatcherServlet dispatcherServlet) {
			DispatcherServletRegistrationBean registration = new DispatcherServletRegistrationBean(dispatcherServlet,
					this.webMvcProperties.getServlet().getPath());
			registration.setName(DEFAULT_DISPATCHER_SERVLET_BEAN_NAME);
			registration.setLoadOnStartup(this.webMvcProperties.getServlet().getLoadOnStartup());
			if (this.multipartConfig != null) {
				registration.setMultipartConfig(this.multipartConfig);
			}
			return registration;
		}

	}
}
可以看到,其像spring容器注册了DispatcherServletRegistrationBean的Bean实例,看一下它的继承关系:
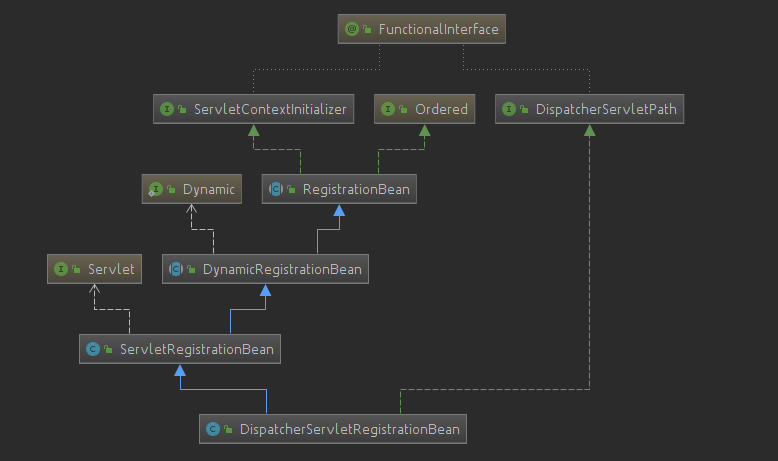
其父类ServletRegistrationBean类有如下方法:
@Override
protected ServletRegistration.Dynamic addRegistration(String description, ServletContext servletContext) {
    String name = getServletName();
    return servletContext.addServlet(name, this.servlet);
}
其调用了ServletContext.addServlet方法将DispatchServlet加入到Servlet容器,这是Servlet3.0中注册servlet的方法。
那么你也许会问,addRegistration又是什么时机调用的呢?
根据继承关系,查看其父类的父类RegistrationBean,其有一个
@Override
public final void onStartup(ServletContext servletContext) throws ServletException {
    String description = getDescription();
    if (!isEnabled()) {
        logger.info(StringUtils.capitalize(description) + " was not registered (disabled)");
        return;
    }
    register(description, servletContext);
}
register方法是一个模板方法,调用子类DynamicRegistrationBean的实现
@Override
protected final void register(String description, ServletContext servletContext) {
    D registration = addRegistration(description, servletContext);
    if (registration == null) {
        logger.info(StringUtils.capitalize(description) + " was not registered " + "(possibly already registered?)");
        return;
    }
    configure(registration);
}
addRegistration方法又是一个模板方法,实现就是前面ServletRegistrationBean的addRegistration实现,而onStartup方法会在SpringApplication.run()方法的流程中被调用到,讲主流程的时候已经讲到,这里不再赘述
这样就将DispatchServlet与Tomcat进行了集成,DispatchServlet使用模板方法设计模式,将具体的请求分配给不同的handler处理,这个后面会讲到,本篇就主要专注在Spring Boot与Spring MVC及Tomcat的集成原理部分。