http://sysprogs.com/VBoxGDB/tutorial/
This tutorial shows how to debug a Linux kernel running on VirtualBox using the VirtualBox debugger and VBoxGDB. In this tutorial we will use a Windows machine as a host machine and will run and debug Linux kernel inside VirtualBox.
- Install VirtualBox 4.1.x. Other versions are currently not supported!
- Download VBoxGDB and unpack the archive.
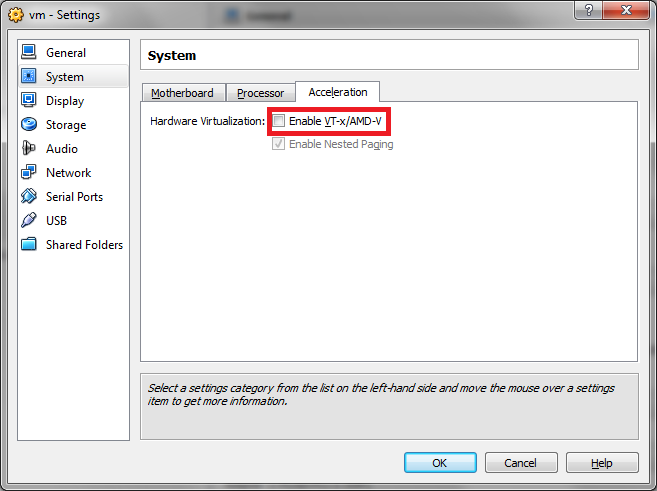
- Create a Linux VM in VirtualBox and install Linux there.Ensure that you have disabled hardware virtualization! Otherwise breakpoints won't work:
- Install Linux source code and prepare it for building. E.g. use the following commands on debian-based distros:
sudo apt-get install linux-source libncurses5-dev
mkdir mykernel
cd mykernel
tar xjf /usr/src/linux-source-<version>/linux-source-<version>.tar.bz2
cd linux-source-<version>
make oldconfig - Run "make menuconfig" and enable "Kernel Hacking->Compile kernel with debug info":

- Build the Linux kernel by running the following commands:
make
make modules - Copy the kernel to your Windows machine. E.g. you can do it by running creating a new Windows shared folder (e.g. 'share') and a new Windows user (e.g. virtual) and then mounting it from the Linux machine:
sudo apt-get install smbfs
sudo mkdir /mnt/share
sudo smbmount //10.0.2.2/share /mnt/share -o user=virtual
sudo cp vmlinux /mnt/share - Once you have built the kernel but not installed it yet, it's a good time to make a VirtualBox snapshot. If anything goes wrong, you will be able to restore the snapshot later.
- Install the new kernel on the Linux machine:
sudo make modules_install
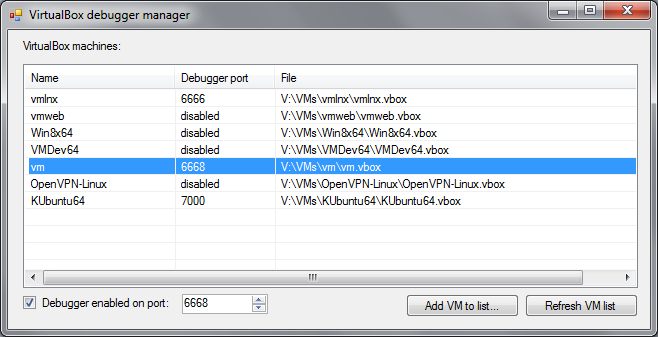
sudo make install - Shut down the Linux machine. Go to the directory where you have extracted VBoxGDB and run VBoxDebugMgr.exe. Select your VM from list and enable the "debugger enabled" checkbox. Alternatively you can change the the debugger port:
- Start your VM again. Wait until Linux starts up.
- Open Command Prompt and go to the directory where you have extracted VBoxGDB. Run the following command:
VBoxGDB <port number>The port number should be the port you specified when enabling the debugger:
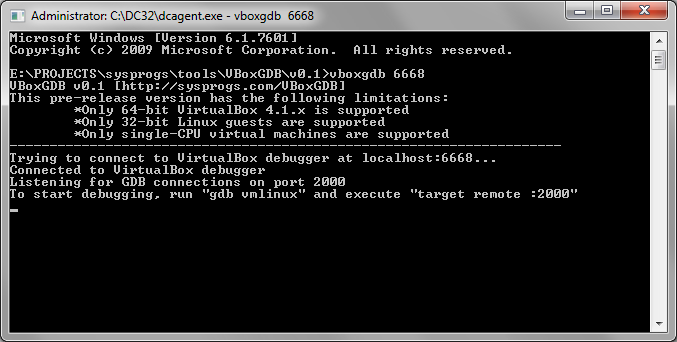 VBoxGDB will connect to VirtualBox and start listening on port 2000
for GDB connections. If VBoxGDB fails to connect, close all VirtualBox-related processes (including VBoxSVC.exe) and enable the debugger again.
VBoxGDB will connect to VirtualBox and start listening on port 2000
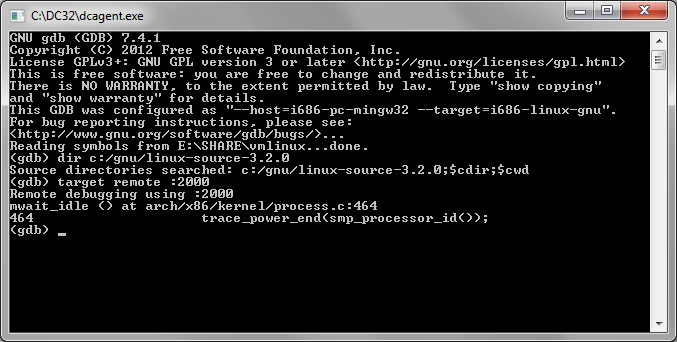
for GDB connections. If VBoxGDB fails to connect, close all VirtualBox-related processes (including VBoxSVC.exe) and enable the debugger again. - Launch the cross-compiled GDB (provided with VBoxGDB) by running the following command in VBoxGDB directory:
i686-linux-gnu-gdb.exe <path-to-your-vmlinux-file>
- If you have copied Linux sources to your Windows machine, tell GDB to search for sources in that directory:
dir <directory-with-linux-source>
- Connect GDB to your Linux kernel by running the following command inside GDB:
target remote :2000
- Congratulations! You can now use normal GDB commands to debug your Linux kernel with GDB.
- If you are familiar with the VirtualBox debugger, you can send commands to it using the "mon " command. E.g. "mon help".
- To try a simple debugging scenario, set a breakpoint on the sys_open() function and run the target:
b sys_open
c - Go to the VM and try launching an application. The breakpoint will soon trigger:
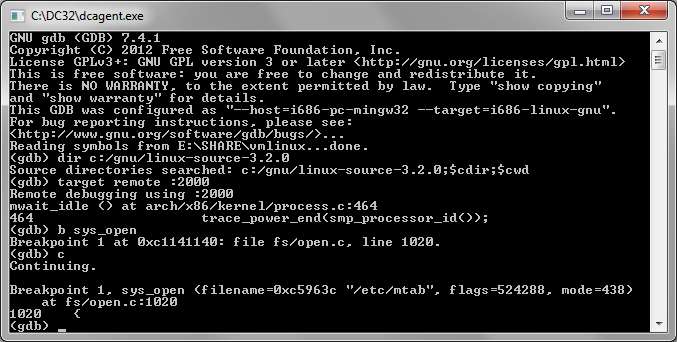
- You can use the normal GDB commands to examine the variable values, set breakpoints, etc. If you need to force the guest OS to stop when it's running (e.g. to set a breakpoint), press Ctrl-C either in GDB window or in the VBoxGDB window.
- When you exit GDB, VBoxGDB will stop as well. Re-run it if you want to debug your VM again.