http://www.cnblogs.com/zhucl1006/archive/2008/01/16/1042092.html
最近一直忙着工作上的事,一直也没有给自己好好充充电了,突然感觉没有了灵感,唉~~
最近到微软的网站去看看了,发现WCF这个技术,之前就知道有这个东西了,但是一直也没有具体的看进去。所以打算在年前这几天的时间里好好学学这门技术。
以下是学习教程后的记录。
什么是WCF。
WCF的全称为Windows Communication Foundation,它提供了现有的比如WebService,.net Remoting,MessageQ,Enterprise Services 等的全部的功能。
WCF是面向服务的,松耦合的,分布式的,可交互的一个程序。
WCF可以很灵活的部署到不同的Host端上,可以采用不同的数据传输模式。可以灵活配置。
.Net FrameWork 3.0 ,Vista中包括。
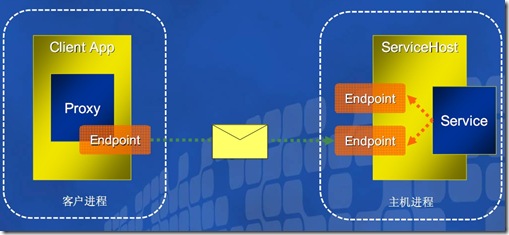
Server端架构:
Host: 一个主机,该可以是一个windows form 程序,可以是一个windows Server程序,可以是一个com+程式 等等。
Service: 一个服务的对象。该就是一个用来处理具体逻辑的对象的定义。
EndPoint: 一个对外的点。该可以定位为不同的协议支持的。
Client端架构:
Client : Client的端的程式
Proxy: 一个代理对象。封装了SErvice 的对象。
EndPoint: 一个对Server端的一个点。
如下图:
开始写一个简单的WCF程序:(包括3个部分,Server端部分,Client部分,Data部分)
以下创建一个基于Http协议的范例程序。
Data部分建立:
1.建立一个工程文件,该工程为一个Class Lib...,命名为:TESTWCF.MyData
2.引入 System.ServiceModel .dll.(这个好像在net3.0中有,net 2.0 要使用的wcf的话,需要安装net 3.0的环境,然后在装一个Visual Studio 2005 extensions for .NET Framework 3.0 这个,应该就可以了。 因为我之前有装过vs 2008 ,但是卸掉了,可能没有卸载干净,竟然还能使用这个.....也好省的麻烦了)
3.添加如下代码:
using System;
using System.Collections.Generic;
using System.Text;
using System.ServiceModel;
namespace TESTWCF.MyData
{
[ServiceContract(Namespace = "http://www.cnblogs.net/zhucl1006")]
public interface IMyDataService
{
[OperationContract]
string GetServerTime(string userName);
}
public class MyDataService : IMyDataService
{
#region IMyDataService 成员
public string GetServerTime(string userName)
{
string str = System.DateTime.Now.ToString("yyyy-MM-dd HH:mm:ss");
return "Server Time Is [" + str + "]. UserName is [" + userName + "]";
}
#endregion
}
}
Server端建立:
1.建立一个工程文件。该工程为一个Window Form的程序。命名为:TESTWCF.HostServer
2.引入 System.ServiceModel .dll.
3.添加app.config 文件。如下:
<?xml version="1.0" encoding="utf-8" ?>
<configuration>
<system.serviceModel>
<services>
<service name="TESTWCF.MyData.MyDataService" behaviorConfiguration="serviceBehavior">
<endpoint binding="basicHttpBinding" contract="TESTWCF.MyData.IMyDataService" address="MyData" />
<endpoint binding="mexHttpBinding" contract="IMetadataExchange" address="mex" />
<host>
<baseAddresses>
<add baseAddress="http://localhost:8080"/>
</baseAddresses>
</host>
</service>
</services>
<behaviors>
<serviceBehaviors>
<behavior name="serviceBehavior">
<serviceMetadata httpGetEnabled="true" />
</behavior>
</serviceBehaviors>
</behaviors>
</system.serviceModel>
</configuration>
其中 Services 节点下表示该HOst中有几个Service服务。
Service节点下定义Service的内容。name:Service的命名空间, behaviorConfiguration:定义行为属性的节点名称。
endpoint节点定义endpoint的内容,binding:定义使用协议,该范例中使用http协议。contract :定义endpoint使用的service类的名称。 address 定义访问的位置。
host: 定义host信息。baseAddresses:定义host中Address前面的部分。如果访问可以使用ie,输入baseAddress.Client要访问具体的服务,使用baseAddress+endpoint.address这个链接点。
serviceBehaviors: 行为定义。
4.设计窗体。略。
主要code:
ServiceHost host;
private void button1_Click(object sender, EventArgs e)
{
host = new ServiceHost(typeof(TESTWCF.MyData.MyDataService));
host.Opened += new EventHandler(host_Opened);
host.Closed += new EventHandler(host_Closed);
host.Open();
}
private void button2_Click(object sender, EventArgs e)
{
if (host.State == CommunicationState.Opened)
{
host.Close();
host.Opened -= new EventHandler(host_Opened);
host.Closed -= new EventHandler(host_Closed);
}
}
void host_Closed(object sender, EventArgs e)
{
this.button1.Enabled = true;
this.button2.Enabled = false;
}
void host_Opened(object sender, EventArgs e)
{
this.button1.Enabled = false;
this.button2.Enabled = true;
}
运行后,可以通过ie查看http://localhost:8080/。如下图:
Client端建立:
1.建立一个工程文件。该工程为一个Windows Form程序,命名为:TESTWCF.MyClient
2.引入 System.ServiceModel .dll.
3.应该可以使用工具生成Service的代理类,我为了方便直接引入MyData.dll,使用ClientBase<>方法。
code如下:
using System;
using System.Collections.Generic;
using System.ComponentModel;
using System.Data;
using System.Drawing;
using System.Text;
using System.Windows.Forms;
using System.ServiceModel;
using TESTWCF.MyData;
namespace TESTWCF.MyClient
{
public partial class Form1 : Form
{
public Form1()
{
InitializeComponent();
}
MyDataClient client = new MyDataClient();
private void button1_Click(object sender, EventArgs e)
{
this.textBox1.Text = client.GetServerTime("Client");
}
}
class MyDataClient : ClientBase<IMyDataService>, IMyDataService
{
internal MyDataClient()
: base()
{ }
#region IMyDataService 成员
public string GetServerTime(string userName)
{
return this.Channel.GetServerTime(userName);
}
#endregion
}
}
ClientBase 会根据app.config中定义创建适当的协议等,生成proxy。
4.添加app.config ,如下:
<?xml version="1.0" encoding="utf-8" ?>
<configuration>
<system.serviceModel>
<client>
<endpoint address="http://localhost:8080/MyData" binding="basicHttpBinding"
contract="TESTWCF.MyData.IMyDataService" />
</client>
</system.serviceModel>
</configuration>
定义Client端的endpoint。
运行结果:
可以看到ServerHost 和Client之间已经建立了链接。并获取到serverHost中的资料。
以上实现均使用WCF中的配置文件进行配置进行的。也可以通过代码直接,但是还是觉得配置的这个方法比较方便部署,更改等。 所以就写了这个方法。
睡觉咯。明天还有还要继续处理VC的那个exe Com....现在架构已经出来了,界面显示也已经OK了,就差往里写逻辑部分了,也是最头疼的部分。明天加油。。。
随便写
C++再修(一)————通过一个头文件,来讲解整个程序的部分概念
ROS学习记录(四)————怎样建立一个package包?
XML的学习笔记(一)————基本语法和规范
C++学习日记(二)————初始字符串类型及封装
C++学习日记(一)————类与对象
ROS学习记录(三)————创建一个简单的发布节点和订阅节点
ROS学习记录(二)————使用smartcar进行仿真(用.xacro文件来运行rviz)
ROS学习记录(一)————创建简单的机器人模型smartcar


