目录:
一、TensorFlow使用GPU
二、深度学习训练与并行模式
三、多GPU并行
四、分布式TensorFlow
4.1分布式TensorFlow的原理
4.2分布式TensorFlow模型训练
4.3使用caicloud运行分布式TensorFlow
深度学习应用到实际问题中,一个非常棘手的问题是训练模型时计算量太大。为了加速训练,TensorFlow可以利用GPU或/和分布式计算进行模型训练。
一、TensorFlow使用GPU
TensorFlow可以通过td.device函数来指定运行每个操作的设备,这个设备可以是本设备的CPU或GPU,也可以是远程的某一台设备。
TF生成会话的时候,可愿意通过设置tf.log_device_placemaent参数来打印每一个运算的设备。
import tensorflow as tf

a = tf.constant([1.0,2.0,3.0],shape=[3],name='a')
b = tf.constant([1.0,2.0,3.0],shape=[3],name='b')
c= tf.add_n([a,b],name="c")

with tf.Session(config=tf.ConfigProto(log_device_placement = True)) as sess:
    print(sess.run(c))


########
Device mapping: no known devices.
c: (AddN): /job:localhost/replica:0/task:0/device:CPU:0
b: (Const): /job:localhost/replica:0/task:0/device:CPU:0
a: (Const): /job:localhost/replica:0/task:0/device:CPU:0

[2. 4. 6.]
在配置好了GPU环境的TensorFlow中,如果没有明确指明运行设备,TF会优先选择GPU。
import tensorflow as tf

a = tf.constant([1.0,2.0,3.0],shape=[3],name='a')
b = tf.constant([1.0,2.0,3.0],shape=[3],name='b')
c= tf.add_n([a,b],name="c")

with tf.Session(config=tf.ConfigProto(log_device_placement = True)) as sess:
    print(sess.run(c))


########
Device mapping: no known devices.
c: (AddN): /job:localhost/replica:0/task:0/device:GPU:0
b: (Const): /job:localhost/replica:0/task:0/device:GPU:0
a: (Const): /job:localhost/replica:0/task:0/device:GPU:0

[2. 4. 6.]
可以通过tf.device 来制定运行操作的设备。
import tensorflow as tf
with tf.device("/CPU:0"):
    a = tf.constant([1.0,2.0,3.0],shape=[3],name='a')
    b = tf.constant([1.0,2.0,3.0],shape=[3],name='b')
with tf.device("/GPU:0"):
    c= tf.add_n([a,b],name="c")

with tf.Session(config=tf.ConfigProto(log_device_placement = True)) as sess:
    print(sess.run(c))
某些数据类型是不被GPU所支持的。强制指定设备会报错。为了避免解决这个问题。在创建会还时可以指定参数allow_soft_placement 。当allow_soft_placement为True的时候,如果运算无法在GPU上运行,TF会自动将其放在CPU 上运行。
a_cpu = tf.Variable(0,name='a_cpu')
with tf.device('/gpu:0'):
    a_gpu = tf.Variable(0,name='a_gpu')

sess = tf.Session(config=tf.ConfigProto(log_device_placement=True,allow_soft_placement = True))
sess.run(tf.global_variables_initializer())
a_gpu: (VariableV2): /job:localhost/replica:0/task:0/device:CPU:0
a_gpu/read: (Identity): /job:localhost/replica:0/task:0/device:CPU:0
a_gpu/Assign: (Assign): /job:localhost/replica:0/task:0/device:CPU:0
init/NoOp_1: (NoOp): /job:localhost/replica:0/task:0/device:CPU:0
a_cpu: (VariableV2): /job:localhost/replica:0/task:0/device:CPU:0
a_cpu/read: (Identity): /job:localhost/replica:0/task:0/device:CPU:0
a_cpu/Assign: (Assign): /job:localhost/replica:0/task:0/device:CPU:0
init/NoOp: (NoOp): /job:localhost/replica:0/task:0/device:CPU:0
init: (NoOp): /job:localhost/replica:0/task:0/device:CPU:0
a_gpu/initial_value: (Const): /job:localhost/replica:0/task:0/device:CPU:0
a_cpu/initial_value: (Const): /job:localhost/replica:0/task:0/device:CPU:0
实践经验:将计算密集型的操作放在GPU上。为了提高程序运行速度,尽量将相关操作放在同一台设备上。
二、深度学习训练与并行模式
常用的并行化深度学习模型的方法有两种:同步模式和异步模式。
在异步模式下,不同设备之间是完全独立的。
异步模型流程图:

同步模型流程图:
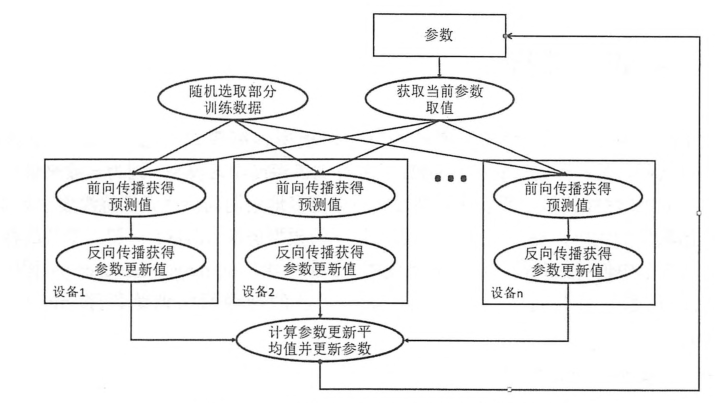
同步模式时,单个设备不会单独对参数进行更新,而会等待所有设备都完成反向传播之后再统一更新参数。
同步模式解决了异步模式中存在参数更新的问题,然而同步模式的效率却低于异步模式。
三、多GPU并行
一般来说,一台机器上的多个GPU性能相似,所以在这种设置下跟多的是采用同步模式训练甚多学习模型。
四、分布式TensorFlow
通过多GPU并行的方式固然可以达到很好的训练效果,但是一台机器上毕竟GPU的个数是有限的。如果需要记忆不提升深度学习模型的训练效果,就需要将TensorFlow分布式的运行在多台计算机上。
4.1分布式TensorFlow的原理
在第二个小结中,介绍了分布式TensorFlow训练甚多学习模型的理论。本小节将具体介绍如何使用TF在分布式集群中训练深度学习模型。TensorFlow集群通过一系列的任务(tasks)来执行TF计算图中的运算。一般来说,不同的任务跑在不同的机器上。当然,使用GPU时,不同任务可以使用用一太机器上的不同GPU。TF中的任务可以聚合成工作。每个工作可以包含一个或多个任务。当一个TF集群有多个任务的时候,需要使用tf.train.ClusterSpec来指定运行每一个人物的机器。
配置第一个任务集群
import tensorflow as tf

c = tf.constant('Hello ,this is the server1!')

#生成一个有两个人物的集群,一个任务跑在本地的2222端口,另一个跑在本地的2223端口
cluster = tf.train.ClusterSpec({"local":['localhost:2998','localhost2999']})
#通过上面生成的集群配置生成Server。并通过job_name和task_index指定当前启动的任务。
server = tf.train.Server(cluster,job_name='local',task_index=0)
#通过server.target生成会话来使用来使用TF集群中的资源。通过log_device_placement可以看到执行每一个操作的任务
sess = tf.Session(server.target,config=tf.ConfigProto(log_device_placement = True))
print(sess.run(c))
配置第二个任务,使用同样的集群配置
import tensorflow as tf

c = tf.constant('Hello ,this is the server2!')
#和第一个任务一样的集群配置
cluster = tf.train.ClusterSpec({"local":['localhost:2998','localhost2999']})
#指定task_index = 1,所以第二个任务是运行在2999端口上
server = tf.train.Server(cluster,job_name='local',task_index=0)

sess = tf.Session(server.target,config=tf.ConfigProto(log_device_placement = True))
print(sess.run(c))
当只启动第一个任务时,程序会停下来等待第二个任务启动。而且持续输出failed to connect to “ipv4:127.0.0.1:2999”,当第二个任务启动后,才会输出第一个任务的结果。