本文内容导航:
上篇总结了熔断降级(Hystrix)与监控的使用方式,里面涉及到的一些重点的知识细节我都有说明,网上很多的spring cloud教程只是简单的贴代码、简单描述,而我的文章是要体现知识的积累与开发时的参考,故花了一些时间描述了一些细节,这些细节能帮助我自己(梦在旅途)以及大家少走弯路,本文仍然围绕这个中心思想来总结描述关于配置中心的搭建与使用,实现了多种搭建配置服务中心(config server),也实现了多种配置消费客户端的实现方式。(多种配置消费方式目前很少有人总结,而我在本文中有特别介绍,不一定都用得上,但应该要了解,以便举一反三灵活运用),好了废话不多说,直接开始本文主题。
首先我们要了解,为什么需要配置中心?配置中心能解决什么问题?回答这些问题可以参见:https://www.cnblogs.com/xiaoqi/p/configserver-compair.html,我这里简要说明一下:JAVA应用一般常用的配置文件是:xxx.Properties 或 xxx.yml文件,.NET(.NET CORE)一般常用的配置文件是:xxx.config 或 xxx.json 甚至是xxx.ini,它们都能够很好的应对单机本地配置的需求(可以多个应用共用同一个目录位置的配置文件),但如果是分布式应用,那么本地配置文件在某些场景下就显得不那么合适了,因为一是存在配置冗余(不同机器上配置相同的配置信息),二是无法快速同步配置信息(如果要更改配置信息,就得每台服务器一台一台的更改,或使用文件同步机制稍微能保证尽快同步),三是没有多版本管理,出现更新配置后有问题无法快速回滚(如有问题,需重新配置或人为将之前的备份的配置文件一台台服务器更新或文件同步到多台服务器),比如:数据库连接字符串,如果使用本地配置就存在如上说的三点问题,正因为存在这些问题,所以才有了分布式配置中心框架来解决这些问题。
分布式配置中心的主流框架有很多,由于本文是总结spring cloud系列的文章,故这里通过DEMO来实现分布式配置中心Server端及Client消费端(读取配置),并确保高可用。
一、搭建配置服务中心(config server)
首先通过IDEA spring initializer(或直接通过https://start.spring.io/)创建一个spring boot项目(demo项目命名:configserver),创建过程中选择:config server依赖,生成项目后的POM XML文件如下:(如果缺少依赖请自行手动添加)


<?xml version="1.0" encoding="UTF-8"?>
<project xmlns="http://maven.apache.org/POM/4.0.0" xmlns:xsi="http://www.w3.org/2001/XMLSchema-instance"
         xsi:schemaLocation="http://maven.apache.org/POM/4.0.0 http://maven.apache.org/xsd/maven-4.0.0.xsd">
    <modelVersion>4.0.0</modelVersion>
    <parent>
        <groupId>org.springframework.boot</groupId>
        <artifactId>spring-boot-starter-parent</artifactId>
        <version>2.1.3.RELEASE</version>
        <relativePath/> <!-- lookup parent from repository -->
    </parent>

    <groupId>cn.zuowenjun.cloud</groupId>
    <artifactId>configserver</artifactId>
    <version>0.0.1-SNAPSHOT</version>
    <name>configserver</name>
    <url>http://www.zuowenjun.cn</url>
    <description>Demo project for Spring Boot</description>

    <properties>
        <java.version>1.8</java.version>
        <spring-cloud.version>Greenwich.RELEASE</spring-cloud.version>
    </properties>

    <dependencies>
        <!--spring cloud配置中心依赖[默认GIT]-->
        <dependency>
            <groupId>org.springframework.cloud</groupId>
            <artifactId>spring-cloud-config-server</artifactId>
        </dependency>
        <dependency>
            <groupId>org.springframework.boot</groupId>
            <artifactId>spring-boot-starter-test</artifactId>
            <scope>test</scope>
        </dependency>
    </dependencies>

    <dependencyManagement>
        <dependencies>
            <dependency>
                <groupId>org.springframework.cloud</groupId>
                <artifactId>spring-cloud-dependencies</artifactId>
                <version>${spring-cloud.version}</version>
                <type>pom</type>
                <scope>import</scope>
            </dependency>
        </dependencies>
    </dependencyManagement>

    <build>
        <plugins>
            <plugin>
                <groupId>org.springframework.boot</groupId>
                <artifactId>spring-boot-maven-plugin</artifactId>
                <configuration>
                    <jvmArguments>-Dfile.encoding=UTF-8</jvmArguments>
                </configuration>
            </plugin>
        </plugins>
    </build>

    <repositories>
        <repository>
            <id>spring-milestones</id>
            <name>Spring Milestones</name>
            <url>https://repo.spring.io/milestone</url>
        </repository>
    </repositories>

</project>
然后下面分别介绍通过三种方式来实现配置中心:(注意三种方式均使用上面的项目初始环境,下面不再介绍)
1.1.git方式(即:将GIT仓库【GITHUB、GITLAB、 GITEE等】作为配置集中存储的介质)
前提工作:既然是使用GIT仓库作为配置存储,那我们首先就得在相关的GIT站点上创建用于存放config信息的仓库,如我(梦在旅途)在自己的github上创建了一个learning-demos/config仓库目录,然后在config目录下分别创建两个环境的配置文件(http://configclient-dev.properties、http://configclient-prod.properties),配置文件命名规则应尽可能使用:{application}-{profile}.{properties|yml},如下是GIT中两个文件配置的演示内容:(演示仓库地址:https://github.com/zuowj/learning-demos)
--configclient-dev.properties内容:测试环境

demo-config-profile-env=dev
zuowenjun.site=http://www.zuowenjun.cn,http://zuowj.cnblogs.com--20190226.AAAXX66
zuowenjun.skills=.net,java,html,js,css,sql,python,vb--20190226.BBBXX66
zuowenjun.motto=Learning is endless; Opportunity is for the prepared mind;--20190226.CCCXX1

--configclient-prod.properties内容:生产环境

demo-config-profile-env=prod
zuowenjun.site=http://www.zuowenjun.cn,http://zuowj.cnblogs.com,http://github.com/zuowj
zuowenjun.skills=.net,java,html,js,css,sql,python,vb
zuowenjun.motto=Learning is endless; Opportunity is for the prepared mind;学无止境;机会是留给有准备的人
1.1.1.在spring boot启动类(ConfigserverApplication)上添加@EnableConfigServer注解,代码如下:
package cn.zuowenjun.cloud;

import org.springframework.boot.SpringApplication;
import org.springframework.boot.autoconfigure.SpringBootApplication;
import org.springframework.cloud.config.server.EnableConfigServer;

@EnableConfigServer
@SpringBootApplication
public class ConfigserverApplication {

    public static void main(String[] args) {
        SpringApplication.run(ConfigserverApplication.class, args);
    }

}
1.1.2.在配置文件(application.yml,当然也可以是application.properties看个人喜好,本系列均采用yml)中进行如下配置,重点关注spring.cloud.config节点,相关配置参数有注释说明:
spring:
  application:
    name: configserver
  profiles:
    active: git #设置使用本地配置(默认是git,可以设置:subversion(SVN),native(本地))
  cloud:
    config:
      server:
        #如下是GIT配置
        git:
          uri: https://github.com/zuowj/learning-demos     # 配置git仓库的地址(最后不需要带/,否则会出现:No custom http config found for URL: XXX)
          search-paths: config                             # git仓库地址下的相对搜索地址(可用使用通配符),可以配置多个,用,分割。可以{application}实现按应用查配置
          username:                                             # git仓库的账号(公开仓库无需账号信息)
          password:                                             # git仓库的密码(公开仓库无需账号信息)
          default-label: master                             #git默认分支
通过上述简单的两步即完成搭建基于GIT的配置服务中心,启动运行项目,GIT仓库中的配置文件会被自动转换成当前项目的web api,若需访问查看远程配置数据可以参照以下的规则:
/{application}/{profile}[/{label}]
[/{label}]/{application}-{profile}{.yml|.properties|.json}
规则简单说明:{application}=配置消费方应用名称(即:config client的项目名,通俗讲:就是谁用这个配置就是谁的名字),{profile}=配置环境(如:dev开发环境,test测试环境,prod生产环境),{label}=仓库分支名(git或svn方式指定,native本地方式无需指定),.yml|.properties|.json表示指定的响应返回格式,{}表示必需,[]表示可选,|表示或的关系,例如本Demo项目访问:
http://localhost:8866/configclient/dev 、http://localhost:8866/configclient/dev/master
http://localhost:8866/configclient-dev.yml、http://localhost:8866/configclient-dev.properties、http://localhost:8866/configclient-dev.json、http://localhost:8866/master/configclient-dev.yml
最终可以根据访问URL规则返回相应的内容,类似如下:
//request: http://localhost:8866/configclient-dev.yml

demo-config-profile-env: dev
zuowenjun:
  motto: Learning is endless; Opportunity is for the prepared mind;--20190226.CCCXX1
  site: http://www.zuowenjun.cn,http://zuowj.cnblogs.com--20190226.AAAXX66
  skills: .net,java,html,js,css,sql,python,vb--20190226.BBBXX66

//request: http://localhost:8866/configclient-dev.properties

demo-config-profile-env: dev
zuowenjun.motto: Learning is endless; Opportunity is for the prepared mind;--20190226.CCCXX1
zuowenjun.site: http://www.zuowenjun.cn,http://zuowj.cnblogs.com--20190226.AAAXX66
zuowenjun.skills: .net,java,html,js,css,sql,python,vb--20190226.BBBXX66

//request: http://localhost:8866/configclient-dev.json
{"demo-config-profile-env":"dev","zuowenjun":{"motto":"Learning is endless; Opportunity is for the prepared mind;--20190226.CCCXX1","site":"http://www.zuowenjun.cn,http://zuowj.cnblogs.com--20190226.AAAXX66","skills":".net,java,html,js,css,sql,python,vb--20190226.BBBXX66"}}

//request: http://localhost:8866/configclient/dev

{"name":"configclient","profiles":["dev"],"label":null,"version":"d4616a65c8429b9dd3a67ff226b125ae6a0959bb","state":null,"propertySources":[{"name":"https://github.com/zuowj/learning-demos/config/configclient-dev.properties","source":{"zuowenjun.skills":".net,java,html,js,css,sql,python,vb--20190226.BBBXX66","zuowenjun.site":"http://www.zuowenjun.cn,http://zuowj.cnblogs.com--20190226.AAAXX66","demo-config-profile-env":"dev","zuowenjun.motto":"Learning is endless; Opportunity is for the prepared mind;--20190226.CCCXX1"}}]}
可以看到GIT中的配置信息通过config server的API能够正常返回,表示搭建成功,另外需要注意的是如果配置文件中包含中文,那么可能中文返回的就是乱码了,上面如果浏览prod生产环境【生产环境我特意配置了中文】,如:http://localhost:8866/configclient/prod,那么中文就会乱码,解决方案后面会说明,此处了解有这个情况即可。
1.2.svn方式(即:将SVN仓库作为配置集中存储的介质)
前提工作:如同GIT方式一样,要使用SVN仓库作为配置存储,那就需要SVN服务器,将创建用于存放config信息的仓库,如我(梦在旅途)在SVN服务器创建了app-config仓库目录,然后在trunk主干中仍然添加两个配置文件(dev,prod)与GIT方式文件名相同,内容如下(内容与GIT方式也基本相同,只是稍微改变内容以便区分):(演示仓库地址:http://svnhost:port/svn/app-config/trunk)
--configclient-dev.properties内容:

demo-config-profile-env=dev-svn
zuowenjun.site=http://www.zuowenjun.cn,http://zuowj.cnblogs.com--20190227
zuowenjun.skills=.net,java,html,js,css,sql,python,vb--20190227
zuowenjun.motto=Learning is endless; Opportunity is for the prepared mind;--20190227

--configclient-prod.properties内容:

demo-config-profile-env=prod-svn
zuowenjun.site=http://www.zuowenjun.cn,http://zuowj.cnblogs.com,http://github.com/zuowj
zuowenjun.skills=.net,java,html,js,css,sql,python,vb
zuowenjun.motto=Learning is endless; Opportunity is for the prepared mind;学无止境;机会是留给有准备的人
1.2.1.由于GIT是默认的实现方式,当引入spring-cloud-config-server时,它就具备了相关的框架处理能力,而这里使用SVN,就需要在POM XML中除了添加config-server依赖外还需单独添加SVN实现方式的依赖,配置如下:
        <!--spring cloud配置中心依赖[默认GIT]-->
        <dependency>
            <groupId>org.springframework.cloud</groupId>
            <artifactId>spring-cloud-config-server</artifactId>
        </dependency>
        <!--使用SVN作为配置中心依赖-->
        <dependency>
            <groupId>org.tmatesoft.svnkit</groupId>
            <artifactId>svnkit</artifactId>
        </dependency>
1.2.2.在配置文件(application.yml)中进行如下配置,仍然重点关注spring.cloud.config节点,相关配置参数有注释说明:
server:
  port: 8866

spring:
  application:
    name: configserver
  profiles:
    active: subversion #设置使用本地配置(默认是git,可以设置:subversion(SVN),native(本地))
  cloud:
    config:
      server:
        #如下是SVN配置
        svn:
          uri: http://svnhost:port/svn/app-config #SVN仓库地址
          username: svnuser #SVN账号(如果没有权限可为空)
          password: svnpassword #SVN密码(如果没有权限可为空)
          default-label: trunk #默认SVN分支
通过上述简单的两步即完成搭建基于SVN的配置服务中心,启动运行项目,SVN仓库中的配置文件会被自动转换成当前项目的web api,访问路径与GIT方式完全相同在此不重述。(参照1.1.2访问URL,可以得到SVN仓库trunk分支里配置文件配置信息的内容)
1.3.本地文件方式(即:将config server项目所有服务器的本地文件存放目录作为配置集中存储的介质)
1.3.1.先在config server项目文件服务器创建指定存放配置的目录,如本demo是直接创建在项目的resources/configs目录,仍然是创建与GIT相同的两个配置文件(dev、prod),配置内容如下:
--configclient-dev.properties内容:

demo-config-profile-env=dev-native
zuowenjun.site=http://www.zuowenjun.cn,http://zuowj.cnblogs.com--20190227
zuowenjun.skills=.net,java,html,js,css,sql,python,vb--20190227
zuowenjun.motto=Learning is endless; Opportunity is for the prepared mind;--20190227

--configclient-prod.properties内容:

demo-config-profile-env=prod-native
zuowenjun.site=http://www.zuowenjun.cn,http://zuowj.cnblogs.com,http://github.com/zuowj
zuowenjun.skills=.net,java,html,js,css,sql,python,vb
zuowenjun.motto=Learning is endless; Opportunity is for the prepared mind;学无止境;机会是留给有准备的人
1.3.2.在配置文件(application.yml)中进行如下配置,仍然重点关注spring.cloud.config节点,相关配置参数有注释说明:(很简单,只需要设置profiles.active=native,然后在native节点设置查找配置的存放目录即可)
server:
  port: 8866

spring:
  application:
    name: configserver
  profiles:
    active: native #设置使用本地配置(默认是git,可以设置:subversion(SVN),native(本地))
  cloud:
    config:
      server:
        #如下是本地文件配置
        native:
          search-locations: classpath:/configs #配置文件存放的目录
通过上述简单的两步即完成搭建基于本地文件的配置服务中心,启动运行项目,存放的配置文件会被自动转换成当前项目的web api,访问路径与GIT方式完全相同在此不重述。(参照1.1.2访问URL,可以得到本地文件配置信息的内容)
1.4.解决配置中包含中文内容返回乱码问题(此处实现方式参照网上说明,在此只是集中说明,便于大家理解)--均适用于以上三种方式
乱码原因及解决方案思路可参见:https://blog.csdn.net/sinat_38843093/article/details/79960777?utm_source=blogxgwz4,但由于最新版本的spring boot的PropertySourceLoader接口定义有些不同故我这里参照该文进行完善并最终解决乱码。
首先自定义一个实现了PropertySourceLoader的类:MyPropertySourceLoader,并实现接口的方法逻辑,具体代码如下:(最重要的代码是:properties.load(new InputStreamReader(inputStream, StandardCharsets.UTF_8));即表示使用UTF8的字符集来读取配置文件流信息)
package cn.zuowenjun.cloud;

import org.slf4j.Logger;
import org.slf4j.LoggerFactory;
import org.springframework.boot.env.PropertySourceLoader;
import org.springframework.core.env.PropertiesPropertySource;
import org.springframework.core.env.PropertySource;
import org.springframework.core.io.Resource;

import java.io.IOException;
import java.io.InputStream;
import java.io.InputStreamReader;
import java.nio.charset.StandardCharsets;
import java.util.ArrayList;
import java.util.List;
import java.util.Properties;

public class MyPropertySourceLoader implements PropertySourceLoader {
    private Logger logger= LoggerFactory.getLogger(MyPropertySourceLoader.class);

    @Override
    public String[] getFileExtensions() {
        return new String[]{"properties", "xml"};
    }

    @Override
    public List<PropertySource<?>> load(String name, Resource resource) throws IOException {
        Properties properties=new Properties();
        InputStream inputStream=null;
        try{
            inputStream=resource.getInputStream();
            properties.load(new InputStreamReader(inputStream, StandardCharsets.UTF_8));
        }catch (IOException ioEx){
            logger.error("load inputStream failed",ioEx);
            throw ioEx;
        }
        catch (Exception e){
            logger.error("load inputStream failed",e);
        }finally {
            if(inputStream!=null){
                inputStream.close();
            }
        }

        List<PropertySource<?>> propertySourceList=null;
        if (!properties.isEmpty()) {

            PropertiesPropertySource propertiesPropertySource = new PropertiesPropertySource(name, properties);
            propertySourceList=  new ArrayList<>();
            propertySourceList.add(propertiesPropertySource);
        }
        return  propertySourceList;

    }


}
然后在resources目录下创建META-INF目录,然后在该目录中创建spring.factories文件(这里spring boot的扩展配置文件),在该文件中输入如下内容即可:
org.springframework.boot.env.PropertySourceLoader=cn.zuowenjun.cloud.MyPropertySourceLoader
若想了解spring.factories相关信息,可参考:https://blog.csdn.net/lvoyee/article/details/82017057 、 https://blog.csdn.net/boling_cavalry/article/details/83048588
通过上述步骤,现在无论是哪种方式访问配置中心的API,若涉及中文都能正常返回不会乱码,如下图所示:(当然如果使用[/{label}]/{application}-{profile}{.yml|.properties|.json}这种方式访问可能还会出现乱码,具体原因我还未了解,求大神们指点,但目前已不影响配置消费【即:配置消费方获取到的中文信息均是正常不会乱码】)
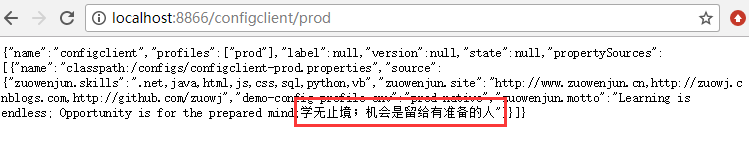
二、搭建配置消费客户端(config client)
首先通过IDEA spring initializer(或直接通过https://start.spring.io/)搭建spring boot + spring MVC(Rest API)空项目,创建过程中选择:web、config client依赖,最后生成的POM XML文件如下:(如果缺少依赖请自行手动添加)
<?xml version="1.0" encoding="UTF-8"?>
<project xmlns="http://maven.apache.org/POM/4.0.0" xmlns:xsi="http://www.w3.org/2001/XMLSchema-instance"
         xsi:schemaLocation="http://maven.apache.org/POM/4.0.0 http://maven.apache.org/xsd/maven-4.0.0.xsd">
    <modelVersion>4.0.0</modelVersion>
    <parent>
        <groupId>org.springframework.boot</groupId>
        <artifactId>spring-boot-starter-parent</artifactId>
        <version>2.1.3.RELEASE</version>
        <relativePath/> <!-- lookup parent from repository -->
    </parent>
    <groupId>cn.zuowenjun.cloud</groupId>
    <artifactId>configclient</artifactId>
    <version>0.0.1-SNAPSHOT</version>
    <name>configclient</name>
    <description>Demo project for Spring Boot</description>

    <properties>
        <java.version>1.8</java.version>
        <spring-cloud.version>Greenwich.RELEASE</spring-cloud.version>
    </properties>

    <dependencies>
        <!--spring MVC依赖-->
        <dependency>
            <groupId>org.springframework.boot</groupId>
            <artifactId>spring-boot-starter-web</artifactId>
        </dependency>
        <!--config client依赖-->
        <dependency>
            <groupId>org.springframework.cloud</groupId>
            <artifactId>spring-cloud-starter-config</artifactId>
        </dependency>

        <!--ConfigurationProperties类所需依赖,手动添加的-->
        <dependency>
            <groupId>org.springframework.boot</groupId>
            <artifactId>spring-boot-configuration-processor</artifactId>
            <optional>true</optional>
        </dependency>

        <dependency>
            <groupId>org.springframework.boot</groupId>
            <artifactId>spring-boot-starter-test</artifactId>
            <scope>test</scope>
        </dependency>
    </dependencies>

    <dependencyManagement>
        <dependencies>
            <dependency>
                <groupId>org.springframework.cloud</groupId>
                <artifactId>spring-cloud-dependencies</artifactId>
                <version>${spring-cloud.version}</version>
                <type>pom</type>
                <scope>import</scope>
            </dependency>
        </dependencies>
    </dependencyManagement>

    <build>
        <plugins>
            <plugin>
                <groupId>org.springframework.boot</groupId>
                <artifactId>spring-boot-maven-plugin</artifactId>
            </plugin>
        </plugins>
    </build>

    <repositories>
        <repository>
            <id>spring-milestones</id>
            <name>Spring Milestones</name>
            <url>https://repo.spring.io/milestone</url>
        </repository>
    </repositories>

</project>
然后在resources目录下创建bootstrap.yml文件,并在配置文件中添加如下内容:(如果想了解bootstrap与application配置文件两者的区别,请参见:https://www.cnblogs.com/BlogNetSpace/p/8469033.html)
server:
  port: 8008

spring:
  application:
    name: configclient

  cloud:
    config:
      name: configclient #对应config server Url中的{application}
      profile: prod #配置环境,对应config server Url中的{profile}
      #label: trunk #配置分支(不配置则默认:git则是master,svn则是trunk),
      uri: http://localhost:8866 #配置中心地址
最后下面分别介绍实现各种不同的配置消费(读取配置)方式:(注意均使用上面的项目初始环境,同时以下的几种服务配置消费方式均可同时并存在一个项目中)
2.1.通过@value方式获取配置信息
这种最为简单,网上也大部份是这种,我这里为了便于区分配置属性与controller本身使用了继承的方式(注意,我这里用继承而没有使用单独定义一个RemoteConfig配置类+Value,是因为经我验证发现将会影响配置自动刷新,具体原因还未查清,初步判断与加上@RefreshScope注解上生成的代理类有关系),代码结构更清晰,实现代码如下:
package cn.zuowenjun.cloud.model;

import org.springframework.beans.factory.annotation.Value;
import org.springframework.cloud.context.config.annotation.RefreshScope;


public abstract class RemoteConfig {

    @Value("${demo-config-profile-env}")
    public String profileEnv;

    @Value("${zuowenjun.site}")
    public String zwjSite;

    @Value("${zuowenjun.skills}")
    public String zwjSkills;

    @Value("${zuowenjun.motto}")
    public String zwjMotto;
}


package cn.zuowenjun.cloud.Controller;

import cn.zuowenjun.cloud.model.RemoteConfig;
import org.springframework.beans.factory.annotation.Autowired;
import org.springframework.web.bind.annotation.RequestMapping;
import org.springframework.web.bind.annotation.RestController;

import java.util.HashMap;
import java.util.Map;

@RestController
@RequestMapping("/demo")
public class DemoController extends RemoteConfig {


    @RequestMapping("/config/byval")
    public Object getRemoteConfigByValue(){
        Map<String,Object> model=new HashMap<>();
        model.put("getMode","@Value");

        Map<String,String> remoteCgfMap=new HashMap<>();
        remoteCgfMap.put("profileEnv", this.profileEnv);
        remoteCgfMap.put("zwjSite", this.zwjSite);
        remoteCgfMap.put("zwjSkills",this.zwjSkills);
        remoteCgfMap.put("zwjMotto", this.zwjMotto);

        model.put("remoteConfig",remoteCgfMap);


        return model;
    }


}
如上代码所示,我们只需在类成员字段上标记@Value注解,并指定要获取的配置中心上配置项的名称即可。运行项目,访问:http://localhost:8008/demo/config/byval,即可响应返回获取到的config信息,如下图示:

2.2.通过创建一个映射远程配置信息的Bean(RemoteConfigProperties) 方式获取配置信息
首先定义一个映射远程配置信息的Bean类:RemoteConfigProperties,该类中所有的属性名均需与配置中心上配置文件的配置内容相同(名字以及层级都需相同,若配置项名称有-,则配置类中请忽略直接拼接命名即可但需符合lowerCamelCase,如:demo-config-profile-env,则字段名为:demoConfigProfileEnv,如果属性中有点( . ),则应视为点后面的部分为下级,应再定义相关的配置映射类),该类完整代码如下:
package cn.zuowenjun.cloud.model;

import org.springframework.boot.context.properties.ConfigurationProperties;
import org.springframework.stereotype.Component;

@Component
@ConfigurationProperties()//如果有前缀,则可以设置prefix=XXX
public class RemoteConfigProperties {

    private String demoConfigProfileEnv;
    private Zuowenjun zuowenjun;

    public String getDemoConfigProfileEnv() {
        return demoConfigProfileEnv;
    }

    public void setDemoConfigProfileEnv(String demoConfigProfileEnv) {
        this.demoConfigProfileEnv = demoConfigProfileEnv;
    }

    public Zuowenjun getZuowenjun() {
        return zuowenjun;
    }

    public void setZuowenjun(Zuowenjun zuowenjun) {
        this.zuowenjun = zuowenjun;
    }

    public static class Zuowenjun {

        private String site;
        private String skills;
        private String motto;


        public String getSite() {
            return site;
        }

        public void setSite(String site) {
            this.site = site;
        }

        public String getSkills() {
            return skills;
        }

        public void setSkills(String skills) {
            this.skills = skills;
        }

        public String getMotto() {
            return motto;
        }

        public void setMotto(String motto) {
            this.motto = motto;
        }

    }

}
如上代码所示,属性字段名与配置项的命名保持一致,若有下级则定义下级的配置类,这里下级配置类(Zuowenjun)采用了内部静态类的方式(注意这里如果是内部类,一定是static,而不能是普通的class,因为内部普通类与内部静态类是有区别的,具体可参见:java 内部类和静态内部类的区别),也可以单独定义一个类,同时在配置类上标记了@ConfigurationProperties(这指明了该类是配置映射类),@Component这个不用说了吧就是表示能自动被spring IOC容器扫描并注册。
然后在DemoController中增加字段注入该类:RemoteConfigProperties,并添加用于读取RemoteConfigProperties类中的配置信息的方法(getRemoteConfigByPropertiesBean),具体代码如下:(这里保留了@Value方式的代码)
package cn.zuowenjun.cloud.Controller;

import cn.zuowenjun.cloud.model.RemoteConfig;
import cn.zuowenjun.cloud.model.RemoteConfigProperties;
import org.springframework.beans.factory.annotation.Autowired;
import org.springframework.cloud.context.config.annotation.RefreshScope;
import org.springframework.core.env.Environment;
import org.springframework.web.bind.annotation.RequestMapping;
import org.springframework.web.bind.annotation.RestController;

import java.util.HashMap;
import java.util.Map;

@RestController
@RequestMapping("/demo")
public class DemoController extends RemoteConfig {


    @Autowired
    private RemoteConfigProperties remoteConfigProperties;

    @RequestMapping("/config/byval")
    public Object getRemoteConfigByValue(){
        Map<String,Object> model=new HashMap<>();
        model.put("getMode","@Value");

        Map<String,String> remoteCgfMap=new HashMap<>();
        remoteCgfMap.put("profileEnv", this.profileEnv);
        remoteCgfMap.put("zwjSite", this.zwjSite);
        remoteCgfMap.put("zwjSkills",this.zwjSkills);
        remoteCgfMap.put("zwjMotto", this.zwjMotto);

        model.put("remoteConfig",remoteCgfMap);


        return model;
    }

    @RequestMapping("/config/byprops")
    public Object getRemoteConfigByPropertiesBean(){
        Map<String,Object> model=new HashMap<>();
        model.put("getMode","Properties Bean");
        model.put("remoteConfig",remoteConfigProperties);
        return model;
    }


}
最后启动运行项目,访问:http://localhost:8008/demo/config/byprops,即可响应返回获取到的config信息,如下图示:

2.3.通过Environment来直接获取配置信息
其实上面2种方式底层都是使用这种方式来获取配置信息的只是包装了后大家无需关心而矣,核心是通过environment.getProperty方法来获取对应的配置信息的,这种方式只需在DemoController增加字段注入Environment的实例,然后添加一个从Environment获取配置信息的方法即可(getRemoteConfigByEnv),具体代码如下:(保留@Value方式、映射远程配置信息的Bean(RemoteConfigProperties) 方式)
package cn.zuowenjun.cloud.Controller;

import cn.zuowenjun.cloud.model.RemoteConfig;
import cn.zuowenjun.cloud.model.RemoteConfigProperties;
import org.springframework.beans.factory.annotation.Autowired;
import org.springframework.cloud.context.config.annotation.RefreshScope;
import org.springframework.core.env.Environment;
import org.springframework.web.bind.annotation.RequestMapping;
import org.springframework.web.bind.annotation.RestController;

import java.util.HashMap;
import java.util.Map;


@RestController
@RequestMapping("/demo")
public class DemoController extends RemoteConfig {


    @Autowired
    private Environment environment;

    @Autowired
    private RemoteConfigProperties remoteConfigProperties;

    @RequestMapping("/config/byval")
    public Object getRemoteConfigByValue(){
        Map<String,Object> model=new HashMap<>();
        model.put("getMode","@Value");

        Map<String,String> remoteCgfMap=new HashMap<>();
        remoteCgfMap.put("profileEnv", this.profileEnv);
        remoteCgfMap.put("zwjSite", this.zwjSite);
        remoteCgfMap.put("zwjSkills",this.zwjSkills);
        remoteCgfMap.put("zwjMotto", this.zwjMotto);

        model.put("remoteConfig",remoteCgfMap);


        return model;
    }

    @RequestMapping("/config/byprops")
    public Object getRemoteConfigByPropertiesBean(){
        Map<String,Object> model=new HashMap<>();
        model.put("getMode","Properties Bean");
        model.put("remoteConfig",remoteConfigProperties);
        return model;
    }

    @RequestMapping("/config/byenv")
    public  Object getRemoteConfigByEnv(){
        Map<String,Object> model=new HashMap<>();
        model.put("getMode","Environment");

        Map<String,String> remoteCgfMap=new HashMap<>();
        remoteCgfMap.put("profileEnv", environment.getProperty("demo-config-profile-env"));
        remoteCgfMap.put("zwjSite", environment.getProperty("zuowenjun.site"));
        remoteCgfMap.put("zwjSkills", environment.getProperty("zuowenjun.skills"));
        remoteCgfMap.put("zwjMotto", environment.getProperty("zuowenjun.motto"));

        model.put("remoteConfig",remoteCgfMap);
        return  model;
    }


}
最后启动运行项目,访问:http://localhost:8008/demo/config/byenv,即可响应返回获取到的config信息,如下图示:

如上三种方式配置文件均不需要改变,如果需要访问不同的环境,不同的分支,则可以修改项目配置文件bootstrap.yml中对应的属性:profile、label等,至于配置中心(config server)使用的是哪种方式存储配置,配置消费端(config client)无需关心,只管用即可。
2.4.实现配置信息自动刷新(可参见:)
2.4.1.在controller类(DemoController)上添加@RefreshScope注解,简单就不贴代码
2.4.2.在POM XML中添加actuator依赖,配置如下:
        <!--actuator监控功能所需依赖(内部包含refresh,动态刷新配置信息需要)-->
        <dependency>
            <groupId>org.springframework.boot</groupId>
            <artifactId>spring-boot-starter-actuator</artifactId>
        </dependency>
2.4.3.在项目配置文件(bootstrap.yml或application.yml都可以)添加如下配置内容:
management:
  endpoints:
    web:
      exposure:
        include: "*" #暴露所有端口,也可以指定某一个环境(先management.endpoint.{profile}.enabled=true,然后这里指定这个{profile},多个用,分隔)
通过上述两步即完成config client端的自动监听与刷新机制(刷新原理参见:https://blog.csdn.net/cml_blog/article/details/78411312)
这时可以启动运行项目,然后POST请求访问:http://localhost:8008/actuator/refresh,如果能正常响应结果没有报404就OK了,响应内容为空?没关系,因为只有当config server端的配置文件有更新,这时POST这个API时,即会检测并响应返回更新的配置项信息,这样config client内部即可进行配置的刷新工作。到目前还没有实现全自动刷新配置,因为config server端配置文件有更新,config client端并不会第一时间感知到,如果不去POST请求refresh API则不会更新,所以自动更新的关键是如何能够实现配置中心的配置文件一旦更改就能通知所有的配置消费端(config client)自动更新配置信息。如果采用github的方式,那么可以使用github仓库的Webhooks功能,具体操作位置如下图示:
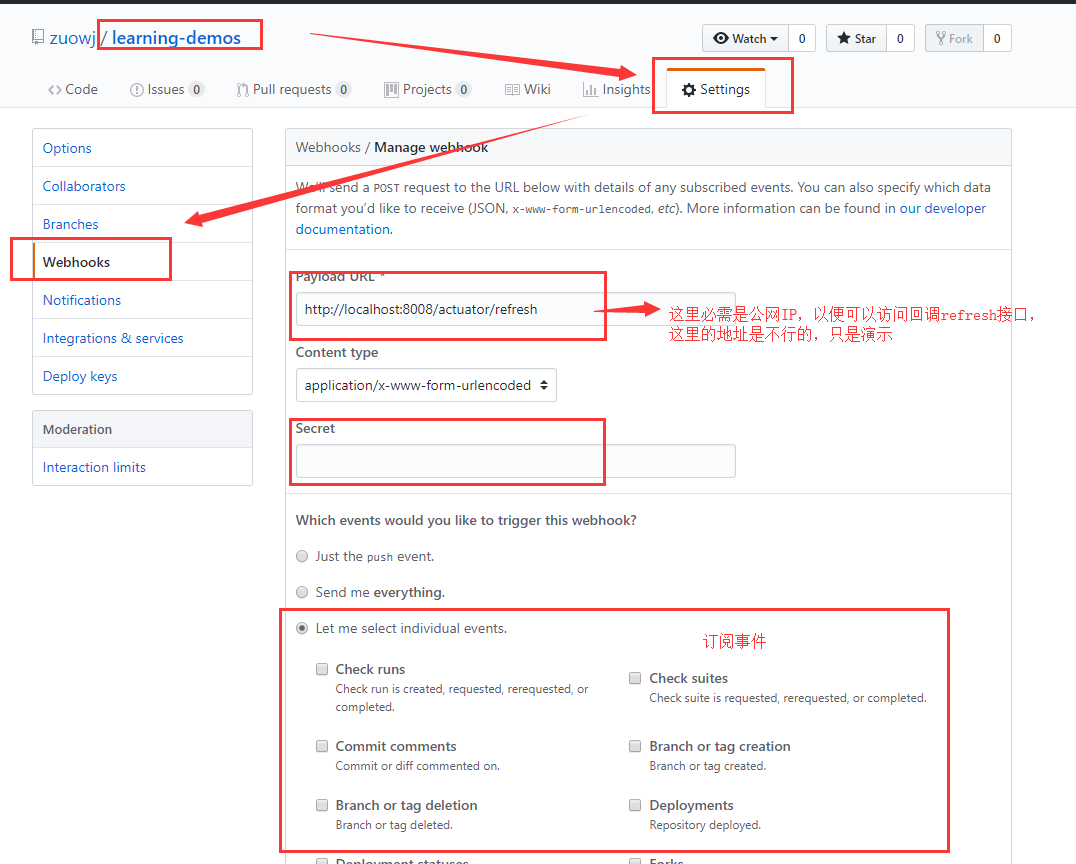
设置webhooks后,只要这个存配置的GIT仓库发生改变,将针触发事件并回调refresh接口(当然可以封装一个通用接口,然后里面把所有的 config client都调refresh接口),config client端收到刷新请求后就会重新从config server中获取配置信息。
虽然webhooks能够解决自动刷新问题,但仍不够优美,比较好的实现方式是再结合spring cloud bus、mq实现更好的自动刷新所有config client,具体可参见:https://www.cnblogs.com/willpan-z/p/9483674.html 、 https://blog.csdn.net/wtdm_160604/article/details/83720391
另外actuator还默认集成了健康检查功能,可访问:http://localhost:8866/actuator/health,即可看到响应结果,正常则为status=UP,否则可能是DOWN
2.5.加入到注册中心配置成高可用集群环境
思路:我们可以把服务配置中心(config server)与服务消费客户端(config client)均作为服务加入到注册中心里面,然后服务消费客户端(config client)通过注册中心根据服务配置中心(config server)的服务ID(应用名称)找到config server IP,然后请求该IP即可。
前提:先把之前文章《玩转Spring Cloud之服务注册发现(eureka)及负载均衡消费(ribbon、feign)》中的eureka server项目正常启动;
2.5.1.改造服务配置中心(config server),集成eureka client(这个我之前文章有说明)【操作步骤简要重述:先在POM XML中添加spring-cloud-starter-netflix-eureka-client依赖,然后在spring boot启动类上添加@EnableDiscoveryClient注解以便启用服务发现,最后在application.yml中添加eureka client的配置信息】,让其能够加入到注册中心中,如下是改造后的配置文件:(注释掉的是多种方式配置)--eureka 配置节点为新增
server:
  port: 8866

spring:
  application:
    name: configserver
  profiles:
    active: native #设置使用本地配置(默认是git,可以设置:subversion(SVN),native(本地))
  cloud:
    config:
      server:
        #如下是GIT配置
#        git:
#          uri: https://github.com/zuowj/learning-demos     # 配置git仓库的地址(最后不需要带/,否则会出现:No custom http config found for URL: XXX)
#          search-paths: config                             # git仓库地址下的相对搜索地址(可用使用通配符),可以配置多个,用,分割。可以{application}实现按应用查配置
#          username:                                             # git仓库的账号(公开仓库无需账号信息)
#          password:                                             # git仓库的密码(公开仓库无需账号信息)
#          default-label: master                             #git默认分支

        #如下是SVN配置
#        svn:
#          uri: http://svnhost:port/svn/app-config #SVN仓库地址
#          username: svnuser #SVN账号(如果没有权限可为空)
#          password: svnpassword#SVN密码(如果没有权限可为空)
#          default-label: trunk #默认SVN分支

        #如下是本地文件配置
        native:
          search-locations: classpath:/configs #配置文件存放的目录

eureka:
  client:
    serviceUrl:
      defaultZone: http://localhost:8800/eureka/
2.5.2.改造服务消费客户端(config client),集成eureka client(同2.5.1的服务配置中心(config server),集成eureka client步骤),让其能够加入到注册中心中,以便可以通过注册中心根据服务配置中心(config server)的服务ID(应用名称)找到config server IP,这里的eureka相关配置应统一在bootstrap.yml中,完整配置如下:
server:
  port: 8008

spring:
  application:
    name: configclient

  cloud:
    config:
      name: configclient #对应config server Url中的{application}
      profile: prod #配置环境,对应config server Url中的{profile}
      #label: trunk #配置分支(不配置则默认:git则是master,svn则是trunk),
      #uri: http://localhost:8866 #配置中心地址
      discovery:
        enabled: true #启用服务发现
        service-id: configserver #指定要从eureka获取的config server的服务ID(即:configserverr的applicationName)

eureka:
  client:
    serviceUrl:
      defaultZone: http://localhost:8800/eureka/
如上配置,重点是spring.cloud.config.uri不再指定固定的config server IP,而是改成配置spring.cloud.config.discovery【服务发现】,eureka配置节点与所有eureka client基本相同不再重述。
都改造完成后,信次先后启动运行:服务配置中心(config server)【可以运多个实例以不同的端口号】、服务消费客户端(config client),发现一切都正常,当服务配置中心(config server)某个实例断开仍不影响服务消费客户端(config client),这样就实现了高可用了。
好了,有关spring cloud config 总结就写到这里了,很多细节若需深究的话还有很多,后面项目中有实际用到再补充总结吧。文中若有不足,欢迎指出,码字不易,请多支持,谢谢!
分享可参考链接:
https://springcloud.cc/spring-cloud-config.html
https://blog.csdn.net/qq_20597727/article/details/82465069
提示:本文相关示例项目代码均已上传到GITHUB,地址如下:
https://github.com/zuowj/learning-demos/tree/master/java/demo-configserver
https://github.com/zuowj/learning-demos/tree/master/java/demo-configclient