给EXSI虚拟机中linux硬盘扩容
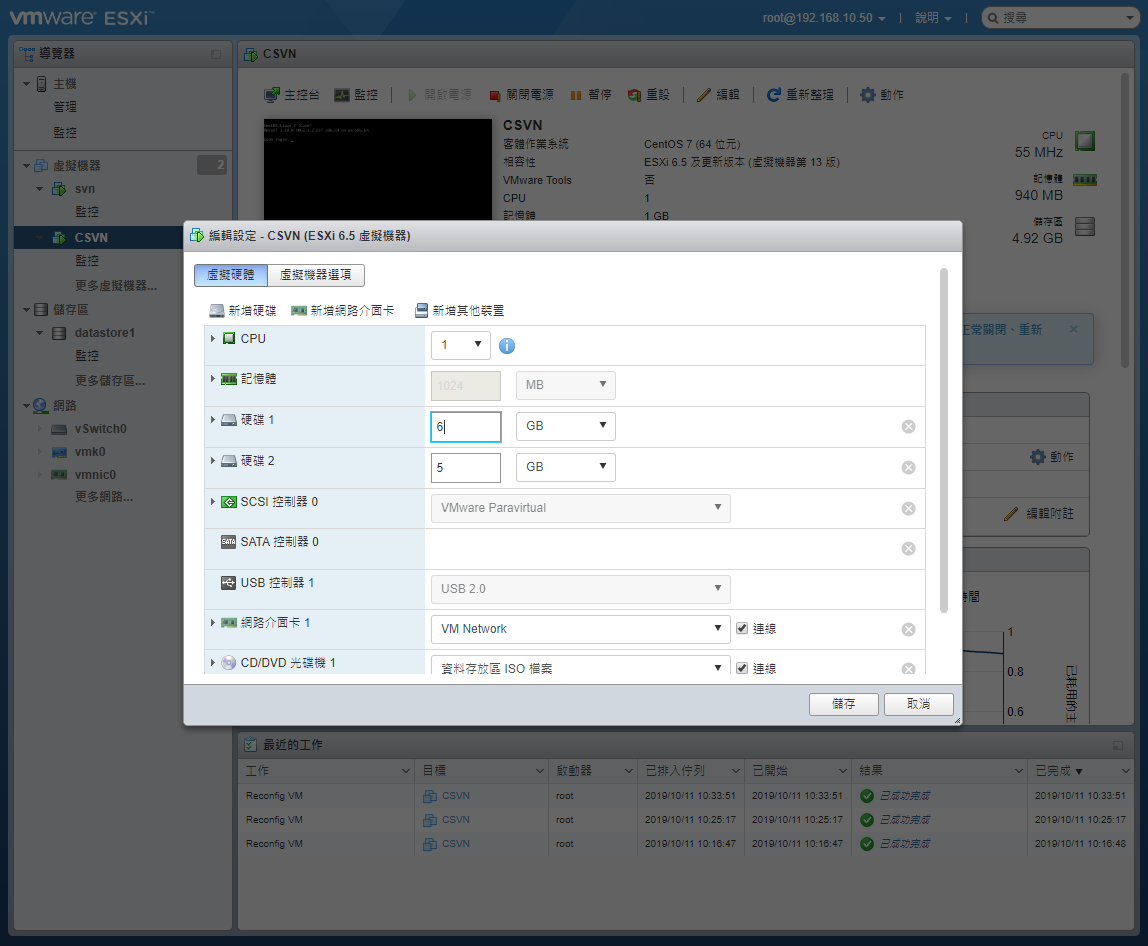
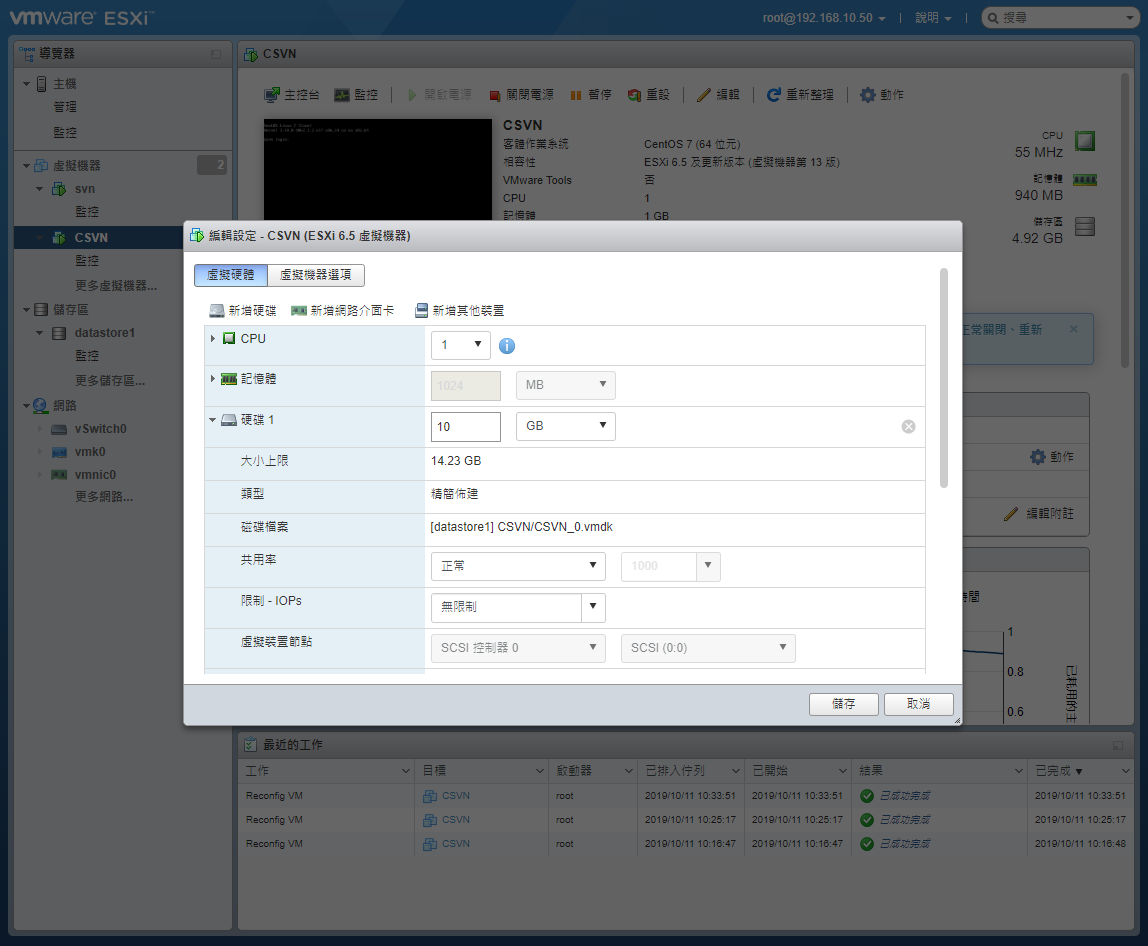
将硬盘1从6G扩充到10G
查看目前磁盘状态
[root@csvn ~]# df -h
Filesystem               Size  Used Avail Use% Mounted on
devtmpfs                 484M     0  484M   0% /dev
tmpfs                    496M     0  496M   0% /dev/shm
tmpfs                    496M  7.1M  489M   2% /run
tmpfs                    496M     0  496M   0% /sys/fs/cgroup
/dev/mapper/centos-root  4.9G  2.9G  2.1G  59% /
/dev/sdb1                4.8G   21M  4.6G   1% /data
/dev/sda1                497M  154M  344M  31% /boot
tmpfs                    100M     0  100M   0% /run/user/1001
tmpfs                    100M     0  100M   0% /run/user/0
[root@csvn ~]# fdisk -l

Disk /dev/sda: 10.7 GB, 10737418240 bytes, 20971520 sectors
Units = sectors of 1 * 512 = 512 bytes
Sector size (logical/physical): 512 bytes / 512 bytes
I/O size (minimum/optimal): 512 bytes / 512 bytes
Disk label type: dos
Disk identifier: 0x000c208b

   Device Boot      Start         End      Blocks   Id  System
/dev/sda1   *        2048     1026047      512000   83  Linux
/dev/sda2         1026048    12582911     5778432   8e  Linux LVM

Disk /dev/sdb: 5368 MB, 5368709120 bytes, 10485760 sectors
Units = sectors of 1 * 512 = 512 bytes
Sector size (logical/physical): 512 bytes / 512 bytes
I/O size (minimum/optimal): 512 bytes / 512 bytes
Disk label type: dos
Disk identifier: 0xc42fca3d

   Device Boot      Start         End      Blocks   Id  System
/dev/sdb1            2048    10485759     5241856   83  Linux

Disk /dev/mapper/centos-root: 5226 MB, 5226102784 bytes, 10207232 sectors
Units = sectors of 1 * 512 = 512 bytes
Sector size (logical/physical): 512 bytes / 512 bytes
I/O size (minimum/optimal): 512 bytes / 512 bytes


Disk /dev/mapper/centos-swap: 645 MB, 645922816 bytes, 1261568 sectors
Units = sectors of 1 * 512 = 512 bytes
Sector size (logical/physical): 512 bytes / 512 bytes
I/O size (minimum/optimal): 512 bytes / 512 bytes
可看到磁盘/dev/sda大小已经变成10.7GB
开始扩容
[root@csvn ~]# fdisk /dev/sda
Welcome to fdisk (util-linux 2.23.2).
Changes will remain in memory only, until you decide to write them.
Be careful before using the write command.
Command (m for help): n
Partition type:
p primary (2 primary, 0 extended, 2 free)
e extended
Select (default p): p
Partition number (3,4, default 3): 3
First sector (12582912-20971519, default 12582912):
Using default value 12582912
Last sector, +sectors or +size{K,M,G} (12582912-20971519, default 20971519):
Using default value 20971519
Partition 3 of type Linux and of size 4 GiB is set
Command (m for help): t (修改分区类型为 Linux LVM, 8e)
Partition number (1-3, default 3): 3
Hex code (type L to list all codes): 8e
Changed type of partition 'Linux' to 'Linux LVM'
Command (m for help): wq
The partition table has been altered!
Calling ioctl() to re-read partition table.
WARNING: Re-reading the partition table failed with error 16: Device or resource busy.
The kernel still uses the old table. The new table will be used at
the next reboot or after you run partprobe(8) or kpartx(8)
Syncing disks.
再次查看磁盘状态,可见新的sda3,表示为可用状态
[root@csvn ~]# fdisk -l

Disk /dev/sda: 10.7 GB, 10737418240 bytes, 20971520 sectors
Units = sectors of 1 * 512 = 512 bytes
Sector size (logical/physical): 512 bytes / 512 bytes
I/O size (minimum/optimal): 512 bytes / 512 bytes
Disk label type: dos
Disk identifier: 0x000c208b

   Device Boot      Start         End      Blocks   Id  System
/dev/sda1   *        2048     1026047      512000   83  Linux
/dev/sda2         1026048    12582911     5778432   8e  Linux LVM
/dev/sda3        12582912    20971519     4194304   8e  Linux LVM
用partprobe重新读取分区信息
ps:使用fdisk工具只是将分区信息写到磁盘,如果需要mkfs磁盘分区则需要重启系统,而使用partprobe则可以使kernel重新读取分区信息,从而避免重启系统.
[root@csvn ~]# partprobe /dev/sda3
创建物理卷及加入组
[root@csvn ~]# pvcreate /dev/sda3
Physical volume "/dev/sda3" successfully created
[root@csvn ~]# vgextend centos /dev/sda3
Volume group "centos" successfully extended
查看物理卷情况
[root@csvn ~]# lvextend
  No command with matching syntax recognised.  Run 'lvextend --help' for more information.
[root@csvn ~]#
[root@csvn ~]# lvextend /dev/mapper/centos-root
  No command with matching syntax recognised.  Run 'lvextend --help' for more information.
[root@csvn ~]#
[root@csvn ~]# vgdisplay
  --- Volume group ---
  VG Name               centos
  System ID
  Format                lvm2
  Metadata Areas        2
  Metadata Sequence No  6
  VG Access             read/write
  VG Status             resizable
  MAX LV                0
  Cur LV                2
  Open LV               2
  Max PV                0
  Cur PV                2
  Act PV                2
  VG Size               5.50 GiB
  PE Size               4.00 GiB
  Total PE              2433
  Alloc PE / Size       2424 / <9.47 GiB
  Free  PE / Size       9 / 4.00 GiB
  VG UUID               rQ55Rt-cdp0-Z177-4RaC-e5PN-7dU2-WTRCDO
扩容
[root@csvn ~]# lvresize -L +4G /dev/mapper/centos-root
  Extending logical volume LogVol00 to  8.9G GB
  Logical volume /centos-root successfully resized
同步文件系统
[root@csvn ~]# xfs_growfs /dev/centos/root
meta-data=/dev/mapper/centos-root isize=256    agcount=4, agsize=318976 blks
         =                       sectsz=512   attr=2, projid32bit=1
         =                       crc=0        finobt=0 spinodes=0
data     =                       bsize=4096   blocks=1275904, imaxpct=25
         =                       sunit=0      swidth=0 blks
naming   =version 2              bsize=4096   ascii-ci=0 ftype=0
log      =internal               bsize=4096   blocks=2560, version=2
         =                       sectsz=512   sunit=0 blks, lazy-count=1
realtime =none                   extsz=4096   blocks=0, rtextents=0
data blocks changed from 1275904 to 2324480
验证
[root@csvn ~]# df -h
Filesystem               Size  Used Avail Use% Mounted on
devtmpfs                 484M     0  484M   0% /dev
tmpfs                    496M     0  496M   0% /dev/shm
tmpfs                    496M  7.1M  489M   2% /run
tmpfs                    496M     0  496M   0% /sys/fs/cgroup
/dev/mapper/centos-root  8.9G  2.9G  6.1G  33% /
/dev/sdb1                4.8G   21M  4.6G   1% /data
/dev/sda1                497M  154M  344M  31% /boot
tmpfs                    100M     0  100M   0% /run/user/0
tmpfs                    100M     0  100M   0% /run/user/1001
成功扩容
报错
Can't initialize physical volume(无法初始化的物理量)
[root@csvn ~]# pvcreate /dev/sda3
  Can't initialize physical volume "/dev/sda3" of volume group "centos" without -ff
  /dev/sda3: physical volume not initialized.
[root@csvn ~]#
检查后得知,之前按照常规流程创建过LVM:/dev/centos/sda3,而没有卸载掉。
解决方法:
方法一:
按顺序先后卸载逻辑卷、卷组(必要时还要卸载物理卷):
lvremove /dev/...逻辑卷
vgremove 卷组
成功卸载后再重新执行sudo pvcreate /dev/cciss/c0d1p1,不再有错误发生。
接着执行后续动作来创建LVM。
方法二:
pvcreate -ff -y /dev/sda3
因为我是扩充根目录的,根目录卷组无法卸载,所以这个方法不适用。
[root@csvn ~]# partprobe
Warning: Unable to open /dev/sr0 read-write (Read-only file system).  /dev/sr0 has been opened read-only.
/dev/sr0是你的光驱(CD Drive),因为你运行partprobe时没有指定设备,所以它会检查所有的块设备(block devices),由于光驱是read-only,所以报上述告警信息,其实避免这个错误也很简单,你只需要使用partprobe检查、扫描指定设备即可。
[root@csvn ~]# partprobe /dev/sda3
[root@csvn ~]# resize2fs  /dev/mapper/centos-root
resize2fs 1.42.9 (28-Dec-2013)
resize2fs: Bad magic number in super-block while trying to open /dev/mapper/centos-root
Couldn't find valid filesystem superblock.
[root@csvn ~]#
resize2fs
调整ext2ext3ext4文件系统的大小,它可以放大或者缩小没有挂载的文件系统的大小。如果文件系统已经挂载,它可以扩大文件系统的大小,前提是内核支持在线调整大小。
扩容/目录后,df -h查看,却没有扩容到。重启也不行,百度说umout目录重新扩容试试,但根目录不可能umout的。
具体再百度发现,(由于CentOS6和CentOS7在默认根文件系统的文件系统格式存在差异,需要判断是否为xfs,如果是xfs则应该使用xfs_growfs而不是一味的使用resize2fs。)
Linux7文件系统格式是xfs,resize2fs命令是读取不了的。
所以要用xfs_growfs来同步文件系统。
[root@csvn ~]# df -h
Filesystem               Size  Used Avail Use% Mounted on
devtmpfs                 484M     0  484M   0% /dev
tmpfs                    496M     0  496M   0% /dev/shm
tmpfs                    496M  7.1M  489M   2% /run
tmpfs                    496M     0  496M   0% /sys/fs/cgroup
/dev/mapper/centos-root  4.9G  2.9G  2.1G  59% /
/dev/sdb1                4.8G   21M  4.6G   1% /data
/dev/sda1                497M  154M  344M  31% /boot
tmpfs                    100M     0  100M   0% /run/user/0
tmpfs                    100M     0  100M   0% /run/user/1001
[root@csvn ~]#
[root@csvn ~]#
[root@csvn ~]#
[root@csvn ~]# xfs_info /dev/centos/root
meta-data=/dev/mapper/centos-root isize=256    agcount=4, agsize=318976 blks
         =                       sectsz=512   attr=2, projid32bit=1
         =                       crc=0        finobt=0 spinodes=0
data     =                       bsize=4096   blocks=1275904, imaxpct=25
         =                       sunit=0      swidth=0 blks
naming   =version 2              bsize=4096   ascii-ci=0 ftype=0
log      =internal               bsize=4096   blocks=2560, version=2
         =                       sectsz=512   sunit=0 blks, lazy-count=1
realtime =none                   extsz=4096   blocks=0, rtextents=0
[root@csvn ~]#
用xfs_growfs来同步文件系
[root@csvn ~]# xfs_growfs /dev/centos/root
meta-data=/dev/mapper/centos-root isize=256    agcount=4, agsize=318976 blks
         =                       sectsz=512   attr=2, projid32bit=1
         =                       crc=0        finobt=0 spinodes=0
data     =                       bsize=4096   blocks=1275904, imaxpct=25
         =                       sunit=0      swidth=0 blks
naming   =version 2              bsize=4096   ascii-ci=0 ftype=0
log      =internal               bsize=4096   blocks=2560, version=2
         =                       sectsz=512   sunit=0 blks, lazy-count=1
realtime =none                   extsz=4096   blocks=0, rtextents=0
data blocks changed from 1275904 to 2324480
[root@csvn ~]#
[root@csvn ~]#
[root@csvn ~]#
[root@csvn ~]# df -h
Filesystem               Size  Used Avail Use% Mounted on
devtmpfs                 484M     0  484M   0% /dev
tmpfs                    496M     0  496M   0% /dev/shm
tmpfs                    496M  7.1M  489M   2% /run
tmpfs                    496M     0  496M   0% /sys/fs/cgroup
/dev/mapper/centos-root  8.9G  2.9G  6.1G  33% /
/dev/sdb1                4.8G   21M  4.6G   1% /data
/dev/sda1                497M  154M  344M  31% /boot
tmpfs                    100M     0  100M   0% /run/user/0
tmpfs                    100M     0  100M   0% /run/user/1001
[root@csvn ~]#
可看到已成功扩容根目录。
附录:
xfs_admin: 调整 xfs 文件系统的各种参数
xfs_copy: 拷贝 xfs 文件系统的内容到一个或多个目标系统(并行方式)
xfs_db: 调试或检测 xfs 文件系统(查看文件系统碎片等)
xfs_check: 检测 xfs 文件系统的完整性
xfs_bmap: 查看一个文件的块映射
xfs_repair: 尝试修复受损的 xfs 文件系统
xfs_fsr: 碎片整理
xfs_quota: 管理 xfs 文件系统的磁盘配额
xfs_metadump: 将 xfs 文件系统的元数据 (metadata) 拷贝到一个文件中
xfs_mdrestore: 从一个文件中将元数据 (metadata) 恢复到 xfs 文件系统
xfs_growfs: 调整一个 xfs 文件系统大小(只能扩展)
xfs_freeze 暂停(-f)和恢复(-u)xfs 文件系统
xfs_logprint: 打印xfs文件系统的日志
xfs_mkfile: 创建xfs文件系统
xfs_info: 查询文件系统详细信息
xfs_ncheck: generate pathnames from i-numbers for XFS
xfs_rtcp: XFS实时拷贝命令
xfs_io: 调试xfs I/O路径