Spring提供了2种方式在运行时注入值:
- 属性占位符(Property placeholder)
- Spring表达式语言(SpEL)
1. 属性占位符
1.1 注入外部的值
1.1.1 使用Environment
一般情况下,我们会将一些值放到配置文件中,等程序运行时再把值注入到一些字段上。
假如,我们有一个test.properties配置文件,内容如下:
book.author=wangyunfei
book.name=spring boot
author.age=30
现在我们希望在程序运行时,把这个值分别赋值给字段bookAuthor和bookName,那么该如何实现呢?
首先,新建配置类ExpressiveConfig如下:
package chapter03.el;

import org.springframework.beans.factory.annotation.Autowired;
import org.springframework.context.annotation.Configuration;
import org.springframework.context.annotation.PropertySource;
import org.springframework.core.env.Environment;

@Configuration
@ComponentScan
@PropertySource("classpath:chapter03/el/test.properties")
public class ExpressiveConfig {
    @Autowired
    private Environment environment;

    public void outputResource() {
        System.out.println("book.name:" + environment.getProperty("book.name"));
        System.out.println("book.author:" + environment.getProperty("book.author"));
    }
}
这里我们使用@PropertySource注解引用了test.properties配置文件,这个文件的位置位于chapter03.el包下。
这个属性文件会加载到Spring的Environment中,然后我们就可以调用getProperty()方法获取到属性值。
新建Main类,在其main()方法中添加如下测试代码:
package chapter03.el;

import org.springframework.context.annotation.AnnotationConfigApplicationContext;

public class Main {
    public static void main(String[] args) {
        AnnotationConfigApplicationContext context = new AnnotationConfigApplicationContext(ExpressiveConfig.class);

        ExpressiveConfig expressiveConfig = context.getBean(ExpressiveConfig.class);

        expressiveConfig.outputResource();

        context.close();
    }
}
运行代码,发现抛出java.io.FileNotFoundException异常,如下所示:

从报错信息可以看出, 这是提示找不到chapter03/el/test.properties这个文件,这是为什么呢?
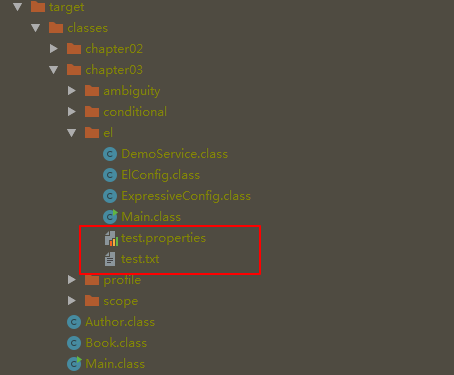
带着这个疑问,我们看下target目录下编译后的代码,如下所示:

从图中可以看出,我们新建的test.properties和test.txt文件并没有被编译到target目录下,所以才会抛出异常。
这是因为,我们新建文件的位置放在chapter03.el包下,而IDEA默认是不会把这些文件自动复制到target目录下的,但我们可以在pom.xml中添加如下配置来解决该问题:
<build>
    <resources>
        <resource>
            <directory>src/main/java</directory>
            <includes>
                <include>**/*.txt</include>
                <include>**/*.properties</include>
            </includes>
        </resource>
    </resources>
</build>
这里我们指定了txt和properties文件,如果需要,可以继续添加<include>标签指定xml等文件。
再次运行测试代码,输出日志如下所示:
book.name:spring boot
book.author:wangyunfei
此时target目录下已经包含了我们新建的2个文件:
如果指定的属性值不存在,getProperty()会返回null,如下所示:
String workCity = environment.getProperty("author.workcity");
System.out.println("author.workcity:" + workCity);
输出结果:
author.workcity:null
getProperty()还提供了1个重载,当指定的属性值不存在时,可以指定默认值:
String workCity = environment.getProperty("author.workcity", "上海");
System.out.println("author.workcity:" + workCity);
输出结果:
author.workcity:上海
如果希望属性值必须存在,可以使用getRequiredProperty()方法,当属性值不存在时,会抛出java.lang.IllegalStateException异常:
String workCity = environment.getRequiredProperty("author.workcity");
System.out.println("author.workcity:" + workCity);

getProperty()还提供了1个重载,可以指定返回值的类型,比如我们想返回Integer类型:
Integer authorAge = environment.getProperty("author.age", Integer.class);
System.out.println("author.age:" + authorAge);
输出结果:
author.age:30
getProperty()还提供了1个重载,当指定的属性值不存在时,不仅可以指定默认值,还可以指定返回值类型:
boolean isMan = environment.getProperty("author.isMan", Boolean.class, true);
System.out.println("author.isMan:" + isMan);
输出结果:
author.isMan:true
1.1.2 使用属性占位符
除了使用Environment获取外部的属性值,我们还可以使用属性占位符来获取。
在Spring装配中,占位符的形式为使用“${......}”包装的属性名称。
新建Book类如下:
package chapter03.el;

import org.springframework.beans.factory.annotation.Value;
import org.springframework.stereotype.Component;

@Component
public class Book {
    @Value("${book.name}")
    private String bookName;

    @Value("${book.author}")
    private String bookAuthor;

    public String getBookName() {
        return bookName;
    }

    public void setBookName(String bookName) {
        this.bookName = bookName;
    }

    public String getBookAuthor() {
        return bookAuthor;
    }

    public void setBookAuthor(String bookAuthor) {
        this.bookAuthor = bookAuthor;
    }
}
可以发现,我们在字段上添加了@Value注解,参数传的值就是属性占位符,用来获取属性文件中指定的属性值。
然后,在ExpressiveConfig配置类中添加如下代码:
@Autowired
private Book book;

public void outputResource() {
     System.out.println("book.name:" + book.getBookName());
     System.out.println("book.author:" + book.getBookAuthor());
}
输出结果:
book.name:spring boot
book.author:wangyunfei
2. Spring表达式语言
Spring表达式语言(Spring Expression Language,SpEL)是一种非常灵活的表达式语言,能够以一种强大和简洁的方式将值装配到bean属性或者构造器参数中,在这个过程中所使用的的表达式会在运行时计算值。
SpEL表达式要放到“#{......}”之中,而之前讲到的属性占位符是放到“${......}”之中。
接下来,我们分场景来看下Spring表达式语言的使用方法。
2.1 引用系统属性值
在ExpressiveConfig中添加如下代码:
@Value("#{systemProperties['os.name']}")
private String osName;

public void outputResource() {
    System.out.println("os.name:" + osName);
}
输出结果:
os.name:Windows 7
2.2 引用bean的属性和方法
首先,新建一个类DemoService如下所示:
package chapter03.el;

import org.springframework.beans.factory.annotation.Value;
import org.springframework.stereotype.Service;

@Service
public class DemoService {
    @Value("DemoService类的another属性")
    private String another;

    public String getAnother() {
        return another;
    }

    public void setAnother(String another) {
        this.another = another;
    }
}
然后,在ExpressiveConfig中添加如下代码:
@Value("#{demoService.another}")
private String fromAnother;

public void outputResource() {
    System.out.println("demoService.another:" + fromAnother);
}
表达式中的demoService为DemoService bean的ID,another是它的属性。
输出结果:
demoService.another:DemoService类的another属性
表达式也可以修改为调用bean的方法:
@Value("#{demoService.getAnother()}")
private String fromAnother;
输出结果不变,只是从调用属性变成了调用方法。
调用完方法,可以对方法的返回值继续调用其它方法,比如toUpperCase():
@Value("#{demoService.getAnother()?.toUpperCase()}")
private String fromAnother;
之所以使用"?."运算符,是为了避免当demoService.getAnother()返回null时,代码出现NullPointerException。
此时的输出结果为:
demoService.another:DEMOSERVICE类的ANOTHER属性
2.3 在表达式中使用类型
使用表达式生成1个随机数:
@Value("#{T(java.lang.Math).random()}")
private double randomNumber;

public void outputResource() {
    System.out.println("randomNumber:" + randomNumber);
}
这里我们使用T()引用了java.lang.Math类,然后调用了它的静态方法random()。
输出结果:
randomNumber:0.6801944394506442
2.4 使用运算符
上面的例子中,生成随机数后,我们还可以使用乘法运算符,如下所示:
@Value("#{T(java.lang.Math).random() * 100.0}")
private double randomNumber;
我们也可以在表达式中使用“+”运算符拼接字符串,如下所示:
@Value("#{book.getBookName() + ' write by ' + book.getBookAuthor()}")
private String bookDescr;

public void outputResource() {
    System.out.println("bookDescr:" + bookDescr);
}
其中book为Book bean的ID,输出结果如下所示:
bookDescr:spring boot write by wangyunfei
也可以在表达式中使用三元运算符:
@Value("#{systemProperties['os.name'] == 'Windows 7'?'Windows':'Linux'}")
private String osType;

public void outputResource() {
    System.out.println("osType:" + osType);
}
因为我的电脑系统是Windows 7,所以输出结果如下所示:
osType:Windows
SpEL还支持很多的运算符,这里只是列举了几个常用的例子,有兴趣的同学可以自己深入研究下。
3. 源码及参考
源码地址:https://github.com/zwwhnly/spring-action.git,欢迎下载。
Craig Walls 《Spring实战(第4版)》
汪云飞《Java EE开发的颠覆者:Spring Boot实战》
IDEA maven项目src源代码下的资源文件不自动复制到classes文件夹的解决方法
原创不易,如果觉得文章能学到东西的话,欢迎点个赞、评个论、关个注,这是我坚持写作的最大动力。
如果有兴趣,欢迎添加我的微信:zwwhnly,等你来聊技术、职场、工作等话题(PS:我是一名奋斗在上海的程序员)。