Core Data 概述
2005年的四月份,Apple 发布了 OS X 10.4,在这个版本中 Core Data 框架发布了。Core Data本身既不是数据库也不是数据库访问框架。相反,Core Data是一个完整的数据模型解决方案。可以简单理解为对持久层的封装,使得我们可以通过可视化建立数据模型,简化数据存取。即使不懂SQL语句,也依然可以使用Core Data。因为Core Data将底层的数据库SQL语句封装成了一套API,并可通过可视化操作来建立数据库的模型和表之间的关系,它甚至在数据变化时会帮你自动处理关系,Core Data还能对非法数据进行过滤。更重要的是,Core Data的NSFetchRequest类可以替代SQL中的Select语句,并提供了NSFetchedResultsController以更高效的方法将查询结果显示在UITableView中。
Core Data 组件
Core Data的组件主要由三部分组成:
Managed Object Model(数据模型): 可以看作是数据库的模型结构。包含了各个实体的定义信息。
Persistent Store Coordinator (持久化存储协调器):将对象图管理部分和持久化部分捆绑在一起,当它们两者中的任何一部分需要和另一部分交流时,这便需要持久化存储协调器来调节。
Managed Object Context (管理数据上下文):被管理数据的上下文,实际上是对你所有数据库操作的一个缓存层,会把你所有的操作都先缓存起来避免大量磁盘 IO 造成不流畅,你在操作完数据库后调用其save方法持久化改变。
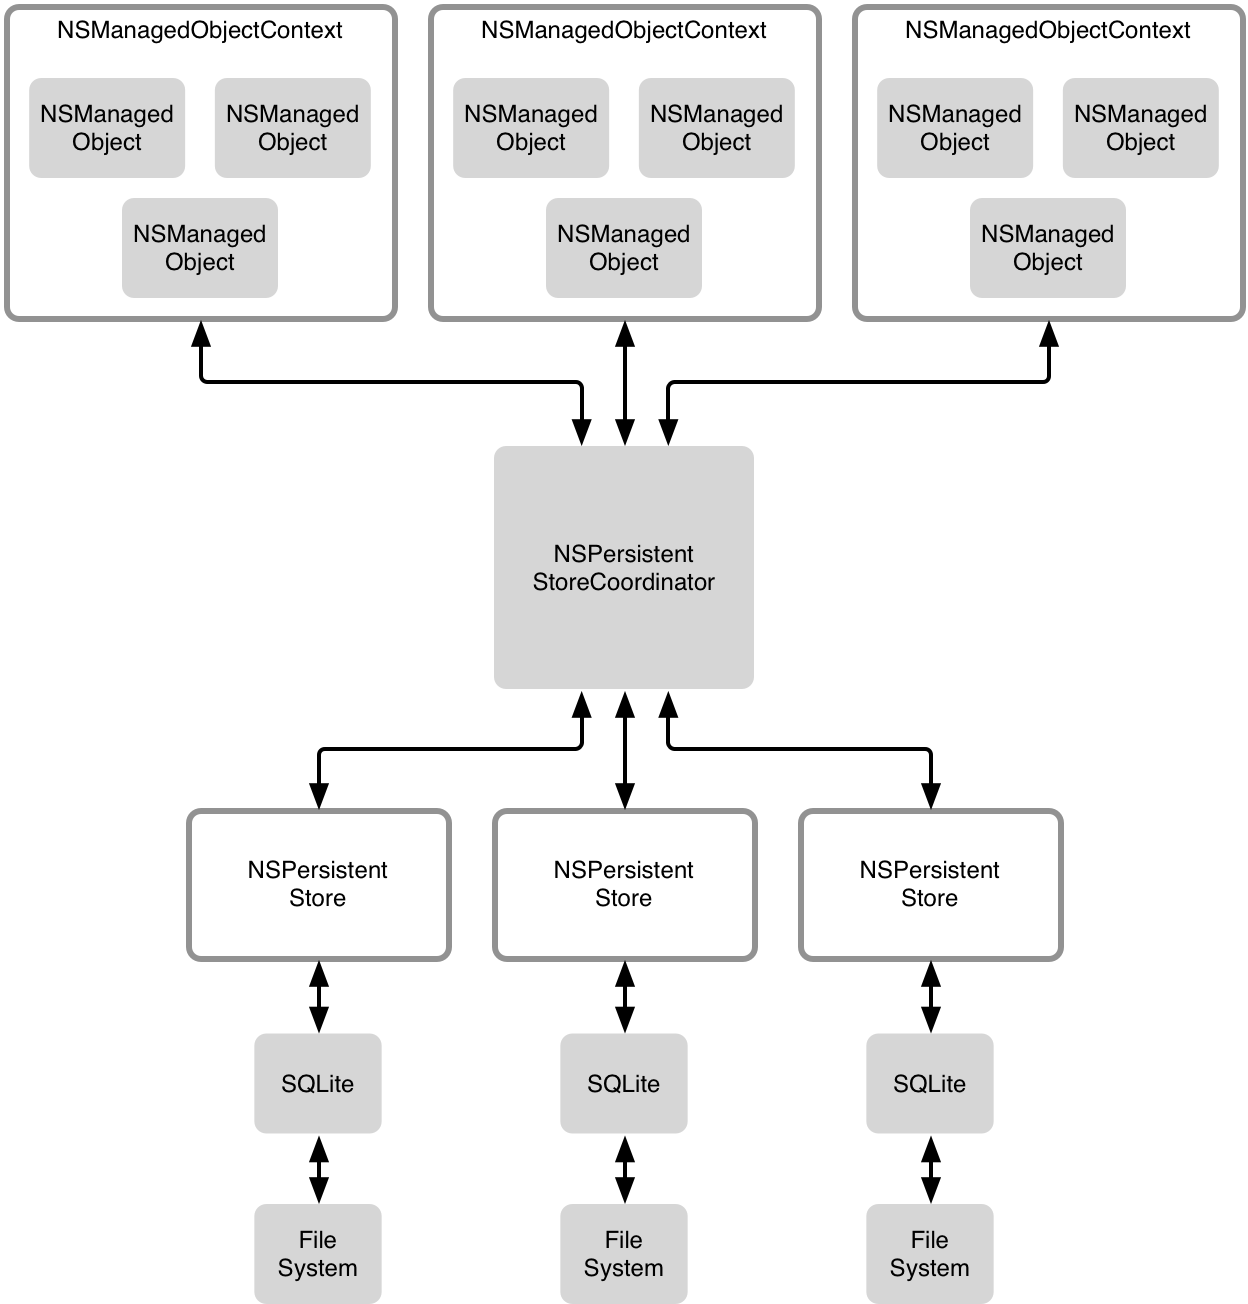
上图是Core Data 基本工作原理 可以帮助我们更加深入的了解Core data各个组件间是怎么工作的 下面通过一个例子详细介绍下core data究竟干了什么
一个Core Data 工程
在这里我们不需要自己动手去做一个工程 因为xcode已经 为我们提供了一个完整的Core Data 项目 打开我们的xcode 在 iOS -> Application 下选择 Master-Detail Application 命完名字后记得勾选Core Data选项 项目建立后我们可以发现Frameworks中已经有了CoreData.framework一项,并且还多了一个以 .xcdatamodeld结尾的文件,这个 文件定义了我们需要 的数据模型结构。点开后 可以看到左侧有三个选项:Entities,Fetch Request、Configurations。
Entities
Entities Core Data 的一个实体 它可以像类一样被继承 为了便于理解我们也可以把它理解为数据库中的一个表,实体里的属性可以看做数据库表中的属性 我们的项目中现在有一个Event实体,这个实体有一个叫timeStamp的属性 这里可以理解为,我们的数据库中有一个叫Event的表 表里有一个叫timeStamp的属性
Attributes 就是我们上面说的属性,我们可以设置其数据类型,默认值,最大,小值等。需要注意的是这里的空值是NULL,不等同于OC中的nil,更不等同于0和空字符串@“”。
Relationships 描述多个Entities间的关系:多对一,一对一,继承关系等。当我们指定了一个关系后,我们也最好指定一个反转关系。比如A和B是多对多的关系,那么A指向B的关系Type为To Many,同时设定B指向A的关系Type为To Many,如果A为B的父类那么同时要指定B为A的子类。
Fetched Property表示了一种弱的、单向的关系。Core Data不支持在persistent store之间建立Relationships,所以Fetched Property可用于建立“松耦合”关系,相似暂时的分组。
Fetch Request
在Core Data中我们使用NSFetchRequest类来进行数据请求,从持久存储(persistent store)中获取对象。请求中包含变量(如查找条件)类似我们sql语句中的查找条件,这个我们以后有机会在介绍。
Configurations
配置包含了一个名称和若干个相关的实体。一个实体可以出现在多个配置中。我们可以在代码中使用setEntities: forConfiguration:的方法来指定配置。我们也可以使用entitiesForConfiguration:来获取配置。一般说来,如果你想把不同的实体存放在不同的存储中去,就可能用到配置。一个持久化存储协调器(persistent store coordinator)只能有一个被管理的对象模型(managed object model)。所以,默认情况下,和协调器关联的某个存储必须包含同样的实体。要想绕过这个限制,你可以创建一个包含所有实体并集的模型,然后在模型中为每一个你想使用的实体子集创建配置,这样一来,使用这个模型创建协调器,当你需要添加存储(persistent store)时,可根据不同的配置来指定对应的存储属性。
通过上面的简单介绍我们已经对Core Data有了初步的了解 下面我们准备从苹果的模板代码体会Core Data是如何具体应用的
首先是AppDelegate.h
#import <UIKit/UIKit.h>
#import <CoreData/CoreData.h>

@interface AppDelegate : UIResponder <UIApplicationDelegate>

@property (strong, nonatomic) UIWindow *window;

@property (readonly, strong, nonatomic) NSManagedObjectContext *managedObjectContext;
@property (readonly, strong, nonatomic) NSManagedObjectModel *managedObjectModel;
@property (readonly, strong, nonatomic) NSPersistentStoreCoordinator *persistentStoreCoordinator;

- (void)saveContext;
- (NSURL *)applicationDocumentsDirectory;


@end
这里比我们平时创建的项目多了三个属性 就是我们上面介绍过的Core Data 的三个组件 managedObjectContext managedObjectModel persistentStoreCoordinator
下面移步.m文件 了解下三个部件的实例化过程
- (NSManagedObjectContext *)managedObjectContext {
    // Returns the managed object context for the application (which is already bound to the persistent store coordinator for the application.)
    if (_managedObjectContext != nil) {
        return _managedObjectContext;
    }

    NSPersistentStoreCoordinator *coordinator = [self persistentStoreCoordinator];
    if (!coordinator) {
        return nil;
    }
    _managedObjectContext = [[NSManagedObjectContext alloc] initWithConcurrencyType:NSMainQueueConcurrencyType];
    [_managedObjectContext setPersistentStoreCoordinator:coordinator];
    return _managedObjectContext;
}
如果是第一次调用,会实例化一个NSManagedObjectContext对象,并使用persistentStoreCoordinator方法返回的NSPersistentStoreCoordinator对象来配置上下文,最后返回新实例化的NSManagedObjectContext对象。
然后来看下persistentStoreCoordinator的实例化
- (NSPersistentStoreCoordinator *)persistentStoreCoordinator {
    // The persistent store coordinator for the application. This implementation creates and returns a coordinator, having added the store for the application to it.
    if (_persistentStoreCoordinator != nil) {
        return _persistentStoreCoordinator;
    }

    // Create the coordinator and store

    _persistentStoreCoordinator = [[NSPersistentStoreCoordinator alloc] initWithManagedObjectModel:[self managedObjectModel]];
    NSURL *storeURL = [[self applicationDocumentsDirectory] URLByAppendingPathComponent:@"ZYCoreData.sqlite"];
    NSError *error = nil;
    NSString *failureReason = @"There was an error creating or loading the application's saved data.";
    if (![_persistentStoreCoordinator addPersistentStoreWithType:NSSQLiteStoreType configuration:nil URL:storeURL options:nil error:&error]) {
        // Report any error we got.
        NSMutableDictionary *dict = [NSMutableDictionary dictionary];
        dict[NSLocalizedDescriptionKey] = @"Failed to initialize the application's saved data";
        dict[NSLocalizedFailureReasonErrorKey] = failureReason;
        dict[NSUnderlyingErrorKey] = error;
        error = [NSError errorWithDomain:@"YOUR_ERROR_DOMAIN" code:9999 userInfo:dict];
        // Replace this with code to handle the error appropriately.
        // abort() causes the application to generate a crash log and terminate. You should not use this function in a shipping application, although it may be useful during development.
        NSLog(@"Unresolved error %@, %@", error, [error userInfo]);
        abort();
    }

    return _persistentStoreCoordinator;
}
同样的如果是第一次调用会实例化一个NSPersistentStoreCoordinator对象,这里要访问到documents目录中的SQLite存储文件ZYCoreData.sqlite,还定义了一个applicationDocumentsDirectory方法,它的作用是获取程序documents的路径
- (NSURL *)applicationDocumentsDirectory {
    // The directory the application uses to store the Core Data store file. This code uses a directory named "com.maxjia.ZYCoreData" in the application's documents directory.
    return [[[NSFileManager defaultManager] URLsForDirectory:NSDocumentDirectory inDomains:NSUserDomainMask] lastObject];
}
ZYCoreData.sqlite文件是在编译ZYCoreData.xcdatamodeld时生成的。 NSPersistentStoreCoordinator初始化时需要传入managedObjectModel。NSPersistentStoreCoordinator对象在添加持久存储的时候不仅需要传入存储类型,存储文件URL,选项以及错误类型。如果添加存储的时候出现错误,就会进入if判断,进行错误处理。
然后是managedObjectModel
- (NSManagedObjectModel *)managedObjectModel {
    // The managed object model for the application. It is a fatal error for the application not to be able to find and load its model.
    if (_managedObjectModel != nil) {
        return _managedObjectModel;
    }
    NSURL *modelURL = [[NSBundle mainBundle] URLForResource:@"ZYCoreData" withExtension:@"momd"];
    _managedObjectModel = [[NSManagedObjectModel alloc] initWithContentsOfURL:modelURL];
    return _managedObjectModel;
}
NSManagedObjectModel类在初始化的时候用到了ZYCoreData.momd文件,这个文件和上面ZYCoreData.sqlite一样是编译项目时,由ZYCoreData.xcdatamodeld数据模型生成,并且保存到app的Bundle目录
- (void)applicationWillTerminate:(UIApplication *)application {
    // Called when the application is about to terminate. Save data if appropriate. See also applicationDidEnterBackground:.
    // Saves changes in the application's managed object context before the application terminates.
    [self saveContext];
}
- (void)saveContext {
    NSManagedObjectContext *managedObjectContext = self.managedObjectContext;
    if (managedObjectContext != nil) {
        NSError *error = nil;
        if ([managedObjectContext hasChanges] && ![managedObjectContext save:&error]) {
            // Replace this implementation with code to handle the error appropriately.
            // abort() causes the application to generate a crash log and terminate. You should not use this function in a shipping application, although it may be useful during development.
            NSLog(@"Unresolved error %@, %@", error, [error userInfo]);
            abort();
        }
    }
}
managedObjectContext对象中的数据的修改,发生在内存中的,需要调用save方法来保存到存储文件当中才能做到数据的持久化,在这里选择在程序退出时调用saveContext保存数据
部件介绍完了 看看我们这个程序干了什么。首先在程序初始化的时候
 UINavigationController *masterNavigationController = splitViewController.viewControllers[0];
  MasterViewController *controller = (MasterViewController *)masterNavigationController.topViewController;
   controller.managedObjectContext = self.managedObjectContext;
    return YES;
给MasterViewController中传入了managedObjectContext MasterViewController继承自UITableViewController 所以我们运行程序 可以看到这个程序实现了 点击左上角加号 把当前时间标签加入到tableView中的功能 多添加几条并关闭程序从新打开 发现之前的数据仍然存在 说明应用做了数据的持久化处理 下面我们看下实现代码
首先是UITableViewDataSource的相关代码
- (NSInteger)numberOfSectionsInTableView:(UITableView *)tableView {
    return [[self.fetchedResultsController sections] count];
}

- (NSInteger)tableView:(UITableView *)tableView numberOfRowsInSection:(NSInteger)section {
    id <NSFetchedResultsSectionInfo> sectionInfo = [self.fetchedResultsController sections][section];
    return [sectionInfo numberOfObjects];
}

- (UITableViewCell *)tableView:(UITableView *)tableView cellForRowAtIndexPath:(NSIndexPath *)indexPath {
    UITableViewCell *cell = [tableView dequeueReusableCellWithIdentifier:@"Cell" forIndexPath:indexPath];
    [self configureCell:cell atIndexPath:indexPath];
    return cell;
}

- (BOOL)tableView:(UITableView *)tableView canEditRowAtIndexPath:(NSIndexPath *)indexPath {
    // Return NO if you do not want the specified item to be editable.
    return YES;
}

- (void)tableView:(UITableView *)tableView commitEditingStyle:(UITableViewCellEditingStyle)editingStyle forRowAtIndexPath:(NSIndexPath *)indexPath {
    if (editingStyle == UITableViewCellEditingStyleDelete) {
        NSManagedObjectContext *context = [self.fetchedResultsController managedObjectContext];
        [context deleteObject:[self.fetchedResultsController objectAtIndexPath:indexPath]];

        NSError *error = nil;
        if (![context save:&error]) {
            // Replace this implementation with code to handle the error appropriately.
            // abort() causes the application to generate a crash log and terminate. You should not use this function in a shipping application, although it may be useful during development.
            NSLog(@"Unresolved error %@, %@", error, [error userInfo]);
            abort();
        }
    }
}

- (void)configureCell:(UITableViewCell *)cell atIndexPath:(NSIndexPath *)indexPath {
    NSManagedObject *object = [self.fetchedResultsController objectAtIndexPath:indexPath];
    cell.textLabel.text = [[object valueForKey:@"timeStamp"] description];
}
通过代码 我们发现就可看出tableView的数据是由fetchedResultsController对象提供的。所以我们继续来看看fetchedResultsController是何方神圣
- (NSFetchedResultsController *)fetchedResultsController
{
    if (_fetchedResultsController != nil) {
        return _fetchedResultsController;
    }

    NSFetchRequest *fetchRequest = [[NSFetchRequest alloc] init];
    // Edit the entity name as appropriate.
    NSEntityDescription *entity = [NSEntityDescription entityForName:@"Event" inManagedObjectContext:self.managedObjectContext];
    [fetchRequest setEntity:entity];

    // Set the batch size to a suitable number.
    [fetchRequest setFetchBatchSize:20];

    // Edit the sort key as appropriate.
    NSSortDescriptor *sortDescriptor = [[NSSortDescriptor alloc] initWithKey:@"timeStamp" ascending:NO];

    [fetchRequest setSortDescriptors:@[sortDescriptor]];

    // Edit the section name key path and cache name if appropriate.
    // nil for section name key path means "no sections".
    NSFetchedResultsController *aFetchedResultsController = [[NSFetchedResultsController alloc] initWithFetchRequest:fetchRequest managedObjectContext:self.managedObjectContext sectionNameKeyPath:nil cacheName:@"Master"];
    aFetchedResultsController.delegate = self;
    self.fetchedResultsController = aFetchedResultsController;

    NSError *error = nil;
    if (![self.fetchedResultsController performFetch:&error]) {
         // Replace this implementation with code to handle the error appropriately.
         // abort() causes the application to generate a crash log and terminate. You should not use this function in a shipping application, although it may be useful during development.
        NSLog(@"Unresolved error %@, %@", error, [error userInfo]);
        abort();
    }

    return _fetchedResultsController;
}
Core Data在iOS上使用了NSFetchedResultsController对象来简化对提取结果和表格视图的处理。NSFetchedResultsController对象被惰性创建并只在表格视图数据源方法有需要时才提取数据。我们可以看到在对NSFetchRequest对象的处理中,使用了Event实体,并提供了一个NSSortDescriptor对象以让提取结果按timeStamp进行排序。最后通过NSFetchRequest对象和managedObjectContext作为参数传入NSFetchedResultsController的初始化方法。NSFetchedResultsController也有它的代理,将MasterViewController设置为其代理,这样在fetched results 发生变化时,MasterViewController中实现的NSFetchedResultsControllerDelegate方法会被调用,然后就可以实现在数据变化是改变tableView中的显示内容
上面是用NSFetchedResultsController批量获取数据的方法 下面看下数据插入的操作
- (void)insertNewObject:(id)sender {
    NSManagedObjectContext *context = [self.fetchedResultsController managedObjectContext];
    NSEntityDescription *entity = [[self.fetchedResultsController fetchRequest] entity];
    NSManagedObject *newManagedObject = [NSEntityDescription insertNewObjectForEntityForName:[entity name] inManagedObjectContext:context];

    // If appropriate, configure the new managed object.
    // Normally you should use accessor methods, but using KVC here avoids the need to add a custom class to the template.
    [newManagedObject setValue:[NSDate date] forKey:@"timeStamp"];

    // Save the context.
    NSError *error = nil;
    if (![context save:&error]) {
        // Replace this implementation with code to handle the error appropriately.
        // abort() causes the application to generate a crash log and terminate. You should not use this function in a shipping application, although it may be useful during development.
        NSLog(@"Unresolved error %@, %@", error, [error userInfo]);
        abort();
    }
}
插入数据需要调用实体描述对象NSEntityDescription返回一个实体对象,然后设置对象属性,最后保存当前上下文即可。这里需要注意,增、删、改操作完最后必须调用管理对象上下文的保存方法,也就是这里[context save:&error]方法
,否则不能被执行。
- (void)tableView:(UITableView *)tableView commitEditingStyle:(UITableViewCellEditingStyle)editingStyle forRowAtIndexPath:(NSIndexPath *)indexPath {
    if (editingStyle == UITableViewCellEditingStyleDelete) {
        NSManagedObjectContext *context = [self.fetchedResultsController managedObjectContext];
        [context deleteObject:[self.fetchedResultsController objectAtIndexPath:indexPath]];

        NSError *error = nil;
        if (![context save:&error]) {
            // Replace this implementation with code to handle the error appropriately.
            // abort() causes the application to generate a crash log and terminate. You should not use this function in a shipping application, although it may be useful during development.
            NSLog(@"Unresolved error %@, %@", error, [error userInfo]);
            abort();
        }
    }
}
在tableView:(UITableView *)tableView commitEditingStyle:(UITableViewCellEditingStyle)editingStyle forRowAtIndexPath:(NSIndexPath *)indexPath实现了删除操作 拿到上下文 直接调用管理对象上下文的deleteObject方法,删除完保存上下文即可
总结
Core Data框架基本的5个类:NSPersistentStoreCoordinator、NSManagedObjectContext、NSManagedObjectModel、NSEntityDescription、NSManagedObject。
NSPersistentStoreCoordinator持久化存储协调器:负责从文件加载数据和将数据写入文件。
NSEntityDescription实体描述:实体可以被看做是NSManagedObject对象的一个具体的实现。
NSManagedObjectContext 管理对象上下文:上下文是内存中的一块暂存区域。查询,插入,删除,修改等操作都是在上下文中进行。在上下文没有保存之前,对数据的任何修改都只记录在暂存区中,不会影响文件内的数据。
NSManagedObject 管理对象:Core Data的核心单元。模型对象的数据被持有在NSManagedObject对象中。每一个NSManagedObject对象都对应一个实体
NSManagedObjectModel 对象模型:NSManagedObjectModel通常被定义在一个.mom文件中,文件中保存了所有实体的定义。