我们在开发Spring Boot程序的时候,我们只需要在启动类上加入@SpringBootApplication注解,然后运行SpringApplication.run(),这样Spring容器就运行起来了。
@SpringBootApplication(scanBasePackages={"com.jnu.example"})
@CoreMapperScan
@EnableAspectAutoProxy
public class App {
    public static void main(String[] args) {
        SpringApplication.run(BlogApplication.class, args);
    }
}
那么问题来了,相比最初Spring MVC繁琐的xml的配置方式,现在只需要简单几行代码,Spring容器就可以启动起来,我们就可以从容器中获取到bean,Spring Boot内部是如何做到的呢?
一、SringApplication准备阶段
1.1、SpringApplication准备阶段
SpringApplication 在运行前做了一系列的准备工作,如:推断 Web 应用类型、加载 Spring 上下文初始器、事件监听器等。接下来,就通过源码的方式进行学习。
我们首先进入SpringApplication的静态帮助方法run里面,该方法接受两个参数:
    /**
     * Static helper that can be used to run a {@link SpringApplication} from the
     * specified source using default settings.
     * @param primarySource the primary source to load
     * @param args the application arguments (usually passed from a Java main method)
     * @return the running {@link ApplicationContext}
     */
    public static ConfigurableApplicationContext run(Class<?> primarySource, String... args) {
        return run(new Class<?>[] { primarySource }, args);
    }
- primarySource:要加载的主要配置类,也就是被@SpringBootApplication注解的App类;
- args:一个可变数组,保存的是应用程序的运行参数,具体可以指定哪些属性,可以查看官网说明:Common Application properties;
接下来,调用了另一个静态帮助方法run,并将primarySource转换为数组参数传入;
    public static ConfigurableApplicationContext run(Class<?>[] primarySources, String[] args) {
        return new SpringApplication(primarySources).run(args);
    }
这里通过入参primarySources创建了一个SpringApplication对象,其中,准备阶段的工作皆在 SpringApplication 的构造器中处理:
    /**
     * Create a new {@link SpringApplication} instance. The application context will load
     * beans from the specified primary sources (see {@link SpringApplication class-level}
     * documentation for details. The instance can be customized before calling
     * {@link #run(String...)}.
     * @param primarySources the primary bean sources
     * @see #run(Class, String[])
     * @see #SpringApplication(ResourceLoader, Class...)
     * @see #setSources(Set)
     */
    public SpringApplication(Class<?>... primarySources) {
        this(null, primarySources);
    }
这里调用了另一个构造方法,然后初始化primarySource,webApplicationType、initializers、listeners、mainApplicationClass等字段:
public SpringApplication(ResourceLoader resourceLoader, Class<?>... primarySources) {

        // resourceLoader 主要用来获取 Resource 及 ClassLoader。这里值为 null
        this.resourceLoader = resourceLoader;

        // 断言primarySources不能为null,否则报错
        Assert.notNull(primarySources, "PrimarySources must not be null");

        // primarySources是SpringApplication.run的参数,存放的是主配置类
        this.primarySources = new LinkedHashSet<>(Arrays.asList(primarySources));

        // 进行Web应用的类型推断
        this.webApplicationType = WebApplicationType.deduceFromClasspath();

        // 加载应用上下文初始化器 initializer
        setInitializers((Collection) getSpringFactoriesInstances(ApplicationContextInitializer.class));

        // 加载应用事件监听器 listener
        setListeners((Collection) getSpringFactoriesInstances(ApplicationListener.class));

        // 推断引导类,也就是找到入口类
        this.mainApplicationClass = deduceMainApplicationClass();
    }
1.2、推断Web应用类型
// 进行Web应用的类型推断
this.webApplicationType = WebApplicationType.deduceFromClasspath();
SpringApplication允许指定应用的类型,大体上分为Web应用和非Web应用。从Spring Boot2.0开始,Web应用又可以分为Servlet Web和Reactive Web。而在准备阶段,是通过检查当前ClassPath下某些Class是否存在,从而推导Web应用的类型:
/**
 * An enumeration of possible types of web application.
 *
 * @author Andy Wilkinson
 * @author Brian Clozel
 * @since 2.0.0
 */
public enum WebApplicationType {

    /**
     * The application should not run as a web application and should not start an
     * embedded web server.
     */
    NONE,

    /**
     * The application should run as a servlet-based web application and should start an
     * embedded servlet web server.
     */
    SERVLET,

    /**
     * The application should run as a reactive web application and should start an
     * embedded reactive web server.
     */
    REACTIVE;

    private static final String[] SERVLET_INDICATOR_CLASSES = { "javax.servlet.Servlet",
            "org.springframework.web.context.ConfigurableWebApplicationContext" };

    private static final String WEBMVC_INDICATOR_CLASS = "org.springframework.web.servlet.DispatcherServlet";

    private static final String WEBFLUX_INDICATOR_CLASS = "org.springframework.web.reactive.DispatcherHandler";

    private static final String JERSEY_INDICATOR_CLASS = "org.glassfish.jersey.servlet.ServletContainer";

    private static final String SERVLET_APPLICATION_CONTEXT_CLASS = "org.springframework.web.context.WebApplicationContext";

    private static final String REACTIVE_APPLICATION_CONTEXT_CLASS = "org.springframework.boot.web.reactive.context.ReactiveWebApplicationContext";

    static WebApplicationType deduceFromClasspath() {
        if (ClassUtils.isPresent(WEBFLUX_INDICATOR_CLASS, null) && !ClassUtils.isPresent(WEBMVC_INDICATOR_CLASS, null)
                && !ClassUtils.isPresent(JERSEY_INDICATOR_CLASS, null)) {
            return WebApplicationType.REACTIVE;
        }
        for (String className : SERVLET_INDICATOR_CLASSES) {
            if (!ClassUtils.isPresent(className, null)) {
                return WebApplicationType.NONE;
            }
        }
        return WebApplicationType.SERVLET;
    }

    static WebApplicationType deduceFromApplicationContext(Class<?> applicationContextClass) {
        if (isAssignable(SERVLET_APPLICATION_CONTEXT_CLASS, applicationContextClass)) {
            return WebApplicationType.SERVLET;
        }
        if (isAssignable(REACTIVE_APPLICATION_CONTEXT_CLASS, applicationContextClass)) {
            return WebApplicationType.REACTIVE;
        }
        return WebApplicationType.NONE;
    }

    private static boolean isAssignable(String target, Class<?> type) {
        try {
            return ClassUtils.resolveClassName(target, null).isAssignableFrom(type);
        }
        catch (Throwable ex) {
            return false;
        }
    }

}
可以看到,在方法中利用 ClassUtils.isPresent 进行判断, 当DispatcherHandler存在,而DispatcherServlet和ServletContainer不存在时,则当前应用推导为 Reactive web 类型;当 Servlet 和 ConfigurableWebApplicationContext 不存在时,当前应用为非 Web 类型;其他的则为 Servlet Web 类型。
注:Reactive:Reactive响应式编程是一种新的编程风格,其特点是异步或并发、事件驱动、推送PUSH机制以及观察者模式的衍生。
该函数执行完后,结果如下:

1.3、加载应用上下文初始器ApplicationContextInitializer
setInitializers((Collection) getSpringFactoriesInstances(ApplicationContextInitializer.class))
接着进入加载Spring应用上下文初始器的过程;
private <T> Collection<T> getSpringFactoriesInstances(Class<T> type) {
        return getSpringFactoriesInstances(type, new Class<?>[] {});
    }

    private <T> Collection<T> getSpringFactoriesInstances(Class<T> type, Class<?>[] parameterTypes, Object... args) {
        ClassLoader classLoader = getClassLoader();
        // Use names and ensure unique to protect against duplicates
        Set<String> names = new LinkedHashSet<>(SpringFactoriesLoader.loadFactoryNames(type, classLoader));
        List<T> instances = createSpringFactoriesInstances(type, parameterTypes, classLoader, args, names);
        AnnotationAwareOrderComparator.sort(instances);
        return instances;
    }
可以看到,这里是通过 Spring 工厂加载机制 SpringFactoriesLoader.loadFactoryNames(type, classLoader) 方法获取,采用这种方式可以将非本项目的外部包的bean加载到Spring容器中。

该方法是从项目引用的所有的jar的 META-INF/spring.factories 资源中获取key为 ApplicationContextInitializer 的实现类集合,如下是 spring-boot-autoconfigure 包下的 spring.factories 文件:
# Initializers
org.springframework.context.ApplicationContextInitializer=
org.springframework.boot.autoconfigure.SharedMetadataReaderFactoryContextInitializer,
org.springframework.boot.autoconfigure.logging.ConditionEvaluationReportLoggingListener
这里获取的就是 SharedMetadataReaderFactoryContextInitializer 和 ConditionEvaluationReportLoggingListener 上下文初始化器,接下来通过 createSpringFactoriesInstances(type, parameterTypes, classLoader, args, names) 方法初始化这些实现类:
 @SuppressWarnings("unchecked")
    private <T> List<T> createSpringFactoriesInstances(Class<T> type, Class<?>[] parameterTypes,
            ClassLoader classLoader, Object[] args, Set<String> names) {
        List<T> instances = new ArrayList<>(names.size());
        for (String name : names) {
            try {
                Class<?> instanceClass = ClassUtils.forName(name, classLoader);
                Assert.isAssignable(type, instanceClass);
                Constructor<?> constructor = instanceClass.getDeclaredConstructor(parameterTypes);
                T instance = (T) BeanUtils.instantiateClass(constructor, args);
                instances.add(instance);
            }
            catch (Throwable ex) {
                throw new IllegalArgumentException("Cannot instantiate " + type + " : " + name, ex);
            }
        }
        return instances;
    }
这里先通过 BeanUtils.instantiate 初始化这些类,然后将初始化的类保存至List进行返回。

并进行排序操作,最后添加到SpringApplication的initializers集合变量中。至此,该流程结束。
    /**
     * Sets the {@link ApplicationContextInitializer} that will be applied to the Spring
     * {@link ApplicationContext}.
     * @param initializers the initializers to set
     */
    public void setInitializers(Collection<? extends ApplicationContextInitializer<?>> initializers) {
        this.initializers = new ArrayList<>(initializers);
    }
我们举例来看看初始器中的内容,如SharedMetadataReaderFactoryContextInitializer:


/*
 * Copyright 2012-2019 the original author or authors.
 *
 * Licensed under the Apache License, Version 2.0 (the "License");
 * you may not use this file except in compliance with the License.
 * You may obtain a copy of the License at
 *
 *      https://www.apache.org/licenses/LICENSE-2.0
 *
 * Unless required by applicable law or agreed to in writing, software
 * distributed under the License is distributed on an "AS IS" BASIS,
 * WITHOUT WARRANTIES OR CONDITIONS OF ANY KIND, either express or implied.
 * See the License for the specific language governing permissions and
 * limitations under the License.
 */

package org.springframework.boot.autoconfigure;

import org.springframework.beans.BeansException;
import org.springframework.beans.factory.BeanClassLoaderAware;
import org.springframework.beans.factory.FactoryBean;
import org.springframework.beans.factory.NoSuchBeanDefinitionException;
import org.springframework.beans.factory.config.BeanDefinition;
import org.springframework.beans.factory.config.ConfigurableListableBeanFactory;
import org.springframework.beans.factory.config.RuntimeBeanReference;
import org.springframework.beans.factory.support.BeanDefinitionBuilder;
import org.springframework.beans.factory.support.BeanDefinitionRegistry;
import org.springframework.beans.factory.support.BeanDefinitionRegistryPostProcessor;
import org.springframework.boot.type.classreading.ConcurrentReferenceCachingMetadataReaderFactory;
import org.springframework.context.ApplicationContextInitializer;
import org.springframework.context.ApplicationListener;
import org.springframework.context.ConfigurableApplicationContext;
import org.springframework.context.annotation.AnnotationConfigUtils;
import org.springframework.context.annotation.ConfigurationClassPostProcessor;
import org.springframework.context.event.ContextRefreshedEvent;
import org.springframework.core.Ordered;
import org.springframework.core.PriorityOrdered;
import org.springframework.core.type.classreading.CachingMetadataReaderFactory;
import org.springframework.core.type.classreading.MetadataReaderFactory;

/**
 * {@link ApplicationContextInitializer} to create a shared
 * {@link CachingMetadataReaderFactory} between the
 * {@link ConfigurationClassPostProcessor} and Spring Boot.
 *
 * @author Phillip Webb
 */
class SharedMetadataReaderFactoryContextInitializer
        implements ApplicationContextInitializer<ConfigurableApplicationContext>, Ordered {

    public static final String BEAN_NAME = "org.springframework.boot.autoconfigure."
            + "internalCachingMetadataReaderFactory";

    @Override
    public void initialize(ConfigurableApplicationContext applicationContext) {
        applicationContext.addBeanFactoryPostProcessor(new CachingMetadataReaderFactoryPostProcessor());
    }

    @Override
    public int getOrder() {
        return 0;
    }

    /**
     * {@link BeanDefinitionRegistryPostProcessor} to register the
     * {@link CachingMetadataReaderFactory} and configure the
     * {@link ConfigurationClassPostProcessor}.
     */
    private static class CachingMetadataReaderFactoryPostProcessor
            implements BeanDefinitionRegistryPostProcessor, PriorityOrdered {

        @Override
        public int getOrder() {
            // Must happen before the ConfigurationClassPostProcessor is created
            return Ordered.HIGHEST_PRECEDENCE;
        }

        @Override
        public void postProcessBeanFactory(ConfigurableListableBeanFactory beanFactory) throws BeansException {
        }

        @Override
        public void postProcessBeanDefinitionRegistry(BeanDefinitionRegistry registry) throws BeansException {
            register(registry);
            configureConfigurationClassPostProcessor(registry);
        }

        private void register(BeanDefinitionRegistry registry) {
            BeanDefinition definition = BeanDefinitionBuilder
                    .genericBeanDefinition(SharedMetadataReaderFactoryBean.class, SharedMetadataReaderFactoryBean::new)
                    .getBeanDefinition();
            registry.registerBeanDefinition(BEAN_NAME, definition);
        }

        private void configureConfigurationClassPostProcessor(BeanDefinitionRegistry registry) {
            try {
                BeanDefinition definition = registry
                        .getBeanDefinition(AnnotationConfigUtils.CONFIGURATION_ANNOTATION_PROCESSOR_BEAN_NAME);
                definition.getPropertyValues().add("metadataReaderFactory", new RuntimeBeanReference(BEAN_NAME));
            }
            catch (NoSuchBeanDefinitionException ex) {
            }
        }

    }

    /**
     * {@link FactoryBean} to create the shared {@link MetadataReaderFactory}.
     */
    static class SharedMetadataReaderFactoryBean
            implements FactoryBean<ConcurrentReferenceCachingMetadataReaderFactory>, BeanClassLoaderAware,
            ApplicationListener<ContextRefreshedEvent> {

        private ConcurrentReferenceCachingMetadataReaderFactory metadataReaderFactory;

        @Override
        public void setBeanClassLoader(ClassLoader classLoader) {
            this.metadataReaderFactory = new ConcurrentReferenceCachingMetadataReaderFactory(classLoader);
        }

        @Override
        public ConcurrentReferenceCachingMetadataReaderFactory getObject() throws Exception {
            return this.metadataReaderFactory;
        }

        @Override
        public Class<?> getObjectType() {
            return CachingMetadataReaderFactory.class;
        }

        @Override
        public boolean isSingleton() {
            return true;
        }

        @Override
        public void onApplicationEvent(ContextRefreshedEvent event) {
            this.metadataReaderFactory.clearCache();
        }

    }

}
可以看到该类实现了 Spring 的 ApplicationContextInitializer 接口,并重写了initialize()方法。同理,其他的 Initializer 接口也是类似实现。 而在这里则是在上下文中加入了 CachingMetadataReaderFactoryPostProcessor bean工厂后置处理器。
ApplicationContextInitializer接口的主要作用是在 ConfigurableApplicationContext#refresh()方法调用之前做一些初始化工作。
1.4、加载应用事件监听器ApplicationListener
setListeners((Collection) getSpringFactoriesInstances(ApplicationListener.class))
接着加载应用事件监听器 ,过程与“加载应用上下文初始器”基本一致,同样是调用 getSpringFactoriesInstances 方法,不过这里获取的是key为ApplicationListener 的对象集合:

如下是spring-boot-autoconfigure包下的spring.factories文件:
# Application Listeners
org.springframework.context.ApplicationListener=
org.springframework.boot.autoconfigure.BackgroundPreinitializer
最后,将获取的 BackgroundPreinitializer对象通过setListeners方法放入listeners 属性变量中:
    /**
     * Sets the {@link ApplicationListener}s that will be applied to the SpringApplication
     * and registered with the {@link ApplicationContext}.
     * @param listeners the listeners to set
     */
    public void setListeners(Collection<? extends ApplicationListener<?>> listeners) {
        this.listeners = new ArrayList<>(listeners);
    }
我们同样举例,来看看监听器中的内容,如BackgroundPreinitializer:
/*
 * Copyright 2012-2019 the original author or authors.
 *
 * Licensed under the Apache License, Version 2.0 (the "License");
 * you may not use this file except in compliance with the License.
 * You may obtain a copy of the License at
 *
 *      https://www.apache.org/licenses/LICENSE-2.0
 *
 * Unless required by applicable law or agreed to in writing, software
 * distributed under the License is distributed on an "AS IS" BASIS,
 * WITHOUT WARRANTIES OR CONDITIONS OF ANY KIND, either express or implied.
 * See the License for the specific language governing permissions and
 * limitations under the License.
 */

package org.springframework.boot.autoconfigure;

import java.nio.charset.StandardCharsets;
import java.util.concurrent.CountDownLatch;
import java.util.concurrent.atomic.AtomicBoolean;

import javax.validation.Configuration;
import javax.validation.Validation;

import org.springframework.boot.context.event.ApplicationFailedEvent;
import org.springframework.boot.context.event.ApplicationReadyEvent;
import org.springframework.boot.context.event.ApplicationStartingEvent;
import org.springframework.boot.context.event.SpringApplicationEvent;
import org.springframework.boot.context.logging.LoggingApplicationListener;
import org.springframework.context.ApplicationListener;
import org.springframework.core.annotation.Order;
import org.springframework.format.support.DefaultFormattingConversionService;
import org.springframework.http.converter.json.Jackson2ObjectMapperBuilder;
import org.springframework.http.converter.support.AllEncompassingFormHttpMessageConverter;

/**
 * {@link ApplicationListener} to trigger early initialization in a background thread of
 * time consuming tasks.
 * <p>
 * Set the {@link #IGNORE_BACKGROUNDPREINITIALIZER_PROPERTY_NAME} system property to
 * {@code true} to disable this mechanism and let such initialization happen in the
 * foreground.
 *
 * @author Phillip Webb
 * @author Andy Wilkinson
 * @author Artsiom Yudovin
 * @since 1.3.0
 */
@Order(LoggingApplicationListener.DEFAULT_ORDER + 1)
public class BackgroundPreinitializer implements ApplicationListener<SpringApplicationEvent> {

    /**
     * System property that instructs Spring Boot how to run pre initialization. When the
     * property is set to {@code true}, no pre-initialization happens and each item is
     * initialized in the foreground as it needs to. When the property is {@code false}
     * (default), pre initialization runs in a separate thread in the background.
     * @since 2.1.0
     */
    public static final String IGNORE_BACKGROUNDPREINITIALIZER_PROPERTY_NAME = "spring.backgroundpreinitializer.ignore";

    private static final AtomicBoolean preinitializationStarted = new AtomicBoolean(false);

    private static final CountDownLatch preinitializationComplete = new CountDownLatch(1);

    @Override
    public void onApplicationEvent(SpringApplicationEvent event) {
        if (!Boolean.getBoolean(IGNORE_BACKGROUNDPREINITIALIZER_PROPERTY_NAME)
                && event instanceof ApplicationStartingEvent && multipleProcessors()
                && preinitializationStarted.compareAndSet(false, true)) {
            performPreinitialization();
        }
        if ((event instanceof ApplicationReadyEvent || event instanceof ApplicationFailedEvent)
                && preinitializationStarted.get()) {
            try {
                preinitializationComplete.await();
            }
            catch (InterruptedException ex) {
                Thread.currentThread().interrupt();
            }
        }
    }

    private boolean multipleProcessors() {
        return Runtime.getRuntime().availableProcessors() > 1;
    }

    private void performPreinitialization() {
        try {
            Thread thread = new Thread(new Runnable() {

                @Override
                public void run() {
                    runSafely(new ConversionServiceInitializer());
                    runSafely(new ValidationInitializer());
                    runSafely(new MessageConverterInitializer());
                    runSafely(new JacksonInitializer());
                    runSafely(new CharsetInitializer());
                    preinitializationComplete.countDown();
                }

                public void runSafely(Runnable runnable) {
                    try {
                        runnable.run();
                    }
                    catch (Throwable ex) {
                        // Ignore
                    }
                }

            }, "background-preinit");
            thread.start();
        }
        catch (Exception ex) {
            // This will fail on GAE where creating threads is prohibited. We can safely
            // continue but startup will be slightly slower as the initialization will now
            // happen on the main thread.
            preinitializationComplete.countDown();
        }
    }

    /**
     * Early initializer for Spring MessageConverters.
     */
    private static class MessageConverterInitializer implements Runnable {

        @Override
        public void run() {
            new AllEncompassingFormHttpMessageConverter();
        }

    }

    /**
     * Early initializer for javax.validation.
     */
    private static class ValidationInitializer implements Runnable {

        @Override
        public void run() {
            Configuration<?> configuration = Validation.byDefaultProvider().configure();
            configuration.buildValidatorFactory().getValidator();
        }

    }

    /**
     * Early initializer for Jackson.
     */
    private static class JacksonInitializer implements Runnable {

        @Override
        public void run() {
            Jackson2ObjectMapperBuilder.json().build();
        }

    }

    /**
     * Early initializer for Spring's ConversionService.
     */
    private static class ConversionServiceInitializer implements Runnable {

        @Override
        public void run() {
            new DefaultFormattingConversionService();
        }

    }

    private static class CharsetInitializer implements Runnable {

        @Override
        public void run() {
            StandardCharsets.UTF_8.name();
        }

    }

}
可以看到,该类实现了Spring的ApplicationListener 接口,在重写的 onApplicationEvent 方法中触发相应的事件进行操作。同理,其他Listener也是类似实现。而该接口的主要功能是另起一个后台线程触发那些耗时的初始化,包括验证器、消息转换器等等。
1.5、推断应用引导类
// 推断引导类,也就是找到入口类
this.mainApplicationClass = deduceMainApplicationClass();
准备阶段的最后一步是推断应用的引导类,也就是获取启动 main 方法的类,执行的是 deduceMainApplicationClass() 方法:
    private Class<?> deduceMainApplicationClass() {
        try {
            StackTraceElement[] stackTrace = new RuntimeException().getStackTrace();
            for (StackTraceElement stackTraceElement : stackTrace) {
                if ("main".equals(stackTraceElement.getMethodName())) {
                    return Class.forName(stackTraceElement.getClassName());
                }
            }
        }
        catch (ClassNotFoundException ex) {
            // Swallow and continue
        }
        return null;
    }
可以看到,通过 getStackTrace()方法获取当前线程的执行栈,再通过 getMethodName()获取方法名,判断是否是main 方法,最后返回main方法的所在类。

二、SpringApplication运行阶段——事件监听机制
前面我们已经讲了 SpringApplication 的构造方法,这里我们就来讲讲 SpringApplication 的核心,也就是run方法:
public ConfigurableApplicationContext run(String... args) {
        // 这是 Spring 的一个计时器,计算代码的执行时间(ms级别)
        StopWatch stopWatch = new StopWatch();
        stopWatch.start();

        // 这俩变量在后面赋值处进行说明
        ConfigurableApplicationContext context = null;
        Collection<SpringBootExceptionReporter> exceptionReporters = new ArrayList<>();

        // 用来设置java.awt.headless属性值
        configureHeadlessProperty();

        // 该对象属于组合模式的实现,核心是内部关联的 SpringApplicationRunListener 集合,SpringApplicationRunListener 是 Spring Boot 的运行时监听器
        SpringApplicationRunListeners listeners = getRunListeners(args);
        // 会在不同的阶段调用对应的方法,这里表示SpringApplication的run方法刚开始执行
        listeners.starting();

        try {

            // 用来获取 SpringApplication.run(args)传入的参数
            ApplicationArguments applicationArguments = new DefaultApplicationArguments(args);

            // 获取 properties 配置文件
            ConfigurableEnvironment environment = prepareEnvironment(listeners, applicationArguments);

            // 设置 spring.beaninfo.ignore 的属性值,判断是否跳过搜索BeanInfo类
            configureIgnoreBeanInfo(environment);

            // 这里是项目启动时,控制台打印的 Banner
            Banner printedBanner = printBanner(environment);

            // 这里就是创建 Spring 应用上下文
            context = createApplicationContext();

            // 获取 spring.factories 中key为 SpringBootExceptionReporter 的类名集合
            exceptionReporters = getSpringFactoriesInstances(SpringBootExceptionReporter.class,
                    new Class[] { ConfigurableApplicationContext.class }, context);

            // 这里是准备 Spring 应用上下文
            prepareContext(context, environment, listeners, applicationArguments, printedBanner);

            // 这里是启动 Spring 应用上下文,底层调用的是 ApplicationContext 的 refresh() 方法,到这里就正式进入了 Spring 的生命周期,同时,SpringBoot的自动装配特性也随之启动
            refreshContext(context);

            // 里面是空的,猜测应该是交由开发人员自行扩展
            afterRefresh(context, applicationArguments);
            stopWatch.stop();

            // 这里打印启动信息
            if (this.logStartupInfo) {
                new StartupInfoLogger(this.mainApplicationClass).logStarted(getApplicationLog(), stopWatch);
            }

            // ApplicationContext 启动时,调用该方法
            listeners.started(context);

            // 项目启动后,做的一些操作,开发人员可自行扩展
            callRunners(context, applicationArguments);
        }
        catch (Throwable ex) {
            handleRunFailure(context, ex, exceptionReporters, listeners);
            throw new IllegalStateException(ex);
        }

        try {

            // ApplicationContext 启动完成时,调用该方法
            listeners.running(context);
        }
        catch (Throwable ex) {
            handleRunFailure(context, ex, exceptionReporters, null);
            throw new IllegalStateException(ex);
        }
        return context;
    }
在介绍这段代码时,我们先介绍一下监听器模式。
2.1、监听器模式
将一个监听器(listener)与特定的控件(如按钮等)绑定起来,当发生用户点击等事件(Event)时,调用监听器的处理方法,从而响应用户的动作,就叫做事件/监听器模式。
目前spring boot中支持的应用事件类型如下:

- ApplicationFailedEvent:该事件为spring boot启动失败时的操作;
- ApplicationPreparedEvent:上下文context准备时触发;
- ApplicationReadyEvent:上下文已经准备完毕的时候触发;
- ApplicationStartedEvent:spring boot 启动监听类;
- SpringApplicationEvent:获取SpringApplication;
- ApplicationEnvironmentPreparedEvent:环境事先准备;
我们1.4节中介绍的ApplicationListener的实现类就是监听器,当某个应用事件发生的时候,就会调用ApplicationListener的onApplicationEvent 方法;
2.2、SpringApplicationRunListeners结构
 // 该对象属于组合模式的实现,核心是内部关联的 SpringApplicationRunListener 集合,SpringApplicationRunListener 是 Spring Boot 的运行时监听器
 SpringApplicationRunListeners listeners = getRunListeners(args);
我们先来看看 SpringApplicationRunListeners 对象,从代码可以看出该对象是由 getRunListeners 方法创建的:
    private SpringApplicationRunListeners getRunListeners(String[] args) {
        Class<?>[] types = new Class<?>[] { SpringApplication.class, String[].class };
        return new SpringApplicationRunListeners(logger,
                getSpringFactoriesInstances(SpringApplicationRunListener.class, types, this, args));
    }
可以看到,通过传入的 getSpringFactoriesInstances 方法的返回值,执行 SpringApplicationRunListeners 的构造方法,进行对象的创建。
同样是调用 getSpringFactoriesInstances 方法,不过这里获取的是 key 为 SpringApplicationRunListener 的对象集合.

最后,就是将该集合传入 SpringApplicationRunListeners 的构造方法:
/**
 * A collection of {@link SpringApplicationRunListener}.
 *
 * @author Phillip Webb
 */
class SpringApplicationRunListeners {

    private final Log log;

    private final List<SpringApplicationRunListener> listeners;

    SpringApplicationRunListeners(Log log, Collection<? extends SpringApplicationRunListener> listeners) {
        this.log = log;
        this.listeners = new ArrayList<>(listeners);
    }

    void starting() {
        for (SpringApplicationRunListener listener : this.listeners) {
            listener.starting();
        }
    }
      ...
}
里面是将集合赋值到 listeners 属性,可以看到 SpringApplicationRunListeners 属于组合模式的实现,核心其实是内部关联的 SpringApplicationRunListener 对象集合,当外部调用该阶段方法时,就会迭代执行集合中 SpringApplicationRunListener 对应的方法。所以接下来我们就来讨论 SpringApplicationRunListener。
2.3、监听器触发机制
SpringApplicationRunListener 负责在 SpringBoot 的不同阶段广播相应的事件,然后调用实际的 ApplicationListener 类,在该类的 onApplicationEvent 方法中,根据不同的 Spring Boot 事件执行相应操作。整个过程大概如此:

接下来进行详细讨论,先来看看 SpringApplicationRunListener 定义:
public interface SpringApplicationRunListener {

    // 在run()方法开始执行时被调用,表示应用刚刚启动,对应的 Spring Boot 事件为 ApplicationStartingEvent
    void starting();

    // ConfigurableEnvironment 构建完成时调用,对应的 Spring Boot 事件为 ApplicationEnvironmentPreparedEvent
    void environmentPrepared(ConfigurableEnvironment environment);

    // ApplicationContext 构建完成时调用,对应的 Spring Boot 事件为 ApplicationContextInitializedEvent
    void contextPrepared(ConfigurableApplicationContext context);

    // ApplicationContext 完成加载但还未启动时调用,对应的 Spring Boot 事件为 ApplicationPreparedEvent
    void contextLoaded(ConfigurableApplicationContext context);

    // ApplicationContext 已启动,但 callRunners 还未执行时调用,对应的 Spring Boot 事件为 ApplicationStartedEvent
    void started(ConfigurableApplicationContext context);

    // ApplicationContext 启动完毕被调用,对应的 Spring Boot 事件为 ApplicationReadyEvent
    void running(ConfigurableApplicationContext context);

    // 应用出错时被调用,对应的 Spring Boot 事件为 ApplicationFailedEvent
    void failed(ConfigurableApplicationContext context, Throwable exception);

}
我们来看看它的实现类,也就是上面加载的 spring.factories 文件中的 EventPublishingRunListener 类,该类也是 Spring Boot 内建的唯一实现类,具体广播事件的操作在该类中进行,代码如下:
public class EventPublishingRunListener implements SpringApplicationRunListener, Ordered {

    private final SpringApplication application;

    private final String[] args;

    private final SimpleApplicationEventMulticaster initialMulticaster;

    public EventPublishingRunListener(SpringApplication application, String[] args) {
        this.application = application;
        this.args = args;
        this.initialMulticaster = new SimpleApplicationEventMulticaster();
        for (ApplicationListener<?> listener : application.getListeners()) {
            //添加ApplicationListener监听器
            this.initialMulticaster.addApplicationListener(listener);
        }
    }

    @Override
    public void starting() {
        //调用广播器来触发事件
        this.initialMulticaster.multicastEvent(new ApplicationStartingEvent(this.application, this.args));
    }

    ...

}
可以看到,通过构造方法创建 EventPublishingRunListener 实例的过程中,调用了 getListeners 方法,将 SpringApplication 中所有 ApplicationListener 监听器关联到了 initialMulticaster 属性中。没错,这里的 ApplicationListener 监听器就是在 SpringApplication 准备阶段从 spring.factories 文件加载的 key 为 ApplicationListener 的实现类集合,该实现类集合全部重写了 onApplicationEvent 方法。
2.4、SimpleApplicationEventMulticaster 广播器
这里又引出了另一个类, 也就是 SimpleApplicationEventMulticaster ,该类是 Spring 的事件广播器,也就是通过它来广播各种事件。接着,当外部迭代的执行到 EventPublishingRunListener 的 starting 方法时,会通过 SimpleApplicationEventMulticaster 的 multicastEvent 方法进行事件的广播,这里广播的是 ApplicationStartingEvent 事件,我们进入 multicastEvent 方法:
public class SimpleApplicationEventMulticaster extends AbstractApplicationEventMulticaster {

    ...

    @Override
    public void multicastEvent(ApplicationEvent event) {
        multicastEvent(event, resolveDefaultEventType(event));
    }

    @Override
    public void multicastEvent(final ApplicationEvent event, @Nullable ResolvableType eventType) {
        ResolvableType type = (eventType != null ? eventType : resolveDefaultEventType(event));
        //获取线程池
        Executor executor = getTaskExecutor();
        //获取对当前事件感兴趣的监听器列表
        for (ApplicationListener<?> listener : getApplicationListeners(event, type)) {
            if (executor != null) {
                executor.execute(() -> invokeListener(listener, event));
            }
            else {
                invokeListener(listener, event);
            }
        }
    }
}
通过 getApplicationListeners 方法,根据事件类型返回从上面关联的 ApplicationListener 集合中筛选出匹配的 ApplicationListener 集合:

然后依次遍历这些监听器,同步或异步的调用 invokeListener 方法:
/**
     * Invoke the given listener with the given event.
     * @param listener the ApplicationListener to invoke
     * @param event the current event to propagate
     * @since 4.1
     */
    protected void invokeListener(ApplicationListener<?> listener, ApplicationEvent event) {
        ErrorHandler errorHandler = getErrorHandler();
        if (errorHandler != null) {
            try {
                doInvokeListener(listener, event);
            }
            catch (Throwable err) {
                errorHandler.handleError(err);
            }
        }
        else {
            doInvokeListener(listener, event);
        }
    }

    @SuppressWarnings({"rawtypes", "unchecked"})
    private void doInvokeListener(ApplicationListener listener, ApplicationEvent event) {
        try {
            listener.onApplicationEvent(event);
        }
        catch (ClassCastException ex) {
            String msg = ex.getMessage();
            if (msg == null || matchesClassCastMessage(msg, event.getClass())) {
                // Possibly a lambda-defined listener which we could not resolve the generic event type for
                // -> let's suppress the exception and just log a debug message.
                Log logger = LogFactory.getLog(getClass());
                if (logger.isTraceEnabled()) {
                    logger.trace("Non-matching event type for listener: " + listener, ex);
                }
            }
            else {
                throw ex;
            }
        }
    }
可以看到,最终调用的是 doInvokeListener 方法,在该方法中执行了 ApplicationListener 的 onApplicationEvent 方法,入参为广播的事件对象。我们就拿其中一个的监听器来看看 onApplicationEvent 中的实现,如 BackgroundPreinitializer 类:
public class BackgroundPreinitializer implements ApplicationListener<SpringApplicationEvent> {

    ...

    @Override
    public void onApplicationEvent(SpringApplicationEvent event) {
        if (!Boolean.getBoolean(IGNORE_BACKGROUNDPREINITIALIZER_PROPERTY_NAME)
                && event instanceof ApplicationStartingEvent && preinitializationStarted.compareAndSet(false, true)) {
            performPreinitialization();
        }
        if ((event instanceof ApplicationReadyEvent || event instanceof ApplicationFailedEvent)
                && preinitializationStarted.get()) {
            try {
                preinitializationComplete.await();
            }
            catch (InterruptedException ex) {
                Thread.currentThread().interrupt();
            }
        }
    }

    ...
}
在该方法中,通过 instanceof 判断事件的类型,从而进行相应的操作。该监听器主要的操作是新建一个后台线程去执行那些耗时的初始化工作,包括验证器、消息转换器等。LoggingApplicationListener 监听器则是对 Spring Boot 的日志系统做一些初始化的前置操作。另外两个监听器在该阶段无任何操作。 至此,SpringBoot 事件机制的整体流程大概如此,我们简要回顾一下几个核心组件:
- SpringApplicationRunListeners:首先,在SpringApplication的run 方法的执行过程中,通过该类在 Spring Boot 不同的阶段调用不同的阶段方法,如在刚启动阶段调用的 starting 方法。
- SpringApplicationRunListener:而 SpringApplicationRunListeners 属于组合模式的实现,它里面关联了 SpringApplicationRunListener 实现类集合,当外部调用阶段方法时,会迭代执行该集合中的阶段方法。实现类集合是 spring.factories 文件中定义好的类。
- EventPublishingRunListener:该类是 Spring Boot 内置的 SpringApplicationRunListener 唯一实现类,所以,当外部调用各阶段的方法时,真正执行的是该类中的方法。
- SimpleApplicationEventMulticaster:在阶段方法中,会通过 Spring 的 SimpleApplicationEventMulticaster 事件广播器,广播各个阶段对应的事件,如这里的 starting 方法广播的事件是 ApplicationStartingEvent。
- ApplicationListener:最后 ApplicationListener 的实现类也就是 Spring Boot 监听器会监听到广播的事件,根据不同的事件,进行相应的操作。
到这里 Spring Boot 事件监听机制差不多就结束了,值得注意的是 Spring Boot 监听器实现的是 Spring 的 ApplicationListener 类,事件类最终继承的也是 Spring 的 ApplicationEvent 类,所以,Spring Boot 的事件和监听机制都基于 Spring 而实现的。
三、SpringApplication运行阶段——加载启动参数
当执行完 listeners.starting 方法后,接着进入构造 ApplicationArguments 阶段:
ApplicationArguments applicationArguments = new DefaultApplicationArguments(args);
该类是用于简化 Spring Boot 应用启动参数的封装接口,我们启动项目时输入的命令参数会封装在该类中。一种是通过 IDEA 输入的参数,如下:

另一种是 springboot jar包运行时传递的参数: cmd中运行java -jar xxx.jar name=张三 pwa=123 。
然后,可以通过 @Autowired 注入 ApplicationArguments 的方式进行使用:
public class Test {

    @Autowired
    private ApplicationArguments applicationArguments;

    public void getArgs() {
        // 获取 args 中的所有 non option 参数
        applicationArguments.getNonOptionArgs();

        // 获取 args 中所有的 option 参数的 name
        applicationArguments.getOptionNames();

        // 获取传递给应用程序的原始未处理参数
        applicationArguments.getSourceArgs();

        // 获取 args 中指定 name 的 option 参数的值
        applicationArguments.getOptionValues("name");

        // 判断从参数中解析的 option 参数是否包含指定名称的选项
        applicationArguments.containsOption("name");
    }
}
四、SpringApplication运行阶段——加载外部化配置的资源文件
在介绍加载外部化配置资源文件之前,我们先来介绍一下外部化配置的资源类型有哪些。
4.1、外部化配置的资源类型
除了在项目中我们常常用到的properties、YAML文件外,还有环境变量、系统属性、启动参数等。所有的资源类型将近二十种,这里只介绍比较熟悉的:
- properties:文件是以.properties为后缀,文件中的数据以key-value格式保存;
- yaml:文件是以.yml为后缀,文件中的数据以key-value格式保存;
- 环境变量:这是通过 System.getenv() 方式获取的默认配置,也是key value格式,下面列出部分配置,其它的还请自行了解,如下:
|
名称 | Key |
|---|---|
| Java安装目录 | JAVA_HOME |
| classpath环境变量 | CLASSPATH |
| 用户临时文件目录 | TEMP |
| 计算机名 | COMPUTERNAME |
| 用户名 | USERNAME |
- 系统属性:这是通过 System.getProperties() 方式获取的默认配置,也是key value格式,下面列出部分配置,其它的还请自行了解,如下:
| 名称 | key |
| 运行时环境版本 | java.version Java |
| Java安装目录 | java.home |
| 要使用的 JIT编译器的名称 | java.compiler |
| 操作系统的架构 | os.arch |
| 操作系统的版本 | os.version |
- 启动参数:就是我们上面介绍到的,一种是在 jar 包运行时行时传递的参数,如:java -jar xxx.jar name=张三 pwa=123 ,还有一种是在 IDEA 的 Program arguments 中输入数据。
可以看到,外部化配置中的数据都是key value 格式。这里还要注意它们的加载顺序,当key相同时,会出现覆盖的情况。
接下来,我们的重心来围绕 properties 和 YAML 配置文件,这两者也是我们日常工作中常用的。首先来看取值方式,在 Spring 时代有 Environment 、 @Value 、 XML 三种方式,在 Spring Boot 时代则是 @ConfigurationProperties 方式。其中,涉及到了一个核心类,它就是 Environment ,该对象不仅可以获取所有的外部化配置数据,就连另外几种取值方式的数据来源也是从该类中获取。这里,主要对 Environment 和 @ConfigurationProperties 进行详细讨论。
外部化配置的资源类型已经介绍的差不多了,我们继续回归到SpringApplication的run方法的分析中。
4.2、Environment
接着进入构造 ConfigurableEnvironment 的阶段,该类是用来处理我们外部化配置的:
public class SpringApplication {

    ...

    public ConfigurableApplicationContext run(String... args) {
        ...

        try {
            ...

            ConfigurableEnvironment environment = prepareEnvironment(listeners, applicationArguments);

        ...

    }
    ...
}
在 SpringApplication 运行阶段的 run 方法中通过 prepareEnvironment 方法了创建 ConfigurableEnvironment 的实现类对象,ConfigurableEnvironment 是一个接口,且继承了 Environment 。进入创建方法:
    private ConfigurableEnvironment prepareEnvironment(SpringApplicationRunListeners listeners,
            ApplicationArguments applicationArguments) {
        // Create and configure the environment
        ConfigurableEnvironment environment = getOrCreateEnvironment();
        configureEnvironment(environment, applicationArguments.getSourceArgs());
        ConfigurationPropertySources.attach(environment);
        listeners.environmentPrepared(environment);
        bindToSpringApplication(environment);
        if (!this.isCustomEnvironment) {
            environment = new EnvironmentConverter(getClassLoader()).convertEnvironmentIfNecessary(environment,
                    deduceEnvironmentClass());
        }
        ConfigurationPropertySources.attach(environment);
        return environment;
    }
这里通过 getOrCreateEnvironment 方法返回具体的 Environment:
private ConfigurableEnvironment getOrCreateEnvironment() {
        if (this.environment != null) {
            return this.environment;
        }
        switch (this.webApplicationType) {
        case SERVLET:
            return new StandardServletEnvironment();
        case REACTIVE:
            return new StandardReactiveWebEnvironment();
        default:
            return new StandardEnvironment();
        }
    }
可以看到,这里通过 webApplicationType 属性来判断当前应用的类型,有 Servlet 、 Reactive 、 非Web 3种类型,该属性是在SpringApplication 准备阶段确定的,这里我们通常都是 Servlet 类型,返回的是 StandardServletEnvironment 实例。
public class StandardServletEnvironment extends StandardEnvironment implements ConfigurableWebEnvironment {

    /** Servlet context init parameters property source name: {@value}. */
    public static final String SERVLET_CONTEXT_PROPERTY_SOURCE_NAME = "servletContextInitParams";

    /** Servlet config init parameters property source name: {@value}. */
    public static final String SERVLET_CONFIG_PROPERTY_SOURCE_NAME = "servletConfigInitParams";

    /** JNDI property source name: {@value}. */
    public static final String JNDI_PROPERTY_SOURCE_NAME = "jndiProperties";


    /**
     * Customize the set of property sources with those contributed by superclasses as
     * well as those appropriate for standard servlet-based environments:
     * <ul>
     * <li>{@value #SERVLET_CONFIG_PROPERTY_SOURCE_NAME}
     * <li>{@value #SERVLET_CONTEXT_PROPERTY_SOURCE_NAME}
     * <li>{@value #JNDI_PROPERTY_SOURCE_NAME}
     * </ul>
     * <p>Properties present in {@value #SERVLET_CONFIG_PROPERTY_SOURCE_NAME} will
     * take precedence over those in {@value #SERVLET_CONTEXT_PROPERTY_SOURCE_NAME}, and
     * properties found in either of the above take precedence over those found in
     * {@value #JNDI_PROPERTY_SOURCE_NAME}.
     * <p>Properties in any of the above will take precedence over system properties and
     * environment variables contributed by the {@link StandardEnvironment} superclass.
     * <p>The {@code Servlet}-related property sources are added as
     * {@link StubPropertySource stubs} at this stage, and will be
     * {@linkplain #initPropertySources(ServletContext, ServletConfig) fully initialized}
     * once the actual {@link ServletContext} object becomes available.
     * @see StandardEnvironment#customizePropertySources
     * @see org.springframework.core.env.AbstractEnvironment#customizePropertySources
     * @see ServletConfigPropertySource
     * @see ServletContextPropertySource
     * @see org.springframework.jndi.JndiPropertySource
     * @see org.springframework.context.support.AbstractApplicationContext#initPropertySources
     * @see #initPropertySources(ServletContext, ServletConfig)
     */
    @Override
    protected void customizePropertySources(MutablePropertySources propertySources) {
        propertySources.addLast(new StubPropertySource(SERVLET_CONFIG_PROPERTY_SOURCE_NAME));
        propertySources.addLast(new StubPropertySource(SERVLET_CONTEXT_PROPERTY_SOURCE_NAME));
        if (JndiLocatorDelegate.isDefaultJndiEnvironmentAvailable()) {
            propertySources.addLast(new JndiPropertySource(JNDI_PROPERTY_SOURCE_NAME));
        }
        super.customizePropertySources(propertySources);
    }

    @Override
    public void initPropertySources(@Nullable ServletContext servletContext, @Nullable ServletConfig servletConfig) {
        WebApplicationContextUtils.initServletPropertySources(getPropertySources(), servletContext, servletConfig);
    }

}
而该类又继承了 StandardEnvironment 类。且重写了 customizePropertySources 方法,并调用了父类的 customizePropertySources 方法。我们继续往下深入:
public class StandardEnvironment extends AbstractEnvironment {

    /** System environment property source name: {@value}. */
    public static final String SYSTEM_ENVIRONMENT_PROPERTY_SOURCE_NAME = "systemEnvironment";

    /** JVM system properties property source name: {@value}. */
    public static final String SYSTEM_PROPERTIES_PROPERTY_SOURCE_NAME = "systemProperties";


    /**
     * Customize the set of property sources with those appropriate for any standard
     * Java environment:
     * <ul>
     * <li>{@value #SYSTEM_PROPERTIES_PROPERTY_SOURCE_NAME}
     * <li>{@value #SYSTEM_ENVIRONMENT_PROPERTY_SOURCE_NAME}
     * </ul>
     * <p>Properties present in {@value #SYSTEM_PROPERTIES_PROPERTY_SOURCE_NAME} will
     * take precedence over those in {@value #SYSTEM_ENVIRONMENT_PROPERTY_SOURCE_NAME}.
     * @see AbstractEnvironment#customizePropertySources(MutablePropertySources)
     * @see #getSystemProperties()
     * @see #getSystemEnvironment()
     */
    @Override
    protected void customizePropertySources(MutablePropertySources propertySources) {
        propertySources.addLast(
                new PropertiesPropertySource(SYSTEM_PROPERTIES_PROPERTY_SOURCE_NAME, getSystemProperties()));
        propertySources.addLast(
                new SystemEnvironmentPropertySource(SYSTEM_ENVIRONMENT_PROPERTY_SOURCE_NAME, getSystemEnvironment()));
    }

}
继续看它的 AbstractEnvironment 父抽象类:
public abstract class AbstractEnvironment implements ConfigurableEnvironment {

    ...

    private final MutablePropertySources propertySources = new MutablePropertySources();

    ...

    public AbstractEnvironment() {
        customizePropertySources(this.propertySources);
    }
    ...
}
可以看到,最终会有一个 AbstractEnvironment 抽象类。在 StandardServletEnvironment 初始化时,会调用 AbstractEnvironment 的构造方法,里面调用了子类重写的 customizePropertySources 方法,且入参是 MutablePropertySources 对象,该对象是 Environment 的一个属性,是底层真正存储外部化配置的。之后, StandardServletEnvironment 和 StandardEnvironment 的 customizePropertySources 方法相继执行,主要是往 MutablePropertySources 对象中添加外部化配置。其中我们前面所说的环境变量和系统属性是在 StandardEnvironment 重写的方法中进行加载。
我们回到外面的 prepareEnvironment 方法,继续往下走。接着执行的是 configureEnvironment 方法,该方法主要是把启动参数加入到 MutablePropertySources 中。之后,我们断点看看有多少种外部化配置:
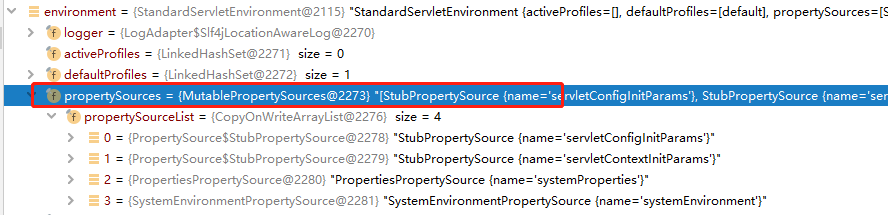
有四种,且真正存储数据的是 MutablePropertySources 中的 PropertySource 实现类集合。
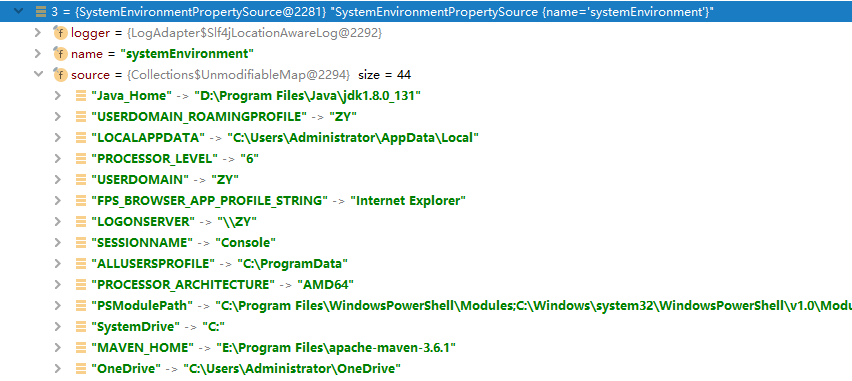
这里简要介绍一下 PropertySource ,我们将其称之为配置源,官方定义它是外部化配置的API描述方式,是外部化配置的一个媒介。 用我们的话来说,它是一个抽象类,提供了统一存储外部化配置数据的功能,而每种外部化配置有具体的实现类,主要提供不同的基础操作,如 get、contains 等 。我们来看看 PropertySource 对象的数据格式,一般包含:
- name : 外部化配置的名称;
- source : 存储配置中的数据,底层一般数据格式都是key value;
以环境变量为例:
之后,还调用了 SpringApplicationRunListeners 的 environmentPrepared 阶段方法,表示 ConfigurableEnvironment 构建完成:
class SpringApplicationRunListeners {

    ...

    private final List<SpringApplicationRunListener> listeners;

    public void environmentPrepared(ConfigurableEnvironment environment) {
        for (SpringApplicationRunListener listener : this.listeners) {
            listener.environmentPrepared(environment);
        }
    }
    ...
}
真正调用的是 SpringApplicationRunListener 集合中的 environmentPrepared 方法。 SpringApplicationRunListener 是一个接口,它具有唯一实现类 EventPublishingRunListener :
public class EventPublishingRunListener implements SpringApplicationRunListener, Ordered {

    ...

    private final SimpleApplicationEventMulticaster initialMulticaster;

    @Override
    public void environmentPrepared(ConfigurableEnvironment environment) {
        this.initialMulticaster
                .multicastEvent(new ApplicationEnvironmentPreparedEvent(this.application, this.args, environment));
    }
    ...
}
可以看到,最终通过 SimpleApplicationEventMulticaster 的 multicastEvent 方法发布 ApplicationEnvironmentPreparedEvent 事件。 执行调监听器的 onApplicationEvent 方法。监听该事件的监听器有:

其中一个名为 ConfigFileApplicationListener 的监听器,监听到该事件后会进行加载 application 和 YAML 配置文件的操作,接下来,我们具体的来看一看该类实现。
4.3、ConfigFileApplicationListener
我们直接进入该类:
public class ConfigFileApplicationListener implements EnvironmentPostProcessor, SmartApplicationListener, Ordered {

    ...

    private static final String DEFAULT_SEARCH_LOCATIONS = "classpath:/,classpath:/config/,file:./,file:./config/";

    public static final String CONFIG_NAME_PROPERTY = "spring.config.name";

    public static final String CONFIG_LOCATION_PROPERTY = "spring.config.location";

    public static final String CONFIG_ADDITIONAL_LOCATION_PROPERTY = "spring.config.additional-location";

    private static final String DEFAULT_NAMES = "application";

    @Override
    public void onApplicationEvent(ApplicationEvent event) {
        // 1、通过 instanceof 判断事件的类型,如果是 ApplicationEnvironmentPreparedEvent 事件,则执行 onApplicationEnvironmentPreparedEvent 方法
        if (event instanceof ApplicationEnvironmentPreparedEvent) {
            onApplicationEnvironmentPreparedEvent((ApplicationEnvironmentPreparedEvent) event);
        }
        ...
    }

    private void onApplicationEnvironmentPreparedEvent(ApplicationEnvironmentPreparedEvent event) {
        // 2、调用 loadPostProcessors 方法,返回 Environment 的后置处理器集合,我们跳到 2.1 查看方法实现
        List<EnvironmentPostProcessor> postProcessors = loadPostProcessors();

        // 2.2、把自己也加入该集合
        postProcessors.add(this);
        AnnotationAwareOrderComparator.sort(postProcessors);

        // 2.3、遍历 EnvironmentPostProcessor 集合,执行它们的 postProcessEnvironment 方法,我们跳到 3 查看当前类的该方法实现
        for (EnvironmentPostProcessor postProcessor : postProcessors) {
            postProcessor.postProcessEnvironment(event.getEnvironment(), event.getSpringApplication());
        }
    }

    // 2.1 是我们比较熟悉的 loadFactories 方法,loadFactories 方法是从 spring.factories 文件中加载 key 为 EnvironmentPostProcessor 的实现类集合
    List<EnvironmentPostProcessor> loadPostProcessors() {
        return SpringFactoriesLoader.loadFactories(EnvironmentPostProcessor.class, getClass().getClassLoader());
    }

    // 3、 执行到该方法时,会调用 addPropertySources 方法,入参是上文加载 ConfigurableEnvironment 对象
    @Override
    public void postProcessEnvironment(ConfigurableEnvironment environment, SpringApplication application) {
        addPropertySources(environment, application.getResourceLoader());
    }

    protected void addPropertySources(ConfigurableEnvironment environment, ResourceLoader resourceLoader) {
        RandomValuePropertySource.addToEnvironment(environment);

        // 4、 我们主要关注这里,通过 Loader 的构造方法创建该对象,并调用它的 load 方法
        new Loader(environment, resourceLoader).load();
    }

    private class Loader {

        private final ConfigurableEnvironment environment;

        private final List<PropertySourceLoader> propertySourceLoaders;

        // 4.1、 构造方法中会初始化一些属性
        Loader(ConfigurableEnvironment environment, ResourceLoader resourceLoader) {
            ...
            this.environment = environment;

            // 又是我们比较熟悉的 loadFactories 方法, loadFactories 方法是从 spring.factories 文件中加载 key 为 PropertySourceLoader 的实现类集合。这里加载的是 PropertiesPropertySourceLoader 和 YamlPropertySourceLoader 两个实现类,看类名可初步断定是处理 properties 和 YAML 文件的
            this.propertySourceLoaders = SpringFactoriesLoader.loadFactories(PropertySourceLoader.class,getClass().getClassLoader());
        }

        public void load() {
            ...
            // 5、这里会继续调用它重载的 load 方法
            load(null, this::getNegativeProfileFilter, addToLoaded(MutablePropertySources::addFirst, true));
            ...

            // 9、这是最后一步,将当前类中的 MutablePropertySources 中的 PropertySource 对象,全部塞到 ConfigurableEnvironment 的 MutablePropertySources 对象中。我们跳到 9.1 进行查看
            addLoadedPropertySources();
        }

        private void load(Profile profile, DocumentFilterFactory filterFactory, DocumentConsumer consumer) {

            // 5.1、首先执行 getSearchLocations 方法,看方法名大致能猜出是获取搜索路径的,我们跳到 5.1.1 查看该方法的实现
            getSearchLocations().forEach((location) -> {

                // 5.2、开始遍历该集合,先判断该路径是否是以反斜杠结尾,是的话则该路径为文件夹;不是的话,则该路径为文件的完整路径,类似于 classPath:/application.properties
                boolean isFolder = location.endsWith("/");

                // 5.3、 如果是文件夹路径,则通过 getSearchNames 获取文件的名称,不是则返回空集合,我们跳到 5.3.1 查看 getSearchNames 方法
                Set<String> names = isFolder ? getSearchNames() : NO_SEARCH_NAMES;

                // 5.4、再调用 load 的重载方法,这里,location 是路径名,name是文件名,我们跳到 6 进行查看
                names.forEach((name) -> load(location, name, profile, filterFactory, consumer));
            });
        }

        // 5.1.1、这个方法就是获取加载 application 和 YAML 文件路径的
        private Set<String> getSearchLocations() {

            //  可以看到 CONFIG_LOCATION_PROPERTY 的值为 spring.config.location,也就是说,先判断我们有没有手动设置搜索路径,有的话直接返回该路径。该值一般通过启动参数的方式设置
            if (this.environment.containsProperty(CONFIG_LOCATION_PROPERTY)) {
                return getSearchLocations(CONFIG_LOCATION_PROPERTY);
            }

            // 该 CONFIG_ADDITIONAL_LOCATION_PROPERTY 变量的值为 spring.config.additional-location,这也是用于手动设置搜索路径,不过和上面不同的是,不会覆盖 接下来默认的搜索路径
            Set<String> locations = getSearchLocations(CONFIG_ADDITIONAL_LOCATION_PROPERTY);

            // 这里就是获取默认的搜索路径,通过 DEFAULT_SEARCH_LOCATIONS 变量的值 classpath:/,classpath:/config/,file:./,file:./config/,将该值用逗号分隔,加入集合并返回。到这一步,我们至少获取到了4个加载 application 和 YAML 文件的路径
            locations.addAll(asResolvedSet(ConfigFileApplicationListener.this.searchLocations, DEFAULT_SEARCH_LOCATIONS));
            return locations;
        }

        // 5.3.1
        private Set<String> getSearchNames() {

            // CONFIG_LOCATION_PROPERTY 变量值为 spring.config.name ,同样先判断有没有手动设置文件名称,有的话,直接返回
            if (this.environment.containsProperty(CONFIG_NAME_PROPERTY)) {
                String property = this.environment.getProperty(CONFIG_NAME_PROPERTY);
                return asResolvedSet(property, null);
            }

            // 如果没有,则通过 DEFAULT_NAMES 变量值返回默认的文件名,变量值为 application
            return asResolvedSet(ConfigFileApplicationListener.this.names, DEFAULT_NAMES);
        }

        // 6、
        private void load(String location, String name, Profile profile, DocumentFilterFactory filterFactory,
                DocumentConsumer consumer) {

            // 6.1、 上面 5.2 说过 name 为空时,表示 location 是完整的文件路径。之后进入这个 if
            if (!StringUtils.hasText(name)) {

                // 6.1.1、propertySourceLoaders 属性是在 4.1 处被初始化的,存储的是 PropertiesPropertySourceLoader 和 YamlPropertySourceLoader 两个类。这里对这两个类进行遍历
                for (PropertySourceLoader loader : this.propertySourceLoaders) {

                    // 我们跳到 6.1.2 查看 canLoadFileExtension 方法实现,入参 location 是文件的完整路径
                    if (canLoadFileExtension(loader, location)) {

                        // 这里又是一个 load 重载方法,我们跳到 7 进行查看
                        load(loader, location, profile, filterFactory.getDocumentFilter(profile), consumer);
                        return;
                    }
                }
            }
            Set<String> processed = new HashSet<>();
            for (PropertySourceLoader loader : this.propertySourceLoaders) {

                // 6.2 这里和 6.1.3 类似,获取文件扩展名
                for (String fileExtension : loader.getFileExtensions()) {
                    if (processed.add(fileExtension)) {

                        // 进入 6.3、查看该方法实现。关注重点的两个参数:一个是路径名 + 文件名,还有一个 “.” +文件扩展名
                        loadForFileExtension(loader, location + name, "." + fileExtension, profile, filterFactory,
                                consumer);
                    }
                }
            }
        }

        // 6.1.2、 该方法作用是 判断 name 完整路径名是否以指定的文件扩展名结尾
        private boolean canLoadFileExtension(PropertySourceLoader loader, String name) {

            // 6.1.3、调用 PropertySourceLoader 的 getFileExtensions 方法。当你的实现类是 PropertiesPropertySourceLoader 时,该方法返回 properties、xml;如果是 YamlPropertySourceLoader 则返回 yml、yaml。从这里可以看出,能被处理的文件格式有这四种
            return Arrays.stream(loader.getFileExtensions())
                    .anyMatch((fileExtension) -> StringUtils.endsWithIgnoreCase(name, fileExtension));
        }

        // 6.3 到了这里,prefix 和 fileExtension 都是进行拼接好的值,如 prefix = classpath:/applicarion,fileExtension = .properties
        private void loadForFileExtension(PropertySourceLoader loader, String prefix, String fileExtension,
                Profile profile, DocumentFilterFactory filterFactory, DocumentConsumer consumer) {

            ...

            // 这里同样调用节点 7 的重载方法,通过 prefix + fileExtension 形成完整的文件路径名,通过入参进行传递。如 classpath:/applicarion.properties
            load(loader, prefix + fileExtension, profile, profileFilter, consumer);
        }

        // 7、
        private void load(PropertySourceLoader loader, String location, Profile profile, DocumentFilter filter,
                DocumentConsumer consumer) {
            try {

                // 这里调用 ResourceLoader 的 getResource 方法,通过 location 文件路径,读取获取该文件资源,之后就好办了
                Resource resource = this.resourceLoader.getResource(location);

                ...

                // 具体解析在过程 loadDocuments 中,这里就不继续跟踪了,大致是以流的方式解析文件。解析之后会生成一个 PropertySource 对象,该对象在上面说过,表示一个外部化配置源对象,存储配置中的数据。之后,会将该对象封装到 Document 中
                List<Document> documents = loadDocuments(loader, name, resource);

                ...

                if (!loaded.isEmpty()) {

                    // 遍历 documents 集合,当执行 consumer.accept 时会进入 addToLoaded 方法,这是 Java8 的写法。consumer 对象参数来自节点 5 。我们跳到 8 查看 addToLoaded 实现
                    loaded.forEach((document) -> consumer.accept(profile, document));
                    if (this.logger.isDebugEnabled()) {
                        StringBuilder description = getDescription("Loaded config file ", location, resource, profile);
                        this.logger.debug(description);
                    }
                }
            }
            catch (Exception ex) {
                throw new IllegalStateException("Failed to load property " + "source from location '" + location + "'",
                        ex);
            }
        }

        // 8、BiConsumer 是 JAVA8 的函数接口,表示定义一个带有两个参数且不返回结果的操作,通过节点 5 我们知道,这个操作是 MutablePropertySources::addFirst 。
        private DocumentConsumer addToLoaded(BiConsumer<MutablePropertySources, PropertySource<?>> addMethod,
                boolean checkForExisting) {
            return (profile, document) -> {
                if (checkForExisting) {
                    for (MutablePropertySources merged : this.loaded.values()) {
                        if (merged.contains(document.getPropertySource().getName())) {
                            return;
                        }
                    }
                }
                MutablePropertySources merged = this.loaded.computeIfAbsent(profile,
                        (k) -> new MutablePropertySources());

                // 当调用 BiConsumer 的 accept 方法时,定义的操作会执行,两个入参分别是 MutablePropertySources 对象和配置文件源对象 PropertySource。该操作会调用 MutablePropertySources 的 addFirst 方法把该配置文件源对象添加至其中。最后我们去看看前面 load 方法中的最后一步 9
                addMethod.accept(merged, document.getPropertySource());
            };
        }

        // 9.1
        private void addLoadedPropertySources() {

            // 获取当前上下文环境中的 MutablePropertySources 对象
            MutablePropertySources destination = this.environment.getPropertySources();

            // 获取当前类中的 MutablePropertySources 集合
            List<MutablePropertySources> loaded = new ArrayList<>(this.loaded.values());
            Collections.reverse(loaded);
            String lastAdded = null;
            Set<String> added = new HashSet<>();

            // 遍历 loaded 集合及其中所有的 PropertySource ,也就是 application 或 YAML 配置文件源对象
            for (MutablePropertySources sources : loaded) {
                for (PropertySource<?> source : sources) {
                    if (added.add(source.getName())) {

                        // 我们进入 9.2 查看该方法,主要参数是上下文环境中的 MutablePropertySources 对象和配置文件源对象
                        addLoadedPropertySource(destination, lastAdded, source);
                        lastAdded = source.getName();
                    }
                }
            }
        }

        // 9.2
        private void addLoadedPropertySource(Mutab lePropertySources destination, String lastAdded,
                PropertySource<?> source) {
            if (lastAdded == null) {
                if (destination.contains(DEFAULT_PROPERTIES)) {
                    destination.addBefore(DEFAULT_PROPERTIES, source);
                }
                else {
                    destination.addLast(source);
                }
            }
            else {

                // 最后通过将 source 添加到 environment 中的 MutablePropertySources 对象中。
                destination.addAfter(lastAdded, source);
            }
        }

        // 至此,properties 和 YAML 配置文件就被加载到了上下文环境共享的 Environment 中,之后如 @Value 等获取值都是从该对象中获取
    }
}
可以看到,ConfigFileApplicationListener 主要功能就是将 properties 和 YAML 文件加载到 Environment 中。另外还存在一个 @PropertySource 注解,也是加载指定的配置文件到 Environment 中。
我们回到最外面的 prepareEnvironment 方法,来看看执行完监听方法时 ConfigurableEnvironment 中加载了多少种外部化配置:

有九种,包括新增的properties、yml文件。至此, Environment 的创建过程及加载外部化配置的过程就到这里结束,我们简要回顾一下该流程:
- 首先 Environment 是一个较为特殊的类,术语称之为应用运行时的环境。它存储了所有的外部化配置,可以通过它获取任意配置数据,并且 @Value、 @ConfigurationProperties 等其它获取配置数据的方式都依赖于该类。
- 通过判断应用的类型,来创建不同环境的 Environment ,有 Servlet、Reactive、非 Web 类型。
- 之后会相继添加外部化配置到该类中,每种外部化配置都对应了一个 PropertySource 配置源对象。
- 重点介绍了加载 properties 和 YAML 的方式。主要是通过回调 Spring Boot 的监听器 ConfigFileApplicationListener 进行处理。
加载完之后,就可以在应用中通过 @Autowired 注入该对象,获取任意外部化配置属性。
五、@ConfigurationProperties
介绍完了Environment类,我们顺便介绍一下@ConfigurationProperties:
众所周知,当Spring Boot 集成外部组件后,就可在 properties 或 YAML 配置文件中定义组件需要的属性,如 Redis 组件:
spring.redis.url=redis://user:password@example.com:6379
spring.redis.host=localhost
spring.redis.password=123456
spring.redis.port=6379
其中都是以 spring.redis 为前缀。这其实是 Spring Boot 为每个组件提供了对应的 Properties 配置类,并将配置文件中的属性值給映射到配置类中,而且它们有个特点,都是以 Properties 结尾,如 Redis 对应的配置类是 RedisProperties:
@ConfigurationProperties(prefix = "spring.redis")
public class RedisProperties {
    private String url;

    private String host = "localhost";

    private String password;

    private int port = 6379;

    ...
}
...
@EnableConfigurationProperties(RedisProperties.class)
public class RedisAutoConfiguration {
    ...
}
可以看到它的参数是RedisProperties配置类。该注解是属于@Enable 模块注解,所以,该注解中必然有@Import 导入的实现了ImportSelector或ImportBeanDefinitionRegistrar接口的类,具体的功能都由导入的类来实现。我们进入该注解:
@Target(ElementType.TYPE)
@Retention(RetentionPolicy.RUNTIME)
@Documented
@Import(EnableConfigurationPropertiesImportSelector.class)
public @interface EnableConfigurationProperties {

    /**
     * Convenient way to quickly register {@link ConfigurationProperties} annotated beans
     * with Spring. Standard Spring Beans will also be scanned regardless of this value.
     * @return {@link ConfigurationProperties} annotated beans to register
     */
    Class<?>[] value() default {};

}
果不其然,通过 @Import 导入了 EnableConfigurationPropertiesImportSelector 类,整个的处理流程都是在该类中进行处理:
class EnableConfigurationPropertiesImportSelector implements ImportSelector {

    private static final String[] IMPORTS = { ConfigurationPropertiesBeanRegistrar.class.getName(),
            ConfigurationPropertiesBindingPostProcessorRegistrar.class.getName() };

    @Override
    public String[] selectImports(AnnotationMetadata metadata) {
        return IMPORTS;
    }

    ...
}
该类实现了 ImportSelector 接口,并重写了selectImports 方法,该方法返回的类会被Spring加载。可以看到这里返回了两个类,其中 ConfigurationPropertiesBeanRegistrar 就是用来注册 Properties 配置类的,而 ConfigurationPropertiesBindingPostProcessorRegistrar 则是用来绑定配置属性,且它们都实现了 ImportBeanDefinitionRegistrar 接口,会在重写的 registerBeanDefinitions 方法中进行直接注册 Bean 的操作。具体可以参考博客:SpringBoot(六)外部化配置 - @ConfigurationProperties。
[2]SpringBoot(二)自动装配正文 - @SpringBootApplication、@EnableAutoConfiguration
[3]SpringBoot(三)SpringApplication启动类准备阶段(转载)
[4]SpringBoot(四)SpringApplication启动类运行阶段(转载)