上一节内容已经详细介绍了AlexNet的网络结构。这节主要通过Tensorflow来实现AlexNet。
这里做测试我们使用的是CIFAR-10数据集介绍数据集,关于该数据集的具体信息可以通过以下链接查看:
https://blog.csdn.net/davincil/article/details/78793067
下面粗略的介绍一下CIFAR-10数据集。
一 CIFAR-10数据集
CIFAR-10数据集由10类32x32的彩色图片组成,一共包含60000张图片,每一类包含6000图片。其中50000张图片作为训练集,10000张图片作为测试集。
CIFAR-10数据集被划分成了5个训练的batch和1个测试的batch,每个batch均包含10000张图片。测试集batch的图片是从每个类别中随机挑选的1000张图片组成的,训练集batch以随机的顺序包含剩下的50000张图片。不过一些训练集batch可能出现包含某一类图片比其他类的图片数量多的情况。训练集batch包含来自每一类的5000张图片,一共50000张训练图片。
数据集下载地址:http://www.cs.toronto.edu/~kriz/cifar-10-python.tar.gz
文件下载后,解压cifar-10-batches-py到我们py问价所在的目录下,打开该文件夹,我们会看到有如下文件:

其中每个文件的作用如下:
batches.meta 程序中不需要使用该文件
data_batch_1 训练集的第一个batch,含有10000张图片
data_batch_2 训练集的第二个batch,含有10000张图片
data_batch_3 训练集的第三个batch,含有10000张图片
data_batch_4 训练集的第四个batch,含有10000张图片
data_batch_5 训练集的第五个batch,含有10000张图片
readme.html 网页文件,程序中不需要使用该文件
test_batch 测试集的batch,含有10000张图片
上述文件结构中,每一个batch文件包含一个python的字典(dict)结构,结构如下:
b'data’ 是一个10000x3072的array,每一行的元素组成了一个32x32的3通道图片,共10000张
b'labels’ 一个长度为10000的list,对应包含data中每一张图片的 label
b'batch_label' 这一份batch的名称
b'filenames' 一个长度为10000的list,对应包含data中每一张图片的名称
由于数据集比较大,在训练的时候如果把所有数据一次性加载到内存训练,会出现内容不足的问题,因此先从batch中读取所有图片的数据,以及每一张图片对应的标签,然后我们创建一个文件夹叫做CIFAR-10-data,在这个文件夹下面创建train和test文件夹,然后在每个文件夹下面创建名称从0-9的文件夹,我们利用OpenCV把每一张图片保存在对应文件夹下面。后面再创建两个文件,一个叫做CIFAR-10-test-label.pkl,另一个叫做CIFAR-10-train-label.pkl,均保存由如下元组:(测试集或训练集的图片路径,以及对应标签)组成的list集合。
save_image()函数执行上面所述的功能:
- 创建一个文件夹 CIFAR-10-data 包含两个子文件夹test,train
- 在子文件夹创建10个文件夹 文件名依次为0-9 对应10个类别
- 训练集数据生成bmp格式文件,存在对应类别的文件下
- 测试集数据生成bmp格式文件,存在对应类别的文件下
- 生成两个文件train_label.pkl,test_label.pkl 分别保存相应的图片文件路径以及对应的标签
执行完save_image()函数,会生成如下文件:


datagenerator.py文件代码如下:
# -*- coding: utf-8 -*-
"""
Created on Wed Apr 11 14:51:27 2018

@author: Administrator
"""

'''
用于加载数据集合
数据集下载地址:http://www.cs.toronto.edu/~kriz/cifar-10-python.tar.gz
CIFAR-10数据集介绍:https://blog.csdn.net/davincil/article/details/78793067

一、CIFAR-10
CIFAR-10数据集由10类32x32的彩色图片组成,一共包含60000张图片,每一类包含6000图片。其中50000张图片作为训练集,10000张图片作为测试集。

CIFAR-10数据集被划分成了5个训练的batch和1个测试的batch,每个batch均包含10000张图片。
测试集batch的图片是从每个类别中随机挑选的1000张图片组成的,一共10000张测试图片,
训练集batch包含来自每一类的5000张图片,一共50000张训练图片。
训练集batch以随机的顺序包含剩下的50000张图片。
不过一些训练集batch可能出现包含某一类图片比其他类的图片数量多的情况。

'''

'''

文件下载之后,解压  主要包括以下文件
名称            作用
batches.meta     程序中不需要使用该文件
data_batch_1     训练集的第一个batch,含有10000张图片
data_batch_2     训练集的第二个batch,含有10000张图片
data_batch_3     训练集的第三个batch,含有10000张图片
data_batch_4     训练集的第四个batch,含有10000张图片
data_batch_5     训练集的第五个batch,含有10000张图片
readme.html     网页文件,程序中不需要使用该文件
test_batch     测试集的batch,含有10000张图片


上述文件结构中,每一个batch文件包含一个python的字典(dict)结构,结构如下:
名称              作用
b'data’          是一个10000x3072的array,每一行的元素组成了一个32x32的3通道图片,共10000张
b'labels’          一个长度为10000的list,对应包含data中每一张图片的label
b'batch_label' 这一份batch的名称
b'filenames'      一个长度为10000的list,对应包含data中每一张图片的名称

'''

import pickle
import numpy as np
import cv2
from skimage import io

class datagenerator(object):
    def __init__(self):
        pass


    def unpickle(self,filename):
        '''
        batch文件中真正重要的两个关键字是data和labels
        反序列化出对象

        每一个batch文件包含一个python的字典(dict)结构,结构如下:
        名称              作用
        b'data’          是一个10000x3072的array,每一行的元素组成了一个32x32的3通道图片,共10000张
        b'labels’          一个长度为10000的list,对应包含data中每一张图片的label
        b'batch_label' 这一份batch的名称
        b'filenames'      一个长度为10000的list,对应包含data中每一张图片的名称
        '''
        with open(filename,'rb')  as  f:
            #默认把字节转换为ASCII编码  这里设置encoding='bytes'直接读取字节数据  因为里面含有图片像素数据 大小从0-255 不能解码为ascii编码,因此先转换成字节类型 后面针对不同项数据再解码,转换为字符串
            dic = pickle.load(f,encoding='bytes')
        return dic


    def get_image(self,image):
        '''
        提取每个通道的数据,进行重新排列,最后返回一张32x32的3通道的图片

        在字典结构中,每一张图片是以被展开的形式存储(即一张32x32的3通道图片被展开成了3072长度的list),
        每一个数据的格式为uint8,前1024个数据表示红色通道,接下来的1024个数据表示绿色通道,最后的1024
        个通道表示蓝色通道。
        image:每一张图片的数据  数据按照R,G,B通道依次排列 长度为3072
        '''
        assert len(image) == 3072
        #对list进行切片操作,然后reshape
        r = image[:1024].reshape(32,32,1)
        g = image[1024:2048].reshape(32,32,1)
        b = image[2048:].reshape(32,32,1)

        #numpy提供了numpy.concatenate((a1,a2,...), axis=0)函数。能够一次完成多个数组的拼接。其中a1,a2,...是数组类型的参数
        #沿着某个轴拼接,默认为列方向(axis=0)
        img = np.concatenate((r,g,b),-1)
        return img


    def get_data_by_keyword(self,keyword,filelist=[],normalized=False,size=(32,32),one_hot=False):
        '''
        按照给出的关键字提取batch中的数据(默认是训练集的所有数据)

        args:
            keyword:'data’ 或 'labels’ 或  'batch_label' 或  'filenames' 表示需要返回的项
            filelist:list 表示要读取的文件集合
            normalized:当keyword = 'data',表示是否需要归一化
            size:当keyword = 'data',表示需要返回的图片的尺寸
            one_hot:当keyword = 'labels'时,one_hot=Flase,返回实际标签  True时返回二值化后的标签

        return:
            keyword = 'data' 返回像素数据
            keyword = 'labels' 返回标签数据
            keyword = 'batch_label' 返回batch的名称
            keyword = 'filenames' 返回图像文件名

        '''

        #keyword编码为字节
        keyword = keyword.encode('ascii')
        assert keyword in [b'data',b'labels',b'batch_label',b'filenames']
        assert type(filelist) is list and len(filelist) != 0
        assert type(normalized) is bool
        assert type(size) is tuple or type(size) is list


        ret = []


        for i in range(len(filelist)):
            #反序列化出对象
            dic = self.unpickle(filelist[i])

            if keyword == b'data':
                #b'data’          是一个10000x3072的array,每一行的元素组成了一个32x32的3通道图片,共10000张
                #合并成一个数组
                for item in dic[b'data']:
                    ret.append(item)
                print('总长度:',len(ret))

            elif keyword == b'labels':
                #b'labels’          一个长度为10000的list,对应包含data中每一张图片的label
                #合并成一个数组
                for item in dic[b'labels']:
                    ret.append(item)


            elif keyword == b'batch_label':
                #b'batch_label' 这一份batch的名称
                #合并成一个数组
                for item in dic[b'batch_label']:
                    ret.append(item.decode('ascii'))    #把数据转换为ascii编码

            else:
                #b'filenames'      一个长度为10000的list,对应包含data中每一张图片的名称
                #合并成一个数组
                for item in dic[b'filenames']:
                    ret.append(item.decode('ascii'))    #把数据转换为ascii编码


        if keyword == b'data':
            if normalized == False:
                array = np.ndarray([len(ret),size[0],size[1],3],dtype = np.float32)
                #遍历每一张图片数据
                for i in range(len(ret)):
                    #图像进行缩放
                    array[i] = cv2.resize(self.get_image(ret[i]),size)
                return array

            else:
                array = np.ndarray([len(ret),size[0],size[1],3],dtype = np.float32)
                #遍历每一张图片数据
                for i in range(len(ret)):
                    array[i] = cv2.resize(self.get_image(ret[i]),size)/255
                return array
            pass

        elif keyword == b'labels':
            #二值化标签
            if one_hot == True:
                #类别
                depth = 10
                m = np.zeros([len(ret),depth])
                for i in range(len(ret)):
                    m[i][ret[i]] = 1
                return m
            pass
        #其它keyword直接返回
        return ret


import os
import pickle

def  save_images():
    '''
    报CIFAR-10数据集图片提取出来保存下来
    1.创建一个文件夹 CIFAR-10-data 包含两个子文件夹test,train
    2.在文革子文件夹创建10个文件夹 文件名依次为0-9  对应10个类别
    3.训练集数据生成bmp格式文件,存在对应类别的文件下
    4.测试集数据生成bmp格式文件,存在对应类别的文件下
    5 生成两个文件train_label.pkl,test_label.pkl 分别保存相应的图片文件路径以及对应的标签
    '''

    #根目录
    root = 'CIFAR-10-data'

    #如果存在该目录 说明数据存在
    if os.path.isdir(root):
        print(root+'目录已经存在!')
        return

    '''
    如果文件夹不存在 创建文件夹
    '''
    #'data'目录不存在,创建目录
    os.mkdir(root)

    #创建文件失败
    if not os.path.isdir(root):
        print(root+'目录创建失败!')
        return

    #创建'test'和'train'目录  以及子文件夹
    train = os.path.join(root,'train')
    os.mkdir(train)
    if os.path.isdir(train):
        for i in range(10):
            name = os.path.join(train,str(i))
            os.mkdir(name)

    test = os.path.join(root,'test')
    os.mkdir(test)
    if os.path.isdir(test):
        for i in range(10):
            name = os.path.join(test,str(i))
            os.mkdir(name)


    '''
    把训练集数据转换为图片
    '''
    data_dir = 'cifar-10-batches-py'       #数据所在目录

    filelist = []
    for i in range(5):
        name = os.path.join(data_dir,str('data_batch_%d'%(i+1)))
        filelist.append(name)

    data = datagenerator()
    #获取训练集数据
    train_x = data.get_data_by_keyword('data',filelist,
                                           normalized=True,size=(32,32))

    #标签
    train_y = data.get_data_by_keyword('labels',filelist)


    #读取图片文件名
    train_filename  = data.get_data_by_keyword('filenames',filelist)


    #保存训练集的文件名和标签
    train_file_labels  = []

    #保存图片
    for i in  range(len(train_x)):
        #获取图片标签
        y = int(train_y[i])

        #文件保存目录
        dir_name = os.path.join(train,str(y))

        #获取文件名
        file_name = train_filename[i]

        #文件的保存路径
        file_path = os.path.join(dir_name,file_name)

        #保存图片
        io.imsave(file_path,train_x[i])

        #追加第i张图片路径和标签   (文件路径,标签)
        train_file_labels.append((file_path,y))

        if i % 1000 == 0:
            print('训练集完成度{0}/{1}'.format(i,len(train_x)))

    for i in range(10):
        print('训练集前10张图片:',train_file_labels[i])

    #保存训练集的文件名和标签
    with open('CIFAR-10-train-label.pkl','wb') as f:
        pickle.dump(train_file_labels,f)

    print('训练集图片保存成功!
')

    '''
    把测试集数据转换为图片
    '''
    filelist = [os.path.join(data_dir,'test_batch')]

    #获取训练集数据 数据标准化为0-1之间
    test_x = data.get_data_by_keyword('data',filelist,
                                           normalized=True,size=(32,32))

    #标签
    test_y = data.get_data_by_keyword('labels',filelist)


    #读取图片文件名
    test_filename = data.get_data_by_keyword('filenames',filelist)


    #保存测试卷的文件名和标签
    test_file_labels  = []

    #保存图片
    for i in  range(len(test_x)):
        #获取图片标签
        y = int(test_y[i])

        #文件保存目录
        dir_name = os.path.join(test,str(y))

        #获取文件名
        file_name = test_filename[i]

        #文件的保存路径
        file_path = os.path.join(dir_name,file_name)

        #保存图片  这里要求图片像素值在-1-1之间,所以在获取数据的时候做了标准化
        io.imsave(file_path,test_x[i])

        #追加第i张图片路径和标签  (文件路径,标签)
        test_file_labels.append((file_path,y))

        if i % 1000 == 0:
            print('测试集完成度{0}/{1}'.format(i,len(test_x)))

    print('测绘集图片保存成功!
')

    #保存测试卷的文件名和标签
    with open('CIFAR-10-test-label.pkl','wb') as f:
        pickle.dump(test_file_labels,f)

    for i in range(10):
        print('测试集前10张图片:',test_file_labels[i])


def load_data():
    '''
    加载数据集
    返回训练集数据和测试卷数据
    training_data 由(x,y)元组组成的list集合
            x:图片路径
            y:对应标签
    '''
    #加载使用的训练集文件名和标签 [(文件路径,标签),....]
    with open('CIFAR-10-train-label.pkl','rb') as f:
        training_data = pickle.load(f)


    #加载使用的测试集文件名和标签
    with open('CIFAR-10-test-label.pkl','rb') as f:
        test_data = pickle.load(f)

    return training_data,test_data


def get_one_hot_label(labels,depth):
    '''
    把标签二值化  返回numpy.array类型

    args:
        labels:标签的集合
        depth:标签总共有多少类
    '''
    m = np.zeros([len(labels),depth])
    for i in range(len(labels)):
        m[i][labels[i]] = 1
    return m


def get_image_data_and_label(value,image_size='NONE',depth=10,one_hot = False):
    '''
    获取图片数据,以及标签数据 注意每张图片维度为 n_w x n_h x n_c

    args:
        value:由(x,y)元组组成的numpy.array类型
            x:图片路径
            y:对应标签
        image_size:图片大小 'NONE':不改变图片尺寸
        one_hot:把标签二值化
        depth:数据类别个数
    '''
    #图片数据集合
    x_batch = []
    #图片对应的标签集合
    y_batch = []
    #遍历每一张图片
    for image in value:
        if image_size == 'NONE':
            x_batch.append(cv2.imread(image[0])/255)    #标准化0-1之间
        else:
            x_batch.append(cv2.resize(cv2.imread(image[0]),image_size)/255)
        y_batch.append(image[1])

    if one_hot == True:
        #标签二值化
        y_batch = get_one_hot_label(y_batch,depth)
    return  np.asarray(x_batch,dtype=np.float32),np.asarray(y_batch,dtype=np.float32)

'''
测试 保存所有图片
'''
save_images()
二 使用传统神经网络训练
在使用AlexNet网络进行训练之前,我们先使用传统network进行训练,这里我们设置网络为4层,包括输入层在内,每一层神经元个数如下3072,7200,1024,10。
我们在训练的时候,每次随机读取batch_size大小的图片数据进行训练。
传统network的实现,我是通过定义一个单独的类来完成该功能。network.py文件代码如下
# -*- coding: utf-8 -*-
"""
Created on Mon Apr  2 10:32:10 2018

@author: Administrator
"""

'''
定义一个network类,实现全连接网络
'''

import    datagenerator
import os
from tensorflow.python import pywrap_tensorflow


def get_one_hot_label(labels,depth):
    '''
    把标签二值化

    args:
        labels:标签的集合
        depth:标签总共有多少类
    '''
    m = np.zeros([len(labels),depth])
    for i in range(len(labels)):
        m[i][labels[i]] = 1
    return m


import tensorflow as tf
import numpy as np
import random
import pickle


class network(object):
    '''
    全连接神经网络
    '''
    def __init__(self,sizes,param_path= None):
        '''
        注意程序中op变量只需要初始化一遍就可以,在fit()中初始化

        args:
            sizes:list传入每层神经元个数
            param_path:是否从指定文件加载模型,None:重新训练  否则指定模型路径 必须指定路径./或者绝对路径
        '''
        #保存参数
        self.__sizes = sizes
        #神经网络每一层的神经元个数数组类型
        self.sizes = tf.placeholder(tf.int64,shape=[1,len(sizes)])
        #计算神经网络层数 包括输入层
        self.num_layer = tf.size(self.sizes)

        #输入样本和输出类别变量
        self.x_ = tf.placeholder(tf.float32,shape=[None,sizes[0]])
        self.y_ = tf.placeholder(tf.float32,shape=[None,sizes[-1]])

        #设置tensorflow对GPU使用按需分配
        config = tf.ConfigProto()
        config.gpu_options.allow_growth = True
        self.sess = tf.InteractiveSession(config=config)


        file_exist = False
        #如果已经存在保存的模型 加载之前保存的w和b
        if not param_path is None:
              if os.path.isfile(param_path):
                  with open(param_path,'rb') as f:
                      dic = pickle.load(f)
                      weights = dic['weightes']
                      biases = dic['biases']
                      file_exist = True

        if file_exist:
            #使用保存的数据初始化  第i层和i+1层之间的权重向量
            self.weights = [self.weight_variable(shape=(x,y),value = weights[i]) for x,y,i in  zip(sizes[:-1],sizes[1:],range(len(sizes)-1))]
            #使用保存的数据初始化  第i层的偏置向量  i=1...num_layers 注意不可以设置shape=(x,1)
            self.biases = [self.bias_variable(shape=[x,],value = biases[i]) for x,i in zip(sizes[1:],range(len(sizes)-1))]
            print('成功加载参数数据!')
        else:
             #使用高斯正态分布初始化  第i层和i+1层之间的权重向量
            self.weights = [self.weight_variable(shape=(x,y)) for x,y in  zip(sizes[:-1],sizes[1:])]
            #使用高斯正态分布初始化  第i层的偏置向量  i=1...num_layers 注意不可以设置shape=(x,1)
            self.biases = [self.bias_variable(shape=[x,]) for x in sizes[1:]]
            print('重新初始化模型参数!')


        '''这一段代码是使用tensorflow Saver对象保存 但是在取数据时候总是失败,因此不再使用这中方法
        #如果已经存在保存的模型 加载之前保存的w和b
        if not model_path is None:

            file = model_path+'.meta'
            #print(file)
            #文件存在 则直接加载
            if os.path.isfile(file):
                #加载以前保存的网络  将保存在.meta文件中的图添加到当前的图中
                self.new_saver = tf.train.import_meta_graph(file)
                #从指定目录下获取最近一次检查点
                self.new_saver.restore(self.sess,tf.train.latest_checkpoint(os.path.dirname(file)))
                #使用加载的模型
                graph = tf.get_default_graph()
                #恢复w和b
                self.weights = [graph.get_tensor_by_name( 'network_w'+str(i)+':0')  for i in range(1,len(sizes))]
                self.biases = [graph.get_tensor_by_name( 'network_b'+str(i)+':0')  for i in range(1,len(sizes))]

                print('成功从模型恢复数据!')
                sh = [self.sess.run(i).shape for i in self.weights]
                print('权重维度:',sh)

                file_exist = True

        #不存在 再新创建
        if not file_exist:
            #随机初始化权重  第i层和i+1层之间的权重向量
            self.weights = [self.weight_variable(shape=(x,y),name='network_w'+str(i)) for x,y,i in  zip(sizes[:-1],sizes[1:],range(1,len(sizes)))]
            #随机初始化偏置  第i层的偏置向量  i=1...num_layers 注意不可以设置shape=(x,1)
            self.biases = [self.bias_variable(shape=[x,],name='network_b'+str(i)) for x,i in zip(sizes[1:],range(1,len(sizes)))]
            print('重新初始化模型参数!')


        #创建Saver op用于保存新的训练参数 指定保存哪些变量,如果全部保存,在恢复时,会有错误 主要是由于偏置和权重我保存在了一个dict中引起的
        param =[w for w in  self.weights]
        for i in self.biases:
            param.append(i)
        self.saver = tf.train.Saver(param)'''

    def weight_variable(self,shape,value=None,name=None):
        '''
        初始化权值
        '''
        if value is None:
            #使用截断式正太分布初始化权值   截断式即在正态分布基础上加以限制,以使生产的数据在一定范围上
            value = tf.truncated_normal(shape,mean=0.0,stddev= 1.0/shape[0])    #方差为1/nin

        if name is None:
            return tf.Variable(value)
        else:
            return tf.Variable(value,name=name)

    def bias_variable(self,shape,value=None,name=None):
        '''
        #初始化偏重
        '''
        if value is None:
            value =  tf.truncated_normal(shape,mean=0.0,stddev= 1.0/shape[0])    #方差为1/nin

        if name is None:
            return tf.Variable(value)
        else:
            return tf.Variable(value,name=name)

    def feedforward(self,x):
        '''
        构建阶段:前向反馈
        x:变量op,tf.placeholder()类型变量
        返回一个op
        '''
        #计算隐藏层
        output = x
        for i in range(len(self.__sizes)-1):
            b = self.biases[i]
            w = self.weights[i]
            if i != len(self.__sizes)-2 :
                output =  tf.nn.relu(tf.matmul(output,w) + b)
            else:
                output = tf.nn.softmax(tf.matmul(output,w) + b)
        return output

    def fit(self,training_data,learning_rate=0.001,batch_size=64,epoches=10):
         '''
         训练神经网络
         training_data (x,y)元祖组成的list
             x:训练集图片数据路径
             y:训练集样本对应的标签
         learning_rate:学习率
         batch_size:批量大小
         epoches:迭代轮数
         '''
         #计算输出层
         output = self.feedforward(self.x_)

         #代价函数 J =-(Σy.logaL)/n    .表示逐元素乘
         cost = tf.reduce_mean( -tf.reduce_sum(self.y_*tf.log(output),axis = 1))

         #求解
         train = tf.train.AdamOptimizer(learning_rate).minimize(cost)

         #使用会话执行图

         #初始化变量 必须在train之后 变量出事后化之后才可以显示相关属性
         self.sess.run(tf.global_variables_initializer())
         sh = [self.sess.run(i).shape for i in self.weights]
         print('权重维度:',sh)

         #训练集长度
         n_train =len(training_data)

         #开始迭代
         for i in range(epoches):
            #打乱训练集
            random.shuffle(training_data)
            #分组
            mini_batchs = [training_data[k:k+batch_size] for k in range(0,n_train,batch_size)]

            #遍历每一个mini_batch
            for mini_batch in mini_batchs:
                x_batch,y_batch = datagenerator.get_image_data_and_label(mini_batch,one_hot=True)
                #每张图片数据展开正一列
                x_batch = x_batch.reshape(len(mini_batch),-1)
                train.run(feed_dict={self.x_:x_batch,self.y_:y_batch})

            '''
            #计算每一轮迭代后在整个训练集的误差 并打印
            '''
            train_cost_sum = []
            train_accuracy_sum = []
            #遍历每一个mini_batch
            for mini_batch in mini_batchs:
                train_cost = cost.eval(feed_dict={self.x_:x_batch,self.y_:y_batch})
                train_cost_sum.append(train_cost)
                train_accuracy = self.accuracy(x_batch,y_batch)
                train_accuracy_sum.append(train_accuracy)
            print('Epoch {0} Training set cost {1} accuracy {2}:'.format(i,np.mean(train_cost),np.mean(train_accuracy)))


    def predict(self,test_x):
        '''
        对输入test_x样本进行预测(图片数据)   nxm维   n为样本个数 m为数据长度
        '''
        output = self.feedforward(self.x_)
        #使用会话执行图
        return output.eval(feed_dict={self.x_:test_x})


    def accuracy(self,x,y):
        '''
        返回值准确率
        x:测试样本集合(图片数据) nxm维   n为样本个数 m为数据长度
        y:测试类别集合 也是二值化的标签
        '''
        output = self.feedforward(self.x_)
        correct = tf.equal(tf.argmax(output,1),tf.argmax(self.y_,1))       #返回一个数组 表示统计预测正确或者错误
        accuracy = tf.reduce_mean(tf.cast(correct,tf.float32))             #求准确率
        #使用会话执行图
        return accuracy.eval(feed_dict={self.x_:x,self.y_:y})

    def cost(self,x,y):
        '''
        计算代价值
        x:样本集合(图片数据) nxm维   n为样本个数 m为数据长度
        y:类别集合  也是二值化的标签
        '''
        #计算输出层
        output = self.feedforward(self.x_)
        #代价函数 J =-(Σy.logaL)/n    .表示逐元素乘
        cost = tf.reduce_mean( -tf.reduce_sum(self.y_*tf.log(output),axis = 1))
        #使用会话执行图
        return cost.eval(feed_dict={self.x_:x,self.y_:y})

    def remove_model_file(self,file):
        '''
        删除保存的模型文件
        删除成功返回True 否则返回 False

        args:
            file:模型文件名
        '''
        path = [file+item for item in ('.index','.meta')]
        path.append(os.path.join( os.path.dirname(path[0]),'checkpoint'))
        for f in path:
            if os.path.isfile(f):
                os.remove(f)
        ret = True
        #检查文件是否存在
        for f in path:
            if os.path.isfile(f):
                ret = False
        return ret


    def save_model(self,file):
        '''
        保存模型

        args:
            file:保存文件名
        '''
        '''
        #先删除之前的模型数据
        if self.remove_model_file(file) == True:
            self.saver.save(self.sess,file)
            print('模型保存成功!')'''

        #把参数序列化并保存
        weights = [item.eval() for item in self.weights]
        biases = [item.eval() for item in self.biases]
        dic = {'weightes':weights,'biases':biases}
        with open(file,'wb') as f:
            pickle.dump(dic,f)
            print('模型参数保存成功!')

    def  global_variables_initializer(self):
        '''
        全局张量初始化,由于全局变量只在fit()训练时进行初始化,如果我们直接加载已经训练好的数据
        就不需要调用fit()函数,因此只有收到调用这个函数就行初始化权重和偏置以及其他张量
        然后才可以执行图 如accuracy()等等
        '''
        self.sess.run(tf.global_variables_initializer())
然后我们使用该网络进行测试,并且把测试后的权重和偏置保存在指定文件,下次可以使用该数据初始化,然后继续训练
- 我们先读取CIFAR-10-train-label.pkl,获取每张的训练图片路径以及标签组成的元组,保存在一个字典中
- 我们先把该字典打乱,然后选择batch_size张图片,读取图片,以及one_hot(二值化)标签,组成一个mini_batch
- 使用mini_batch进行训练
- 迭代字典中的所有数据,迭代完一轮,我们继续迭代,直至到我们设置的迭代轮数
在这里有个地方需要注意:由于我们每次都是从指定路径读取图片,因此速度比较慢,其实我们可以利用get_data_by_keyword()函数一次性读取所有数据和标签,然后保存在内存中,然后每次选择batch_size数据进行训练。这样就避免了每次从硬盘读取图片数据。这里我们取数据的时候可以先设置一个训练集大小的索引字典,然后打乱该字典,我们每次把batch_size个字典元素,传给数据,这样我们就可以达到随机取数据的目的。
# 生成并打乱训练集的顺序。
indices = np.arange(50000)
random.shuffle(indices)
测试代码如下:
# -*- coding: utf-8 -*-
"""
Created on Wed Apr 11 16:42:09 2018
@author: Administrator
"""
'''
用于训练network网络
由于内存有限,不能一次读取所有的数据,因此采用每次读取小批量的图片
1.在datagenerator.py文件中 把所有图片保存成bmp格式文件
2.存储一个dict字典,每个元素为 (图片的相对路径,标签),将这个字典序列化保存到文件
3.读取该文件,把元组顺序打乱,分成多组,每次加载mini_batch个图片进行训练
'''

import  tensorflow as tf
from    alexnet  import alexnet
import    datagenerator
import numpy as np
#import cv2
import random
import network
import os
def remove_model_file(file):
    '''
    删除保存的模型文件
    删除成功返回True 否则返回 False

    args:
        file:模型文件名
    '''
    path = [file+item for item in ('.index','.meta')]
    path.append(os.path.join( os.path.dirname(path[0]),'checkpoint'))
    for f in path:
        if os.path.isfile(f):
            os.remove(f)
    ret = True
    #检查文件是否存在
    for f in path:
        if os.path.isfile(f):
            ret = False
    return ret


def network_main():
    '''
    使用network网络测试
    由于数据量比较大,图片不能一次全部加载进来,因此采用分批读取图片数据
    '''

    '''
    一 加载数据
    '''
    training_data,test_data = datagenerator.load_data()
    param_path = './network_param/network_param.pkl'                   #模型参数保存所在文件
    learning_rate = 1e-4                                  #学习率
    training_epoches = 10                                 #训练轮数
    batch_size = 256                                      #小批量大小

    '''
    二 创建网络
    '''
    #如果已经存在训练好的数据,直接加载初始化
    nn = network.network([3072,7200,1024,10],param_path=param_path)

    '''
    三 开始训练
    '''
    nn.fit(training_data,learning_rate=learning_rate,batch_size=batch_size,epoches=training_epoches)

    nn.save_model(param_path)                    #保存参数

    '''
    四 校验
    '''
    mini_batchs = [test_data[k:k+batch_size] for k in range(0,len(test_data),batch_size)]
    test_accuracy_sum = []

    #如果不训练网络,需要手动初始化张量
    #nn.global_variables_initializer()

    for mini_batch in mini_batchs:
        x_batch,y_batch = datagenerator.get_image_data_and_label(mini_batch,one_hot=True)
        #每张图片数据展开正一列
        x_batch = x_batch.reshape(len(mini_batch),-1)
        test_accuracy_sum.append(nn.accuracy(x_batch,y_batch))

    print('准确率:',np.mean(test_accuracy_sum))
'''
测试
'''
if __name__ == '__main__':
    network_main()
运行结果如下,我们可以看到迭代10次后,在测试集的准确率大概为52%,如果我们使用卷积神经网络的话或者迭代次数更多一些的话,准确率可能会更高,你也可以尝试使用LeNet进行训练,详情可以参考:Tensorflow深度学习之二十一:LeNet的实现(CIFAR-10数据集)https://blog.csdn.net/davincil/article/details/78794044

三 使用AlexNet网络训练
按照上一节讲的内容定义,alexnet网络结构,alexnet.py文件代码如下:
# -*- coding: utf-8 -*-
"""
Created on Wed Apr 11 10:48:31 2018

@author: Administrator
"""

'''
自己实现一个标准的AlexNet网络
参考链接:https://blog.csdn.net/OliverkingLi/article/details/73849228
https://blog.csdn.net/DaVinciL/article/details/78888605
'''
import tensorflow as tf


def conv(x,filter_height,filter_width,out_channels,stride_y, stride_x, name,
         padding='SAME'):
    '''
    定义一个卷积层
    Create a convolution layer.
    Adapted from: https://github.com/ethereon/caffe-tensorflow

    Args:
        x:输入图片集合 维度为[batch, in_height, in_width, in_channels]
        weights:共享权重[filter_height, filter_width, in_channels, out_channels]
            filter_height : 过滤器高度
            filter_width:  过滤器宽度
            in_channels:   输入通道数
            out_channels   过滤器个数
        biases:共享偏置 [out_channels]
        stride_x:      x轴步长
        stride_y:      y轴步长
        name:        卷积层名字
        padding:      卷基层填充方式 'VALID'或者'SAME'
    '''
    #获取输入通道数
    in_channels = int(x.get_shape()[-1])

    with tf.name_scope(name) as scope:
        #搜索变量没有就创建,有会报错 get_variable创建的变量不受name_scope的影响
        weights = tf.get_variable(scope+'w', shape=[filter_height,
                                                    filter_width,
                                                    in_channels,
                                                    out_channels],
                                                dtype = tf.float32,
                                 initializer = tf.contrib.layers.xavier_initializer_conv2d())

        '''
        或者写成
        shape=[filter_height,filter_width,in_channels,out_channels]
        weights = tf.get_variable(scope+'w', shape=shape,dtype = tf.float32)
        '''
        #Variable创建变量,自动检测有没有重命名,有就自行处理
        biases = tf.Variable(tf.constant(0.0,shape=[out_channels]),dtype=tf.float32,trainable=True,name=scope+'b')

        #注意这里的strides每个元素分别与[batch, in_height, in_width, in_channels]对应
        conv = tf.nn.conv2d(x, weights,strides=[1, stride_y, stride_x, 1],
                                         padding=padding)
        # Add biases
        bias = tf.nn.bias_add(conv, biases)

        # Apply relu function
        relu = tf.nn.relu(bias, name=scope)
        return relu

def max_pool(x, filter_height, filter_width, stride_y, stride_x, name,
             padding='SAME'):
    '''
    定义一个池化层 最大下采样操作

    Args:
        x:输入图片集合 维度为[batch, in_height, in_width, in_channels]
        filter_height : 滑动窗口高度
        filter_width:  滑动窗口宽度
        stride_x:      x轴步长
        stride_y:      y轴步长
        name:         池化层名字
        padding:      填充方式 'SAME'或者'VALID'
    '''
    return tf.nn.max_pool(x, ksize=[1, filter_height, filter_width, 1],
                          strides=[1, stride_y, stride_x, 1],
                          padding=padding, name=name)


def fc(x, num_out,name, relu=True):
    '''
    全连接网络
    '''
    num_in = int(x.get_shape()[-1])
    with tf.name_scope(name) as scope:

        # Create tf variables for the weights and biases
        weights = tf.get_variable(scope+'w', shape=[num_in, num_out],
                                             dtype = tf.float32,
                                 initializer = tf.contrib.layers.xavier_initializer_conv2d())
        '''
        或者写成
        shape=[num_in, num_out]
        weights = tf.get_variable(scope+'w', shape=shape,dtype = tf.float32)

        '''

        biases = tf.Variable(tf.constant(0.0,shape=[num_out]),dtype=tf.float32,trainable=True,name=scope+'b')


        if relu:
            act = tf.nn.xw_plus_b(x, weights, biases)
            # Apply ReLu non linearity
            relu = tf.nn.relu(act, name=scope)
            return relu
        else:
            act = tf.nn.xw_plus_b(x, weights, biases, name=scope)
            return act


def lrn(x, radius, alpha, beta, name, bias=1.0):
    '''
    局部相应归一化操作
    参考论文:http://papers.nips.cc/paper/4824-imagenet-classification-with-deep-convolutional-neural-networks.pdf
    Create a local response normalization layer.

    Args:
        depth_radius:归一化窗口的半径长度 一般设置为5 也是 论文中的n/2的值
        alpha:超参数 一般设置为1e-4
        beta:指数 一般设置为0.5
        bias:偏置 一般设置为1.0
        name:lrn层名字
    '''
    return tf.nn.local_response_normalization(x, depth_radius=radius,
                                              alpha=alpha, beta=beta,
                                              bias=bias, name=name)


def dropout(x, keep_prob):
    '''
    弃权操作

    Args:
        x:激活函数之后的输出
        keep_prob:弃权概率 即每个神经元被保留的概率
    '''
    return tf.nn.dropout(x, keep_prob)


'''
初始化权值和偏重
为了创建这个模型,我们需要创建大量的权重和偏置项。这个模型中的权重在初始化时应该加入少量的噪声来
打破对称性以及避免0梯度。由于我们使用的是ReLU神经元,因此比较好的做法是用一个较小的正数来初始化
偏置项,以避免神经元节点输出恒为0的问题(dead neurons)。为了不在建立模型的时候反复做初始化操作
,我们定义两个函数用于初始化。
'''
def weight_variable(shape):
    #使用正太分布初始化权值
    initial = tf.truncated_normal(shape,dtype=tf.float32,mean=0,stddev=0.1)    #标准差为0.1
    return tf.Variable(initial)


def bias_variable(shape):
    initial = tf.constant(0.0,shape=shape)
    return tf.Variable(initial,dtype=tf.float32)


def print_dimension(t):
    '''
    输出指定张量的维度
    '''
    print(t.op.name,'',t.get_shape().as_list())


class alexnet(object):
    '''
    定义一个类 实现AlexNet网络
    '''

    def __init__(self, n_classes):
        '''
        Create the graph of the AlexNet model.

        Args:
            x: 输入张量的占位符 Placeholder for the input tensor.
            keep_prob: 占位符 每个神经元保留的概率 Dropout probability.
        '''
        # 初始化参数
            #占位符输入
        self.input_x = tf.placeholder(tf.float32,shape=[None,227,227,3],name='input_x')
        self.input_y = tf.placeholder(tf.float32,shape=[None,n_classes],name='input_y')
        self.keep_prob = tf.placeholder(tf.float32,name='keep_prob')
        self.n_classes = n_classes

        self.out = self.create()


    def  initial_weights_biases(self):
        '''
        初始化权重和偏置

        '''
        #标砖AlexNet参数
        weights = {
                'wc1': weight_variable([11,11,3,96]),
                'wc2': weight_variable([5,5,96,256]),
                'wc3': weight_variable([3,3,256,384]),
                'wc4': weight_variable([3,3,384,384]),
                'wc5': weight_variable([3,3,384,256]),
                'wfc6': weight_variable([6*6*256,4096]),
                'wfc7': weight_variable([4096,4096]),
                'wfc8': weight_variable([4096,10]),
                }
        biases = {
                'bc1':bias_variable([96]),
                'bc2':bias_variable([256]),
                'bc3':bias_variable([384]),
                'bc4':bias_variable([384]),
                'bc5':bias_variable([256]),
                'bfc6':bias_variable([4096]),
                'bfc7':bias_variable([4096]),
                'bfc8':bias_variable([10]),
                }
        '''
        #为了加快训练速度 简化网络
        weights = {
                'wc1': weight_variable([11,11,3,64]),
                'wc2': weight_variable([5,5,64,192]),
                'wc3': weight_variable([3,3,192,384]),
                'wc4': weight_variable([3,3,384,384]),
                'wc5': weight_variable([3,3,384,256]),
                'wfc6': weight_variable([6*6*256,4096]),
                'wfc7': weight_variable([4096,4096]),
                'wfc8': weight_variable([4096,10]),
                }
        biases = {
                'bc1':bias_variable([64]),
                'bc2':bias_variable([192]),
                'bc3':bias_variable([384]),
                'bc4':bias_variable([384]),
                'bc5':bias_variable([256]),
                'bfc6':bias_variable([4096]),
                'bfc7':bias_variable([4096]),
                'bfc8':bias_variable([10]),
                }
        '''
        return weights,biases


    def create(self):
        '''
        Create the network graph.
        创建AlexNet网络 返回网络输出的张量(没有经过正激函数)
        共有8层网络  5层卷积测,3个全连接网络
        '''
        # 1st Layer: Conv (w ReLu) -> Lrn -> Pool
        self.conv1 = conv(self.input_x,filter_height=11,filter_width=11,out_channels=96,stride_y=4, stride_x=4, padding='VALID', name='conv1')
        print_dimension(self.conv1)
        self.norm1 = lrn(self.conv1, radius=4, alpha=1e-4, beta=0.75,  name='norm1')
        self.pool1 = max_pool(self.norm1, filter_height=3, filter_width=3, stride_y=2, stride_x=2, padding='VALID', name='pool1')
        print_dimension(self.pool1)

        # 2nd Layer: Conv (w ReLu)  -> Lrn -> Pool with 2 groups
        self.conv2 = conv(self.pool1,5,5,256, 1, 1, name='conv2')
        print_dimension(self.conv2)
        self.norm2 = lrn(self.conv2, radius=4, alpha=1e-4, beta=0.75, name='norm2')
        self.pool2 = max_pool(self.norm2, 3, 3, 2, 2, padding='VALID', name='pool2')
        print_dimension(self.pool2)

        # 3rd Layer: Conv (w ReLu)
        self.conv3 = conv(self.pool2,3,3,384, 1, 1, name='conv3')
        print_dimension(self.conv3)

        # 4th Layer: Conv (w ReLu) splitted into two groups
        self.conv4 = conv(self.conv3,3,3,384, 1, 1, name='conv4')
        print_dimension(self.conv4)

        # 5th Layer: Conv (w ReLu) -> Pool splitted into two groups
        self.conv5 = conv(self.conv4,3,3,256, 1, 1, name='conv5')
        print_dimension(self.conv5)
        self.pool5 = max_pool(self.conv5, 3, 3, 2, 2, padding='VALID', name='pool5')
        print_dimension(self.pool5)

        # 6th Layer: Flatten -> FC (w ReLu) -> Dropout
        flattened = tf.reshape(self.pool5, [-1, 6*6*256])
        self.fc6 = fc(flattened, 4096, name='fc6')
        print_dimension(self.fc6)
        self.dropout6 = dropout(self.fc6, self.keep_prob)

        # 7th Layer: FC (w ReLu) -> Dropout
        self.fc7 = fc(self.dropout6,4096, name='fc7')
        print_dimension(self.fc7)
        self.dropout7 = dropout(self.fc7, self.keep_prob)

        # 8th Layer: FC and return unscaled activations
        self.out = fc(self.dropout7,self.n_classes, relu=False, name='out')
        print_dimension(self.out)


        #计算交叉熵损失函数
        with tf.name_scope('cost'):
               self.cost = tf.reduce_mean(tf.nn.softmax_cross_entropy_with_logits(logits = self.out,labels = self.input_y))

        #准确率
        with tf.name_scope('accuracy'):
            #tf.argmax(output,1)  按行统计最大值得索引
            self.correct = tf.equal(tf.argmax(self.out,1),tf.argmax(self.input_y,1))       #返回一个数组 表示统计预测正确或者错误
            self.accuracy = tf.reduce_mean(tf.cast(self.correct,tf.float32))      #求准确率

        #use softmax activations
        #self.out = tf.nn.softmax(fc8)
        return self.out
定义好网络结构之后,我们需要进行测试:这里在读取数据时我采用两种方式,代码中会有解释:
# -*- coding: utf-8 -*-
"""
Created on Wed Apr 11 16:42:09 2018
@author: Administrator
"""
'''
用于训练AlexNet网络
由于内存有限,不能一次读取所有的数据,因此采用每次读取小批量的图片
1.在datagenerator.py文件中 把所有图片保存成bmp格式文件
2.存储一个dict字典 每个元素为 (图片的相对路径,标签) 将这个字典序列化保存到文件
3.读取该文件,把文件名顺序打乱,分成多组,每次加载mini_batch个图片进行训练
4.在加载图片时,需要把图片放大为227*227的 这是由于AlexNet网络输入的维度
'''

import  tensorflow as tf
from    alexnet  import alexnet
import    datagenerator
import numpy as np
import cv2
import random
import network
import os


def remove_model_file(file):
    '''
    删除保存的模型文件
    删除成功返回True 否则返回 False

    args:
        file:模型文件名
    '''
    path = [file+item for item in ('.index','.meta')]
    path.append(os.path.join( os.path.dirname(path[0]),'checkpoint'))
    for f in path:
        if os.path.isfile(f):
            os.remove(f)
    ret = True
    #检查文件是否存在
    for f in path:
        if os.path.isfile(f):
            ret = False
    return ret
def alexnet_main():
    '''
    使用AlexNet测试
    由于数据量比较大,图片不能一次全部加载进来,因此采用分批读取图片数据 由于这里每次从硬盘读取batch_size大小的图片,速度较慢
    '''


    '''
    一 加载数据

    '''
    training_data,test_data = datagenerator.load_data()


    '''
    二 定义网络参数
    '''
    model_name = './alexnet_param/alexnet_model.ckpt'                 #模型保存所在文件
    #定义网络超参数
    learning_rate = 1e-4                                  #学习率
    training_epoches = 40                                 #训练轮数
    batch_size = 256                                      #小批量大小


    #定义网络参数
    n_classes = 10                                       #标签的维度
    pdropout = 0.5                                       #弃权的概率
    n_train = len(training_data)                         #训练集数据长度
    n_test = len(test_data)                              #测试卷数据长度
    image_size = (227,227)                               #图片大小


    #如果目录不存在创建目录
    if  not os.path.isdir(os.path.dirname(model_name)):
        os.mkdir(os.path.dirname(model_name))

    '''
    三 求解 构建模型 开始测试
    '''

    alex = alexnet(n_classes)


    #创建Saver op用于保存和恢复所有变量
    saver = tf.train.Saver()

     #定义学习步骤
    optimizer = tf.train.AdamOptimizer(learning_rate)
    train =  optimizer.minimize(alex.cost)
    #train = tf.train.GradientDescentOptimizer(learning_rate).minimize(cost)

    with tf.Session() as sess:
        sess.run(tf.global_variables_initializer())     #初始化变量

        #如果该文件存在,恢复模型数据
        if os.path.isfile(model_name+'.meta'):
            saver.restore(sess,model_name)

        count = 0
        #开始迭代
        for i in range(training_epoches):
            #打乱训练集
            random.shuffle(training_data)
            #分组
            mini_batchs = [training_data[k:k+batch_size] for k in range(0,n_train,batch_size)]

            #遍历每一个mini_batch
            for mini_batch in mini_batchs:
                print('输出',mini_batch[0])
                x_batch,y_batch = datagenerator.get_image_data_and_label(mini_batch,image_size=image_size,one_hot=True)
                #开始训练
                train.run(feed_dict={alex.input_x:x_batch,alex.input_y:y_batch,alex.keep_prob:pdropout})

                #每次训练一批后,输出训练集准确率
                training_accuracy,training_cost = sess.run([alex.accuracy,alex.cost],feed_dict={alex.input_x:x_batch,alex.input_y:y_batch,alex.keep_prob:pdropout})
                count +=1
                print('Iteration {0}:Training set accuracy {1},cost {2}.'.format(count,np.mean(training_accuracy),np.mean(training_cost)))


            '''
            每一轮训练完成做测试
            #输出测试集准确率   如果一次性全部做测试,内容不够用会出现OOM错误。所以测试时选取比较小的mini_batch来测试
            '''
            #分组
            mini_batchs = [test_data[k:k+batch_size] for k in range(0,n_test,batch_size)]

            test_accuracy_sum = []
            test_cost_sum = []
            #遍历每一个mini_batch
            for mini_batch in mini_batchs:

                x_batch,y_batch = datagenerator.get_image_data_and_label(mini_batch,image_size=image_size,one_hot=True)

                #校验
                test_accuracy,test_cost = sess.run([alex.accuracy,alex.cost],feed_dict={alex.input_x:x_batch,alex.input_y:y_batch,alex.keep_prob:pdropout})
                test_accuracy_sum.append(test_accuracy)
                test_cost_sum.append(test_cost)
            #迭代完一轮测试集,求平均
            print('Epoch {0}: Test set accuracy {1},cost {2}.'.format(i,np.mean(test_accuracy_sum),np.mean(test_cost_sum)))


    #tensorflow的saver,用于保存模型
    if remove_model_file(model_name) == True:     #删除原先模型文件
        saver.save(sess,model_name)
        print('模型保存成功!')


def alexnet_improve_main():
    '''
    使用AlexNet测试
    这里采用一次获取所有的图片数据和标签,然后每次训练时从这些数据中随机选取batch_size去训练
    '''


    '''
    一 加载数据

    '''
    data_dir = 'cifar-10-batches-py'       #数据所在目录

    filelist = []
    for i in range(5):
        name = os.path.join(data_dir,str('data_batch_%d'%(i+1)))
        filelist.append(name)
    data = datagenerator.datagenerator()
    #获取训练集数据
    train_x = data.get_data_by_keyword('data',filelist,
                                           normalized=True,size=(32,32))
    #标签
    train_y = data.get_data_by_keyword('labels',filelist)

    filelist = [os.path.join(data_dir,'test_batch')]

    #获取训练集数据 数据标准化为0-1之间
    test_x = data.get_data_by_keyword('data',filelist,
                                           normalized=True,size=(32,32))

    #标签
    test_y = data.get_data_by_keyword('labels',filelist)


    '''
    二 定义网络参数
    '''
    tf.reset_default_graph()

    tf.flags.DEFINE_string('model_file_name','./alexnet_improve_param/alexnet_model.ckpt','model file name (default:./alexnet_improve_param/alexnet_model.ckpt) ')
    #定义网络超参数
    tf.flags.DEFINE_float('learning_rate', 0.0001,'learning rate (default:0.0001)')
    tf.flags.DEFINE_float('pdropout' , 0.5,'Dropout keep probability (default:0.5)')

    #定义网络参数
    tf.flags.DEFINE_integer('training_epoches',5,'Number of training epochs (default:20)')
    tf.flags.DEFINE_integer('batch_size', 512,'Batch size (default:256)')


    n_classes = 10                                       #标签的维度
    n_train = len(train_y)                               #训练集数据长度
    n_test =  len(test_y)                                #测试卷数据长度
    image_size = (227,227)                               #图片大小


    FLAGS = tf.flags.FLAGS
    FLAGS._parse_flags()

    print('网络参数')
    for attr,value in sorted(FLAGS.__flags.items()):
        print('{0}:{1}'.format(attr.upper(),value))

    #如果目录不存在创建目录
    if  not os.path.isdir(os.path.dirname(FLAGS.model_file_name)):
        os.mkdir(os.path.dirname(FLAGS.model_file_name))

    '''
    三 求解 构建模型 开始测试
    '''
    #构建alexnet网络
    alex = alexnet(n_classes)

    #创建Saver op用于保存和恢复所有变量
    saver = tf.train.Saver()

    #定义学习步骤
    optimizer = tf.train.AdamOptimizer(FLAGS.learning_rate)
    train =  optimizer.minimize(alex.cost)
    #train = tf.train.GradientDescentOptimizer(learning_rate).minimize(cost)

    #设置tensorflow对GPU使用按需分配
    config = tf.ConfigProto()
    config.gpu_options.allow_growth = True

    with tf.Session(config=config) as sess:
         #初始化变量
        sess.run(tf.global_variables_initializer())


        #如果该文件存在,恢复模型数据
        if os.path.isfile(FLAGS.model_file_name + '.meta'):
            saver.restore(sess, FLAGS.model_file_name)


        #开始迭代
        for epoch in range(FLAGS.training_epoches):
            indices =  np.arange(n_train)
            #打乱训练集
            random.shuffle(indices)

            #这里取n_train-batch_size+1 是为了防止indices[i+j]溢出
            for i in range(0, n_train - FLAGS.batch_size + 1, FLAGS.batch_size):
                x_batch = []
                y_batch = []

                for j in range(FLAGS.batch_size):
                    x_batch.append(cv2.resize(train_x[indices[i+j]], image_size)/255)
                    y_batch.append(train_y[indices[i+j]])

                #转换为one_hot格式
                y_batch = datagenerator.get_one_hot_label(y_batch,n_classes)
                #开始训练
                train.run(feed_dict={alex.input_x:x_batch,alex.input_y:y_batch,alex.keep_prob:FLAGS.pdropout})
                #training_accuracy,training_cost = sess.run([alex.accuracy,alex.cost],feed_dict={alex.input_x:x_batch,alex.input_y:y_batch,alex.keep_prob:FLAGS.pdropout})
                #print('Iteration {0}:Training set accuracy {1},cost {2}.'.format(int((i+epoch * n_train)/FLAGS.batch_size) ,np.mean(training_accuracy),np.mean(training_cost)))


            #迭代完一轮后 输出训练集准确率
            training_accuracy_sum = []
            training_cost_sum = []
            for i in range(0,n_train-FLAGS.batch_size+1,FLAGS.batch_size):
                x_batch = []
                y_batch = []

                for j in range(FLAGS.batch_size):
                    x_batch.append(cv2.resize(train_x[i+j],image_size)/255)
                    y_batch.append(train_y[i+j])

                #转换为one_hot格式
                y_batch = datagenerator.get_one_hot_label(y_batch,n_classes)

            training_accuracy,training_cost = sess.run([alex.accuracy,alex.cost],feed_dict={alex.input_x:x_batch,alex.input_y:y_batch,alex.keep_prob:FLAGS.pdropout})
            training_accuracy_sum.append(training_accuracy)
            training_cost_sum.append(training_cost)
            print('Epoch {0}:Training set accuracy {1},cost {2}.'.format(epoch,np.mean(training_accuracy_sum),np.mean(training_cost_sum)))


            '''
            每一轮训练完成做测试
            #输出测试集准确率   如果一次性全部做测试,内容不够用会出现OOM错误。所以测试时选取比较小的mini_batch来测试
            '''
            test_accuracy_sum = []
            test_cost_sum = []
            for i in range(0,n_test-FLAGS.batch_size+1,FLAGS.batch_size):
                x_batch = []
                y_batch = []

                for j in range(FLAGS.batch_size):
                    x_batch.append(cv2.resize(test_x[i+j],image_size)/255)
                    y_batch.append(test_y[i+j])

                #转换为one_hot格式
                y_batch = datagenerator.get_one_hot_label(y_batch,n_classes)

                #校验
                test_accuracy,test_cost = sess.run([alex.accuracy,alex.cost],feed_dict={alex.input_x:x_batch,alex.input_y:y_batch,alex.keep_prob:FLAGS.pdropout})
                test_accuracy_sum.append(test_accuracy)
                test_cost_sum.append(test_cost)
            #迭代完一轮测试集,求平均
            print('Epoch {0}: Test set accuracy {1},cost {2}.'.format(epoch,np.mean(test_accuracy_sum),np.mean(test_cost_sum)))


        #tensorflow的saver,用于保存模型
        if remove_model_file(FLAGS.model_file_name) == True:     #删除原先模型文件
            saver.save(sess,FLAGS.model_file_name)
            print('模型保存成功!')

'''
测试
'''
if __name__ == '__main__':
    #alexnet_main()
    alexnet_improve_main()
由于网络比较大训练时间比较长,我只训练了5次,并设置每次训练的batch_size=512。运行结果如下:

然后我们可以在之前训练的基础上继续训练。后面我又稍微对程序进行了改进,加入了检查点的保存,每迭代一轮保存一次参数,并在输出的时候打印出时间,然后运行几轮后输出如下:

我们可以执行以下程序,查看我们保存的模型数据:然后截取部分内容显示:
from tensorflow.python.tools.inspect_checkpoint import print_tensors_in_checkpoint_file
print_tensors_in_checkpoint_file('./alexnet_improve_param/alexnet_model.ckpt',None,True)
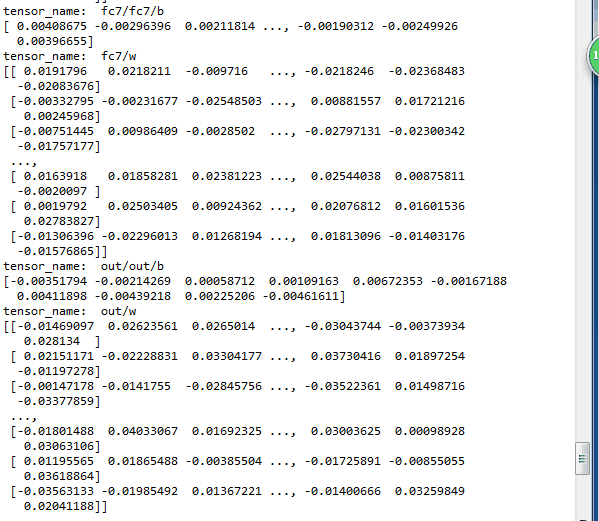
我们以输出层为例,为什么输出的张量名字为out/out/b和out/w,这是因为我们在定义Alexnet网络的时候定义了一个函数:
def fc(x, num_out,name, relu=True):
    '''
    全连接网络
    '''
    num_in = int(x.get_shape()[-1])
    with tf.name_scope(name) as scope:

        # Create tf variables for the weights and biases
        weights = tf.get_variable(scope+'w', shape=[num_in, num_out],
                                             dtype = tf.float32,
                                 initializer = tf.contrib.layers.xavier_initializer_conv2d())
        '''
        或者写成
        shape=[num_in, num_out]
        weights = tf.get_variable(scope+'w', shape=shape,dtype = tf.float32)

        '''

        biases = tf.Variable(tf.constant(0.0,shape=[num_out]),dtype=tf.float32,trainable=True,name=scope+'b')


        if relu:
            act = tf.nn.xw_plus_b(x, weights, biases)
            # Apply ReLu non linearity
            relu = tf.nn.relu(act, name=scope)
            return relu
        else:
            act = tf.nn.xw_plus_b(x, weights, biases, name=scope)
            return act
并且输出层定义如下:

当给fc()函数传入name为'out'时候,get_variable()函数首先去查找是否定义了out/w(scope输出的是字符串为out/)张量,如果没有会创建一个,所以在保存的模型里有名称为out/w的张量。对于偏置我们使用的是Variable()函数,这个函数会始终创建新的变量,如果名称重复会自行处理,并且默认会在变量名称前加上name_scope()中定义的名称作为前缀。所以biases的名称就变成了out/out/b,因此如果我们想保存的张量名字是out/b的话,我们应该把fc()函数中biases这一行改成:
biases = tf.Variable(tf.constant(0.0,shape=[num_out]),dtype=tf.float32,trainable=True,name='b')