沉淀再出发:dubbo的基本原理和应用实例
一、前言
阿里开发的dubbo作为服务治理的工具,在分布式开发中有着重要的意义,这里我们主要专注于dubbo的架构,基本原理以及在Windows下面开发出来的实例来解释和介绍,从而使得dubbo不再神秘。
二、dubbo的架构和原理
2.1、dubbo的架构
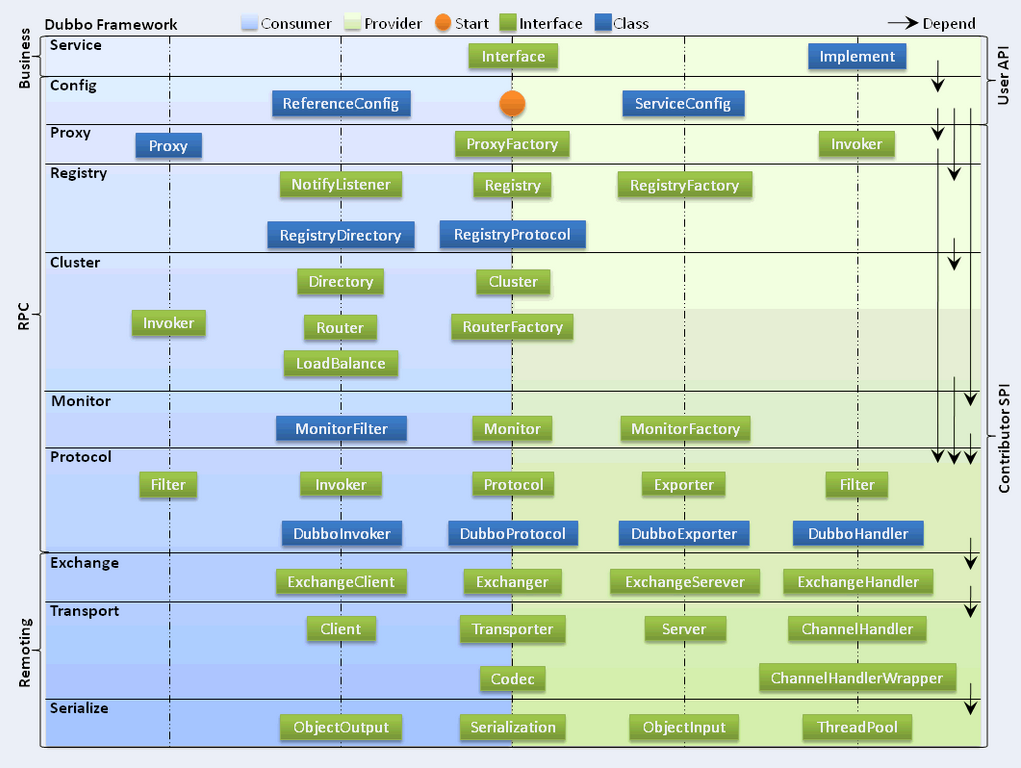
Dubbo框架设计一共划分了10个层,而最上面的Service层留给实际想要使用Dubbo开发分布式服务的开发者实现业务逻辑的接口层。左边淡蓝背景的为服务消费方使用的接口,右边淡绿色背景的为服务提供方使用的接口, 位于中轴线上的为双方都用到的接口。
各个层次的设计要点:
 1     服务接口层(Service):该层是与实际业务逻辑相关的,根据服务提供方和服务消费方的业务设计对应的接口和实现。
 2     配置层(Config):对外配置接口,以ServiceConfig和ReferenceConfig为中心,可以直接new配置类,也可以通过spring解析配置生成配置类。
 3     服务代理层(Proxy):服务接口透明代理,生成服务的客户端Stub和服务器端Skeleton,以ServiceProxy为中心,扩展接口为ProxyFactory。
 4     服务注册层(Registry):封装服务地址的注册与发现,以服务URL为中心,扩展接口为RegistryFactory、Registry和RegistryService。可能没有服务注册中心,此时服务提供方直接暴露服务。
 5     集群层(Cluster):封装多个提供者的路由及负载均衡,并桥接注册中心,以Invoker为中心,扩展接口为Cluster、Directory、Router和LoadBalance。将多个服务提供方组合为一个服务提供方,实现对服务消费方来透明,只需要与一个服务提供方进行交互。
 6     监控层(Monitor):RPC调用次数和调用时间监控,以Statistics为中心,扩展接口为MonitorFactory、Monitor和MonitorService。
 7     远程调用层(Protocol):封将RPC调用,以Invocation和Result为中心,扩展接口为Protocol、Invoker和Exporter。Protocol是服务域,它是Invoker暴露和引用的主功能入口,它负责Invoker的生命周期管理。Invoker是实体域,它是Dubbo的核心模型,其它模型都向它靠扰,或转换成它,它代表一个可执行体,可向它发起invoke调用,它有可能是一个本地的实现,也可能是一个远程的实现,也可能一个集群实现。
 8     信息交换层(Exchange):封装请求响应模式,同步转异步,以Request和Response为中心,扩展接口为Exchanger、ExchangeChannel、ExchangeClient和ExchangeServer。
 9     网络传输层(Transport):抽象mina和netty为统一接口,以Message为中心,扩展接口为Channel、Transporter、Client、Server和Codec。
10     数据序列化层(Serialize):可复用的一些工具,扩展接口为Serialization、 ObjectInput、ObjectOutput和ThreadPool。
Dubbo对于服务提供方和服务消费方,从框架的10层中分别提供了各自需要关心和扩展的接口,构建整个服务生态系统(服务提供方和服务消费方本身就是一个以服务为中心的)。
1     在RPC中,Protocol是核心层,也就是只要有Protocol + Invoker + Exporter就可以完成非透明的RPC调用,然后在Invoker的主过程上Filter拦截点。
2     Consumer和Provider是抽象概念,只是想让看图者更直观的了解哪些类分属于客户端与服务器端,不用Client和Server的原因是Dubbo在很多场景下都使用Provider、Consumer、Registry、Monitor划分逻辑拓普节点,保持统一概念。
3     而Cluster是外围概念,所以Cluster的目的是将多个Invoker伪装成一个Invoker,这样其它人只要关注Protocol层Invoker即可,加上Cluster或者去掉Cluster对其它层都不会造成影响,因为只有一个提供者时,是不需要Cluster的。
4     Proxy层封装了所有接口的透明化代理,而在其它层都以Invoker为中心,只有到了暴露给用户使用时,才用Proxy将Invoker转成接口,或将接口实现转成Invoker,也就是去掉Proxy层RPC是可以Run的,只是不那么透明,不那么看起来像调本地服务一样调远程服务。
5     而Remoting实现是Dubbo协议的实现,如果你选择RMI协议,整个Remoting都不会用上,Remoting内部再划为Transport传输层和Exchange信息交换层,Transport层只负责单向消息传输,是对Mina、Netty、Grizzly的抽象,它也可以扩展UDP传输,而Exchange层是在传输层之上封装了Request-Response语义。
6     Registry和Monitor实际上不算一层,而是一个独立的节点,只是为了全局概览,用层的方式画在一起。
2.2、Dubbo核心要点
服务定义
服务是围绕服务提供方和服务消费方的,服务提供方实现服务,而服务消费方调用服务。
服务注册
对于服务提供方,它需要发布服务,而且由于应用系统的复杂性,服务的数量、类型也不断膨胀;对于服务消费方,它最关心如何获取到它所需要的服务,而面对复杂的应用系统,需要管理大量的服务调用。而且,对于服务提供方和服务消费方来说,他们还有可能兼具这两种角色,即既需要提供服务,有需要消费服务。通过将服务统一管理起来,可以有效地优化内部应用对服务发布/使用的流程和管理。服务注册中心可以通过特定协议来完成服务对外的统一。Dubbo提供的注册中心有如下几种类型可供选择: Multicast注册中心、Zookeeper注册中心、Redis注册中心、Simple注册中心。
服务监控
无论是服务提供方,还是服务消费方,他们都需要对服务调用的实际状态进行有效的监控,从而改进服务质量。
远程通信与信息交换
远程通信需要指定通信双方所约定的协议,在保证通信双方理解协议语义的基础上,还要保证高效、稳定的消息传输。Dubbo继承了当前主流的网络通信框架,主要包括如下几个:Mina、Netty、Grizzly。
服务调用

1     服务提供方发布服务到服务注册中心;
2     服务消费方从服务注册中心订阅服务;
3     服务消费方调用已经注册的可用服务
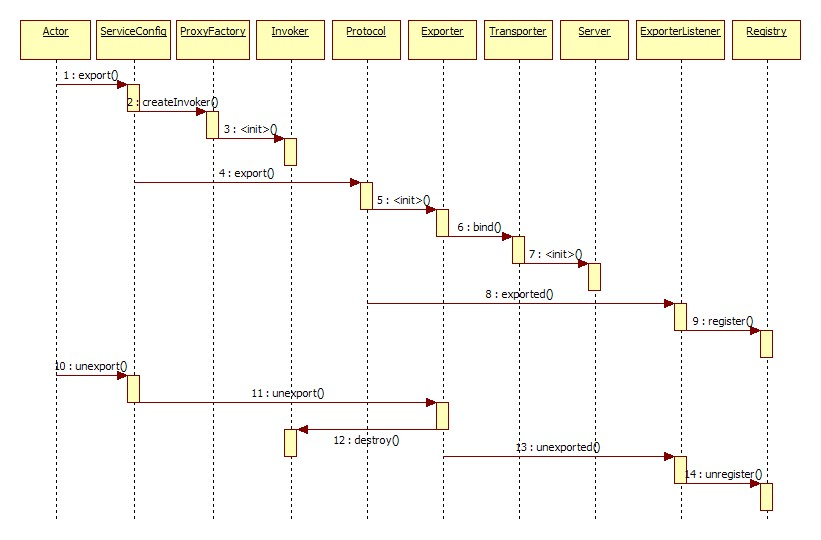
注册/注销服务
服务的注册与注销,是对服务提供方角色而言:
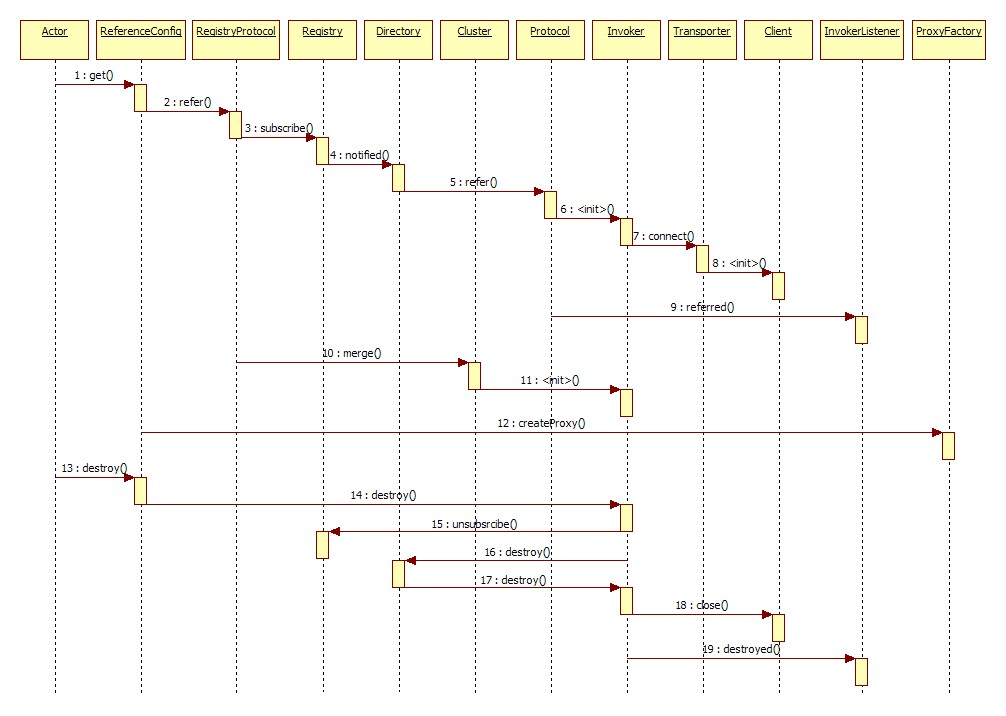
服务订阅/取消
为了满足应用系统的需求,服务消费方的可能需要从服务注册中心订阅指定的有服务提供方发布的服务,在得到通知可以使用服务时,就可以直接调用服务。反过来,如果不需要某一个服务了,可以取消该服务。
2.3、协议支持
Dubbo支持多种协议,如下所示:
1     Dubbo协议
2     Hessian协议
3     HTTP协议
4     RMI协议
5     WebService协议
6     Thrift协议
7     Memcached协议
8     Redis协议
在通信过程中,不同的服务等级一般对应着不同的服务质量,那么选择合适的协议便是一件非常重要的事情。可以根据你应用的创建来选择。例如,使用RMI协议,一般会受到防火墙的限制,所以对于外部与内部进行通信的场景,就不要使用RMI协议,而是基于HTTP协议或者Hessian协议。
2.4、dubbo的包结构
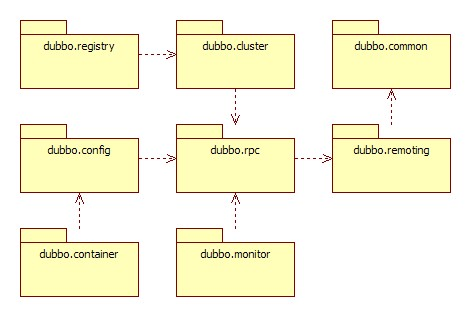
1     dubbo-common 公共逻辑模块,包括Util类和通用模型。
2     dubbo-remoting 远程通讯模块,相当于Dubbo协议的实现,如果RPC用RMI协议则不需要使用此包。
3     dubbo-rpc 远程调用模块,抽象各种协议,以及动态代理,只包含一对一的调用,不关心集群的管理。
4     dubbo-cluster 集群模块,将多个服务提供方伪装为一个提供方,包括:负载均衡、容错、路由等,集群的地址列表可以是静态配置的,也可以是由注册中心下发。
5     dubbo-registry 注册中心模块,基于注册中心下发地址的集群方式,以及对各种注册中心的抽象。
6     dubbo-monitor 监控模块,统计服务调用次数,调用时间的,调用链跟踪的服务。
7     dubbo-config 配置模块,是Dubbo对外的API,用户通过Config使用Dubbo,隐藏Dubbo所有细节。
8     dubbo-container 容器模块,是一个Standalone的容器,以简单的Main加载Spring启动,因为服务通常不需要Tomcat/JBoss等Web容器的特性,没必要用Web容器去加载服务。
三、dubbo的应用实例
这里我们使用windows10操作系统,在Windows上面安装zookeeper,这个在我们之前的博客上已经安装过了,可以查看沉淀再出发:kafka初探来进行安装。因为dubbo的运行需要zookeeper的参与。开发工具我们使用IDEA,建立maven工程的方式,下面言归正传。
3.1、创建空的maven工程
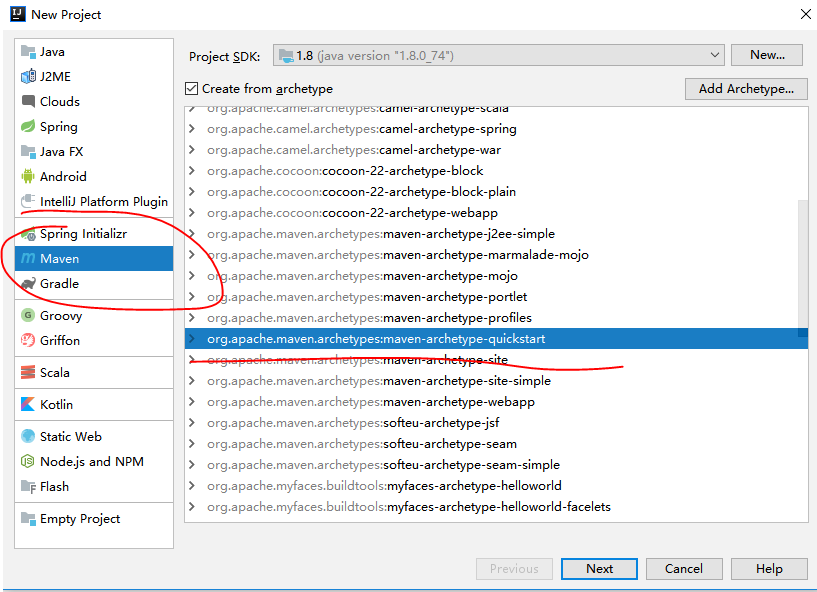
然后生成空白的maven工程,如果有src文件夹则直接删除就可以了。
接下来最重要的一步,修改其中的pom.xml文件:
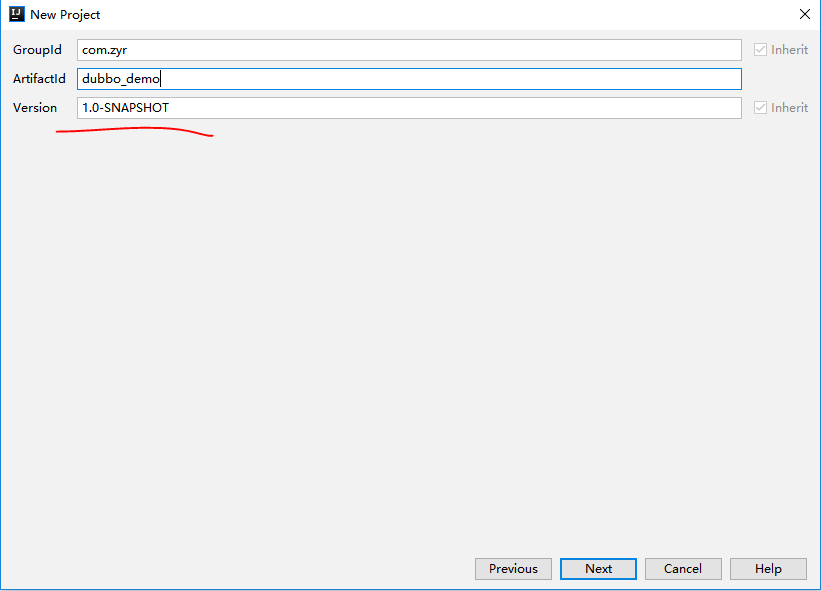
  1 <?xml version="1.0" encoding="UTF-8"?>
  2
  3 <project xmlns="http://maven.apache.org/POM/4.0.0" xmlns:xsi="http://www.w3.org/2001/XMLSchema-instance"
  4          xsi:schemaLocation="http://maven.apache.org/POM/4.0.0 http://maven.apache.org/xsd/maven-4.0.0.xsd">
  5     <modelVersion>4.0.0</modelVersion>
  6
  7     <groupId>com.zyr</groupId>
  8     <artifactId>dubbo_demo</artifactId>
  9     <packaging>pom</packaging>
 10     <version>1.0-SNAPSHOT</version>
 11     <!--POM是最简单的打包类型。不像一个JAR,SAR,或者EAR,它生成的构件只是它本身。-->
 12     <!--没有代码需要测试或者编译,也没有资源需要处理-->
 13     <!--pom 项目里没有java代码,也不执行任何代码,只是为了聚合工程或传递依赖用的。-->
 14     <properties>
 15         <motan.version>0.3.0</motan.version>
 16         <dubbo.version>2.5.3</dubbo.version>
 17         <dubbox.version>2.8.4</dubbox.version>
 18         <spring.version>4.3.6.RELEASE</spring.version>
 19         <java.version>1.8</java.version>
 20         <project.build.sourceEncoding>UTF-8</project.build.sourceEncoding>
 21     </properties>
 22
 23     <dependencies>
 24         <dependency>
 25             <groupId>com.alibaba</groupId>
 26             <artifactId>dubbo</artifactId>
 27             <version>2.5.3</version>
 28             <exclusions>
 29                 <exclusion>
 30                     <groupId>org.springframework</groupId>
 31                     <artifactId>spring</artifactId>
 32                 </exclusion>
 33             </exclusions>
 34         </dependency>
 35         <dependency>
 36             <groupId>com.github.sgroschupf</groupId>
 37             <artifactId>zkclient</artifactId>
 38             <version>0.1</version>
 39         </dependency>
 40         <!-- spring相关 -->
 41         <dependency>
 42             <groupId>org.springframework</groupId>
 43             <artifactId>spring-core</artifactId>
 44             <version>${spring.version}</version>
 45         </dependency>
 46         <dependency>
 47             <groupId>org.springframework</groupId>
 48             <artifactId>spring-beans</artifactId>
 49             <version>${spring.version}</version>
 50         </dependency>
 51         <dependency>
 52             <groupId>org.springframework</groupId>
 53             <artifactId>spring-context</artifactId>
 54             <version>${spring.version}</version>
 55         </dependency>
 56         <dependency>
 57             <groupId>org.springframework</groupId>
 58             <artifactId>spring-jdbc</artifactId>
 59             <version>${spring.version}</version>
 60         </dependency>
 61         <dependency>
 62             <groupId>org.springframework</groupId>
 63             <artifactId>spring-web</artifactId>
 64             <version>${spring.version}</version>
 65         </dependency>
 66         <dependency>
 67             <groupId>org.springframework</groupId>
 68             <artifactId>spring-webmvc</artifactId>
 69             <version>${spring.version}</version>
 70         </dependency>
 71         <dependency>
 72             <groupId>org.springframework</groupId>
 73             <artifactId>spring-aop</artifactId>
 74             <version>${spring.version}</version>
 75         </dependency>
 76         <dependency>
 77             <groupId>org.springframework</groupId>
 78             <artifactId>spring-tx</artifactId>
 79             <version>${spring.version}</version>
 80         </dependency>
 81         <dependency>
 82             <groupId>org.springframework</groupId>
 83             <artifactId>spring-orm</artifactId>
 84             <version>${spring.version}</version>
 85         </dependency>
 86         <dependency>
 87             <groupId>org.springframework</groupId>
 88             <artifactId>spring-context-support</artifactId>
 89             <version>${spring.version}</version>
 90         </dependency>
 91         <dependency>
 92             <groupId>org.springframework</groupId>
 93             <artifactId>spring-test</artifactId>
 94             <version>${spring.version}</version>
 95         </dependency>
 96         <dependency>
 97             <groupId>org.springframework</groupId>
 98             <artifactId>spring-jms</artifactId>
 99             <version>${spring.version}</version>
100         </dependency>
101         <dependency>
102             <groupId>org.aspectj</groupId>
103             <artifactId>aspectjrt</artifactId>
104             <version>1.6.11</version>
105         </dependency>
106         <dependency>
107             <groupId>org.aspectj</groupId>
108             <artifactId>aspectjweaver</artifactId>
109             <version>1.6.11</version>
110         </dependency>
111         <!-- https://mvnrepository.com/artifact/junit/junit -->
112         <dependency>
113             <groupId>junit</groupId>
114             <artifactId>junit</artifactId>
115             <version>4.12</version>
116             <scope>test</scope>
117         </dependency>
118
119     </dependencies>
120
121     <modules>
122         <module>dubbo_api</module>
123         <module>dubbo_provider</module>
124         <module>dubbo_consumer</module>
125     </modules>
126 </project>
这里要注意,后面的<modules>中的内容,我们正要创建,因此会提示错误的信息,我们暂时不用管就可以了,等创建之后就能正常识别了。或者我们先不写这些东西,当后面的模块的pom.xml继承了这个pom.xml的时候就会自动添加进去了。
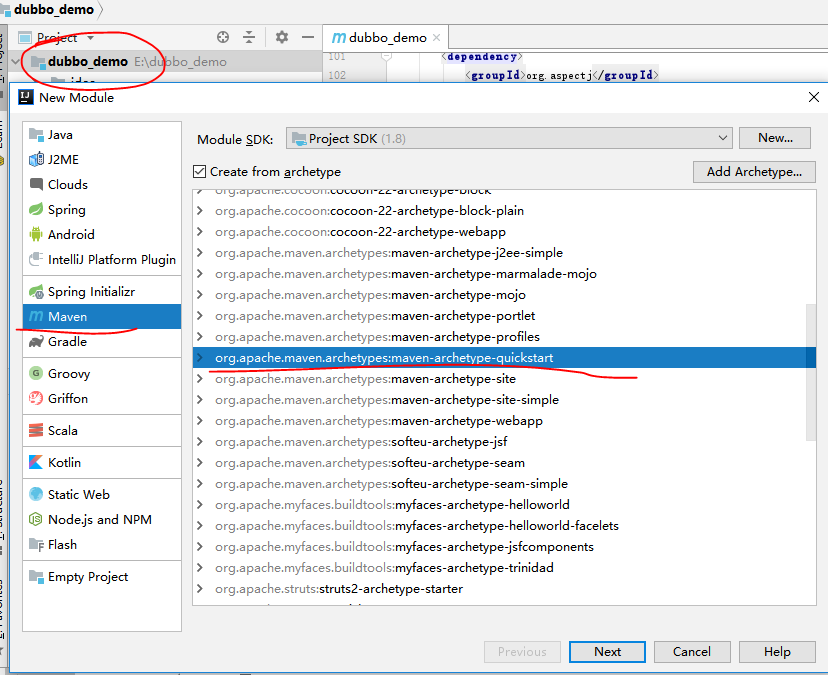
3.2、在空的工程里面创建API模块
其实我们只用创建生产者和消费者就可以了,但是为了更高层次的封装,我们将生产者提供的服务给暴露出来,用统一的模块来显示,于是就有了API模块。右键点击项目“dubbo_demo”,然后新建“Module”,在模块中我们同样使用快速模板。
可以看到这个子模块已经默认的将空项目的pom.xml当成了父pom.xml。

之后生成子项目:

我们修改dubbo_api的pom.xml:
 1 <?xml version="1.0" encoding="UTF-8"?>
 2 <project xmlns="http://maven.apache.org/POM/4.0.0"
 3          xmlns:xsi="http://www.w3.org/2001/XMLSchema-instance"
 4          xsi:schemaLocation="http://maven.apache.org/POM/4.0.0 http://maven.apache.org/xsd/maven-4.0.0.xsd">
 5     <parent>
 6         <artifactId>dubbo_demo</artifactId>
 7         <groupId>com.zyr</groupId>
 8         <version>1.0-SNAPSHOT</version>
 9     </parent>
10     <modelVersion>4.0.0</modelVersion>
11
12     <artifactId>dubbo_api</artifactId>
13     <packaging>jar</packaging>
14
15 </project>
同时定义需要暴露的服务接口:DemoService.java
1 package com.api.service;
2
3 /**
4  * 定义服务接口
5  */
6 public interface DemoService {
7     String sayHello(String name);
8 }
至此这个模块暂时配置完成。
3.3、继续在原工程里面创建provider模块
同样的我们需要创建生产者和消费者模块,这里先创建生产者模块,方式和前面的一样,名字改为dubbo_provider:
然后我们修改dubbo_provider的pom.xml:
 1 <?xml version="1.0" encoding="UTF-8"?>
 2
 3 <project xmlns="http://maven.apache.org/POM/4.0.0" xmlns:xsi="http://www.w3.org/2001/XMLSchema-instance"
 4          xsi:schemaLocation="http://maven.apache.org/POM/4.0.0 http://maven.apache.org/xsd/maven-4.0.0.xsd">
 5     <parent>
 6         <artifactId>dubbo_demo</artifactId>
 7         <groupId>com.zyr</groupId>
 8         <version>1.0-SNAPSHOT</version>
 9     </parent>
10
11     <modelVersion>4.0.0</modelVersion>
12
13     <artifactId>dubbo_provider</artifactId>
14
15     <dependencies>
16         <dependency>
17             <groupId>com.zyr</groupId>
18             <artifactId>dubbo_api</artifactId>
19             <version>1.0-SNAPSHOT</version>
20             <scope>compile</scope>
21         </dependency>
22     </dependencies>
23 </project>
最后添加的依赖,就是为了要使用其中的接口的,这样就能连通了,同样的我们还是继承自空文件的pom.xml,这样就可以使用其中的依赖了,这种方式我们需要仔细的学习,在大型的工程之中是非常有用的。
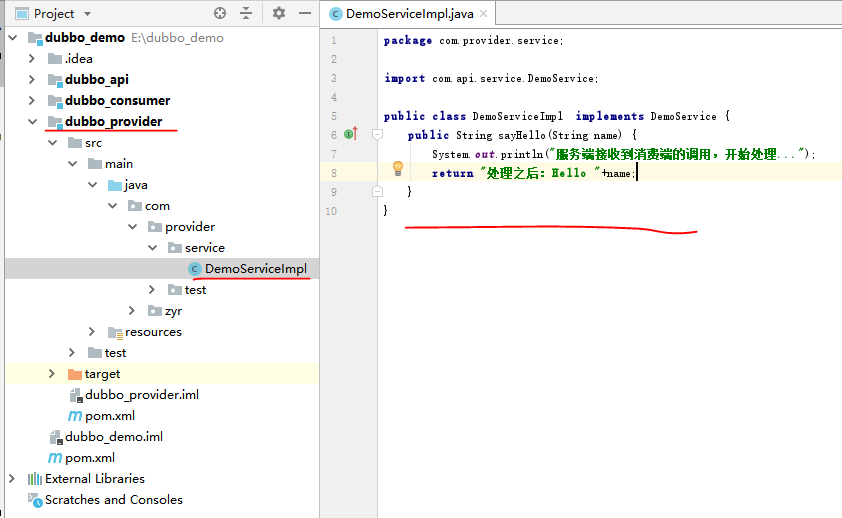
然后创建服务的实现类:DemoServiceImpl
 1 package com.provider.service;
 2
 3 import com.api.service.DemoService;
 4
 5 public class DemoServiceImpl  implements DemoService {
 6     public String sayHello(String name) {
 7         System.out.println("服务端接收到消费端的调用,开始处理...");
 8         return "处理之后:Hello "+name;
 9     }
10 }
然后我们创建一个测试文件:ProviderTest.java
 1 package com.provider.test;
 2
 3 import org.springframework.context.support.ClassPathXmlApplicationContext;
 4
 5 import java.io.IOException;
 6
 7 public class ProviderTest {
 8     public static void main(String[] args) {
 9         ClassPathXmlApplicationContext context = new ClassPathXmlApplicationContext("classpath:springmvc.xml");
10         context.start();
11
12         System.out.println("Dubbo provider start...");
13
14         try {
15             System.in.read();   // 按任意键退出
16             System.out.println("生产者退出...");
17         } catch (IOException e) {
18             e.printStackTrace();
19         }
20     }
21 }
另外,我们这里就需要配置属于服务者的xml文件了,这里也是项目中非常重要的一点。在我们使用IntelliJ IDEA创建maven项目的时候,默认情况下是没有给项目创建resources文件夹的,这个文件夹里面是为了存放.xml配置文件等其他资源文件的,如果我们要使用classpath来定位这些xml文件,我们必须把这些文件放到resources文件夹下面去,这样系统在编译的时候就会找到这些文件,将编译之后的文件放到target/classes文件夹下面。

创建resources文件夹并赋予资源文件夹属性
问题是怎么创建resources文件夹呢,有的人说直接在相应的目录创建就行了,这一点肯定是错误的,就算我们创建了,IDEA也不会认可的,因此我们需要通过IDEA的法定途径来让IDEA承认。
我们从File-》Project Structure这个里面进行定义文件夹的性质:
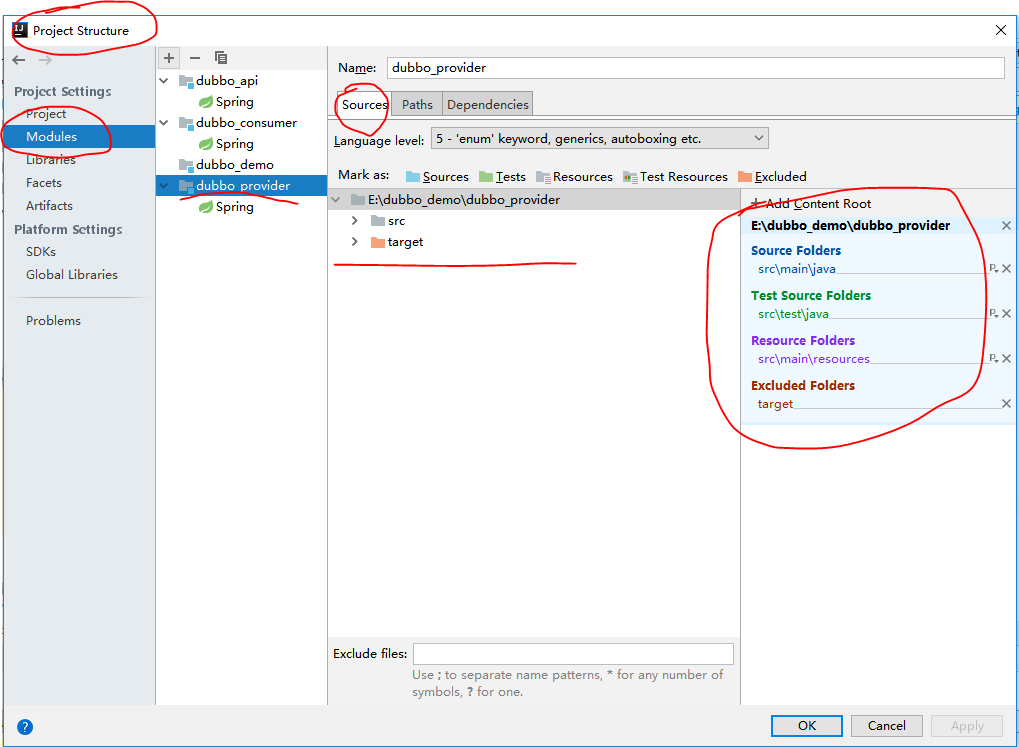
首先我们找到需要定义resources的位置,也就是main下面,点击main右键,新建文件夹,写入resources,然后创建:

创建之后,我们将该文件夹赋予相应的性质,点击resources文件夹,并且点击上面的Resources,这样在右边我们就能看到系统认可了这个资源文件夹。
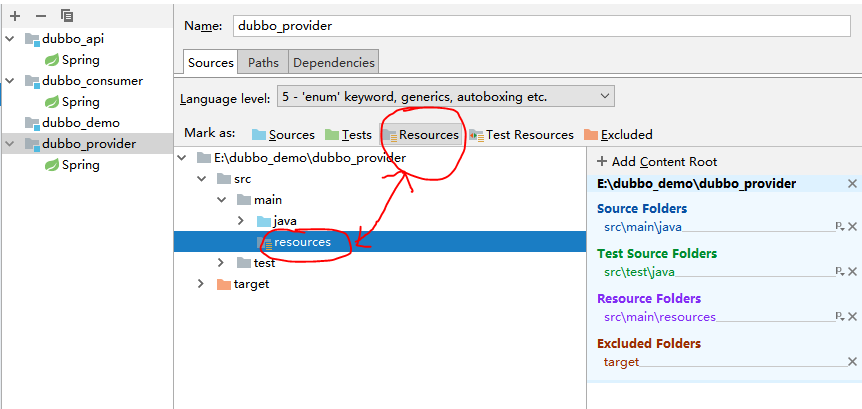
使用同样的方式,我们还可以定义其他的文件夹,甚至改变src的属性,但是这样之后,我们可能在工程中看不到里面的底层文件了,这个功能特别的有意思。
改变了之后,我们就可以新建xml文件了:
创建dubbo-provider.xml:
 1 <?xml version="1.0" encoding="UTF-8"?>
 2 <beans xmlns="http://www.springframework.org/schema/beans"
 3        xmlns:xsi="http://www.w3.org/2001/XMLSchema-instance"
 4        xmlns:dubbo="http://code.alibabatech.com/schema/dubbo"
 5        xsi:schemaLocation="http://www.springframework.org/schema/beans
 6     http://www.springframework.org/schema/beans/spring-beans.xsd
 7     http://code.alibabatech.com/schema/dubbo
 8     http://code.alibabatech.com/schema/dubbo/dubbo.xsd">
 9
10     <!-- 提供方应用信息,用于计算依赖关系 -->
11     <dubbo:application name="dubbo_provider"  />
12
13     <!-- 使用zookeeper注册中心暴露服务地址 -->
14     <dubbo:registry address="zookeeper://127.0.0.1:2181" />
15
16     <!-- 用dubbo协议在20880端口暴露服务 -->
17     <dubbo:protocol name="dubbo" port="20880" />
18
19     <!-- 声明需要暴露的服务接口 -->
20     <dubbo:service interface="com.api.service.DemoService" ref="demoService" />
21
22     <!-- 接口实现类-->
23     <bean id="demoService" class="com.provider.service.DemoServiceImpl"/>
24
25 </beans>
创建springmvc.xml:
 1 <?xml version="1.0" encoding="UTF-8"?>
 2 <beans xmlns="http://www.springframework.org/schema/beans" xmlns:aop="http://www.springframework.org/schema/aop"
 3        xmlns:context="http://www.springframework.org/schema/context"
 4        xmlns:util="http://www.springframework.org/schema/util" xmlns:xsi="http://www.w3.org/2001/XMLSchema-instance"
 5        xsi:schemaLocation="http://www.springframework.org/schema/aop
 6         http://www.springframework.org/schema/aop/spring-aop-4.0.xsd
 7         http://www.springframework.org/schema/beans
 8         http://www.springframework.org/schema/beans/spring-beans-4.0.xsd
 9         http://www.springframework.org/schema/context
10         http://www.springframework.org/schema/context/spring-context-4.0.xsd"
11        default-autowire="byName">
12
13     <aop:aspectj-autoproxy />
14     <context:component-scan base-package="com" />
15     <import resource="classpath:dubbo-provider.xml" />
16 </beans>
至此,provider模块设置完毕。
3.4、继续在原工程里面创建consumer模块
同样的,我们创建模块之后,修改pom.xml:
 1 <?xml version="1.0" encoding="UTF-8"?>
 2
 3 <project xmlns="http://maven.apache.org/POM/4.0.0" xmlns:xsi="http://www.w3.org/2001/XMLSchema-instance"
 4          xsi:schemaLocation="http://maven.apache.org/POM/4.0.0 http://maven.apache.org/xsd/maven-4.0.0.xsd">
 5     <parent>
 6         <artifactId>dubbo_demo</artifactId>
 7         <groupId>com.zyr</groupId>
 8         <version>1.0-SNAPSHOT</version>
 9     </parent>
10     <modelVersion>4.0.0</modelVersion>
11
12     <artifactId>dubbo_consumer</artifactId>
13
14     <dependencies>
15         <dependency>
16             <groupId>com.zyr</groupId>
17             <artifactId>dubbo_api</artifactId>
18             <version>1.0-SNAPSHOT</version>
19             <scope>compile</scope>
20         </dependency>
21     </dependencies>
22 </project>
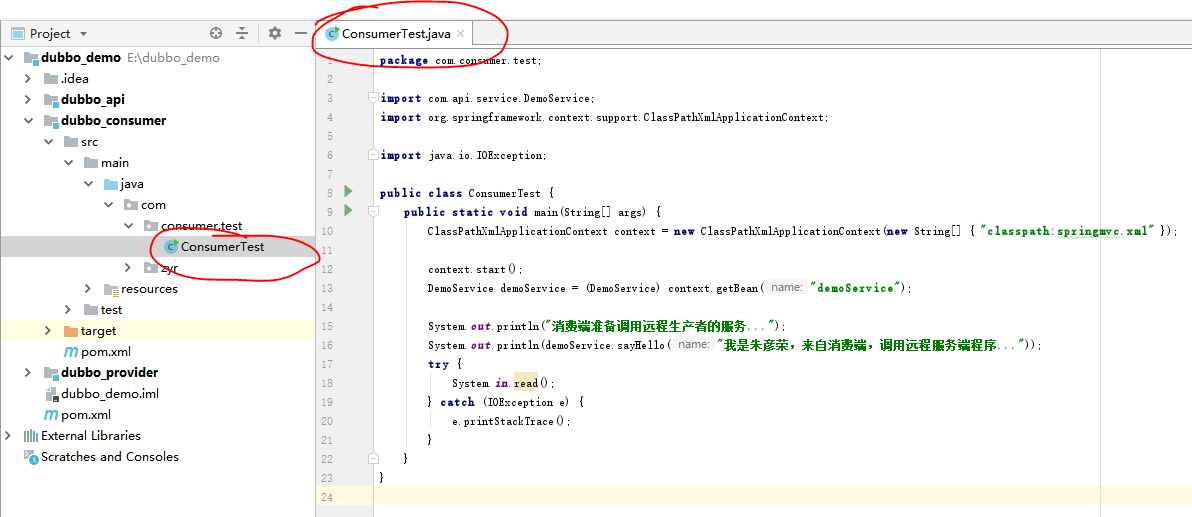
然后我们新建一个测试文件:ConsumerTest.java
 1 package com.consumer.test;
 2
 3 import com.api.service.DemoService;
 4 import org.springframework.context.support.ClassPathXmlApplicationContext;
 5
 6 import java.io.IOException;
 7
 8 public class ConsumerTest {
 9     public static void main(String[] args) {
10         ClassPathXmlApplicationContext context = new ClassPathXmlApplicationContext(new String[] { "classpath:springmvc.xml" });
11
12         context.start();
13         DemoService demoService = (DemoService) context.getBean("demoService");
14
15         System.out.println("消费端准备调用远程生产者的服务...");
16         System.out.println(demoService.sayHello("我是朱彦荣,来自消费端,调用远程服务端程序..."));
17         try {
18             System.in.read();
19         } catch (IOException e) {
20             e.printStackTrace();
21         }
22     }
23 }
新建resources文件,加入xml:
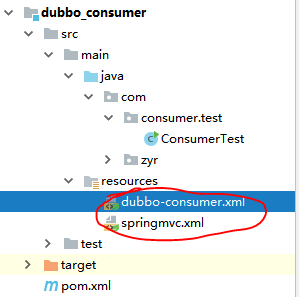
dubbo-consumer.xml:
 1 <?xml version="1.0" encoding="UTF-8"?>
 2 <beans xmlns="http://www.springframework.org/schema/beans"
 3        xmlns:xsi="http://www.w3.org/2001/XMLSchema-instance" xmlns:dubbo="http://code.alibabatech.com/schema/dubbo"
 4        xsi:schemaLocation="http://www.springframework.org/schema/beans
 5         http://www.springframework.org/schema/beans/spring-beans.xsd
 6         http://code.alibabatech.com/schema/dubbo
 7         http://code.alibabatech.com/schema/dubbo/dubbo.xsd ">
 8     <!-- 消费方应用名,用于计算依赖关系,不是匹配条件,不要与提供方一样 -->
 9     <dubbo:application name="dubbo_consumer" />
10     <!-- 使用multicast广播注册中心暴露发现服务地址 -->
11     <dubbo:registry  protocol="zookeeper" address="zookeeper://127.0.0.1:2181" />
12     <!-- 生成远程服务代理,可以和本地bean一样使用demoService -->
13     <dubbo:reference id="demoService" interface="com.api.service.DemoService" />
14 </beans>
springmvc.xml:
 1 <?xml version="1.0" encoding="UTF-8"?>
 2 <beans xmlns="http://www.springframework.org/schema/beans" xmlns:aop="http://www.springframework.org/schema/aop"
 3        xmlns:context="http://www.springframework.org/schema/context"
 4        xmlns:util="http://www.springframework.org/schema/util" xmlns:xsi="http://www.w3.org/2001/XMLSchema-instance"
 5        xsi:schemaLocation="http://www.springframework.org/schema/aop
 6         http://www.springframework.org/schema/aop/spring-aop-4.0.xsd
 7         http://www.springframework.org/schema/beans
 8         http://www.springframework.org/schema/beans/spring-beans-4.0.xsd
 9         http://www.springframework.org/schema/context
10         http://www.springframework.org/schema/context/spring-context-4.0.xsd"
11        default-autowire="byName">
12
13     <aop:aspectj-autoproxy />
14     <context:component-scan base-package="com" />
15     <import resource="classpath:dubbo-consumer.xml" />
16 </beans>
至此我们完成了三个模块的配置,然后我们进入主pom.xml中,看看确实已经自动加入了module,因此删除之前添加的(不重复的话无需删除)即可。

3.5、整个项目的结构
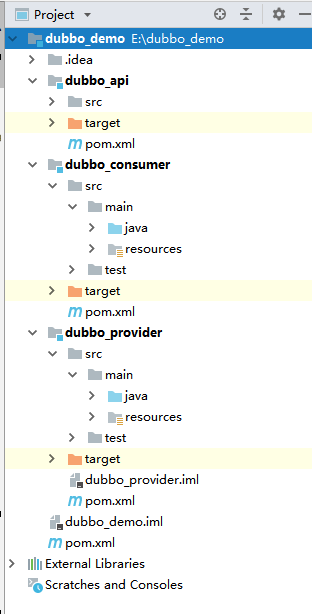
3.6、运行测试
首先我们运行zookeeper,在命令行输入zkServer即可(需要配置环境变量):

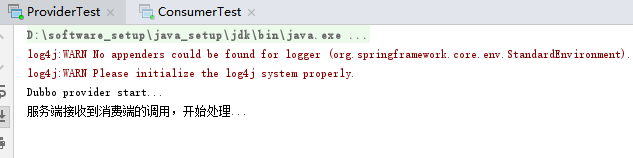
其次,我们先运行provider模块:

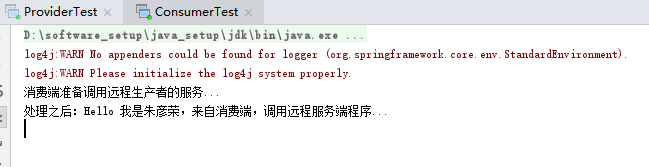
最后,我们运行consumer模块:
当有多个客户端调用的时候:
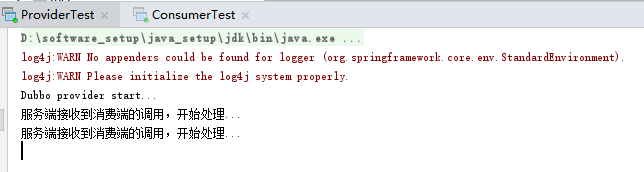
这样,我们就实现了dubbo的服务通信,生产者生产服务发布到zookeeper上面,消费者通过相应的地址去获取服务并且使用,这就是dubbo的工作方式了。
四、总结
通过我们对dubbo的理解,以及使用对dubbo进行的实验测试,我们掌握了dubbo的基本的功能,可以发现dubbo非常类似于wcf的概念,同样也是发布服务,客户端使用服务,由此可以看到生产者,消费者,注册者,这三个东西结合起来组成的SOA架构非常的有用。
参考文献:https://blog.csdn.net/crazer_cy/article/details/80397649