SnapKit swift版的自动布局框架,第一次使用感觉还不错。
GtiHub地址:https://github.com/SnapKit/SnapKit
1.uitableview高度自适应的关键代码:
self.tableView.estimatedRowHeight=50//预估值随意写一个差不多的就可以
self.tableView.rowHeight=UITableViewAutomaticDimension
2.布局约束时一定要从上往下不然高度也无法适应
3.在最后一个view一定要添加与底部的一个约束: make.bottom.equalTo(-10)
以下是示例代码
//
// TableViewCell.swift
// Test
// Copyright © 2017年 All rights reserved.
//
import UIKit
import SnapKit
class TableViewCell: UITableViewCell {
override func awakeFromNib() {
super.awakeFromNib()
//约束头像
self.headImageView.backgroundColor=UIColor.red
self.addSubview(headImageView)
self.headImageView.snp.makeConstraints({make in
make.top.left.equalTo(10)
make.width.height.equalTo(40)
})
//约束用户名
self.addSubview(nameLabel)
self.nameLabel.snp.makeConstraints({make in
make.top.equalTo(headImageView.snp.top)
make.left.equalTo(headImageView.snp.right).offset(5)
})
self.addSubview(timeLabel)
self.timeLabel.snp.makeConstraints({make in
make.left.equalTo(headImageView.snp.right).offset(5)
make.bottom.equalTo(headImageView.snp.bottom)
})
//约束文字内容
self.addSubview(contentLabel)
self.contentLabel.snp.makeConstraints({make in
make.top.equalTo(headImageView.snp.bottom).offset(5)
make.left.equalTo(headImageView.snp.left)
make.right.equalTo(-10)
})
//约束图片
self.picView.dataSource=self
self.picView.delegate=self
// let nib = UINib.init(nibName: "CollectionViewCell", bundle: nil)
self.picView.register(UICollectionViewCell.self, forCellWithReuseIdentifier: "imgCell")
self.addSubview(picView)
self.picView.snp.makeConstraints({make in
make.top.equalTo(contentLabel.snp.bottom).offset(5)
make.height.equalTo(0)
make.left.equalTo(contentLabel.snp.left)
make.right.equalTo(-10)
})
//约束底部工具条
self.addSubview(bottomBar)
self.bottomBar.snp.makeConstraints({make in
make.top.equalTo(picView.snp.bottom).offset(5)
make.left.equalTo(10)
make.right.equalTo(-10)
make.height.equalTo(40)
make.bottom.equalTo(-10)//这句一定要放在最后一个view不然无法自动计算高度
})
}
//懒加载头像
lazy private var headImageView:UIImageView={
let headImageView = UIImageView()
return headImageView
}()
//懒加载用户名
lazy private var nameLabel:UILabel={
let nameLabel=UILabel()
return nameLabel
}()
//懒加载时间
lazy private var timeLabel:UILabel={
let timeLabel = UILabel()
timeLabel.font=UIFont.systemFont(ofSize: 14)
timeLabel.textColor=UIColor.darkGray
return timeLabel
}()
//懒加载文字内容
lazy private var contentLabel:UILabel={
let contentLabel = UILabel()
contentLabel.numberOfLines=0
return contentLabel
}()
//懒加载图片容器
lazy private var picView:UICollectionView={
let picView=UICollectionView(frame:CGRect.zero,collectionViewLayout: UICollectionViewFlowLayout())
return picView
}()
//底部工条
lazy private var bottomBar:UIView={
let bottomBar=UIView()
bottomBar.backgroundColor=UIColor.cyan
return bottomBar
}()
var model:Model?{
didSet{
guard let model=model else {
return
}
self.nameLabel.text="用户名"
self.timeLabel.text="时间"
self.contentLabel.text=model.text ?? ""
//这里更新图片容器(注意:这里测试写死的,开发中应根据图片张数计算图片容器高度)
self.picView.snp.updateConstraints({make in
make.height.equalTo(310)
})
}
}
}
extension TableViewCell:UICollectionViewDataSource,UICollectionViewDelegate,UICollectionViewDelegateFlowLayout{
func numberOfSections(in collectionView: UICollectionView) -> Int {
return 1
}
func collectionView(_ collectionView: UICollectionView, numberOfItemsInSection section: Int) -> Int {
return 9
}
func collectionView(_ collectionView: UICollectionView, layout collectionViewLayout: UICollectionViewLayout, minimumLineSpacingForSectionAt section: Int) -> CGFloat {
return 5
}
func collectionView(_ collectionView: UICollectionView, layout collectionViewLayout: UICollectionViewLayout, minimumInteritemSpacingForSectionAt section: Int) -> CGFloat {
return 0
}
func collectionView(_ collectionView: UICollectionView, layout collectionViewLayout: UICollectionViewLayout, sizeForItemAt indexPath: IndexPath) -> CGSize {
return CGSize((UIScreen.main.bounds.size.width-30)/3,height:100)
}
func collectionView(_ collectionView: UICollectionView, cellForItemAt indexPath: IndexPath) -> UICollectionViewCell {
let cell = collectionView.dequeueReusableCell(withReuseIdentifier: "imgCell", for: indexPath)
cell.backgroundColor=UIColor.orange
return cell
}
}
//
// TableViewController.swift
// Test
//
// Created by admin
// Copyright © 2017年 tdin360. All rights reserved.
//
import UIKit
class TableViewController: UITableViewController {
var datas = [Model]()
override func viewDidLoad() {
super.viewDidLoad()
datas.append(Model(text: "2016.01.18 -- 推出“普通简化版”tableview的cell自动高度方法(推荐使用),原来的需2步设置的普通版方法将标记过期"))
datas.append(Model(text: "One line of code to implement automatic layout. 一行代码搞定自动布局!支持Cell和Tableview高度自适应,Label和ScrollView内容自适应,致力于做最简单易用的AutoLayout库。The most easy way for autoLayout. Based on runtime."))
datas.append(Model(text: "One line of code to implement automatic layout. 一行代码搞定自动布局!支持Cell和Tableview高度自适应,Label和ScrollView内容自适应,致力于做最简单易用的AutoLayout库。The most easy way for autoLayout. Based on runtime.One line of code to implement automatic layout. 一行代码搞定自动布局!支持Cell和Tableview高度自适应,Label和ScrollView内容自适应,致力于做最简单易用的AutoLayout库。The most easy way for autoLayout. Based on runtime."))
datas.append(Model(text: "One line of code to implement automatic layout. 一行代码搞定自动布局!支持Cell和Tableview高度自适应,Label和ScrollView内容自适应,致力于做最简单易用的AutoLayout库。The most easy way for autoLayout. Based on runtime.One line of code to implement automatic layout. 一行代码搞定自动布局!支持Cell和Tableview高度自适应,Label和ScrollView内容自适应,致力于做最简单易用的AutoLayout库。The most easy way for autoLayout. Based on runtime.One line of code to implement automatic layout. 一行代码搞定自动布局!支持Cell和Tableview高度自适应,Label和ScrollView内容自适应,致力于做最简单易用的AutoLayout库。The most easy way for autoLayout. Based on runtime."))
datas.append(Model(text: "One line of code to implement automatic layout. 一行代码搞定自动布局!支持Cell和Tableview高度自适应,Label和ScrollView内容自适应,致力于做最简单易用的AutoLayout库。The most easy way for autoLayout. Based on runtime."))
//这两句是实现高度自适应的关键代码
self.tableView.estimatedRowHeight=50
self.tableView.rowHeight=UITableViewAutomaticDimension
}
override func didReceiveMemoryWarning() {
super.didReceiveMemoryWarning()
}
// MARK: - Table view data source
override func numberOfSections(in tableView: UITableView) -> Int {
return 1
}
override func tableView(_ tableView: UITableView, numberOfRowsInSection section: Int) -> Int {
return datas.count
}
override func tableView(_ tableView: UITableView, cellForRowAt indexPath: IndexPath) -> UITableViewCell {
let cell = tableView.dequeueReusableCell(withIdentifier: "cell", for: indexPath) as! TableViewCell
cell.model=datas[indexPath.row]
return cell
}
}
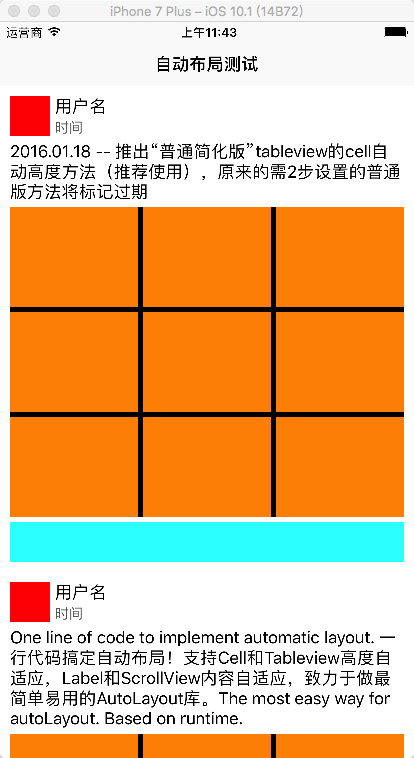
效果图