https://www.zabbix.com/documentation/4.0/zh/manual/installation/install_from_packages/rhel_centos
zabbix zzl0916
服务器zzl*&123
1 2020-10-25 23:28:22
2 2020-10-25 23:28:35 mysql
3 2020-10-25 23:29:39 rpm -qa | grep mariadb
4 2020-10-25 23:29:54 yum install mariadb*
5 2020-10-25 23:31:07 systemctl restart mariadb.service
6 2020-10-25 23:31:15 mysql
7 2020-10-25 23:32:40 yum install -y lrzsz
8 2020-10-25 23:32:44 rz
9 2020-10-25 23:36:35 mysql -h127.0.0.1 -uroot -pzlinux123456 zabbix < create.sql
10 2020-10-25 23:36:41 mysql -h 127.0.0.1 -uroot -pzlinux123456 zabbix < create.sql
11 2020-10-25 23:37:11 mysql -h 127.0.0.1 -uzabbix -pzlinux123456 zabbix < create.sql
12 2020-10-25 23:37:26 mysql
13 2020-10-25 23:38:16 wget repo.zabbix.com/zabbix/3.2/rhel/7/x86_64/zabbix-release-3.2-1.el7.noarch.rpm
14 2020-10-25 23:38:27 rpm -ivh zabbix-release-3.2-1.el7.noarch.rpm
15 2020-10-25 23:38:38 yum install -y zabbix-agent zabbix-get zabbix-server-mysql zabbix-web zabbix-web-mysql
16 2020-10-25 23:40:13 yum install -y zabbix-agent
17 2020-10-25 23:40:22 yum install -y zabbix-agent
18 2020-10-25 23:40:34 yum install -y zabbix-agent
19 2020-10-25 23:40:47 yum install -y zabbix-agent
20 2020-10-25 23:41:00 yum install -y zabbix-agent
21 2020-10-25 23:41:24 yum install -y zabbix-web zabbix-web-mysql
22 2020-10-25 23:41:34 yum install -y zabbix-web zabbix-web-mysql
23 2020-10-25 23:41:47 yum install -y zabbix-web zabbix-web-mysql
24 2020-10-25 23:42:02 yum install -y zabbix-web zabbix-web-mysql
25 2020-10-25 23:42:17 yum install -y zabbix-web zabbix-web-mysql
26 2020-10-25 23:42:29 yum install -y zabbix-web zabbix-web-mysql
27 2020-10-25 23:43:44 yum install -y zabbix-web zabbix-web-mysql
28 2020-10-25 23:43:57 kill -9 13290
29 2020-10-25 23:44:02 yum install -y zabbix-web zabbix-web-mysql
30 2020-10-25 23:44:15 yum install -y zabbix-web zabbix-web-mysql
31 2020-10-25 23:45:04 yum install -y zabbix-web zabbix-web-mysql
32 2020-10-25 23:45:20 yum install -y zabbix-web zabbix-web-mysql
33 2020-10-25 23:45:40 systemctl start httpd
34 2020-10-25 23:45:43 yum install -y zabbix-web zabbix-web-mysql
35 2020-10-25 23:45:59 yum install -y zabbix-web zabbix-web-mysql
36 2020-10-25 23:46:13 yum install -y zabbix-web zabbix-web-mysql
37 2020-10-25 23:46:32 yum install -y zabbix-web zabbix-web-mysql
38 2020-10-25 23:46:52 yum install -y zabbix-web zabbix-web-mysql
39 2020-10-25 23:47:02 yum install -y zabbix-web zabbix-web-mysql
40 2020-10-25 23:47:29 yum install -y zabbix-web zabbix-web-mysql
41 2020-10-25 23:47:43 yum install -y zabbix-web zabbix-web-mysql
42 2020-10-25 23:47:49 yum install -y zabbix-web zabbix-web-mysql
43 2020-10-25 23:48:06 yum install -y zabbix-web zabbix-web-mysql
44 2020-10-25 23:48:17 yum install -y zabbix-web zabbix-web-mysql
45 2020-10-25 23:48:38 yum install -y zabbix-web zabbix-web-mysql
46 2020-10-25 23:48:51 yum install -y zabbix-web zabbix-web-mysql
47 2020-10-25 23:49:02 yum install -y zabbix-web zabbix-web-mysql
48 2020-10-25 23:49:15 yum install -y zabbix-web zabbix-web-mysql
49 2020-10-25 23:49:29 yum install -y zabbix-web zabbix-web-mysql
50 2020-10-25 23:49:38 yum install -y zabbix-web zabbix-web-mysql
51 2020-10-25 23:49:51 yum install -y zabbix-web zabbix-web-mysql
52 2020-10-25 23:50:04 yum install -y zabbix-web zabbix-web-mysql
53 2020-10-25 23:50:16 yum install -y zabbix-web zabbix-web-mysql
54 2020-10-25 23:50:33 yum install -y zabbix-web zabbix-web-mysql
55 2020-10-25 23:50:49 yum install -y zabbix-web zabbix-web-mysql
56 2020-10-25 23:51:04 yum install -y zabbix-web zabbix-web-mysql
57 2020-10-25 23:51:14 yum install -y zabbix-web zabbix-web-mysql
58 2020-10-25 23:51:32 yum install -y zabbix-web zabbix-web-mysql
59 2020-10-25 23:51:39 yum install -y zabbix-web zabbix-web-mysql
60 2020-10-25 23:51:56 yum install -y zabbix-web zabbix-web-mysql
61 2020-10-25 23:52:11 yum install -y zabbix-web zabbix-web-mysql
62 2020-10-25 23:52:29 yum install -y zabbix-web zabbix-web-mysql
63 2020-10-25 23:52:36 yum install -y zabbix-web zabbix-web-mysql
64 2020-10-25 23:52:53 yum install -y zabbix-web zabbix-web-mysql
65 2020-10-25 23:53:14 yum install -y zabbix-web zabbix-web-mysql
66 2020-10-25 23:53:27 yum install -y zabbix-web zabbix-web-mysql
67 2020-10-25 23:53:39 yum install -y zabbix-web zabbix-web-mysql
68 2020-10-25 23:53:49 yum install -y zabbix-web zabbix-web-mysql
69 2020-10-25 23:53:58 yum install -y zabbix-web zabbix-web-mysql
70 2020-10-25 23:54:47 vim /etc/zabbix/zabbix_server.conf
71 2020-10-25 23:55:13 systemctl start zabbix-server
72 2020-10-25 23:56:16 cd /etc/zabbix/
73 2020-10-25 23:56:18 ll -a
74 2020-10-25 23:56:43 cd web/
75 2020-10-25 23:56:44 ll -a
76 2020-10-25 23:56:47 cd ../
77 2020-10-25 23:56:50 ll -a
78 2020-10-25 23:57:35 cat zabbix_server.conf.swp
79 2020-10-25 23:57:42 cat .zabbix_server.conf.swp
80 2020-10-25 23:58:20 yum install -y zabbix-agent zabbix-get zabbix-server-mysql zabbix-web zabbix-web-mysql
81 2020-10-25 23:59:04 yum install -y zabbix-server-mysql
82 2020-10-25 23:59:19 yum install -y zabbix-server-mysql
83 2020-10-25 23:59:28 yum install -y zabbix-server-mysql
84 2020-10-25 23:59:39 yum install -y zabbix-server-mysql
85 2020-10-25 23:59:55 yum install -y zabbix-server-mysql
86 2020-10-26 00:00:07 yum install -y zabbix-server-mysql
87 2020-10-26 00:00:20 yum install -y zabbix-server-mysql
88 2020-10-26 00:00:39 yum install -y zabbix-server-mysql
89 2020-10-26 00:00:54 yum install -y zabbix-server-mysql
90 2020-10-26 00:01:02 yum install -y zabbix-server-mysql
91 2020-10-26 00:01:18 yum install -y zabbix-server-mysql
92 2020-10-26 00:01:30 yum install -y zabbix-server-mysql
93 2020-10-26 00:01:38 yum install -y zabbix-server-mysql
94 2020-10-26 00:01:52 yum install -y zabbix-server-mysql
95 2020-10-26 00:02:06 yum install -y zabbix-server-mysql
96 2020-10-26 00:02:20 yum install -y zabbix-server-mysql
97 2020-10-26 00:02:31 yum install -y zabbix-server-mysql
98 2020-10-26 00:02:48 yum install -y zabbix-server-mysql
99 2020-10-26 00:02:58 yum install -y zabbix-server-mysql
100 2020-10-26 00:03:12 yum install -y zabbix-agent zabbix-get zabbix-server-mysql zabbix-web zabbix-web-mysql
101 2020-10-26 00:03:29 systemctl start httpd
102 2020-10-26 00:03:42 systemctl start zabbix-server
103 2020-10-26 00:03:58 vim /etc/zabbix/zabbix_server.conf
104 2020-10-26 00:06:32 vim /etc/zabbix/zabbix_server.conf
1 2020-10-25 23:29:52
2 2020-10-25 23:28:35 mysql
3 2020-10-25 23:29:39 rpm -qa | grep mariadb
4 2020-10-25 23:43:05 yum install -y zabbix-agent
5 2020-10-25 23:43:38 yum install -y zabbix-get
6 2020-10-25 23:44:19 yum install -y zabbix-get
7 2020-10-25 23:44:30 kill -9 13392
8 2020-10-25 23:44:32 yum install -y zabbix-get
9 2020-10-25 23:44:47 yum install -y zabbix-get
10 2020-10-25 23:54:37 yum install -y vim
11 2020-10-25 23:54:43 yum install -y vim
12 2020-10-26 00:05:53 systemctl stop zabbix-server
13 2020-10-26 00:07:59 systemctl start zabbix-server
14 2020-10-26 00:08:57 vim /etc/httpd/conf.d/zabbix.conf
15 2020-10-26 00:09:27 systemctl start zabbix-server
16 2020-10-26 00:09:43 systemctl restart zabbix-server
17 2020-10-26 00:10:13 systemctl restart httpd
18 2020-10-26 00:23:00 history
https://blog.51cto.com/3069201/2097480
zabbix-web-3.2.11-1.el7.noarch: [Errno 256] No more mirrors to try.
zabbix-get-3.2.11-1.el7.x86_64: [Errno 256] No more mirrors to try.
zabbix-agent-3.2.11-1.el7.x86_64: [Errno 256] No more mirrors to try.
zabbix-server-mysql-3.2.11-1.el7.x86_64: [Errno 256] No more mirrors to try.
Linux配置监控服务器:Zabbix监控(一)

一、Linux监控平台介绍
- cacti、nagios、zabbix、smokeping、open-falcon等;
- cacti、smokeping偏向基础监控,成图非常漂亮;
- cacti、nagios、zabbix服务端监控中心,需要PHP环境支持,其中zabbix和cacti都需要mysql作为数据存储,nagios不用存储历史数据,注重服务或者监控项的状态,zabbix会获取服务或者监控项目的数据,会把数据记录到数据库里,从而可以成图;
- open-falcon为小米公司开发,开源后受到诸多大公司和运维工程师的追捧,适合大企业,滴滴、360、新浪微博、京东等大公司在使用这款监控软件,值得研究;
二、Zabbix监控介绍
- C/S架构,基于C++开发,监控中心支持web界面配置和管理;
- 单server节点可以支持上万台客户端;
- 最新版本3.4 ,官网文档https://www.zabbix.com/manuals
1、组件
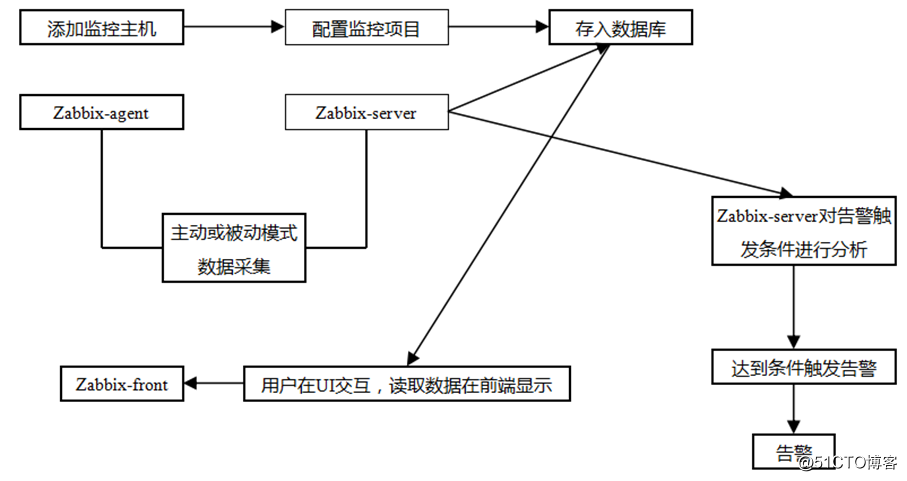
Zabbix整个体系架构中有几个主要角色:
- zabbix-server:核心,监控中心,接收客户端上报信息,负责配置、统计、操作数据;
- 数据存储:存放数据,比如mysql;
- web界面:也叫web UI ,在web界面下操作配置是zabbix简单易用的主要原因;
- zabbix-proxy:可选组件,它可以代替zabbix-server的功能,减轻server的压力;
- zabbix-agent:客户端软件,负责采集各个监控服务或项目的数据,并上报。
2、架构
三、Zabbix监控安装与部署
1、用yum安装Zabbix
[root@zlinux-01 ~]# wget repo.zabbix.com/zabbix/3.2/rhel/7/x86_64/zabbix-release-3.2-1.el7.noarch.rpm    //下载Zabbix的yum扩展源
[root@zlinux-01 ~]# rpm -ivh zabbix-release-3.2-1.el7.noarch.rpm    //安装扩展源
[root@zlinux-01 ~]# yum install -y zabbix-agent zabbix-get zabbix-server-mysql zabbix-web zabbix-web-mysql   //安装相关安装包
#会连带安装httpd和php
#如果mysql之前没有装的话,需要根据lamp那一章的mysql安装方法安装msyql

[root@zlinux-01 ~]# ps aux | grep mysql          //查看mysql服务是否启动,没有就启动下
2、配置MySQL
[root@zlinux-01 ~]# vim /etc/my.cnf    //在[mysqld]下添加以下一行

character_set_server = utf8

[root@zlinux-01 ~]# systemctl restart mysql       //重启mysql
[root@zlinux-01 ~]# mysql -uroot -pzlinux123456
Warning: Using a password on the command line interface can be insecure.
Welcome to the MySQL monitor.  Commands end with ; or g.
Your MySQL connection id is 1
Server version: 5.6.36-log MySQL Community Server (GPL)

Copyright (c) 2000, 2017, Oracle and/or its affiliates. All rights reserved.

Oracle is a registered trademark of Oracle Corporation and/or its
affiliates. Other names may be trademarks of their respective
owners.

Type 'help;' or 'h' for help. Type 'c' to clear the current input statement.

mysql> create database zabbix character set utf8;    //创建zabbix库,字符集utf8
Query OK, 1 row affected (0.00 sec)

mysql> grant all on zabbix.* to 'zabbix'@'127.0.0.1' identified by 'zlinux123456';   //创建zabbix用户,为了zabbix连接数据库
Query OK, 0 rows affected (0.00 sec)

mysql> quit
Bye

#导入zabbix数据库
[root@zlinux-01 ~]# cd /usr/share/doc/zabbix-server-mysql-3.2.11/
[root@zlinux-01 zabbix-server-mysql-3.2.11]# ls
AUTHORS  ChangeLog  COPYING  create.sql.gz  NEWS  README
[root@zlinux-01 zabbix-server-mysql-3.2.11]# gzip -d create.sql.gz
[root@zlinux-01 zabbix-server-mysql-3.2.11]# mysql -uroot -pzlinux123456 zabbix < create.sql

#修改zabbix-server配置文件
[root@zlinux-01 ~]# vim /etc/zabbix/zabbix_server.conf            //加入以下内容

DBHost=127.0.0.1
DBPassword=zlinux123456
3、启动相关服务
[root@zlinux-01 ~]# systemctl stop nginx             //先停止掉Nginx服务因为占用了80,或者Nginx做下代理配置,可参考前文
[root@zlinux-01 ~]# systemctl start httpd    //启动httpd
[root@zlinux-01 ~]# ps aux | grep httpd
root       3472  0.0  0.8 394324 15480 ?        Ss   15:20   0:00 /usr/sbin/httpd -DFOREGROUND
apache     3474  0.0  0.4 394460  7680 ?        S    15:20   0:00 /usr/sbin/httpd -DFOREGROUND
apache     3475  0.0  0.4 394460  7680 ?        S    15:20   0:00 /usr/sbin/httpd -DFOREGROUND
apache     3476  0.0  0.4 394460  7680 ?        S    15:20   0:00 /usr/sbin/httpd -DFOREGROUND
apache     3477  0.0  0.4 394460  7680 ?        S    15:20   0:00 /usr/sbin/httpd -DFOREGROUND
apache     3478  0.0  0.4 394460  7680 ?        S    15:20   0:00 /usr/sbin/httpd -DFOREGROUND
[root@zlinux-01 ~]# systemctl start zabbix-server     //启动zabbix服务
[root@zlinux-01 ~]# ps aux | grep zabbix        //查看zabbix相关,成功的情况下有很多条服务
[root@zlinux-01 ~]# netstat -lntp            //80,3306,11051三个端口
Active Internet connections (only servers)
Proto Recv-Q Send-Q Local Address           Foreign Address         State       PID/Program name
tcp        0      0 0.0.0.0:45930           0.0.0.0:*               LISTEN      -
tcp        0      0 0.0.0.0:111             0.0.0.0:*               LISTEN      1/systemd
tcp        0      0 0.0.0.0:20048           0.0.0.0:*               LISTEN      995/rpc.mountd
tcp        0      0 0.0.0.0:22              0.0.0.0:*               LISTEN      839/sshd
tcp        0      0 127.0.0.1:25            0.0.0.0:*               LISTEN      1703/master
tcp        0      0 0.0.0.0:2049            0.0.0.0:*               LISTEN      -
tcp        0      0 0.0.0.0:10051           0.0.0.0:*               LISTEN      3393/zabbix_server
tcp        0      0 0.0.0.0:42343           0.0.0.0:*               LISTEN      824/rpc.statd
tcp6       0      0 :::3306                 :::*                    LISTEN      3330/mysqld
tcp6       0      0 :::111                  :::*                    LISTEN      1/systemd
tcp6       0      0 :::80                   :::*                    LISTEN      3472/httpd
tcp6       0      0 :::38704                :::*                    LISTEN      -
tcp6       0      0 :