ElasticSearch 简介
Elasticsearch 是一个分布式、高扩展、高实时的搜索与数据分析引擎 。基于 Java 开发,并使用 Lucene 作为核心库,实现所有索引和搜索的功能;可以处理大规模日志数据,实现数据的实时全文搜索搜索、支持分布式可实现高可用、提供API接口;Elasticsearch 的实现原理主要分为以下几个步骤,
①. — 用户将数据提交到 Elasticsearch 数据库中
②. — 通过分词控制器去将对应的语句分词,将其权重和分词结果一并存入数据
③. — 用户搜索数据时,**根据权重将结果排名,打分,再返回结果 **
Elasticsearch支持分布式,这意味着索引可以被分片,每个分片可以有 0 个或多个副本,每个节点托管一个或多个分片,并充当协调器将操作委托给正确的分片。再平衡和路由是自动完成的。“相关数据通常存储在同一个索引中,该索引由一个或多个主分片和零个或多个复制分片组成。一旦创建了索引,就不能更改主分片的数量。
Elasticsearch 是与名为 Logstash 的数据收集和日志解析引擎以及名为 Kibana 的分析和可视化平台一起开发的,这三个产品被设计成一个集成解决方案,称为 “Elastic Stack”(以前称为 “ELK stack”)。
数据模型对比
结构化数据
结构化数据也称作行数据,是由二维表结构来逻辑表达和实现的数据,严格地遵循数据格式与长度规范,主要通过关系型数据库进行存储和管理 。
结构化数据存储时,严格遵守固定数据格式与长度规范,使用 SQL (结构化查询语言)查询
非结构化数据
与结构化数据相对的是不适于由数据库二维表来表现的非结构化数据,包括所有格式的办公文档、XML、HTML、各类报表、图片和音频、视频信息等 。
非结构化数据存储时,没有固定的存储格式,一般使用顺序扫描、全文搜索
ElasticSearch 和 MySQL 结构对比
| Elastic Search | MySQL |
|---|---|
| Index(索引) | Database |
| Type(类型,只能配置一个) | Table |
| Document(文档) | Row |
| Field(字段) | Column |
| Everything is indexed | Index |
| Query DSL | SQL |
| GET http:// ... | SELECT * FROM table ... |
| PUT http:// ... | UPDATE table SET ... |
ElasticSearch 原理
①. — 存储数据时进行全文检索
②. — 全文检索后建立倒排索引
全文检索
将一个数据的内容转化拆分
①. — 分词
②. — 找到关键词
③. — 搜索索引
④. — 匹配,命中,计算命中率
⑤. — 根据命中率进行排序
倒排索引
document_1: Java 是世界上最好的语言
document_2: PHP 是世界上最好的语言
document_3: Python 是世界上最好的语言
| Term(分词后的词条) | Document_1 | Document_2 | Document_3 |
|---|---|---|---|
| Java | 命中 | ||
| 是 | 命中 | 命中 | 命中 |
| 世界上 | 命中 | 命中 | 命中 |
| 最好的 | 命中 | 命中 | 命中 |
| 语言 | 命中 | 命中 | 命中 |
| PHP | 命中 | ||
| Python | 命中 |
实际上一些停顿词(的、了、着、是 、标点符号)不会被记录到词条(Term)中
倒排索引术语
①. —— 词条(Term):索引最小的存储单位,拆分一组词之后,每一个字或者词
②. —— 词典(Term Dictionary):词条存储的地方,一般在内存中
③. —— 倒排表:记录多个词命中的次数和顺序
④. —— 倒排文件:存储倒排表的地方,一般在磁盘中
倒排索引介绍:https://www.cnblogs.com/ajianbeyourself/p/11280247.html
ElasticSearch 部署(单台)
Ntpdate 时间同步
# 同步时间
[root@db01 ~]# yum install -y ntpdate
[root@db01 ~]# ntpdate time1.aliyun.com
安装 JDK
# 上传
[root@db01 ~]# rz jdk-8u181-linux-x64.rpm

# 安装
[root@db01 ~]# rpm -ivh jdk-8u181-linux-x64.rpm
安装 ElasticSearch
# 下载包
[root@db01 ~]# rz elasticsearch-6.6.0.rpm
# 下载地址:https://www.elastic.co/downloads/elasticsearch

# 安装
[root@db01 ~]# rpm -ivh elasticsearch-6.6.0.rpm

# 根据提示继续操作
[root@db01 ~]# systemctl daemon-reload
[root@db01 ~]# systemctl enable elasticsearch.service
Created symlink from /etc/systemd/system/multi-user.target.wants/elasticsearch.service to /usr/lib/systemd/system/elasticsearch.service.
[root@db01 ~]# systemctl start elasticsearch.service

# 验证
[root@db01 ~]# netstat -lntp
tcp6       0      0 127.0.0.1:9200          :::*                    LISTEN      20040/java
tcp6       0      0 127.0.0.1:9300          :::*                    LISTEN      20040/java

[root@db01 ~]# curl 127.0.0.1:9200
{
  "name" : "FIddisT",
  "cluster_name" : "elasticsearch",
  "cluster_uuid" : "m8Y9neWHRxat7V1tVijMxA",
  "version" : {
    "number" : "6.6.0",
    "build_flavor" : "default",
    "build_type" : "rpm",
    "build_hash" : "a9861f4",
    "build_date" : "2019-01-24T11:27:09.439740Z",
    "build_snapshot" : false,
    "lucene_version" : "7.6.0",
    "minimum_wire_compatibility_version" : "5.6.0",
    "minimum_index_compatibility_version" : "5.0.0"
  },
  "tagline" : "You Know, for Search"
}
ElasticSearch 配置文件
[root@db01 ~]# rpm -qc elasticsearch
/etc/elasticsearch/elasticsearch.yml				# ES主配置文件
/etc/elasticsearch/jvm.options					# jvm虚拟内存配置
/etc/elasticsearch/log4j2.properties				# 日志配置
/etc/elasticsearch/role_mapping.yml				# 规则配置
/etc/elasticsearch/roles.yml
/etc/elasticsearch/users
/etc/elasticsearch/users_roles
/etc/init.d/elasticsearch					# 启动脚本
/etc/sysconfig/elasticsearch					# 系统配置
/usr/lib/sysctl.d/elasticsearch.conf				# 参数配置
/usr/lib/systemd/system/elasticsearch.service		        # 启动程序
配置 ElasticSearch
[root@db01 ~]# vim /etc/elasticsearch/elasticsearch.yml
# 集群名称
#cluster.name: my-application

# 节点名称
node.name: node-1
# 指定数据目录
path.data: /service/es/data
# 指定日志目录
path.logs: /service/es/logs
# 开启内存锁
bootstrap.memory_lock: true
# ES 监听地址
network.host: 10.0.0.51,127.0.0.1
# ES 对外开发的http端口
http.port: 9200

# 集群的地址
#discovery.zen.ping.unicast.hosts: ["host1", "host2"]
# 集群投票切换
#discovery.zen.minimum_master_nodes:

# 总配置
[root@db01 ~]# grep "^[a-z]" /etc/elasticsearch/elasticsearch.yml
node.name: node-1
path.data: /service/es/data
path.logs: /service/es/logs
bootstrap.memory_lock: true
network.host: 10.0.0.51,127.0.0.1
http.port: 9200
根据配置文件创建目录
# 创建数据目录和日志目录
[root@db01 ~]# mkdir /service/es/{data,logs} -p

# 授权
[root@db01 ~]# chown -R elasticsearch.elasticsearch /service/es/
重启 ElasticSearch
# 重启 ES
[root@db01 ~]# systemctl restart elasticsearch.service

# 启动失败,查看日志,说明内存未锁定
[2020-08-10T10:38:56,170][ERROR][o.e.b.Bootstrap          ] [node-1] node validation exception
[1] bootstrap checks failed
[1]: memory locking requested for elasticsearch process but memory is not locked


# 配置启动文件中内存锁
[root@db01 ~]# vim /usr/lib/systemd/system/elasticsearch.service
[Service]
... ...
LimitMEMLOCK=infinity

# 再次启动 ES
[root@db01 ~]# systemctl daemon-reload
[root@db01 ~]# systemctl start elasticsearch.service
浏览器访问验证
# 浏览器访问	 http://10.0.0.51:9200/
{
  #节点名称
  "name" : "node-1",
  #集群名称
  "cluster_name" : "elasticsearch",
  #集群的uuid
  "cluster_uuid" : "KCRhZiS2QWSADsuDwwKC9g",
  #版本信息
  "version" : {
    "number" : "6.6.0",
    "build_flavor" : "default",
    "build_type" : "rpm",
    "build_hash" : "a9861f4",
    "build_date" : "2019-01-24T11:27:09.439740Z",
    "build_snapshot" : false,
    "lucene_version" : "7.6.0",
    "minimum_wire_compatibility_version" : "5.6.0",
    "minimum_index_compatibility_version" : "5.0.0"
  },
  "tagline" : "You Know, for Search"
}
ElasticSearch 部署(集群)
ElasticSearch 集群配置
| Node | IP | Memory |
|---|---|---|
| node-1 | 10.0.0.121 | 2G |
| node-2 | 10.0.0.122 | 2G |
| node-3 | 10.0.0.123 | 2G |
Ntpdate 时间同步
# 同步时间
[root@dbtest01 ~]# yum install -y ntpdate
[root@dbtest01 ~]# ntpdate time1.aliyun.com

[root@dbtest02 ~]# yum install -y ntpdate
[root@dbtest02 ~]# ntpdate time1.aliyun.com

[root@dbtest03 ~]# yum install -y ntpdate
[root@dbtest03 ~]# ntpdate time1.aliyun.com
安装 JDK
[root@dbtest01 ~]# rpm -Uvh jdk-8u181-linux-x64.rpm
[root@dbtest02 ~]# rpm -Uvh jdk-8u181-linux-x64.rpm
[root@dbtest03 ~]# rpm -Uvh jdk-8u181-linux-x64.rpm
安装 ElasticSearch
[root@dbtest01 ~]# rpm -Uvh elasticsearch-6.6.0.rpm
[root@dbtest02 ~]# rpm -Uvh elasticsearch-6.6.0.rpm
[root@dbtest03 ~]# rpm -Uvh elasticsearch-6.6.0.rpm
修改 Systemd 配置文件
# 全部修改
[root@dbtest01 ~]# vim /usr/lib/systemd/system/elasticsearch.service
[root@dbtest02 ~]# vim /usr/lib/systemd/system/elasticsearch.service
[root@dbtest03 ~]# vim /usr/lib/systemd/system/elasticsearch.service
[service]
......
LimitMEMLOCK=infinity
......
重新加载 Systemd 配置
[root@dbtest01 ~]# systemctl daemon-reload
[root@dbtest01 ~]# systemctl enable elasticsearch.service

[root@dbtest02 ~]# systemctl daemon-reload
[root@dbtest02 ~]# systemctl enable elasticsearch.service

[root@dbtest03 ~]# systemctl daemon-reload
[root@dbtest03 ~]# systemctl enable elasticsearch.service
配置 ElasticSearch
# 主节点配置文件
[root@dbtest01 ~]# grep "^[a-Z]" /etc/elasticsearch/elasticsearch.yml
cluster.name: my-application
node.name: node-1
node.master: true
path.data: /service/es/data
path.logs: /service/es/logs
bootstrap.memory_lock: true
network.host: 10.0.0.121,127.0.0.1
http.port: 9200
discovery.zen.ping.unicast.hosts: ["10.0.0.121", "10.0.0.122", "10.0.0.123"]
discovery.zen.minimum_master_nodes: 2


# 从节点配置文件
[root@dbtest02 ~]#  grep "^[a-Z]" /etc/elasticsearch/elasticsearch.yml
cluster.name: my-application
node.name: node-2
path.data: /service/es/data
path.logs: /service/es/logs
bootstrap.memory_lock: true
network.host: 10.0.0.122,127.0.0.1
http.port: 9200
discovery.zen.ping.unicast.hosts: ["10.0.0.121", "10.0.0.122", "10.0.0.123"]
# 一般情况下 discovery.zen.minimum_master_nodes = N/2+1 , 即选举新的主节点(原主节点宕机的情况下)
# 这个配置的意思是说在选举 Master 过程中,需要多少个节点通信,说白点就是票数 。如果达不到 N/2+1(就是超过半数),就会选举失败,重新选举
discovery.zen.minimum_master_nodes: 2


# 从节点配置文件
[root@dbtest03 ~]#  grep "^[a-Z]" /etc/elasticsearch/elasticsearch.yml
cluster.name: my-application
node.name: node-3
path.data: /service/es/data
path.logs: /service/es/logs
bootstrap.memory_lock: true
network.host: 10.0.0.123,127.0.0.1
http.port: 9200
discovery.zen.ping.unicast.hosts: ["10.0.0.121", "10.0.0.122", "10.0.0.123"]
discovery.zen.minimum_master_nodes: 2
创建数据和日志存储目录
# 所有节点全部执行
mkdir /service/es/data -p
mkdir /service/es/logs -p
chown -R elasticsearch.elasticsearch /service/es
启动 ElasticSearch
# 全部执行
systemctl restart elasticsearch.service
插入数据测试
[root@dbtest01 ~]# curl -XPUT '10.0.0.121:9200/student/user/1?pretty' -H 'Content-Type: application/json' -d '{"name": "wqh","gender":"male","age":"23","about":"good good sturdy","interests":["chinese","english"]}'
{
  "_index" : "student",
  "_type" : "user",
  "_id" : "1",
  "_version" : 1,
  "result" : "created",
  "_shards" : {
    "total" : 2,
    "successful" : 2,
    "failed" : 0
  },
  "_seq_no" : 0,
  "_primary_term" : 1
}
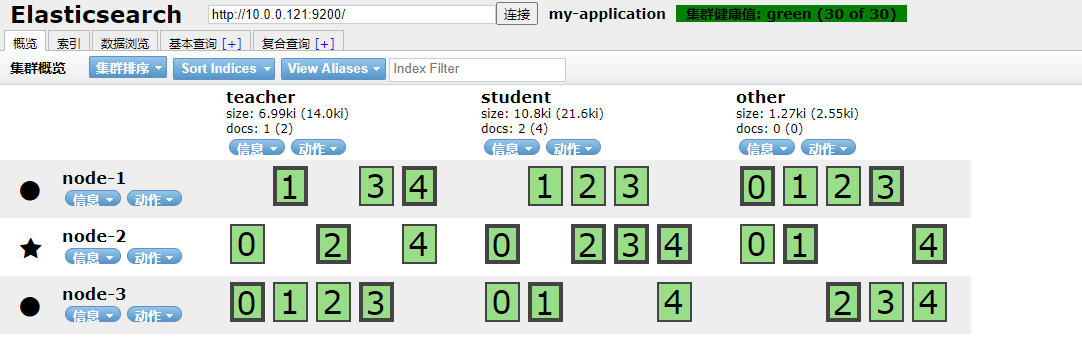
ES-Head 查看数据
谷歌浏览器安装 ES-Head 插件,点击下载
将解压后的文件夹拖入谷歌浏览器扩展程序界面即可