我在昨天的文章中介绍了Silverlight Toolkit最新更新的一些情况,其中最令人兴奋的就是其拖拽(Drag&Drop)操作的支持。
由于项目原因,我还未安装toolkit的十月份更新,所以也没法写一些亲身体验式的文章。这里就只能翻译一下Tim Heuer大神的相关文章给大家喽。
原文链接:http://timheuer.com/blog/archive/2009/10/19/silverlight-toolkit-adds-drag-drop-support.aspx
Silverlight Toolkit 2009年10月更新中带来的很多新特性,其中最爽就要数其对一些核心控件提供的拖拽操作支持了。看到这里你可能在想:“恩,很好,又有新控件了要学了”。其实你错了,没有什么新控件,也不需要额外的学习使用它们。如你所愿,现在有了toolkit的帮助,这类拖动操作并不需要写多少代码(译注:或者说只需标记,不需代码)。
现在让我们做一个最简单的例子:将ListBox中的某项移动到另外一个ListBox中。用Blend拖一个ListBox进去,更改一些属性后得到如下XAML:
    <StackPanel Orientation="Horizontal" Margin="10">
        <ListBox Width="200" Height="500" x:Name="FromBox" DisplayMemberPath="FullName"/>
        <ListBox Width="200" Height="500" x:Name="ToBox" DisplayMemberPath="FullName"/>
    </StackPanel>
在后置代码中,我搞了一个很简单的People类。它的GetListOfPeople()方法返回ObserveableCollection<Person>集合,然后将其绑定到FromBox上。代码如下:
using System.Collections.ObjectModel;
namespace SilverlightApplication105 {
    public class People {
        public static ObservableCollection<Person> GetListOfPeople() {
            ObservableCollection<Person> ppl = new ObservableCollection<Person>();
            for (int i = 0; i < 15; i++) {
                Person p = new Person() {
                    Firstname = "First " + i.ToString(),
                    Lastname = "Last " + i.ToString()
                };
                ppl.Add(p);
            }
            return ppl;
        }
    }
    public class Person {
        public string Firstname { get; set; }
        public string Lastname { get; set; }
        public string FullName {
            get { return string.Concat(Firstname, " ", Lastname); }
        }
    }
}
MainPage.xaml.cs中的代码如下:
using System.Windows;
using System.Windows.Controls;
namespace SilverlightApplication105 {
    public partial class MainPage : UserControl {
        public MainPage() {
            InitializeComponent();
            Loaded += new RoutedEventHandler(MainPage_Loaded);
        }
        void MainPage_Loaded(object sender, RoutedEventArgs e) {
            FromBox.ItemsSource = People.GetListOfPeople();
        }
    }
}
以前我们处理这类拖拽操作的,就必须在代码中进行针对列表项的索引、移动规则的控制。现在好了,我们只需添加一个Silverlight Toolkit中程序集System.Windows.Controls.Toolkit的引用即可。以下是处理过后的XAML:
 <UserControl
     x:Class="SilverlightApplication105.MainPage"
     xmlns="http://schemas.microsoft.com/winfx/2006/xaml/presentation"
     xmlns:x="http://schemas.microsoft.com/winfx/2006/xaml"
     xmlns:d="http://schemas.microsoft.com/expression/blend/2008" xmlns:mc="http://schemas.openxmlformats.org/markup-compatibility/2006"
     mc:Ignorable="d" d:DesignWidth="640" d:DesignHeight="480"
     xmlns:toolkit="clr-namespace:System.Windows.Controls;assembly=System.Windows.Controls.Toolkit"
     xmlns:mswindows="clr-namespace:Microsoft.Windows;assembly=System.Windows.Controls.Toolkit">
    <Grid x:Name="LayoutRoot">
        <StackPanel Orientation="Horizontal" Margin="10">
            <ListBox Width="200" Height="500" x:Name="FromBox" DisplayMemberPath="FullName"/>
            <ListBox Width="200" Height="500" x:Name="ToBox" DisplayMemberPath="FullName"/>
        </StackPanel>
    </Grid>
</UserControl>
这里要注意一下声明的xmlns:toolkit和xmlns:mswindows。现在我们可以简单的将ListBox控件用ListBoxDropTarget控件包裹起来:
<StackPanel Orientation="Horizontal" Margin="10">
    <toolkit:ListBoxDragDropTarget mswindows:DragDrop.AllowDrop="True">
        <ListBox Width="200" Height="500" x:Name="FromBox" DisplayMemberPath="FullName"/>
    </toolkit:ListBoxDragDropTarget>
    <toolkit:ListBoxDragDropTarget mswindows:DragDrop.AllowDrop="True">
        <ListBox Width="200" Height="500" x:Name="ToBox" DisplayMemberPath="FullName"/>
    </toolkit:ListBoxDragDropTarget>
</StackPanel>
接下来我们将程序运行起来看看成果。是的,只需一行标记我们就已经拥有了将一个list项拖动到另外一个list中的功能!

牛X吧?不仅如此,我们还可以对列表项的顺序进行重排,也就是说一个ListBox同时可以是拖动的起点和终点。不过,ListBoxDragDropTarget并不能作用于virtualized容器(ListBox默认容器)。所以我们必须改变ListBox的ItemsPanelTemplate,比如说像这样加个StackPanel进去:
<toolkit:ListBoxDragDropTarget mswindows:DragDrop.AllowDrop="True">
    <ListBox Width="200" Height="500" x:Name="FromBox" DisplayMemberPath="FullName">
        <ListBox.ItemsPanel>
            <ItemsPanelTemplate>
                <StackPanel/>
            </ItemsPanelTemplate>
        </ListBox.ItemsPanel>
    </ListBox>
</toolkit:ListBoxDragDropTarget>
现在我们就可以通过drag/drop行为对ListBox中的项目进行重新排列了

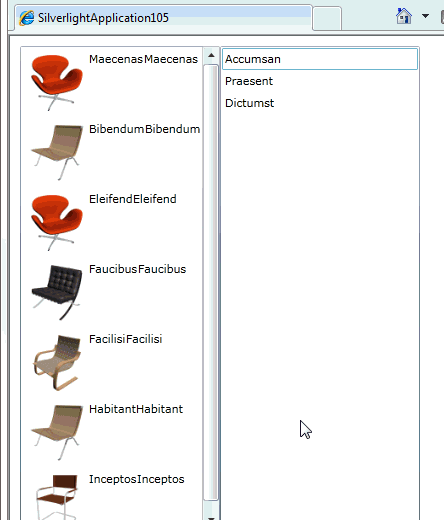
更牛X的是,它支持任意的DataTemplate。比如我在Person类中增加一个Image属性并将其作用于控件的template,拖拽操作仍然成立!

如上图所示,两个ListBox的DataTemolate并不相同,我们可以将FromBox的DataTemplate搞得很复杂,同时又让ToBox只处理类中的某个属性。
而且而且而且,除了ListBoxDragDropTarget外,我们还拥有
- ListBoxDragDropTarget
- TreeViewDragDropTarget
- DataGridDragDropTarget
- DataPointSeriesDragDropTarget
好了,就到这,enjoy~
