先将快速开始01看完,再看这个文档
配置日志
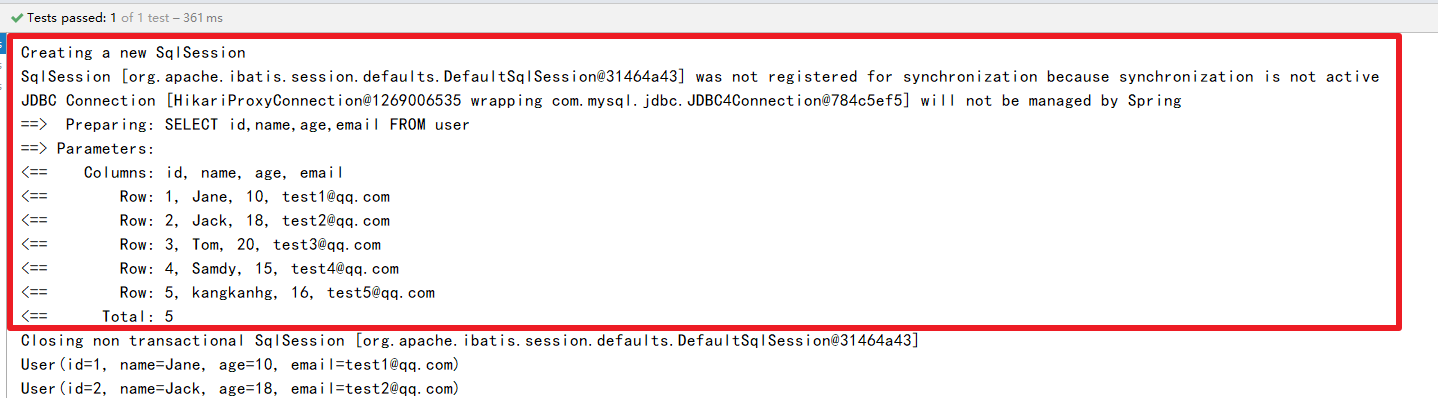
我们所有的sql现在都是不可见的,我们希望知道它是怎么执行的,所以我们就必须看日志,开发的时候打开,上线的时候关闭
在application.properties配置日志
#配置日志
#默认的控制台输出
mybatis-plus.configuration.log-impl=org.apache.ibatis.logging.stdout.StdOutImpl
CRUD扩展
插入操作
注意:User是Long不是long
package com.jmu;

import com.jmu.mapper.UserMapper;
import com.jmu.pojo.User;
import org.junit.jupiter.api.Test;
import org.springframework.beans.factory.annotation.Autowired;
import org.springframework.boot.test.context.SpringBootTest;

import java.util.List;

@SpringBootTest
class MpApplicationTests {

    @Autowired
    private UserMapper userMapper;

    @Test
    public void testInsert(){
        User user = new User();
        user.setName("java");
        user.setAge(3);
        user.setEmail("10134@qq.com");
        int insert = userMapper.insert(user);
        System.out.println(insert);
        System.out.println(user);
    }

}

主键生成策略
涉及到一个注解@TableId
@TableId描述:主键注解
| 属性 | 类型 | 必须指定 | 默认值 | 描述 |
|---|---|---|---|---|
| value | String | 否 | "" | 主键字段名 |
| type | Enum | 否 | IdType.NONE | 主键类型 |
IdType
| 值 | 描述 |
|---|---|
| AUTO | 数据库ID自增(需要在数据中也开启自增) |
| NONE | 无状态,该类型为未设置主键类型(注解里等于跟随全局,全局里约等于 INPUT) |
| INPUT | insert前自行set主键值 |
| ASSIGN_ID(默认) | 分配ID(主键类型为Number(Long和Integer)或String)(since 3.3.0),使用接口IdentifierGenerator的方法nextId(默认实现类为DefaultIdentifierGenerator雪花算法) |
| ASSIGN_UUID | 分配UUID,主键类型为String(since 3.3.0),使用接口IdentifierGenerator的方法nextUUID(默认default方法) |
分布式全局唯一ID 长整型类型(please use ASSIGN_ID) |
|
32位UUID字符串(please use ASSIGN_UUID) |
|
分布式全局唯一ID 字符串类型(please use ASSIGN_ID) |
使用
package com.jmu.pojo;

import com.baomidou.mybatisplus.annotation.IdType;
import com.baomidou.mybatisplus.annotation.TableId;
import lombok.Data;

@Data
public class User {
    @TableId(type =IdType.ASSIGN_ID)
    private Long id;
    private String name;
    private Integer age;
    private String email;
}
雪花算法
详情查看链接
更新操作
updateById通过条件实现动态sql
@Test
public void testUpdate(){
    User user = new User();
    user.setId(2L);
    user.setName("java-02");
    user.setAge(23);
    int update = userMapper.updateById(user);
    System.out.println(update);
}
自动填充
官网日志填充,可以先看看说不定到时候下面的方法就过时了。
创建时间、修改时间!这些操作都是自动化完成的,我们不希望手动更新!
阿里巴巴开发手册:所有的数据库表:gmt_create、gmt_modified几乎所有的表都要配置上!而且需要自动化
代码级别的方式
- 在表中新增字段 create_time,update_time

- 实体类字段属性上需要增加注解
一定要是LocalDateTime,而且Mybatis-Plus默认使用驼峰命名,所以是update_time-updateTime,user-User
//表示在insert的时候有createTime这个字段
@TableField(fill = FieldFill.INSERT)
private LocalDateTime createTime;
//表示在insert和update的时候都有updateTime这个字段
@TableField(fill = FieldFill.INSERT_UPDATE)
private LocalDateTime updateTime;
- 编写处理器处理这个注解即可(可以新建一个handler包中写这个类)
- 而且因为使用了
LocalDateTime,所以字段属性也是要private LocalDateTime,而且类型如果不匹配的话是无法填充的,需要对应。 - @Component 一定不要忘记把处理器加到IOC容器中
@Slf4j
@Component //一定不要忘记把处理器加到IOC容器中
public class MyMetaObjectHandler implements MetaObjectHandler {

    @Override
    public void updateFill(MetaObject metaObject) {
        log.info("start update fill...");
        this.strictInsertFill(metaObject, "createTime", LocalDateTime.class, LocalDateTime.now());
    }

    @Override
    public void insertFill(MetaObject metaObject) {
        log.info("start insert fill...");
        this.strictInsertFill(metaObject, "createTime", LocalDateTime.class, LocalDateTime.now());
        this.strictInsertFill(metaObject, "updateTime", LocalDateTime.class, LocalDateTime.now());
    }
}
乐观锁
简单介绍
乐观锁:十分乐观,总是认为不会出现问题,无论干什么都不去上锁!如果出现了问题,再次更新值测试。
主要解决:丢失更新问题
丢失更新问题描述:即多人同时修改同一条数据
比如:有两个线程都要去改一行数据的某个属性值,两个线程同时开启事务,一个线程首先提交事务,修改了值。这个时候另外一个线程又提交,但是这时候的值进行再次的更新,将第一个提交的线程覆盖了,所以导致首先提交的数据丢失更新 。正确的过程应该是线程一开启事务,到提交事务后。线程二再去开启事务,提交事务。
乐观锁实现方式:
- 取出记录时,获取当前version
- 更新时,带上这个version
- 执行更新时, set version = newVersion where version = oldVersion
- 如果version不对,就更新失败
实现乐观锁
(1)在数据库中添加version字段

(2)实体类中添加version字段
并添加@version注解
@Version
private Integer version;
(3)配置乐观锁插件
你可以把插件直接放在springboot的启动类中,但是,我们更加建议将插件放在配置中config.MpConfig
package com.jmu.config;

import com.baomidou.mybatisplus.extension.plugins.OptimisticLockerInterceptor;
import org.mybatis.spring.annotation.MapperScan;
import org.springframework.context.annotation.Bean;
import org.springframework.context.annotation.Configuration;
//配置随便取,重要的是加@Configuration注解
//顺便把之前放在启动类中的扫描包一起放在配置类这边
@MapperScan("com.jmu.mapper")
@Configuration
public class MpConfig {
    @Bean
    public OptimisticLockerInterceptor optimisticLockerInterceptor() {
        return new OptimisticLockerInterceptor();
    }
}
测试乐观锁
(1)成功案例
@Test
public void testOptimisticLocker(){
    //根据id查询数据
    User user = userMapper.selectById(1313089952522756098L);
    System.out.println(user);
    //修改
    user.setAge(10);
    userMapper.updateById(user);
}

注意:只能先查询,后更新才乐观锁生效
@Test
public void testOptimisticLocker(){
    User user = new User();
    user.setId(1313089952522756098L);
    user.setAge(10);
    userMapper.updateById(user);
}

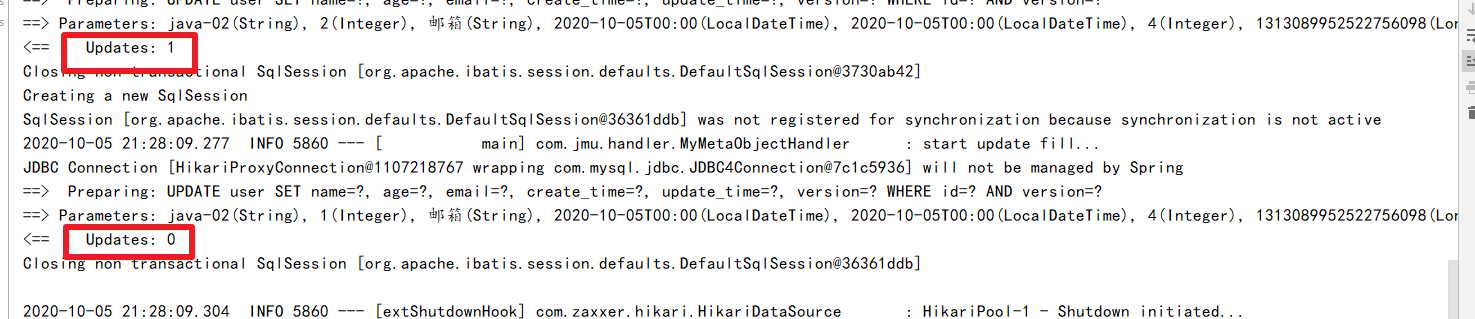
(2)失败案例
@Test
public void testOptimisticLocker(){
    //根据id查询数据
    User user1 = userMapper.selectById(1313089952522756098L);
    user1.setAge(1);
    //模拟线程抢占
    User user2 = userMapper.selectById(1313089952522756098L);
    user2.setAge(2);
    userMapper.updateById(user2);
    userMapper.updateById(user1);
}
查询操作
//测试查询
@Test
public void testSelectById(){
    User user = userMapper.selectById(1L);
    System.out.println(user);
}
//测试批量查询
@Test
public void testSelectByIds(){
    List<User> users = userMapper.selectBatchIds(Arrays.asList(1, 2, 33));
    users.forEach(System.out::println);
}
//条件查询 map
@Test
public void testselectByMap(){
    HashMap<String, Object> map = new HashMap<>();
    map.put("name","java");
    map.put("age","3");
    List<User> users = userMapper.selectByMap(map);
    users.forEach(System.out::println);
}
分页查询
(1)配置插件
和配置乐观锁差不多
@Bean
public PaginationInterceptor paginationInterceptor() {
    return new PaginationInterceptor();
}
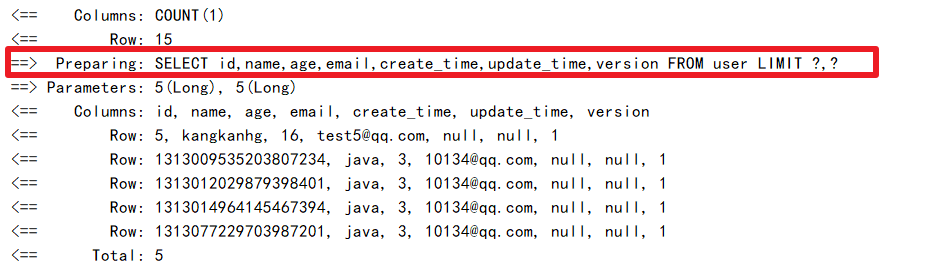
(2)测试分页
//测试分页
@Test
public void testPage(){
    //当前页 分页大小
    Page<User> page = new Page<>(2,5);
    userMapper.selectPage(page,null);
    page.getRecords().forEach(System.out::println);
}
删除操作
@Test
public void testDelete(){
    userMapper.deleteById(null);
    userMapper.deleteByMap(map);
    userMapper.deleteBatchIds(Arrays.asList(1,2,3));
    userMapper.delete(null);
}
逻辑删除(软删除)
物理删除:从数据库中直接移除
逻辑删除:在数据库中没有被移除,而是通过一个变量来让他失效 delete=0=>delete=1
(1)表中添加字段
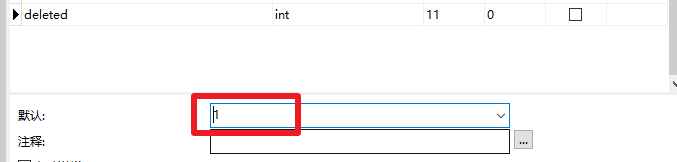
默认值也可以用代码实现
@TableField(fill=FieldFill.INSERT)
    private Integer deleted;

public void insertFill(MetaObject metaObject) {
        log.info("start insert fill ....");
        this.strictInsertFill(metaObject, "deleted", Integer.class, 0);
...
(2)在application.properties添加配置
注意:是delete-value不是delete-field
# 逻辑已删除值(默认为 1)
mybatis-plus.global-config.db-config.logic-delete-value=2
# 逻辑未删除值(默认为 0)
mybatis-plus.global-config.db-config.logic-not-delete-value=1
(3)在实体类添加注解@TableLogic
@TableLogic
private Integer deleted;
(4)测试删除

条件构造器 Wrapper
写一些复杂的sql就可以使用他来替代
具体可以看官网的条件构造器文档
注意:wrapper.like("name","a")里面的name指的是数据中的字段名
package com.jmu;

import com.baomidou.mybatisplus.core.conditions.query.QueryWrapper;
import com.jmu.mapper.UserMapper;
import com.jmu.pojo.User;
import org.junit.jupiter.api.Test;
import org.springframework.beans.factory.annotation.Autowired;
import org.springframework.boot.test.context.SpringBootTest;

import java.util.List;
import java.util.Map;

@SpringBootTest
public class WrapperTest {
    @Autowired
    private UserMapper userMapper;

    @Test
    public void test1(){
        //查询name不为空的用户,并且邮箱不为空的用户,年龄大于等于12
        // (name IS NOT NULL AND email IS NOT NULL AND age >= ?)
        QueryWrapper<User> wrapper = new QueryWrapper<>();
        wrapper.isNotNull("name").isNotNull("email").ge("age",12);
        userMapper.selectList(wrapper).forEach(System.out::println);
    }
    @Test
    public void test2(){
        //查询年龄在20-30岁之间的用户
        //(age BETWEEN ? AND ?)
        QueryWrapper<User> wrapper = new QueryWrapper<>();
        wrapper.between("age",2,13);
        userMapper.selectList(wrapper).forEach(System.out::println);
    }
    @Test
    public void test3(){
        //查询名字中包含a的用户,并且邮箱以t开头
        // (name LIKE ? AND email LIKE ?)
        QueryWrapper<User> wrapper = new QueryWrapper<>();
        //likeRight理解成%(Like)的在右边
        wrapper.like("name","a")
            .likeRight("email","t");
        List<Map<String, Object>> maps = userMapper.selectMaps(wrapper);
        maps.forEach(System.out::println);
    }
    @Test
    public void test4(){
        //查询id大于10的用户
        // (id IN (select id from user where id > 10))
        QueryWrapper<User> wrapper = new QueryWrapper<>();
        //likeRight理解成%(Like)的在右边
        wrapper.inSql("id","select id from user where id > 10");
        List<Map<String, Object>> maps = userMapper.selectMaps(wrapper);
        maps.forEach(System.out::println);
    }
}