一、threading模块
1、线程对象的创建
1.1 Thread类直接创建

import threading
import time

def countNum(n): # 定义某个线程要运行的函数

    print("running on number:%s" %n)

    time.sleep(3)

if __name__ == '__main__':

    t1 = threading.Thread(target=countNum,args=(23,)) #生成一个线程实例
    t2 = threading.Thread(target=countNum,args=(34,))

    t1.start() #启动线程
    t2.start()

    print("ending!")
1.2 Thread类继承式创建
#继承Thread式创建

import threading
import time

class MyThread(threading.Thread):

    def __init__(self,num):
        threading.Thread.__init__(self)
        self.num=num

    def run(self):
        print("running on number:%s" %self.num)
        time.sleep(3)

t1=MyThread(56)
t2=MyThread(78)

t1.start()
t2.start()
print("ending")
2、Thread类的实例方法
2.1 join() 和 steDaemon()
# join():在子线程完成运行之前,这个子线程的父线程将一直被阻塞。

# setDaemon(True):
        '''
         将线程声明为守护线程,必须在start() 方法调用之前设置,如果不设置为守护线程程序会被无限挂起。

         当我们在程序运行中,执行一个主线程,如果主线程又创建一个子线程,主线程和子线程 就分兵两路,分别运行,那么当主线程完成

         想退出时,会检验子线程是否完成。如果子线程未完成,则主线程会等待子线程完成后再退出。但是有时候我们需要的是只要主线程

         完成了,不管子线程是否完成,都要和主线程一起退出,这时就可以 用setDaemon方法啦'''

import threading
from time import ctime,sleep
import time

def Music(name):

        print ("Begin listening to {name}. {time}".format(name=name,time=ctime()))
        sleep(3)
        print("end listening {time}".format(time=ctime()))

def Blog(title):

        print ("Begin recording the {title}. {time}".format(title=title,time=ctime()))
        sleep(5)
        print('end recording {time}'.format(time=ctime()))


threads = []


t1 = threading.Thread(target=Music,args=('FILL ME',))
t2 = threading.Thread(target=Blog,args=('',))

threads.append(t1)
threads.append(t2)
if __name__ == '__main__':

    for t in threads:
        t.start()

    print ("all over %s" %ctime())
'''
运行结果
Begin listening to FILL ME. Tue Jul 18 16:15:06 2017
Begin recording the . Tue Jul 18 16:15:06 2017
all over Tue Jul 18 16:15:06 2017
end listening Tue Jul 18 16:15:09 2017
end recording Tue Jul 18 16:15:11 2017


前三行瞬间执行完毕,后两行等待3秒和5秒执行

'''
if __name__ == '__main__':

    for t in threads:
        t.setDaemon(True) #注意:一定在start之前设置
        t.start()

    print("all over %s" % ctime())
'''
运行结果:
Begin listening to FILL ME. Tue Jul 18 16:31:23 2017
Begin recording the . Tue Jul 18 16:31:23 2017
all over Tue Jul 18 16:31:23 201

每个线程都是守护线程,跟随主线程一块挂掉
'''
if __name__ == '__main__':

    # t2.setDaemon(True)

    for t in threads:
        # t.setDaemon(True) #注意:一定在start之前设置
        t.start()

    t1.join()

    print("all over %s" % ctime())
'''
运行结果:
Begin listening to FILL ME. Tue Jul 18 16:34:41 2017
Begin recording the . Tue Jul 18 16:34:41 2017
end listening Tue Jul 18 16:34:44 2017
all over Tue Jul 18 16:34:44 2017
end recording Tue Jul 18 16:34:46 2017

前两行瞬间执行完成后等待,第二三行一起执行,最后一行最后出现。
在t1.join()处阻塞,t1线程运行完毕,主线程才继续执行。
'''
daemon
A boolean value indicating whether this thread is a daemon thread (True) or not (False). This must be set before start() is called, otherwise RuntimeError is raised. Its initial value is inherited from the creating thread; the main thread is not a daemon thread and therefore all threads created in the main thread default to daemon = False.

The entire Python program exits when no alive non-daemon threads are left.

当daemon被设置为True时,如果主线程退出,那么子线程也将跟着退出,

反之,子线程将继续运行,直到正常退出。

daemon
2.2 其他方法
Thread实例对象的方法
  # isAlive(): 返回线程是否活动的。
  # getName(): 返回线程名。
  # setName(): 设置线程名。

threading模块提供的一些方法:
  # threading.currentThread(): 返回当前的线程变量。
  # threading.enumerate(): 返回一个包含正在运行的线程的list。正在运行指线程启动后、结束前,不包括启动前和终止后的线程。
  # threading.activeCount(): 返回正在运行的线程数量,与len(threading.enumerate())有相同的结果。
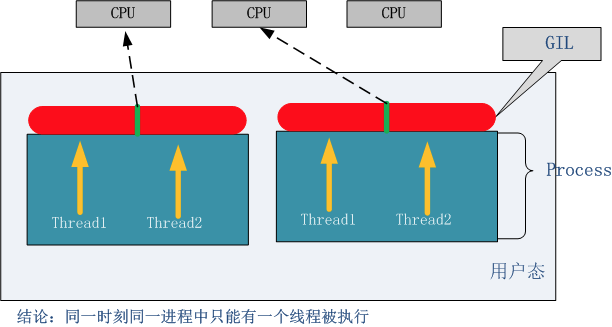
3、GIL(全局解释器锁)
'''
定义:
In CPython, the global interpreter lock, or GIL, is a mutex that prevents multiple native threads from executing Python bytecodes at once. This lock is necessary mainly because CPython’s memory management is not thread-safe. (However, since the GIL exists, other features have grown to depend on the guarantees that it enforces.)

翻译:
在CPython中,全局解释器锁是一个互斥锁,它可以防止多个本机线程同时执行Python的编译器。这个锁是必需的,主要是因为CPython的内存管理不是线程安全的。(然而,由于GIL的存在,其他的特性已经发展到依赖于它的保证。)
'''
Python中的线程是操作系统的原生线程,Python虚拟机使用一个全局解释器锁(Global Interpreter Lock)来互斥线程对Python虚拟机的使用。为了支持多线程机制,一个基本的要求就是需要实现不同线程对共享资源访问的互斥,所以引入了GIL。
GIL:在一个线程拥有了解释器的访问权之后,其他的所有线程都必须等待它释放解释器的访问权,即使这些线程的下一条指令并不会互相影响。
在调用任何Python C API之前,要先获得GIL
GIL缺点:多处理器退化为单处理器;优点:避免大量的加锁解锁操作。
3.1 GIL的早期设计
Python支持多线程,而解决多线程之间数据完整性和状态同步的最简单方法自然就是加锁。 于是有了GIL这把超级大锁,而当越来越多的代码库开发者接受了这种设定后,他们开始大量依赖这种特性(即默认python内部对象是thread-safe的,无需在实现时考虑额外的内存锁和同步操作)。慢慢的这种实现方式被发现是蛋疼且低效的。但当大家试图去拆分和去除GIL的时候,发现大量库代码开发者已经重度依赖GIL而非常难以去除了。有多难?做个类比,像MySQL这样的“小项目”为了把Buffer Pool Mutex这把大锁拆分成各个小锁也花了从5.5到5.6再到5.7多个大版为期近5年的时间,并且仍在继续。MySQL这个背后有公司支持且有固定开发团队的产品走的如此艰难,那又更何况Python这样核心开发和代码贡献者高度社区化的团队呢?
3.2 GIL的影响
无论你启多少个线程,你有多少个cpu, Python在执行一个进程的时候会淡定的在同一时刻只允许一个线程运行。
所以,python是无法利用多核CPU实现多线程的。
这样,python对于计算密集型的任务开多线程的效率甚至不如串行(没有大量切换),但是,对于IO密集型的任务效率还是有显著提升的。
#coding:utf8
from threading import Thread
import time

def counter():
    i = 0
    for _ in range(50000000):
        i = i + 1

    return True


def main():

    l=[]
    start_time = time.time()

    for i in range(2):

        t = Thread(target=counter)
        t.start()
        l.append(t)
        t.join()

    # for t in l:
    #     t.join()

    end_time = time.time()
    print("Total time: {}".format(end_time - start_time))

if __name__ == '__main__':
    main()


'''
py2.7:
     串行:25.4523348808s
     并发:31.4084379673s
py3.5:
     串行:8.62115597724914s
     并发:8.99609899520874s

'''

计算密集型
3.3 解决方案
用multiprocessing替代Thread multiprocessing库的出现很大程度上是为了弥补thread库因为GIL而低效的缺陷。它完整的复制了一套thread所提供的接口方便迁移。唯一的不同就是它使用了多进程而不是多线程。每个进程有自己的独立的GIL,因此也不会出现进程之间的GIL争抢。
#coding:utf8
from multiprocessing import Process
import time

def counter():
    i = 0
    for _ in range(40000000):
        i = i + 1

    return True

def main():

    l=[]
    start_time = time.time()

    for _ in range(2):
        t=Process(target=counter)
        t.start()
        l.append(t)
        #t.join()

    for t in l:
       t.join()

    end_time = time.time()
    print("Total time: {}".format(end_time - start_time))

if __name__ == '__main__':
    main()


'''

py2.7:
     串行:6.1565990448 s
     并行:3.1639978885 s

py3.5:
     串行:6.556925058364868 s
     并发:3.5378448963165283 s

'''

使用multiprocessing
当然multiprocessing也不是万能良药。它的引入会增加程序实现时线程间数据通讯和同步的困难。就拿计数器来举例子,如果我们要多个线程累加同一个变量,对于thread来说,申明一个global变量,用thread.Lock的context包裹住三行就搞定了。而multiprocessing由于进程之间无法看到对方的数据,只能通过在主线程申明一个Queue,put再get或者用share memory的方法。这个额外的实现成本使得本来就非常痛苦的多线程程序编码,变得更加痛苦了。
总结:因为GIL的存在,只有IO Bound场景下得多线程会得到较好的性能 - 如果对并行计算性能较高的程序可以考虑把核心部分换成C模块,或者索性用其他语言实现 - GIL在较长一段时间内将会继续存在,但是会不断对其进行改进。
所以对于GIL,既然不能反抗,那就学会去享受它吧!
4、同步锁(Lock)
import time
import threading
def addNum():
    global num #在每个线程中都获取这个全局变量
    #num-=1

    temp=num
    time.sleep(0.1)
    num =temp-1  # 对此公共变量进行-1操作

num = 100  #设定一个共享变量

thread_list = []

s=time.time()
for i in range(100):
    t = threading.Thread(target=addNum)
    t.start()
    thread_list.append(t)

for t in thread_list: #等待所有线程执行完毕
    t.join()

print('Result: ', num ,'cost time: ' ,time.time()-s)
#运行结果
#Result:  99 cost time:  0.11100625991821289
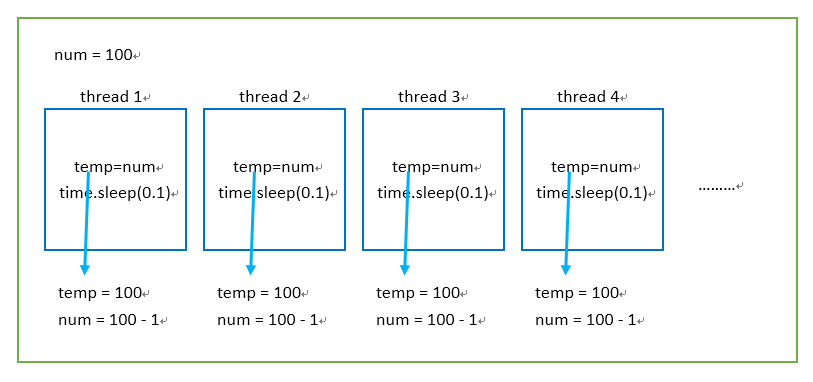
分析结果:
绿色框代表进程,蓝色框代表子线程,一共开了100个子线程(不包括主线程)。
开启一个子线程并运行后,temp被赋值为100,然后遇到阻塞,其他子线程抢到CPU进行执行,此时num没有执行-1操作,所以线程2 的temp也被赋值为100,然后遇到阻塞。其他线程抢CPU执行。0.1秒的时间足够100个线程都将temp赋值为100,然后再执行-1操作。所以num = 100 - 1 ,到结束num=99。
解决方法:使用同步锁对数据进行保护
锁通常被用来实现对共享资源的同步访问。为每一个共享资源创建一个Lock对象,当你需要访问该资源时,调用acquire方法来获取锁对象(如果其它线程已经获得了该锁,则当前线程需等待其被释放),待资源访问完后,再调用release方法释放锁:
import threading

R=threading.Lock()

R.acquire()
'''
对公共数据的操作
'''
R.release()
import time
import threading
def addNum():
    global num #在每个线程中都获取这个全局变量
    #num-=1

    R.acquire()    #保护数据,串行执行
    temp=num
    time.sleep(0.1)
    num =temp-1  # 对此公共变量进行-1操作
    R.release()

num = 100  #设定一个共享变量
thread_list = []

R=threading.Lock()    #实例化锁对象

s=time.time()
for i in range(100):
    t = threading.Thread(target=addNum)
    t.start()
    thread_list.append(t)

for t in thread_list: #等待所有线程执行完毕
    t.join()

print('Result: ', num ,'cost time: ' ,time.time()-s)
#运行结果
#Result:  0 cost time:  10.023573398590088
5、死锁与递归锁
所谓死锁: 是指两个或两个以上的进程或线程在执行过程中,因争夺资源而造成的一种互相等待的现象,若无外力作用,它们都将无法推进下去。此时称系统处于死锁状态或系统产生了死锁,这些永远在互相等待的进程称为死锁进程。
import threading,time

LockA=threading.Lock()      #定义锁A
LockB=threading.Lock()      #定义锁B

class MyThread(threading.Thread):

    def __init__(self):
        threading.Thread.__init__(self)

    def run(self):
        self.foo()
        self.bar()

    def foo(self):
        LockA.acquire()     #加A锁
        print('I am foo %s get LOCKA-------%s'%(self.name,time.ctime()))

        LockB.acquire()     #加B锁
        print('I am foo %s get LOCKB-------%s' % (self.name, time.ctime()))
        LockB.release()     #解B锁

        LockA.release()     #解A锁,A锁被线程2拿到

    def bar(self):
        LockB.acquire()     #加B锁
        print('I am bar %s get LOCKB-------%s' % (self.name, time.ctime()))

        LockA.acquire()     #需要加A锁,但A锁被线程2占用,线程2需要加B锁,相互拿不到锁,造成死锁
        print('I am bar %s get LOCKA-------%s' % (self.name, time.ctime()))
        LockA.release()

        LockB.release()for i in range(10):
    t=MyThread()
    t.start()
'''
运行结果:
I am foo Thread-1 get LOCKA-------Tue Jul 18 18:22:26 2017
I am foo Thread-1 get LOCKB-------Tue Jul 18 18:22:26 2017
I am bar Thread-1 get LOCKB-------Tue Jul 18 18:22:26 2017
I am foo Thread-2 get LOCKA-------Tue Jul 18 18:22:26 2017
'''
解决方案:使用递归锁
import threading,time

Rlock=threading.RLock()  #定义递归锁

class MyThread(threading.Thread):

    def __init__(self):
        threading.Thread.__init__(self)

    def run(self):
        self.foo()
        self.bar()

    def foo(self):
        Rlock.acquire()     #递归锁counter+1
        print('I am foo %s get LOCKA-------%s'%(self.name,time.ctime()))

        Rlock.acquire()     #递归锁counter+1
        print('I am foo %s get LOCKB-------%s' % (self.name, time.ctime()))
        Rlock.release()     #递归锁counter-1

        Rlock.release()     #递归锁counter-1  递归锁counter为零,可被其他线程获取

    def bar(self):
        Rlock.acquire()     #递归锁counter+1
        print('I am bar %s get LOCKB-------%s' % (self.name, time.ctime()))

        Rlock.acquire()     #递归锁counter+1
        print('I am bar %s get LOCKA-------%s' % (self.name, time.ctime()))
        Rlock.release()   #递归锁counter-1

        Rlock.release()   #递归锁counter-1

for i in range(10):
    t=MyThread()
    t.start()
'''
运行结果:
I am foo Thread-1 get LOCKA-------Tue Jul 18 18:30:01 2017
I am foo Thread-1 get LOCKB-------Tue Jul 18 18:30:01 2017
I am foo Thread-2 get LOCKA-------Tue Jul 18 18:30:01 2017
I am foo Thread-2 get LOCKB-------Tue Jul 18 18:30:01 2017
I am bar Thread-1 get LOCKB-------Tue Jul 18 18:30:01 2017
I am bar Thread-1 get LOCKA-------Tue Jul 18 18:30:01 2017
I am foo Thread-3 get LOCKA-------Tue Jul 18 18:30:01 2017
I am foo Thread-3 get LOCKB-------Tue Jul 18 18:30:01 2017
I am bar Thread-2 get LOCKB-------Tue Jul 18 18:30:01 2017
I am bar Thread-2 get LOCKA-------Tue Jul 18 18:30:01 2017
I am foo Thread-4 get LOCKA-------Tue Jul 18 18:30:01 2017
I am foo Thread-4 get LOCKB-------Tue Jul 18 18:30:01 2017
I am bar Thread-4 get LOCKB-------Tue Jul 18 18:30:01 2017
I am bar Thread-4 get LOCKA-------Tue Jul 18 18:30:01 2017
I am bar Thread-3 get LOCKB-------Tue Jul 18 18:30:01 2017
I am bar Thread-3 get LOCKA-------Tue Jul 18 18:30:01 2017
I am foo Thread-6 get LOCKA-------Tue Jul 18 18:30:01 2017
I am foo Thread-6 get LOCKB-------Tue Jul 18 18:30:01 2017
I am bar Thread-6 get LOCKB-------Tue Jul 18 18:30:01 2017
I am bar Thread-6 get LOCKA-------Tue Jul 18 18:30:01 2017
I am foo Thread-5 get LOCKA-------Tue Jul 18 18:30:01 2017
I am foo Thread-5 get LOCKB-------Tue Jul 18 18:30:01 2017
I am bar Thread-5 get LOCKB-------Tue Jul 18 18:30:01 2017
I am bar Thread-5 get LOCKA-------Tue Jul 18 18:30:01 2017
I am foo Thread-9 get LOCKA-------Tue Jul 18 18:30:01 2017
I am foo Thread-9 get LOCKB-------Tue Jul 18 18:30:01 2017
I am bar Thread-9 get LOCKB-------Tue Jul 18 18:30:01 2017
I am bar Thread-9 get LOCKA-------Tue Jul 18 18:30:01 2017
I am foo Thread-7 get LOCKA-------Tue Jul 18 18:30:01 2017
I am foo Thread-7 get LOCKB-------Tue Jul 18 18:30:01 2017
I am bar Thread-7 get LOCKB-------Tue Jul 18 18:30:01 2017
I am bar Thread-7 get LOCKA-------Tue Jul 18 18:30:01 2017
I am foo Thread-10 get LOCKA-------Tue Jul 18 18:30:01 2017
I am foo Thread-10 get LOCKB-------Tue Jul 18 18:30:01 2017
I am bar Thread-10 get LOCKB-------Tue Jul 18 18:30:01 2017
I am bar Thread-10 get LOCKA-------Tue Jul 18 18:30:01 2017
I am foo Thread-8 get LOCKA-------Tue Jul 18 18:30:01 2017
I am foo Thread-8 get LOCKB-------Tue Jul 18 18:30:01 2017
I am bar Thread-8 get LOCKB-------Tue Jul 18 18:30:01 2017
I am bar Thread-8 get LOCKA-------Tue Jul 18 18:30:01 2017
'''

运行结果
在Python中为了支持在同一线程中多次请求同一资源,python提供了可重入锁RLock。这个RLock内部维护着一个Lock和一个counter变量,counter记录了acquire的次数,从而使得资源可以被多次require。直到一个线程所有的acquire都被release,其他的线程才能获得资源。
6、Semaphore(信号量)
Semaphore管理一个内置的计数器,
每当调用acquire()时内置计数器-1;
调用release() 时内置计数器+1;
计数器不能小于0;当计数器为0时,acquire()将阻塞线程直到其他线程调用release()。
实例:(同时只有5个线程可以获得semaphore,即可以限制最大连接数为5):
import threading
import time

semaphore = threading.Semaphore(5)

def func():
    if semaphore.acquire():
        print (threading.currentThread().getName() + ' get semaphore')
        time.sleep(2)
        semaphore.release()

for i in range(20):
  t1 = threading.Thread(target=func)
  t1.start()
'''
运行结果:
Thread-1 get semaphore
Thread-2 get semaphore
Thread-3 get semaphore
Thread-4 get semaphore
Thread-5 get semaphore
Thread-6 get semaphore
Thread-8 get semaphore
Thread-7 get semaphore
Thread-10 get semaphore
Thread-9 get semaphore
Thread-12 get semaphore
Thread-11 get semaphore
Thread-13 get semaphore
Thread-14 get semaphore
Thread-15 get semaphore
Thread-16 get semaphore
Thread-17 get semaphore
Thread-18 get semaphore
Thread-19 get semaphore
Thread-20 get semaphore

每5个一起打印
'''
应用:连接池
二、ThreadLocal
在多线程环境下,每个线程都有自己的数据。一个线程使用自己的局部变量比使用全局变量好,因为局部变量只有线程自己能看见,不会影响其他线程,而全局变量的修改必须加锁。
但是局部变量也有问题,就是在函数调用的时候,传递起来很麻烦:
def process_student(name):
    std = Student(name)
    # std是局部变量,但是每个函数都要用它,因此必须传进去:
    do_task_1(std)
    do_task_2(std)

def do_task_1(std):
    do_subtask_1(std)
    do_subtask_2(std)

def do_task_2(std):
    do_subtask_2(std)
    do_subtask_2(std)
每个函数一层一层调用都这么传参数那还得了?用全局变量?也不行,因为每个线程处理不同的Student对象,不能共享。
如果用一个全局dict存放所有的Student对象,然后以thread自身作为key获得线程对应的Student对象如何?
global_dict = {}

def std_thread(name):
    std = Student(name)
    # 把std放到全局变量global_dict中:
    global_dict[threading.current_thread()] = std
    do_task_1()
    do_task_2()

def do_task_1():
    # 不传入std,而是根据当前线程查找:
    std = global_dict[threading.current_thread()]
    ...

def do_task_2():
    # 任何函数都可以查找出当前线程的std变量:
    std = global_dict[threading.current_thread()]
    ...
这种方式理论上是可行的,它最大的优点是消除了std对象在每层函数中的传递问题,但是,每个函数获取std的代码有点丑。
有没有更简单的方式?
ThreadLocal应运而生,不用查找dict,ThreadLocal帮你自动做这件事:
import threading

# 创建全局ThreadLocal对象:
local_school = threading.local()

def process_student():
    # 获取当前线程关联的student:
    std = local_school.student
    print('Hello, %s (in %s)' % (std, threading.current_thread().name))

def process_thread(name):
    # 绑定ThreadLocal的student:
    local_school.student = name
    process_student()

t1 = threading.Thread(target= process_thread, args=('Alice',), name='Thread-A')
t2 = threading.Thread(target= process_thread, args=('Bob',), name='Thread-B')
t1.start()
t2.start()
t1.join()
t2.join()
'''
执行结果:

Hello, Alice (in Thread-A)
Hello, Bob (in Thread-B)
'''
全局变量local_school就是一个ThreadLocal对象,每个Thread对它都可以读写student属性,但互不影响。你可以把local_school看成全局变量,但每个属性如local_school.student都是线程的局部变量,可以任意读写而互不干扰,也不用管理锁的问题,ThreadLocal内部会处理。
可以理解为全局变量local_school是一个dict,不但可以用local_school.student,还可以绑定其他变量,如local_school.teacher等等。
ThreadLocal最常用的地方就是为每个线程绑定一个数据库连接,HTTP请求,用户身份信息等,这样一个线程的所有调用到的处理函数都可以非常方便地访问这些资源。
小结
一个ThreadLocal变量虽然是全局变量,但每个线程都只能读写自己线程的独立副本,互不干扰。ThreadLocal解决了参数在一个线程中各个函数之间互相传递的问题。
参考博客(海峰):