一 URL补充
二 Views试图函数
一 URL补充
1 MTV模型
2 django建立流程(用命令版)
(1)django-admin startproject projectname
(2)python manage.py startapp appname
(3)python manage.py runserver IP PORT
3 url配置(urls.py)
功能:建立起URL与视图函数的映射关系。
url:http://127.0.0.1:8080/blog/articles/2003/05?a=1&b=2
url(正则表达式(规则),视图函数) 匹配字符串:用户输入的url对应的路径:“/blog/articles/2003/05”
注意点:
(1) 出现覆盖现象的情况,匹配第一个url
(2) 无名分组 url(r'^articles/(d{4})/(d{2})$', views.year_month), # year(requset,1990,12) 按位置传参数
(3) 有名分组 url(r'^articles/(?P<year>d{4})/(?P<month>d{2})$', views.year_month), # year (requset,year=1990,month=12) 按位置传参数
(4) url(r'^blog/', include('blog.urls'))分发
取值:request.POST.get("user")
获取form表单提交的方法:request.method=="POST"
有return 就不往下走 可以去掉else
模板语法两种{{}}
渲染了后再往前端发 render 函数 render函数可以检测模板语法
点击提交 走url 走views 走render函数接着渲染模板(看有无别名) 发往前端
二 视图函数
一定包含两个对象
request------->,请求信息
HttpResponse------->响应内容
render 一个HttpResponse函数也存在render函数里
get 请求的数据放在路径后面
重点 request 里面的哪些信息:
request.GET:GET请求的数据()
request.POST:POST请求的数据()
request.method:请求数据的方式()主要get或者post
request.path:请求路径()与数据无关
根目录 :/(判断根目录)
request.get_full_path()拿到路径后面所有的数据(包括路径)
取一个键下的多个值:request.POST.getlist("hobby")
render 函数 render(request, template_name[, context]) 第三个参数是上下文对象
redirect 函数
对比 render与redirect 的区别:
redirect:发送第二次请求,url更新啦
render: 直接返回一个页面内容但是url没有变化(未发送第二次请求)(涉及页面跳转时不用)
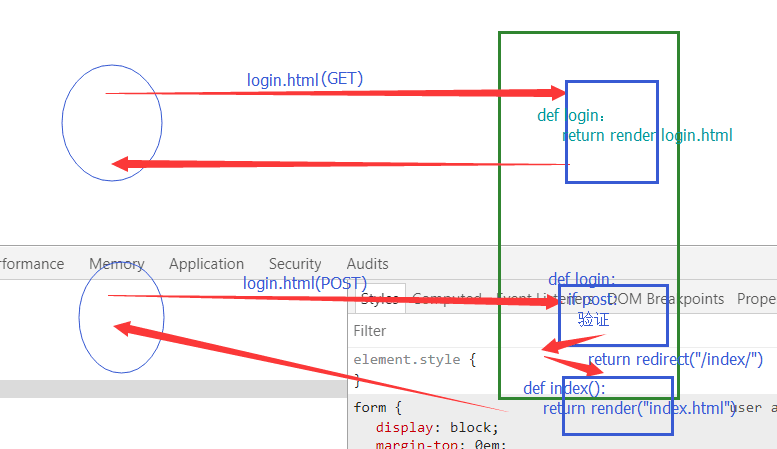
一个小例子:注:跳转是前后都要加/ ,返回时不用加/ 图片用到了分发 例子里没有用到分发
---Model


from django.db import models

# Create your models here.
import pymysql
conn = pymysql.connect(host='', port=3306, user='root', passwd='', db='day66')
cur = conn.cursor()
cur.executemany("insert into userinfo values(%s,%s)", [( "yuan", "123"),
                                                                   ( "alex", "456"),
                                                                   ("egon", "789")])

conn.commit()
#关闭指针对象
cur.close()
#关闭连接对象
conn.close()
---views
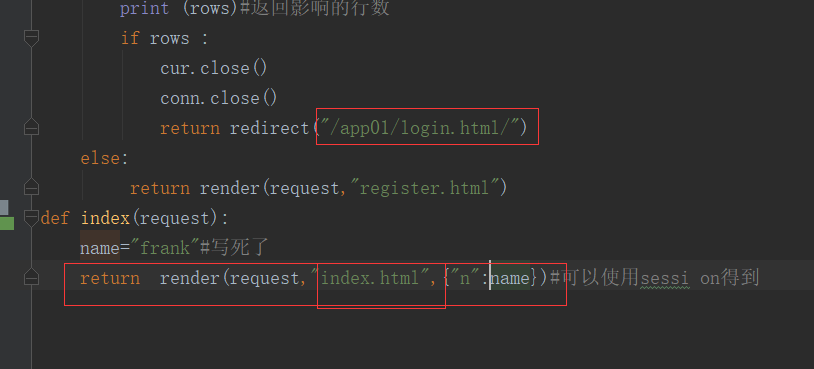
from django.shortcuts import render,HttpResponse,redirect

# Create your views here.
def login(request):
    print(request.POST)  # 这个是获取form表单的提交方法
    if request.method=="POST":
        print(request.POST)#这个是获取form表单的提交方法
        username=request.POST.get("user")
        password=request.POST.get("pwd")
        if username=="frank" and password=="789":
            return  redirect("/index.html/")#跳转到个人主页
    # else:#else 可以去掉啦
    # name="frank"
    return render(request, "login.html")
def register(request):
    if request.method=="POST":
        username=request.POST.get("user")
        password=request.POST.get("pwd")
        # hobby=request.POST.getlist("hobby")#一个键获得多个值时用这种方法
        import pymysql
        conn = pymysql.connect(host='', port=3306, user='root', passwd='', db='day66')
        cur = conn.cursor()
        SQL = "insert into userinfo (name,pwd)values(%s,%s)";
        rows = cur.execute(SQL,(username, password))
        conn.commit()
        print (rows)#返回影响的行数
        if rows :
            cur.close()
            conn.close()
            return redirect("/login.html/")
    else:
         return render(request,"register.html")
def index(request):
    name="frank"#写死了
    return  render(request,"index.html",{"n":name})#可以使用session得到
Template
<!DOCTYPE html>
<html lang="en">
<head>
    <meta charset="UTF-8">
    <meta http-equiv="X-UA-Compatible" content="IE=edge">
    <meta name="viewport" content="width=device-width, initial-scale=1">
    <title>Title</title>
    <style>
        .cc{
            margin-left: 250px;
            margin-top: 200px;
        }
    </style>
</head>
<body>

<div class="cc">
    <h1>注册页面</h1>
<form action="{% url 'register' %}"  method="post">
   <p> 姓名:<input type="text" name="user"></p>
   <p> 密码:<input type="password" name="pwd"></p>
   <!--<p> 爱好:-->
       <!--<input type="checkbox" name="hobby" value="basketball">篮球-->
       <!--<input type="checkbox" name="hobby"  value="shuangseqiu ">双色球-->
       <!--<input type="checkbox" name="hobby" value="football">足球-->

   <!--</p>-->
    <p><input type="submit"></p></div>
</form>

</body>
</html>
<!DOCTYPE html>
<html lang="en">
<head>
    <meta charset="UTF-8">
    <meta http-equiv="X-UA-Compatible" content="IE=edge">
    <meta name="viewport" content="width=device-width, initial-scale=1">
    <title>Title</title>
    <style>
        .cc{
            margin-top: 200px;
            margin-left: 300px;
        }
    </style>
</head>
<body>
<div  class="cc">
    <h1>登陆页面</h1>
<form action="{% url "login" %}"   method="post">
    <p>姓名:<input type="text" name="user"></p>
    <p>密码:<input type="password" name="pwd"></p>
    <p><input type="submit"></p>
</form>
</div>
</body>
</html>
<!DOCTYPE html>
<html lang="en">
<head>
    <meta charset="UTF-8">
    <meta http-equiv="X-UA-Compatible" content="IE=edge">
    <meta name="viewport" content="width=device-width, initial-scale=1">
    <title>Title</title>
    <style>
            .cc{
                margin-right: 200px;

    }
    </style>

</head>
<body>
<div class="cc">
<h1>hello{{ n }} </h1>
<h1>欢迎回来</h1>
</div>
</body>
</html>