C语言编程练习
双向链表添加节点
根据数据添加到双向链表中的位置不同,可细分为以下 3 种情况:
添加至表头
将新数据元素添加到表头,只需要将该元素与表头元素建立双层逻辑关系即可。
换句话说,假设新元素节点为 temp,表头节点为 head,则需要做以下 2 步操作即可:
temp->next=head; head->prior=temp;
将 head 移至 temp,重新指向新的表头;
例如,将新元素 7 添加至双链表的表头

中间位置添加节点

添加到表尾

实现代码:
head.h
#ifndef _head_h_
#define _head_h_
#include <stdio.h>
#include <stdlib.h>
typedef struct line{
    struct line * prior;
    int data;
    struct line * next;
}line;
//双链表的创建
line* initLine(line * head);
//双链表插入元素,add表示插入位置
line * insertLine(line * head,int data,int add);
//双链表删除指定元素
line * delLine(line * head,int data);
//双链表中查找指定元素
int selectElem(line * head,int elem);
//双链表中更改指定位置节点中存储的数据,add表示更改位置
line *amendElem(line * p,int add,int newElem);
//输出双链表的实现函数
void display(line * head);
#endif
main.c
#include head.h
int main() {
    line * head=NULL;
    //创建双链表
    head=initLine(head);
    display(head);
    //在表中第 3 的位置插入元素 7
    head=insertLine(head, 7, 3);
    display(head);
    //表中删除元素 2
    head=delLine(head, 2);
    display(head);
    printf("元素 3 的位置是:%d
",selectElem(head,3));
    //表中第 3 个节点中的数据改为存储 6
    head = amendElem(head,3,6);
    display(head);
    return 0;
}
line.c
#include head.h
line* initLine(line * head){
    head=(line*)malloc(sizeof(line));
    head->prior=NULL;
    head->next=NULL;
    head->data=1;
    line * list=head;
    for (int i=2; i<=5; i++) {
        line * body=(line*)malloc(sizeof(line));
        body->prior=NULL;
        body->next=NULL;
        body->data=i;
        list->next=body;
        body->prior=list;
        list=list->next;
    }
    return head;
}
line * insertLine(line * head,int data,int add){
    //新建数据域为data的结点
    line * temp=(line*)malloc(sizeof(line));
    temp->data=data;
    temp->prior=NULL;
    temp->next=NULL;
    //插入到链表头,要特殊考虑
    if (add==1) {
        temp->next=head;
        head->prior=temp;
        head=temp;
    }else{
        line * body=head;
        //找到要插入位置的前一个结点
        for (int i=1; i<add-1; i++) {
            body=body->next;
        }
        //判断条件为真,说明插入位置为链表尾
        if (body->next==NULL) {
            body->next=temp;
            temp->prior=body;
        }else{
            body->next->prior=temp;
            temp->next=body->next;
            body->next=temp;
            temp->prior=body;
        }
    }
    return head;
}
line * delLine(line * head,int data){
    line * temp=head;
    //遍历链表
    while (temp) {
        //判断当前结点中数据域和data是否相等,若相等,摘除该结点
        if (temp->data==data) {
            temp->prior->next=temp->next;
            temp->next->prior=temp->prior;
            free(temp);
            return head;
        }
        temp=temp->next;
    }
    printf("链表中无该数据元素");
    return head;
}
//head为原双链表,elem表示被查找元素
int selectElem(line * head,int elem){
//新建一个指针t,初始化为头指针 head
    line * t=head;
    int i=1;
    while (t) {
        if (t->data==elem) {
            return i;
        }
        i++;
        t=t->next;
    }
    //程序执行至此处,表示查找失败
    return -1;
}
//更新函数,其中,add 表示更改结点在双链表中的位置,newElem 为新数据的值
line *amendElem(line * p,int add,int newElem){
    line * temp=p;
    //遍历到被删除结点
    for (int i=1; i<add; i++) {
        temp=temp->next;
    }
    temp->data=newElem;

    return p;
}
display.c
#include “head.h”

void display(line * head){
    line * temp=head;
    while (temp) {
        if (temp->next==NULL) {
            printf("%d
",temp->data);
        }else{
            printf("%d->",temp->data);
        }
        temp=temp->next;
    }
}
建立自己的项目目录
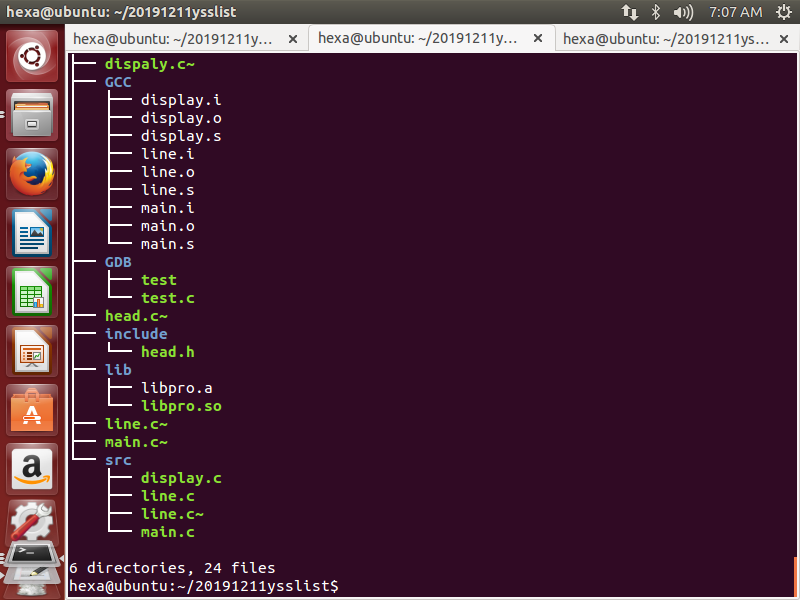
新建三个标签,分别用于基本命令、编译文件和调试文件,GCC测试生成文件转移到GCC中,源文件转移到src中,库文件转移到lib中等等。生成的tree目录如上所示。
GCC练习


编译过程
1、编译预处理:c文件到c文件
2、编译:c文件到asm文件(就是汇编语言)
3、汇编:asm到code
4、链接:将生成的目标文件链接起来
Gcc+文件名.c:编译,会得到a.out文件
Gcc+文件名.c+ -o+文件名 :一步到位的编译指令
./文件名:执行编译后的文件
对应编译过程的命令(记忆:ESC)
1、gcc -E + xx.c  -o + xx.i
或者 gcc -E +xx.c
2、gcc -S + xx.i  -o + xx.s
3、gcc -C + xx.s  -o +  xx.o
4、gcc xx.o -o  + xx
-Iinclude选项是用来寻找头文件的,-std=c99选项用于将编译指令换成c99标准。这是因为在gcc中直接在for循环中初始化了增量:
for(int i=0; i<len; i++)
{}
这语法在gcc中是错误的,必须先先定义i变量:
int i;
for(i=0;i<len;i++){}
这是因为gcc基于c89标准,换成C99标准就可以在for循环内定义i变量了。
注意:ESc选项中的大小写要区分清
静态库,动态库制作和调用
静态库


动态库
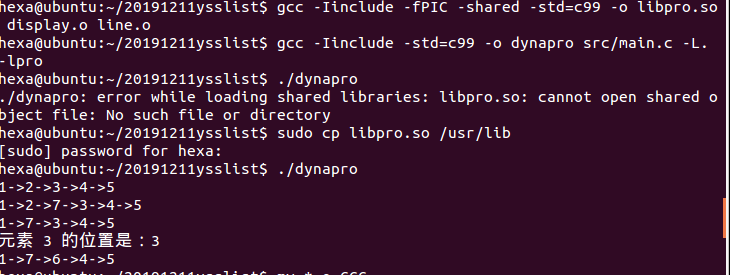
gdb练习(四种断点)
实验代码:
#include<stdio.h>
int main(int argc,char* argv[])
{
    int num = 1;
    while(num<100)
    {
        num *= 2;
    }
    printf("num=%d",num);
    return 0;
}
1、b location
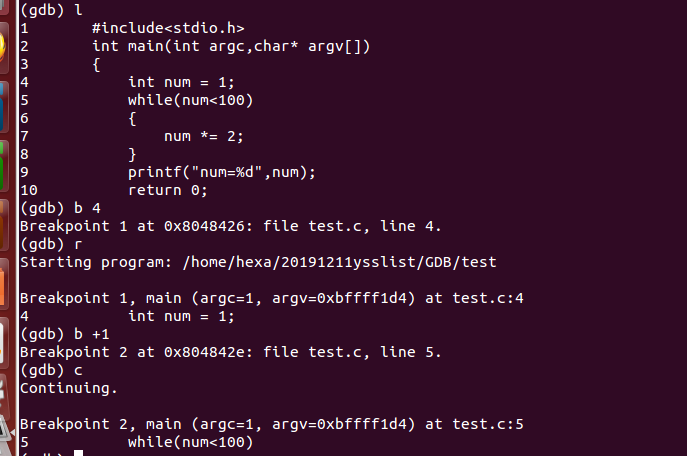
b 4和b +1,分别在第四行和第五行打上断点
2、b .. if condition

条件断点,当num>10时在第7行打上断点
此时打印num得到值为16,结果正确
3、tbreak
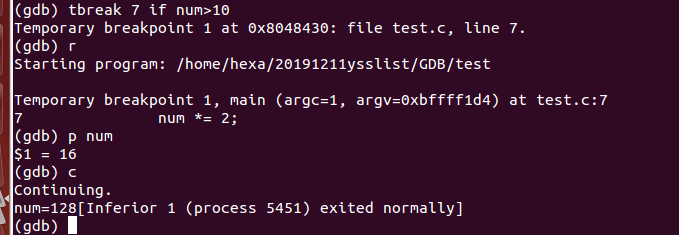
和条件断点类似,但可以看到在continue之后,num还是大于10,程序理应在第7行的断点停下,可由于tbreak的作用,它只在这个断点停了一次
4、rbreak
对源程序进行修改,添加一个函数
#include<stdio.h>
void rb_one(){
printf("rb_one
");
}
 void rb_second(){
  printf("rb_second");
}
 int main(int argc,char* argv[])
{
   rb_one();

   rb_second();
   return 0;
}
rbreak是针对函数设置的断点
rbreak 命令的使用语法格式为:
(gdb) rbreak regex
其中 regex 为一个正则表达式,程序中函数的函数名只要满足 regex 条件,rbreak 命令就会其内部的开头位置打断点。值得一提的是,rbreak 命令打的断点和 break 命令打断点的效果是一样的,会一直存在,不会自动消失。
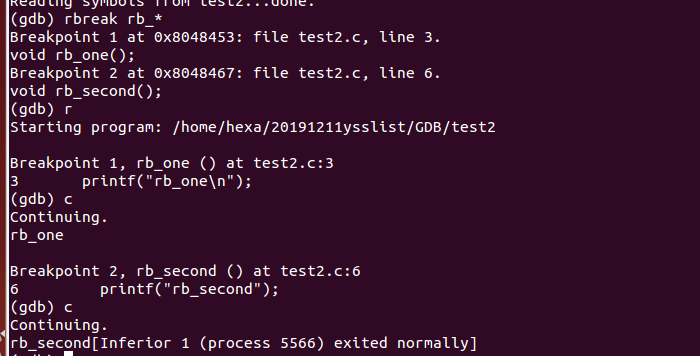
我们可以对rb开头的函数设置断点,得到结果如下所示
makefile
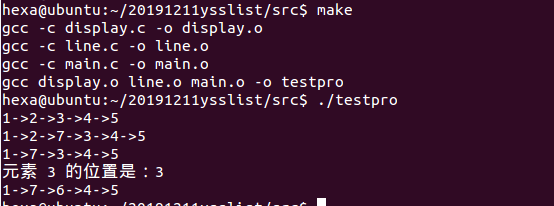
内容:
testpro:display.o line.o main.o
	gcc display.o line.o main.o -o testpro
display.o:display.c head.h
	gcc -c display.c -o display.o
line.o:line.c head.h
	gcc -c line.c -o line.o
main.o:main.c head.h
	gcc -c main.c -o main.o