目录
使用数据库是开发基本应用的基础,借助于开发框架,我们已经不用编写原始的访问数据库的代码,也不用调用JDBC(Java Data Base Connectivity)或者连接池等诸如此类的被称作底层的代码,我们将从更高的层次上访问数据库,这在Springboot中更是如此,本章我们将详细介绍在Springboot中使用 Spring Data JPA 来实现对数据库的操作。
JPA & Spring Data JPA
JPA是Java Persistence API的简称,中文名Java持久层API,是Sun官方提出的Java持久化规范,其设计目标主要是为了简化现有的持久化开发工作和整合ORM技术。JPA使用XML文件或注解(JDK 5.0或更高版本)来描述对象-关联表的映射关系,能够将运行期的实体对象持久化到数据库,它为Java开发人员提供了一种ORM工具来管理Java应用中的关系数据。 简单地说,JPA就是为POJO(Plain Ordinary Java Object)提供持久化的标准规范,即将Java的普通对象通过对象关系映射(Object-Relational Mapping,ORM)持久化到数据库中。由于JPA是在充分吸收了现有Hibernate,TopLink,JDO等ORM框架的基础上发展而来的,因而具有易于使用、伸缩性强等优点。
Spring Data JPA 是 Spring 基于 Spring Data 框架、在JPA 规范的基础上开发的一个框架,使用 Spring Data JPA 可以极大地简化JPA 的写法,可以在几乎不用写实现的情况下实现对数据库的访问和操作,除了CRUD外,还包括分页和排序等一些常用的功能。
配置Maven依赖
以MySQL数据库为例,为了使用JPA和MySQL,首先在工程中引入它们的Maven依赖。
<parent>
  <groupId>org.springframework.boot</groupId>
  <artifactId>spring-boot-starter-parent</artifactId>
  <version>1.5.1.RELEASE</version>
</parent>
<dependencies>
  <dependency>
	<groupId>mysql</groupId>
	<artifactId>mysql-connector-java</artifactId>
  </dependency>
  <dependency>
	<groupId>org.springframework.boot</groupId>
	<artifactId>spring-boot-starter-data-jpa</artifactId>
  </dependency>
  <dependency>
	<groupId>org.springframework</groupId>
	<artifactId>spring-test</artifactId>
  </dependency>
</dependencies>
配置数据源和JPA
在Springboot核心配置文件 application.properties 中配置MySQL数据源和JPA。
########################################################
### Spring datasource -- Datasource configuration.
########################################################
spring.datasource.url = jdbc:mysql://localhost:3306/mybatis?characterEncoding=UTF-8
spring.datasource.username = root
spring.datasource.password = 123456
spring.datasource.driverClassName = com.mysql.jdbc.Driver
spring.datasource.type = org.apache.tomcat.jdbc.pool.DataSource

########################################################
### Java Persistence Api --  Spring jpa configuration.
########################################################
# Specify the DBMS
spring.jpa.database = MYSQL
# Show or not log for each sql query
spring.jpa.show-sql = true
# Hibernate ddl auto (create, create-drop, update, validate, none)
spring.jpa.hibernate.ddl-auto = update
# Naming strategy
#[org.hibernate.cfg.ImprovedNamingStrategy  #org.hibernate.cfg.DefaultNamingStrategy]
spring.jpa.hibernate.naming-strategy = org.hibernate.cfg.ImprovedNamingStrategy
# stripped before adding them to the entity manager)
spring.jpa.properties.hibernate.dialect = org.hibernate.dialect.MySQL5Dialect
其中,spring.jpa.hibernate.ddl-auto 参数用来配置是否开启自动更新数据库表结构,可取create、create-drop、update、validate、none五个值。
- create 每次加载hibernate时,先删除已存在的数据库表结构再重新生成;
- create-drop 每次加载hibernate时,先删除已存在的数据库表结构再重新生成,并且当 sessionFactory关闭时自动删除生成的数据库表结构;
- update 只在第一次加载hibernate时自动生成数据库表结构,以后再次加载hibernate时根据model类自动更新表结构;
- validate 每次加载hibernate时,验证数据库表结构,只会和数据库中的表进行比较,不会创建新表,但是会插入新值。
- none 关闭自动更新
创建POJO实体
首先创建一些普通对象,用来与数据库的表建立映射关系,在此我们只定义了员工和部门两个实体来进行示例。
@Entity
@Table(name = "tbl_employee") // 指定关联的数据库的表名
public class Employee implements Serializable {

	private static final long serialVersionUID = 1L;

	@Id
	@GeneratedValue(strategy = GenerationType.IDENTITY)
	private Long id; // 主键ID

	private String name; // 姓名

	@ManyToOne
	@JoinColumn(name = "department_id")
	private Department department; // 部门

	public Long getId() {
		return id;
	}

	public void setId(Long id) {
		this.id = id;
	}

	public String getName() {
		return name;
	}

	public void setName(String name) {
		this.name = name;
	}

	public Department getDepartment() {
		return department;
	}

	public void setDepartment(Department department) {
		this.department = department;
	}

}
@Entity
@Table(name = "tbl_department")
public class Department  implements Serializable{

	private static final long serialVersionUID = 1L;

	@Id
	@GeneratedValue(strategy = GenerationType.IDENTITY)
	private Long id; // 主键ID

	private String name; // 部门名称

	public Long getId() {
		return id;
	}

	public void setId(Long id) {
		this.id = id;
	}

	public String getName() {
		return name;
	}

	public void setName(String name) {
		this.name = name;
	}

}
其中,注解@Entity用来标记该类是一个JPA实体类,并使用了注解@Table指定关联的数据库的表名;注解@Id用来定义记录的唯一标识,并结合注解@GeneratedValue将其设置为自动生成。
数据持久化
使用 JPA 进行数据持久化有两种实现方式。
- 方式一:使用Spring Data JPA 提供的接口默认实现,
- 方式二:自定义符合Spring Data JPA规则的查询方法,由框架将其自动解析为SQL。
使用Spring Data JPA接口(方式一)
Spring Data JPA提供了一些实现了基本的数据库操作的接口类,如下图所示。

CrudRepository

CrudRepository提供了一些简单的增删查改功能,接口定义如下。
package org.springframework.data.repository;

import java.io.Serializable;

@NoRepositoryBean
public interface CrudRepository<T, ID extends Serializable> extends Repository<T, ID> {

	<S extends T> S save(S entity); // 保存并返回(修改后的)实体

	<S extends T> Iterable<S> save(Iterable<S> entities); // 保存并返回(修改后的)实体集合

	T findOne(ID id); // 根据ID获取实体

	boolean exists(ID id); // 判断指定ID的实体是否存在

	Iterable<T> findAll(); // 查询所有实体

	Iterable<T> findAll(Iterable<ID> ids); // 根据ID集合查询实体

	long count(); // 获取实体的数量

	void delete(ID id); // 删除指定ID的实体

	void delete(T entity); // 删除实体

	void delete(Iterable<? extends T> entities); // 删除实体集合

	void deleteAll(); // 删除所有实体
}
PagingAndSortingRepository
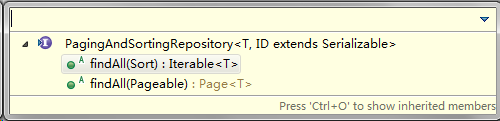
PagingAndSortingRepository继承于CrudRepository,除了具有CrudRepository接口的能力外,还新增了分页和排序的功能,接口定义如下。
package org.springframework.data.repository;

import java.io.Serializable;

import org.springframework.data.domain.Page;
import org.springframework.data.domain.Pageable;
import org.springframework.data.domain.Sort;

@NoRepositoryBean
public interface PagingAndSortingRepository<T, ID extends Serializable> extends CrudRepository<T, ID> {

	Iterable<T> findAll(Sort sort); // 查询所有实体并排序

	Page<T> findAll(Pageable pageable); // 分页查询实体
}
JpaRepository

JpaRepository继承于PagingAndSortingRepository,所以它传递性地拥有了以上接口的所有方法,同时,它还继承了另外一个QueryByExampleExecutor接口,拥有了该接口匹配指定样例的能力,JpaRepository接口定义如下。
package org.springframework.data.jpa.repository;

import java.io.Serializable;
import java.util.List;

import javax.persistence.EntityManager;

import org.springframework.data.domain.Example;
import org.springframework.data.domain.Sort;
import org.springframework.data.repository.NoRepositoryBean;
import org.springframework.data.repository.PagingAndSortingRepository;
import org.springframework.data.repository.query.QueryByExampleExecutor;

@NoRepositoryBean
public interface JpaRepository<T, ID extends Serializable>
		extends PagingAndSortingRepository<T, ID>, QueryByExampleExecutor<T> {

	List<T> findAll(); // 查询所有实体

	List<T> findAll(Sort sort); // 查询所有实体并排序

	List<T> findAll(Iterable<ID> ids); // 根据ID集合查询实体

	<S extends T> List<S> save(Iterable<S> entities); // 保存并返回(修改后的)实体集合

	void flush(); // 提交事务

	<S extends T> S saveAndFlush(S entity); // 保存实体并立即提交事务

	void deleteInBatch(Iterable<T> entities); // 批量删除实体集合

	void deleteAllInBatch();// 批量删除所有实体

	T getOne(ID id); // 根据ID查询实体

	@Override
	<S extends T> List<S> findAll(Example<S> example); // 查询与指定Example匹配的所有实体

	@Override
	<S extends T> List<S> findAll(Example<S> example, Sort sort);// 查询与指定Example匹配的所有实体并排序

}
QueryByExampleExecutor
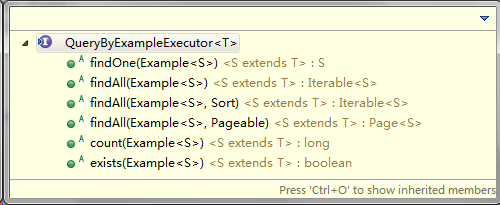
QueryByExampleExecutor接口允许开发者根据给定的样例执行查询操作,接口定义如下。
package org.springframework.data.repository.query;

import org.springframework.data.domain.Example;
import org.springframework.data.domain.Page;
import org.springframework.data.domain.Pageable;
import org.springframework.data.domain.Sort;

public interface QueryByExampleExecutor<T> {

	<S extends T> S findOne(Example<S> example); // 查询与指定Example匹配的唯一实体

	<S extends T> Iterable<S> findAll(Example<S> example); // 查询与指定Example匹配的所有实体

	<S extends T> Iterable<S> findAll(Example<S> example, Sort sort); // 查询与指定Example匹配的所有实体并排序

	<S extends T> Page<S> findAll(Example<S> example, Pageable pageable);// 分页查询与指定Example匹配的所有实体

	<S extends T> long count(Example<S> example); // 查询与指定Example匹配的实体数量

	<S extends T> boolean exists(Example<S> example); // 判断与指定Example匹配的实体是否存在
}
以部门实体资源库接口DepartmentRepository为例,只需继承CrudRepository接口便会自动拥有基础的增删查改功能,无须编写一条SQL。
@Repository
public interface DepartmentRepository extends CrudRepository<Department, Long> {

}
自定义查询方法(方式二)
除了可以直接使用Spring Data JPA接口提供的基础功能外,Spring Data JPA还允许开发者自定义查询方法,对于符合以下命名规则的方法,Spring Data JPA能够根据其方法名为其自动生成SQL,除了使用示例中的 find 关键字,还支持的关键字有:query、get、read、count、delete等。
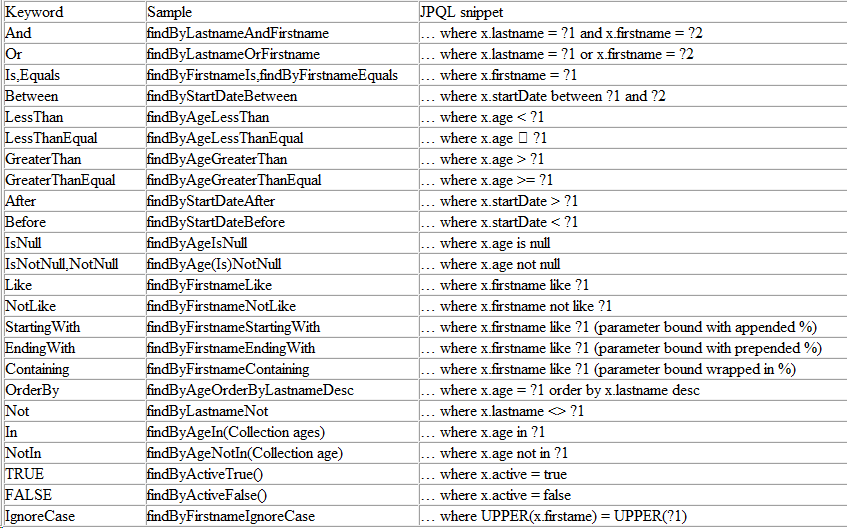
另外,Spring Data JPA 还提供了对分页查询、自定义SQL、查询指定N条记录、联表查询等功能的支持,以员工实体资源库接口EmployeeRepository为例,功能代码示意如下。
@Repository
public interface EmployeeRepository extends JpaRepository<Employee, Long> {

	/**
	 * 根据部门ID获取员工数量
	 */
	int countByDepartmentId(Long departmentId);

	/**
	 * 根据部门ID分页查询
	 */
	Page<Employee> queryByDepartmentId(Long departmentId, Pageable pageable);

	/**
	 * 根据员工ID升序查询前10条
	 */
	List<Employee> readTop10ByOrderById();

	/**
	 * 根据员工姓名取第一条记录
	 */
	Employee getFirstByName(String name, Sort sort);

	/**
	 * 联表查询
	 */
	@Query("select e.id as employeeId,e.name as employeeName,d.id as departmentId,d.name as departmentName from Employee e , Department d where e.id= ?1 and d.id= ?2")
	EmployeeDetail getEmployeeJoinDepartment(Long eid, Long did);

	/**
	 * 修改指定ID员工的姓名
	 */
	@Modifying
	@Transactional(timeout = 10)
	@Query("update Employee e set e.name = ?1 where e.id = ?2")
	int modifyEmployeeNameById(String name, Long id);

	/**
	 * 删除指定ID的员工
	 */
	@Transactional(timeout = 10)
	@Modifying
	@Query("delete from Employee where id = ?1")
	void deleteById(Long id);

}
JUnit测试
为例验证上面接口的正确性,我们使用JUnit来进行测试,先增加一个JPA的配置类,代码如下。
@Order(Ordered.HIGHEST_PRECEDENCE)
@Configuration
@EnableTransactionManagement(proxyTargetClass = true)
@EnableJpaRepositories(basePackages = {"com.pengjunlee.repository"})
@EntityScan(basePackages = {"com.pengjunlee.entity"})
@EnableAutoConfiguration
public class JpaConfiguration {

	@Bean
	PersistenceExceptionTranslationPostProcessor persistenceExceptionTranslationPostProcessor() {
		return new PersistenceExceptionTranslationPostProcessor();
	}
}
其中,@EnableTransactionManagement注解用来启用JPA事务管理,@EnableJpaRepositories注解用来启用JPA资源库发现,@EntityScan注解用来启用实体发现。
配置类定义好之后,编写一个JUnit Test Case测试程序。
@RunWith(SpringJUnit4ClassRunner.class)
@ContextConfiguration(classes = JpaConfiguration.class)
@TestPropertySource(locations = { "classpath:application.properties" })
public class JpaTest {

	@Autowired
	DepartmentRepository departmentRepository;

	@Autowired
	EmployeeRepository employeeRepository;

	@Test
	public void addDepartmentTest() {

	}

	@Test
	public void initData() {
		// 清空员工表中的数据
		employeeRepository.deleteAll();
		// 清空部门表中的数据
		departmentRepository.deleteAll();
		// 部门表中添加一个开发部
		Department dept1 = new Department();
		dept1.setName("开发部");
		departmentRepository.save(dept1);
		// 部门表中添加一个测试部
		Department dept2 = new Department();
		dept2.setName("测试部");
		departmentRepository.save(dept2);

		String[] names = new String[] { "lucy", "tom", "hanmeime", "jacky", "francky", "lilly", "xiaoming", "smith",
				"walt", "sherry" };
		// 员工表中增加10条记录
		for (int i = 0; i < 10; i++) {
			Employee emp = new Employee();
			emp.setName(names[i]);
			if (i < 5) {
				emp.setDepartment(dept1);
			} else {
				emp.setDepartment(dept2);
			}
			employeeRepository.save(emp);
		}
	}

	@Test
	public void testCountByDepartmentId() {
		int count = employeeRepository.countByDepartmentId(19L);
		System.out.println(count);
	}

	@Test
	public void testQueryByDepartmentId() {
		Pageable pageable = new PageRequest(0, 10, new Sort(Sort.Direction.ASC, "name"));
		Page<Employee> emps = employeeRepository.queryByDepartmentId(19L, pageable);

		for (Employee emp : emps.getContent()) {
			System.out.println("员工姓名:" + emp.getName() + ",所属部门:" + emp.getDepartment().getName());
		}
	}

	@Test
	public void testReadTop10ByOrderById() {
		List<Employee> emps = employeeRepository.readTop10ByOrderById();
		for (Employee emp : emps) {
			System.out.println("员工姓名:" + emp.getName() + ",所属部门:" + emp.getDepartment().getName());
		}
	}

	@Test
	public void testGetFirstByName() {
		Employee emp = employeeRepository.getFirstByName("xiaoming", new Sort(Direction.ASC, "id"));
		System.out.println("员工姓名:" + emp.getName() + ",所属部门:" + emp.getDepartment().getName());
	}

	@Test
	public void testGetEmployeeJoinDepartment() {
		EmployeeDetail empDetail = employeeRepository.getEmployeeJoinDepartment(5L, 19L);
		System.out.println("员工姓名:" + empDetail.getEmployeeName() + ",部门名称:" + empDetail.getDepartmentName());
	}

	@Test
	public void testModifyEmployeeNameById() {
		employeeRepository.modifyEmployeeNameById("chris", 5L);
	}

	@Test
	public void testDeleteById() {
		employeeRepository.deleteById(11L);
	}
}