iOS 开发之Target-action模式
Target-action:目标-动作模式,它贯穿于iOS开发始终。但是对于初学者来说,还是被这种模式搞得一头雾水。
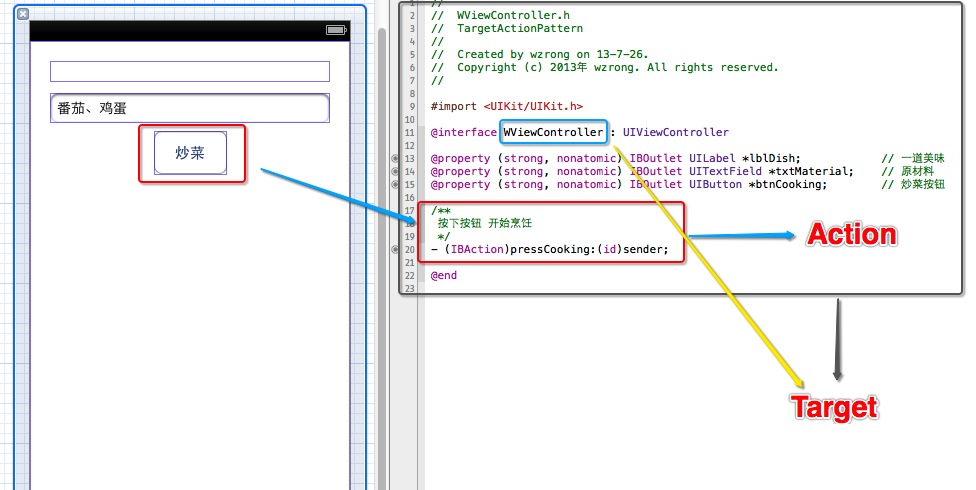
其实Target-action模式很简单,就是当某个事件发生时,调用那个对象中的那个方法。如:按下按钮时,调用Controller里边的click方法。“那个对象”就是Target,“那个方法”就是Action,及Controller是Targer,click方法是action。
一般Target都是Controller,而Action有它自己固有的格式:-(IBAction)click:(id)sender。
如下图所示,target是处理交互事件的对象实例,action是target对象中处理该事件的方法。
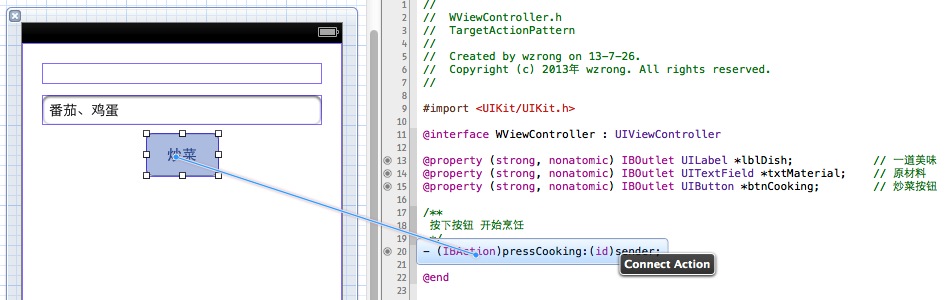
这里有两种方式给“炒菜”按钮设置Action:
1、直接拖拽连线
2、以代码的方式实现
在iOS中有一个UIControl类,该类中定义了一个
-(void)addTarget:(id)target action:(SEL) forControlEvents:(UIControlEvents)controlEvents
方法,大部分视图类都继承自UIControl类,所以"炒菜"按钮可以使用该方法实现Target-action模式。在iOS中这种设计模式被称作一个对象给另外一个对象发送消息。

- (void)viewDidLoad
{
    [super viewDidLoad];

    // 给炒菜按钮添加点击事件
    // 使用Target-action设计模式,在两个对象间直接发送消息
    [self.btnCooking addTarget:self action:@selector(pressCooking:) forControlEvents:UIControlEventTouchUpInside];
}

1、self 指目标对象为当前对象,及WViewController;
2、action 即 在目标对象上的点击方法;
3、何时调用该方法,UIControlEventTouchUpInside即单击时。
“炒菜”按钮是一个可交互的视图控件,点击它后,它指定了一个target(目标对象),并执行目标对象上指定的action(方法)。
action方法有以下几种形式:
- (void)doSomething;
// OR
- (void)doSomething:(id)sender;
// OR
- (IBAction)doSomething:(id)sender;
// OR
- (IBAction)doSomething:(UIButton *) sender;
这里的sender,发送者,就是对 “菜单” 按钮对象的引用。
以下代码是完全用代码定义的一个UIButton,并添加在self.view中:
- (void)viewDidLoad
{
    [super viewDidLoad];

    // 实例化按钮,并设置按钮类型为圆角
    UIButton *btnCustom = [UIButton buttonWithType:UIButtonTypeRoundedRect];
    // 设置按钮大小
    btnCustom.frame = CGRectMake(124, 140, 73, 44);
    // 设置按钮标题
    [btnCustom setTitle:@"点击我..." forState:UIControlStateNormal];
    // 设置按钮点击事件
    [btnCustom addTarget:self action:@selector(customButton) forControlEvents:UIControlEventTouchUpInside];
    // 将按钮添加到View
    [self.view addSubview:btnCustom];
}

/**
 自定义按钮点击方法
 */
- (void)customButton{
    [self.lblDish setText:self.txtMaterial.text];
}
UIButton的几种触发方式:
1、UIControlEventTouchDown
指鼠标左键按下(注:只是“按下”)的动作
2、UIControlEventTouchDownRepeat
指鼠标左键连续多次重复按下(注:只是“按下”)的动作,比如,鼠标连续双击、三击、……、多次连击。
说明:多次重复按下时,事件序列是这样的:
UIControlEventTouchDown ->
(UIControlEventTouchUpInside) ->
UIControlEventTouchDown ->
UIControlEventTouchDownRepeat ->
(UIControlEventTouchUpInside) ->
UIControlEventTouchDown ->
UIControlEventTouchDownRepeat ->
(UIControlEventTouchUpInside) ->
......
除了第一次按下外,后面每次摁下都是一个UIControlEventTouchDown事件,然后紧跟一个UIControlEventTouchDownRepeat事件。
3、UIControlEventTouchDragInside
指按下鼠标,然后在控件边界范围内拖动。
4、UIControlEventTouchDragOutside
与UIControlEventTouchDragInside不同的是,拖动时,鼠标位于控件边界范围之外。
但首先得有个UIControlEventTouchDown事件,然后接一个UIControlEventTouchDragInside事件,再接一个UIControlEventTouchDragExit事件,这时,鼠标已经位于控件外了,继续拖动就是UIControlEventTouchDragOutside事件了。
具体操作是:在控件里面按下鼠标,然后拖动到控件之外。
5、UIControlEventTouchDragEnter
指拖动动作中,从控件边界外到内时产生的事件。
6、UIControlEventTouchDragExit
指拖动动作中,从控件边界内到外时产生的事件。
7、UIControlEventTouchUpInside
指鼠标在控件范围内抬起,前提先得按下,即UIControlEventTouchDown或UIControlEventTouchDownRepeat事件。
8、UIControlEventTouchUpOutside
指鼠标在控件边界范围外抬起,前提先得按下,然后拖动到控件外,即
UIControlEventTouchDown ->
UIControlEventTouchDragInside(n 个) ->
UIControlEventTouchDragExit ->
UIControlEventTouchDragOutside(n 个)
时间序列,再然后就是抬起鼠标,产生UIControlEventTouchUpOutside事件。
事例传送门:TargetActionPattern
参考:
2、http://blog.teamtreehouse.com/ios-design-patterns-target-action-part-1
IOS 调用WebService(同步和异步)
因为公司的服务全都是webservice,每次总要花费大量时间在调试服务上面,干脆就写了一个解析wsdl的项目,希望将来能用上吧。还未经过烘焙,有问题,还请高手点播点播。
下面,我拿天气服务的wsdl作为例子吧。
服务的WSDL地址:http://www.webxml.com.cn/WebServices/WeatherWebService.asmx?wsdl
WSDL包含以下节点
definitions 根节点
根节点下面有以下节点:
types 数据类型定义。方法的参数名都包含在里面。
message 消息数据结构。
portType 描述服务和服务的方法。
binding 描述Web Service的通信协议。
service 描述Web Service 的访问点的集合。
下面对来一步一步解析如何根据wsdl 生成SOAP 消息体。
1.添加一个类扩展,如下图DDXMLElement+WSDL.h和DDXMLElement+WSDL.m

头文件中,暴露以下方法

2.SoapUtility 文件是用来封装soap消息的。SoapUtility调用DDXMLElement+WSDL
在SoapUtility头文件中,暴露以下方法

3.服务调用,上面,都把Soap消息给准备好了。那么最后一步就是服务的调用了。这里分两种调用方式:同步和异步。

4.使用方法,下面是天气服务的调用例子
//参数列表
NSDictionary *dic=@{@"theCityName": cityname};
//方法名
NSString *methodName=@"getWeatherbyCityName";
//封装soap信封
SoapUtility *soaputility=[[SoapUtility alloc] initFromFile:@"WeatherWebService"];
NSString *postData=[soaputility BuildSoapwithMethodName:@"getWeatherbyCityName" withParas:dic];
//初始化服务
SoapService *soaprequest=[[SoapService alloc] init];
soaprequest.PostUrl=@"http://www.webxml.com.cn/WebServices/WeatherWebService.asmx";
soaprequest.SoapAction=[soaputility GetSoapActionByMethodName:methodName SoapType:SOAP];
if (isSync) {
//同步方法
ResponseData *result= [soaprequest PostSync:postData];
[self.result setText:result.Content];
}
else{
//异步请求
[soaprequest PostAsync:postData Success:^(NSString *response) {
[self.result setText:response];
} falure:^(NSError *response) {
[self.result setText:response.description];
}];
}
5.代码实现
https://github.com/xujialiang/SOAP-IOS
欢迎大家给意见。