http://www.cnblogs.com/coffeegg/archive/2011/11/15/2249452.html(转)
http://blog.csdn.net/cgzhello1/article/details/8514113
加载Qss文件http://www.tuicool.com/articles/fAF7zq
Qss 实例http://blog.csdn.net/sdljlcming/article/details/8602659
将文件添加到树形工程中:http://blog.csdn.net/lyc_daniel/article/details/8813121
qt值qss(stylesheet)用法简介(一) :使用qt写程序,总要有界面,而美工给程序猿的设计总是那么美轮美奂,那么该怎么样将效果图转化为实际图http://blog.csdn.net/cgzhello1/article/details/8514113
------------------------------------------------
摘要:
QT Create中,对button或者window等部件设置背景、颜色、透明等样式时,需要用到style sheet,可以直接在代码里写,也可以在ui设计师里通过右键change style sheet的方法来设置,本人是使用的后面的方式,下面介绍几种常见的用法。
介绍:
作者使用的开发环境为:qt creator 201005, qt4.7。
1、利用style sheet给窗体设置背景
使用stylesheet设置背景图片还是有一些要注意的,如果是在mainwindow和dialog中,直接右键change style sheet在add resource中选择background-image或者border-image,选择资源文件中的图片就行了(前者是按像素显示图片,后者可根据窗体大小来自动缩放图片),如下图:

但在widget中就不行,你会发现,用同样的方法,背景并没有发生改变,而仅仅是它的子窗体背景图片发生了改变。
那么在widget中要如何做呢,我们在widget中放置一个frame,然后对frame通过stylesheet设置背景,后面窗体里所有的部件都放在这个frame里。
我们知道,子窗体会继承父窗体的属性,也就是说,父窗体的背景,在子窗体中也会有,那如何让子窗体不继承父窗体的背景呢,同样的,还是在Edit Style Sheet里,需下输入如下代码:
#desktop {
border-image: url(:/images/desktop.jpg);
}
#desktop * {
border-image:url();
}
desktop是你的窗体名。
2、menubar设置透明
我想做一个菜单按钮,像ubuntu的应用程序菜单一样,能在点击时弹出一个下拉框,我选择了用mainwindow来实现,但我如现menuba显示在顶层很难看,如何才能不让它显示呢。
设置menuba的stylesheet,
background-color:transparent
将背景设置为透明。

3、tool button不显示边框
当我们设置button的icon时,发现icon的形状并不与button完全一致,如下图:

设置stylesheet
border-style: flat;
效果如下:

注意,一定要选择tool button,而不要选择push button,因为push button活动的时候会有一个虚线框。
要达到上图的效果,除了设置border-style:flat,可不可以将style设置为transparent呢?设置成transparent后,显示上看,效果是和上图的一样,但当按下时,button没有被图片覆盖的地方就会显示被按下时的颜色。
4、在父窗体的stylesheet中设置子部件的属性
假设有多个button,且它们的样式是一样的,那是不是需要一个个设置呢?不需要的,我们可以在父窗体中进行设置,那么子部件都会继承它的属性。
如果某个button的样式特殊,再单独修改就行了,下面举个实例,在父窗体的stylesheet中设置如下
QDialog{background:rgb(229, 255, 239)}
QMenuBar{background:url(:/image/header.bmp)}
QStatusBar{background:url(:/image/header.bmp)}
QPushButton{background:url(:/image/header.bmp)}
QLCDNumber{background:url(:/image/lcd.bmp)}
QLabel{color: rgb(0, 0, 255)}
QDial{background-color: rgb(67, 67, 67)}
QGroupBox {
border-2px;
border-style:solid;
border-color:#FFFFFF;
}
QGroupBox{color: rgb(255,255, 255)}
QToolButton{border-style: flat;}
结语:
style sheet用起来很方便,以上是总结的几种用法,后面会继续补充。
--------------------
|
关于控件styleSheet的设置方法: 1、Designer方法:直接在属性的styleSheet添加如下行: color:red;background-image:url("D:/back.jpg"); //设置字体为红色;设置背景图像 ;表示共存; 2、代码方法:setStyleSheet(...)等 3、这样加载styleSheet的话可能引起整个窗体字号等的变化;而且加载图像很慢,严重影响程序执行速度。 |
在mainwindow.cpp里作如下修改:
#include "mainwindow.h"
#include "ui_mainwindow.h"
#include <QFile>//加入这两个头文件
#include <QTextStream>
void loadStyleSheet(QString qssName)//加入下面函数
{
QFile data(qssName);
QString qssFile;
if(data.open(QFile::ReadOnly))
{
QTextStream styleIn(&data);
qssFile = styleIn.readAll();
data.close();
qApp->setStyleSheet(qssFile);
}
}
MainWindow::MainWindow(QWidget *parent) :
QMainWindow(parent),
ui(new Ui::MainWindow)
{
loadStyleSheet(QString(":/style1.qss"));//在构造函数里添加这一句,加载stylesheet
ui->setupUi(this);
}
=============================================
QT stylesheet 操作
- #include <QTextStream>
- #include <QFile>
- QFile file("./styles/default.qss");
- file.open(QFile::ReadOnly);
- QString styleSheet = file.readAll();//QLatin1String(file.readAll());
- a.setStyleSheet(styleSheet);
#ifndef DIALOG_H#define DIALOG_H
#include <QDialog>
#include <QGridLayout>
#include <QLabel>
#include <QPushButton>
#include <QLineEdit>

namespace Ui {class Dialog;}

class Dialog : public QDialog{    Q_OBJECT    public:    explicit Dialog(QWidget *parent = 0);
 ~Dialog();
private:    Ui::Dialog *ui;    QGridLayout *layout1;
QPushButton *btn1;
 QPushButton *btn2;
  QPushButton *btn3;
QPushButton *btn4;
QLineEdit   *edit1;};
#endif //

DIALOG_H
#include "dialog.h"
#include "ui_dialog.h"
Dialog::Dialog(QWidget *parent) :    QDialog(parent),    ui(new Ui::Dialog)
{    ui->setupUi(this);        this->setWindowFlags(this->windowFlags()&Qt::WindowMaximizeButtonHint&Qt::WindowMinimizeButtonHint);
 //为对话框添加上最大化和最小化按钮
   layout=new QBoxLayout(this);
    layout1=new QGridLayout(this);
      btn1=new QPushButton(this);
  btn1->setStyleSheet("QPushButton{color:red;background:yellow}"); //设定前景颜色,就是字体颜色    //
    btn1->setStyleSheet("QPushButton{background:yellow}");        btn1->setText("Button1");
   btn2=new QPushButton(this);
     btn2->setStyleSheet("QPushButton{color:red;background-color:rgb(200,155,100)}"); //使用rgb来设定背景颜色
 btn2->setText("Button2");
   btn3=new QPushButton(this);

 btn3->setStyleSheet("QPushButton{background-image:url
(image/1.png);background-repeat: repeat-xy;background-position:
center;background-attachment: fixed;background-attachment:
fixed;background-attachment: fixed;;background-clip:
padding}");         //设定按钮的背景图片,background-repeat可以设定背景图片的
重复规则,这里设定仅在xy方向都重复,所以图片会被重复一
次
  //background-position用来设定图片的位置,是左(left)还是右(right),还是在中间(center),是上(top)还是底部(bottom)
   //background-attachment用来这定背景图片是否卷动或者和窗口大小相匹配,默认是卷动的         btn3->setText("Button3");
    btn4=new QPushButton(this);
  btn4->setStyleSheet("QPushButton{border: 3px solid red;border-radius:8px}"); //设定边框宽度以及颜色
   //可以使用border-top,border-right,border-bottom,border-left分别设定按钮的上下左右边框,
    //同样有border-left-color, border-left-style, border-left-width.等分别来设定他们的颜色,样式和宽度
     //border-image用来设定边框的背景图片。
  //border-radius用来设定边框的弧度。可以设定圆角的按钮         btn4->setText("Button4");
   //字体设定         //font-family来设定字体所属家族,
   //font-size来设定字体大小         //font-style来设定字体样式         //font-weight来设定字体深浅         //height用来设定其高低         //selection-color用来设定选中时候的颜色         edit1=new QLineEdit(this);
  edit1->setStyleSheet("QLineEdit{font: bold italic large "Times New Roman";
font-size:25px;color:rgb(55,100,255);
height:50px;border:4px solid rgb(155,200,33);border-radius:15px;selection-color:pink}");
  //父窗口的设定         //icon-size来设定图片大小
  this->setWindowIcon(QIcon("image/1.png"));
   this->setStyleSheet("QWidget{background:write url(image/2.png);icon-size:20px 5px}");
 //设定整个对话框的背景颜色
  //      this->setStyleSheet("QWidget{icon-size:20px 5px}");
 layout1->addWidget(btn1,0,0);        layout1->addWidget(btn2,0,1);        l
ayout1->addWidget(btn3,1,0);        layout1->addWidget(btn4,1,1);
  layout1->addWidget(edit1,2,0);  setLayout(layout1);}Dialog::~Dialog(){    delete ui;}
------------------------------QPushBUtton美化
第一篇
http://blog.csdn.net/yiyaaixuexi/article/details/6706729
第二篇
http://blog.csdn.net/yiyaaixuexi/article/details/6343337
有很多朋友都抱怨,为什么自己使Qt做的小项目,UI那么土那么俗,方方框框,基本控件很丑,要不是Qt的跨平台,才不去学习它。呵呵,其实我想说,嵌入式系统中的图形界面,通通交给QT,绝对没问题!
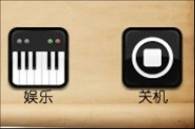
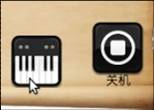
简单说说自定义Button,QPushButton是常用组件之一,先看下效果。
当单击按钮后,效果如图:
实现代码:
这下明白喽?我们只是需要在mousePressEvent和mouseReleaseEvent中,添加setIcon(QIcon(*buttonPicture))的处理,就让Button动起来了o(∩_∩)o ...
 哦,即使不会,咱可是可以写PS的无所不能的程序员,学一下怎么使用应该不难吧?
