工具:pycharm + Appium + Genymotion
开发环境:python 3.6.5 + selenium 2.48.0 + pytest框架 + Android 5.1
测试机型:Samsung Galaxy S6
#需求:设计3个测试用例
#1.实现点击设置->显示->放大镜(查找)->输入内容->点击返回按钮
#2.实现点击设置->更多->移动网络->首选网络类型->2G
#3.实现点击设置->更多->移动网络->首选网络类型->3G
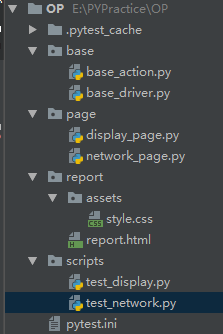
以下是PO模式设计文件目录
实现设计模式前:

import time
from appium import webdriver


class TestSetting:

    def setup(self):
        # server 启动参数
        desired_caps = {}
        # 设备信息
        desired_caps['platformName'] = 'Android'
        desired_caps['platformVersion'] = '5.1'
        desired_caps['deviceName'] = '192.168.56.101:5555'
        # app的信息
        desired_caps['appPackage'] = 'com.android.settings'
        desired_caps['appActivity'] = '.Settings'
        # 解决输入中文
        desired_caps['unicodeKeyboard'] = True
        desired_caps['resetKeyboard'] = True

        # 声明我们的driver对象
        self.driver = webdriver.Remote('http://127.0.0.1:4723/wd/hub', desired_caps)

    def test_mobile_network_2g(self):
        self.driver.find_element_by_xpath("//*[contains(@text,'更多')]").click()
        self.driver.find_element_by_xpath("//*[contains(@text,'移动网络')]").click()
        self.driver.find_element_by_xpath("//*[contains(@text,'首选网络类型')]").click()
        self.driver.find_element_by_xpath("//*[contains(@text,'2G')]").click()

    def test_mobile_network_3g(self):
        self.driver.find_element_by_xpath("//*[contains(@text,'更多')]").click()
        self.driver.find_element_by_xpath("//*[contains(@text,'移动网络')]").click()
        self.driver.find_element_by_xpath("//*[contains(@text,'首选网络类型')]").click()
        self.driver.find_element_by_xpath("//*[contains(@text,'3G')]").click()

    def test_mobile_display_input(self):
        self.driver.find_element_by_xpath("//*[contains(@text,'显示')]").click()
        self.driver.find_element_by_id("com.android.settings:id/search").click()
        self.driver.find_element_by_id("android:id/search_src_text").send_keys("hello")
        self.driver.find_element_by_class_name("android.widget.ImageButton").click()

    def teardown(self):
        self.driver.quit()
实现设计模式后:
公共部分抽取在base文件夹
抽取前置配置:
base_driver.py
from appium import webdriver

def Testbase():
    # server 启动参数
    desired_caps = {}
    desired_caps['platformName'] = 'Android'
    desired_caps['platformVersion'] = '5.1'
    desired_caps['deviceName'] = '192.168.56.101:5555'
    desired_caps['appPackage'] = 'com.android.settings'
    desired_caps['appActivity'] = '.Settings'
    desired_caps['unicodeKeyboard'] = True
    desired_caps['resetKeyboard'] = True
    # 解决输入中文问题
    desired_caps['unicodeKeyboard'] = True
    desired_caps['resetKeyboard'] = True

    # 声明driver对象
    driver = webdriver.Remote('http://127.0.0.1:4723/wd/hub', desired_caps)
    return driver
抽取公共方法:
base_action.py
from selenium.webdriver.support.wait import WebDriverWait


class BaseAction:
    def __init__(self, driver):
        self.driver = driver
    # 显示等待
    def find_elements(self, loc, time=10, poll=1):
        return WebDriverWait(self.driver, time, poll).until(lambda x: x.find_element(loc[0], loc[1]))

    # 定义一个函数,取按钮的元素
    def act_click(self,loc):
        return self.act_title(loc).click()
    # 定义一个函数,取输入框的元素
    def act_text(self,loc,text):
        return self.act_title(loc).send_keys(text)
    def act_title(self, loc):
        by = loc[0]
        value = loc[1]
        return self.driver.find_element(by, value)
页面主体部分:
page
测试用例1:
display_page.py
from base.base_action import BaseAction
from selenium.webdriver.common.by import By

class DisplayPage(BaseAction):
    # 初始化方法
    # 显示按钮
    see_button = By.XPATH, "//*[contains(@text,'显示')]"
    # 放大镜按钮
    search_button = By.ID, "com.android.settings:id/search"
    # 放大镜旁边的输入文本
    search_edit_text = By.ID, "android:id/search_src_text"
    # 返回按钮
    back_button = By.CLASS_NAME, "android.widget.ImageButton"
    #
    # # 定义一个函数,取按钮的元素
    # def act_click(self,loc):
    #     return self.driver.find_element(loc[0],loc[1]).click()
    # # 定义一个函数,取输入框的元素
    # def act_text(self,loc,text):
    #     return self.driver.find_element(loc[0],loc[1]).send_keys(text)

    # def __init__(self, driver):
    #     self.driver = driver


    # 点击显示
    def click_see(self):
        # self.driver.find_element_by_xpath("//*[contains(@text,'显示')]").click()
        # self.driver.find_element(self.see_button).click()
        self.act_click(self.see_button)

    # 点击放大镜
    def click_search(self):
        # self.driver.find_element_by_id("com.android.settings:id/search").click()
        # self.driver.find_element(self.search_button).click()
        self.act_click(self.search_button)


    # 输入文本
    def input_text(self, text):
        # self.driver.find_element_by_id("android:id/search_src_text").send_keys(text)
        # self.driver.find_element(self.search_edit_text).send_keys(text)
        self.act_text(self.search_edit_text,text)

    # 点击返回
    def click_back(self):
        # self.driver.find_element_by_class_name("android.widget.ImageButton").click()
        # self.driver.find_element(self.back_button).click()
        self.act_click(self.back_button)
测试用例2/3:
network_page.py
from selenium.webdriver.common.by import By
from base.base_action import BaseAction

class NetworkPage(BaseAction):

# 抽离元素
    # 更多按钮
    more_button = By.XPATH, "//*[contains(@text,'更多')]"
    # 网络移动按钮
    network_button = By.XPATH, "//*[contains(@text,'移动网络')]"
    #首选网络类型按钮
    first_network_button = By.XPATH, "//*[contains(@text,'首选网络类型')]"
    # 2G选择按钮
    button_2g = By.XPATH, "//*[contains(@text,'2G')]"
    # 3G选择按钮
    button_3g = By.XPATH, "//*[contains(@text,'3G')]"

# 代码精简方式,提取公共元素
    def click_more(self):
        # self.driver.find_element_by_xpath("//*[contains(@text,'更多')]").click()
        # self.driver.find_element(By.XPATH, "//*[contains(@text,'更多')]").click()
        self.act_click(self.more_button)


    def click_network(self):
        # self.driver.find_element_by_xpath("//*[contains(@text,'移动网络')]").click()
        # self.driver.find_element(By.XPATH, "//*[contains(@text,'移动网络')]").click()
        self.act_click(self.network_button)


    def click_first_network(self):
        # self.driver.find_element_by_xpath("//*[contains(@text,'首选网络类型')]").click()
        # self.driver.find_element(By.XPATH, "//*[contains(@text,'首选网络类型')]").click()
        self.act_click(self.first_network_button)

    def mobile_network_2g(self):
        # self.driver.find_element_by_xpath("//*[contains(@text,'2G')]").click()
        # self.driver.find_element(By.XPATH, "//*[contains(@text,'2G')]").click()
        self.act_click(self.button_2g)


    def mobile_network_3g(self):
        # self.driver.find_element_by_xpath("//*[contains(@text,'3G')]").click()
        # self.driver.find_element(By.XPATH, "//*[contains(@text,'2G')]").click()
        self.act_click(self.button_3g)
测试用例1的脚本:
test_display.py
# 获取本地地址
import sys, os
sys.path.append(os.getcwd())

from base.base_driver import Testbase
from page.display_page import DisplayPage

class TestDisplay:
    def setup(self):
        self.driver = Testbase()
        self.display_page = DisplayPage(self.driver)

    def test_mobile_display_input(self):
        # 点击显示
        self.display_page.click_see()
        # 点击放大镜
        self.display_page.click_search()
        # 文本输入
        self.display_page.input_text("hello")
        # 点击返回
        self.display_page.click_back()

    def teardown(self):
        self.driver.quit()
测试用例2/3的脚本:
test_network.py
import os, sys
sys.path.append(os.getcwd())
from page.network_page import NetworkPage
from base.base_driver import Testbase

class TestNetwork:
    def setup(self):
        self.driver = Testbase()
        self.network_page = NetworkPage(self.driver)
        self.network_page.click_more()
        self.network_page.click_network()
        self.network_page.click_first_network()

    def test_mobile_network_2g(self):

        self.network_page.mobile_network_2g()

    def test_mobile_network_3g(self):
        # self.network_page.click_more()
        # self.network_page.click_network()
        # self.network_page.click_first_network()
        self.network_page.mobile_network_3g()

    def teardown(self):
        self.driver.quit()
pytest框架的执行文件:
pytest.ini
注意:因为文件为ini格式,#不被识别为注释标识,请删掉注释部分
[pytest]
#文件路径,和生成报告
addopts = -s --html=./report/report.html
testpaths = ./scripts
#执行的文件名
python_files = test_*.py
#执行文件里面的类
python_classes = Test*
#执行类中的那些方法
python_functions = test_*