品优购_day03
1. 自定义服务
自定义服务,而服务会封装一些操作。在不同的控制器中可以调用同一个服务,这样服务的代码将会被重用。页面需要用到该服务时,直接引入即可。
<script type="text/javascript" src="../js/base_pagination.js"></script>

同时body标签要指定ng-app="pinyougou"
- base_pagination.js
var app=angular.module('pinyougou',['pagination']);
//分页,定义模块时引入pagination模块
再用app定义不同的Service服务层,如:
- brandService.js
app.service('brandService',function($http){

	this.findAll=function(){
		return $http.get('../brand/findAll.do');
	}
}
Controller控制层再引入需要的服务即可,如:
- brandController.js
//控制层
app.controller('brandController' ,function($scope,brandService){
	brandService.findAll=function(){
		brandService.findAll().success(
			function(response){
				$scope.list=response;
			}
		);
	}
2. 控制器继承
有些功能是每个页面都有可能用到的,比如分页,复选等等,如果我们再开发另一个功能,还需要重复编写,可通过继承的方式让这些通用的功能只写一次。
- 建立父控制器baseController.js
app.controller('baseController' ,function($scope){

	$scope.updateSelection = function($event, id) {
		if($event.target.checked){
			$scope.selectIds.push( id);
		}else{
			var idx = $scope.selectIds.indexOf(id);
            $scope.selectIds.splice(idx, 1);
		}
}
- brandController.js可继承baseController.js
 //控制层
app.controller('brandController' ,function($scope,$controller,brandService){

	$controller('baseController',{$scope:$scope});
    //$controller也是angular提供的一个服务,可以实现伪继承,实际上就是与baseController共享$scope

	$scope.findAll=function(){
		brandService.findAll().success(
			function(response){
				$scope.list=response;
			}
		);
	}
由于brandController继承了baseController,所以brandPro.html要引入baseController.js,理论上要在brandController.js前引入,实测引入位置在引入brandController.js之前之后都可以。
3. 代码生成器
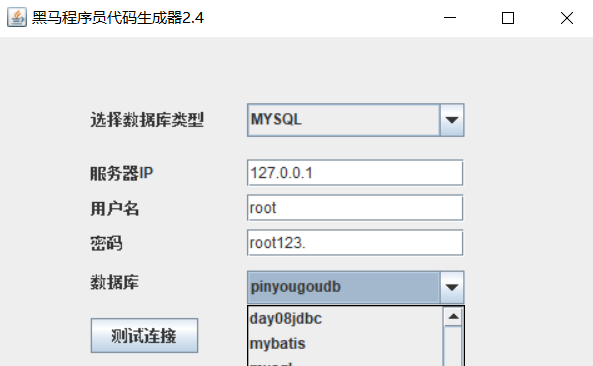
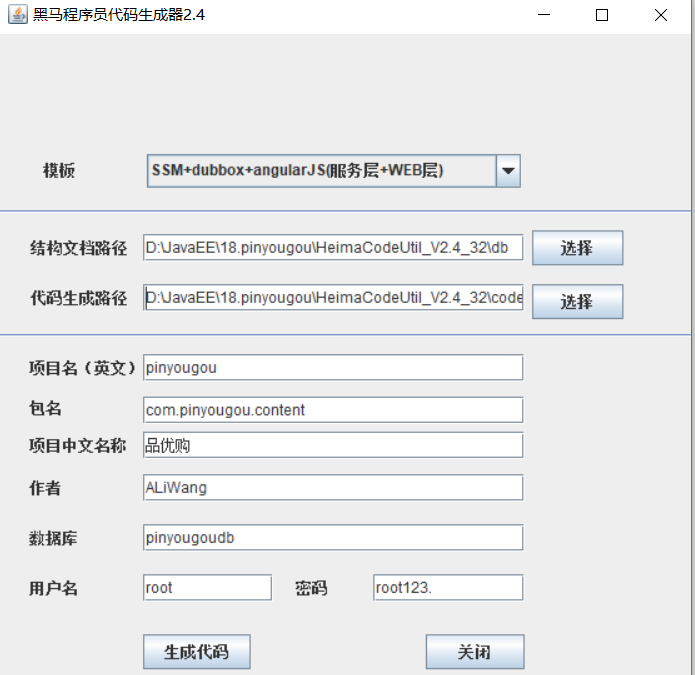
可使用《黑马程序员代码生成器2.4》来完成基础代码的编写,生成后将代码拷贝到工程中,步骤如下:
-
将HeimaCodeUtil_V2.4_32文件夹拷贝到不含中文和空格的目录下;
-
运行heima_code_util.exe,填写对应信息,先点击测试连接,成功后选择数据库即可;

-
点击下一步,选择模板为SSM+dubbox+angularJS(服务层+WEB层),选择代码生成路径,点击生成代码,然后拷贝代码到工程即可。
这个模板不会生成数据访问层和实体类,因为之前已经用逆向工程完成了数据访问层与实体类的生成。

4. 代码编写重难点
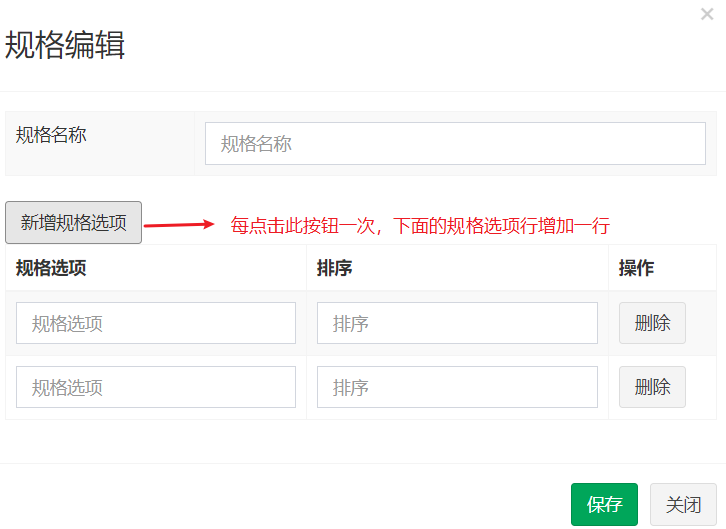
4.1 新增规格选项行

- specification.html
给新建规格选项按钮添加addTableRow()方法:
<button type="button" class="btn btn-default" title="新建" ng-click="addTableRow()"><i class="fa fa-file-o"></i> 新增规格选项</button>
修改specification.html 新建按钮,弹出窗口时对entity进行初始化,可以清空上次添加规格遗留的内容;另外如果不对entity初始化向集合添加数据时会出错。
<button type="button" class="btn btn-default" ng-click="entity={'specificationOptionList':[]}" title="新建" data-toggle="modal" data-target="#editModal" ><i class="fa fa-file-o"></i> 新建</button>
- 如何初始化entity?
entity是一个组合,包含TbSpecification和List
一开始是再js中初始化:
$cope.entity.specificationOptionList=[];//这种写法是错误的,因为entity为null
$scope.entity={specification:{},specificationOptionList:[]};//定义entity初始结构,也可写为$scope.entity={specificationOptionList:[]},specification:{}可省略,因为specification不是一个集合。由于每次弹出新建规格窗口时要清空输入框中的内容,所以改到了在每次点击新建按钮时初始化。
- 绑定编辑框的内容
新增规格,数据分为两部分,一部分是规格名称,可封装到specification这个pojo中,另一部分是规格选项集合specificationOptionList;再将这两部分数据封装到一个对象entity中。
<input ng-model="entity.specification.specName" class="form-control" placeholder="规格名称" >

<input ng-model="tbSpecificationOption.optionName"  class="form-control" placeholder="规格选项" >
<input ng-model="tbSpecificationOption.orders" class="form-control" placeholder="排序">
- specificationController.js
$scope.addTableRow=function(){
		$scope.entity.specificationOptionList.push({});
		//specificationOptionList的格式为[{},{}...]
}
4.2 删除规格选项行
实现思路:在规格选项每一行将索引值传递给specificationOptionList集合,在集合中删除。
- 修改删除按钮,传递当前行索引值
<button type="button" class="btn btn-default" title="删除" ng-click="deleTableRow($index)"><i class="fa fa-trash-o"></i> 删除</button>
- specificationController.js
$scope.deleTableRow=function(index){
 	$scope.entity.specificationOptionList.splice(index,1);
}
4.3 保存新增规格数据
实现思路:规格和规格选项数据合并成一个对象entity来传递,则需要用一个组合pojo来接收传递过来的对象。在业务逻辑中,得到组合对象中的规格和规格选项列表,先插入规格数据到tb_specification返回规格id,然后循环插入规格选项数据到tb_specification_option,因为插入规格选项时需要规格id。
-
插入规格后,获取规格id
在TbSpecificationMapper.xml中的insert节点插入selectKey获取刚插入的规格id。
<insert id="insert" parameterType="com.pinyougou.pojo.TbSpecification" >

  	<selectKey resultType="java.lang.Long" order="AFTER" keyProperty="id">
  		SELECT LAST_INSERT_ID() AS ID
  	</selectKey>

    insert into tb_specification (id, spec_name)
    values (#{id,jdbcType=BIGINT}, #{specName,jdbcType=VARCHAR})
  </insert>
- 建立组合pojo
public class SpecificationAndOption implements Serializable {
	private TbSpecification specification;//规格
	private List<TbSpecificationOption> specificationOptionList;//规格选项
    //......get/set
}
-
业务层SpecificationService
插入规格后,获取到了规格id,插入规格选项前要先设置规格选项的规格id。
public void add(SpecificationAndOption sao) {
		specificationMapper.insert(sao.getSpecification());//插入规格
		for(TbSpecificationOption tso:sao.getSpecificationOptionList()) {
			//注意这里要设置id
			tso.setSpecId(sao.getSpecification().getId());
			specificationOptionMapper.insert(tso);
		}
	}
4.4 品牌下拉列表(select2组件)

- 认识select2

页面使用要引入select2的js文件。
- 在type_template.html 用select2组件实现多选下拉框
<input select2 select2-model="entity.brandIds" config="brandList" multiple placeholder="选择品牌(可多选)" class="form-control" type="text"/>
select2 表示它是一个多选框;multiple 表示可多选;config用于配置数据来源;select2-model用于指定用户选择后提交的变量。
- TbBrandMapper.xml中添加SQL语句配置
查询出的数据格式如下: [{"id":1,"text":"联想"},{"id":3,"text":"三星"}],所以用List里面封装Map。
<select id="selectOptionList"  resultType="java.util.Map" >
select id,name as text from tb_brand
//因为id,text这两个key的名称是固定的
</select>
4.5 扩展属性

- type_template.html
点击“新建”,执行实体的初始化操作:ng-click="entity={'customAttributeItems':[]}",点击“新增扩展属性”时增加一行:ng-click="addTableRow()"
4.6 根据id查询模板
-
typeTemplateController.js
查询模板实体
$scope.findOne=function(id){
		typeTemplateService.findOne(id).success(
			function(response){
				$scope.entity= response;				$scope.entity.brandIds=JSON.parse($scope.entity.brandIds);
//将json字符串转换为json对象
//转换品牌列表
               $scope.entity.specIds=JSON.parse($scope.entity.specIds);
//转换规格列表
               $scope.entity.customAttributeItems=JSON.parse($scope.entity.customAttributeItems);//转换品牌列表
			}
		);
	}
例如:从数据库中查询出来的规格列表是字符串:[{"id":27,"text":"网络"},{"id":32,"text":"机身内存"}],必须将其转换为json对象才能实现信息的回显(但经过我的测试发现不转换为json对象也可以显示)。
-
baseController.js
最终页面显示的数据不是json字符串,而是text属性值,以","分割,所以需要从json字符串提取属性值。
//提取json字符串数据中的某个属性,返回拼接字符串,以逗号分隔
	$scope.json2String=function(jsonStr,key){
		var json=JSON.parse(jsonStr);//将json字符串转为json对象
		var str="";
		for(var i=0;i<json.length;i++){
			if(i>0){
				str+=",";
			}
			str+=json[i][key];//获取第i个键名为key的值
			//[{"id":27,"text":"网络"},{"id":32,"text":"机身内存"}]
		}
		return str;
	}
- type_template.html
//调用方法转换json字符串
<td>{{json2String(entity.brandIds,'text')}}</td>
<td>{{json2String(entity.specIds,'text')}}</td>				<td>{{json2String(entity.customAttributeItems,'text')}}</td>