0. 引言 / Overview
介绍 Dlib 中基于 HOG,Histogram of Oriented Gradients / 方向梯度直方图 实现 Face Detect / 人脸检测 的两个 Examples / 例程 :
1. face_detector.py: 单张图片中的单个/多个人脸的面部定位 ;
2. face_landmark_detection.py: 单张图片的脸部特征点标定 ;
如果在 Windows下开发,在 Python 中安装 Dlib 有问题,可以参考我的另一篇博客:http://www.cnblogs.com/AdaminXie/p/9032224.html
1. 简介 / Breif introduction of codes
开发环境:
Python: 3.6.3
Dlib: 19.7
face_detector.py, 利用 Dlib 的 get_frontal_face_detector / 正向人脸检测器,进行人脸检测,提取人脸外部矩形框 :
detector = dlib.get_frontal_face_detector()
face_landmark_detection.py, 利用训练好的 shape_predictor("shape_predictor_68_face_landmarks.dat") / 人脸 68 点特征检测器,进行人脸面部轮廓特征提取:
predictor = dlib.shape_predictor("shape_predictor_68_face_landmarks.dat")
shape = predictor(img, dets[0])
程序执行结果:
(a) face_detector.py (b) face_landmark_detection.py
图 1 代码实现结果示例
2. 源码介绍 / Source code introduction
两个源码的 Face detect / 人脸检测 都是基于 HOG / 方向梯度直方图 实现的 ( 关于 HOG,可以看我另一篇博客的介绍:https://www.cnblogs.com/AdaminXie/p/9884096.html )
This face detector is made using the now classic Histogram of Oriented Gradients (HOG) feature combined with a linear classifier, / 这种人脸检测器是由传统的 HOG / 方向梯度直方图 加上 线性分类器,
an image pyramid, and sliding window detection scheme. / 图像金字塔,和一个 滑动窗口检测。
This type of object detector is fairly general and capable of detecting many types of semi-rigid objects / 这种目标检测器适合检测很多种物体。
This example program shows how to find frontal human faces in an image. / 这个例子程序告诉我们如何找出图像中的正向人脸;
In particular, it shows how you can take a list of images from the command line / 从命令行读取一系列图像文件,
and display each on the screen with red boxes overlaid on each human face. / 然后在每张人脸上面用红色框标识出来。
This example program shows how to find frontal human faces in an image and estimate their pose. / 这个例子程序向我们展示如何图像中的正向人脸并且估计出他们的相貌;
The pose takes the form of 68 landmarks. These are points on the face such as the corners of the mouth, along the eyebrows, on the eyes, and so forth. / 这些面部特征由 68 点特征构成,这些特征点向我们展示了人脸部的嘴部,眼部等等;
2.1. face_detector.py
原始的 face detector.py 源码:
 1 #!/usr/bin/python
 2 # The contents of this file are in the public domain. See LICENSE_FOR_EXAMPLE_PROGRAMS.txt
 3 #
 4 #   This example program shows how to find frontal human faces in an image.  In
 5 #   particular, it shows how you can take a list of images from the command
 6 #   line and display each on the screen with red boxes overlaid on each human
 7 #   face.
 8 #
 9 #   The examples/faces folder contains some jpg images of people.  You can run
10 #   this program on them and see the detections by executing the
11 #   following command:
12 #       ./face_detector.py ../examples/faces/*.jpg
13 #
14 #   This face detector is made using the now classic Histogram of Oriented
15 #   Gradients (HOG) feature combined with a linear classifier, an image
16 #   pyramid, and sliding window detection scheme.  This type of object detector
17 #   is fairly general and capable of detecting many types of semi-rigid objects
18 #   in addition to human faces.  Therefore, if you are interested in making
19 #   your own object detectors then read the train_object_detector.py example
20 #   program.
21 #
22 #
23 # COMPILING/INSTALLING THE DLIB PYTHON INTERFACE
24 #   You can install dlib using the command:
25 #       pip install dlib
26 #
27 #   Alternatively, if you want to compile dlib yourself then go into the dlib
28 #   root folder and run:
29 #       python setup.py install
30 #   or
31 #       python setup.py install --yes USE_AVX_INSTRUCTIONS
32 #   if you have a CPU that supports AVX instructions, since this makes some
33 #   things run faster.
34 #
35 #   Compiling dlib should work on any operating system so long as you have
36 #   CMake installed.  On Ubuntu, this can be done easily by running the
37 #   command:
38 #       sudo apt-get install cmake
39 #
40 #   Also note that this example requires scikit-image which can be installed
41 #   via the command:
42 #       pip install scikit-image
43 #   Or downloaded from http://scikit-image.org/download.html.
44
45 import sys
46
47 import dlib
48 from skimage import io
49
50
51 detector = dlib.get_frontal_face_detector()
52 win = dlib.image_window()
53
54 for f in sys.argv[1:]:
55     print("Processing file: {}".format(f))
56     img = io.imread(f)
57     # The 1 in the second argument indicates that we should upsample the image
58     # 1 time.  This will make everything bigger and allow us to detect more
59     # faces.
60     dets = detector(img, 1)
61     print("Number of faces detected: {}".format(len(dets)))
62     for i, d in enumerate(dets):
63         print("Detection {}: Left: {} Top: {} Right: {} Bottom: {}".format(
64             i, d.left(), d.top(), d.right(), d.bottom()))
65
66     win.clear_overlay()
67     win.set_image(img)
68     win.add_overlay(dets)
69     dlib.hit_enter_to_continue()
70
71
72 # Finally, if you really want to you can ask the detector to tell you the score
73 # for each detection.  The score is bigger for more confident detections.
74 # The third argument to run is an optional adjustment to the detection threshold,
75 # where a negative value will return more detections and a positive value fewer.
76 # Also, the idx tells you which of the face sub-detectors matched.  This can be
77 # used to broadly identify faces in different orientations.
78 if (len(sys.argv[1:]) > 0):
79     img = io.imread(sys.argv[1])
80     dets, scores, idx = detector.run(img, 1, -1)
81     for i, d in enumerate(dets):
82         print("Detection {}, score: {}, face_type:{}".format(
83             d, scores[i], idx[i]))
face_detector 代码处理过程如下:
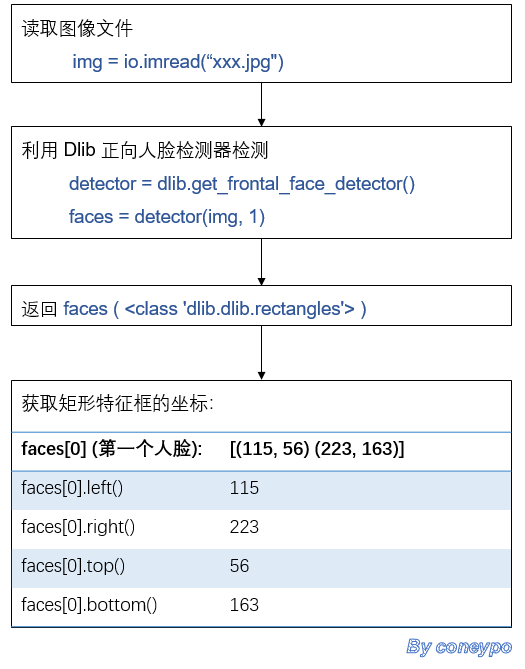
图 2 face_detector 代码处理过程
为了方便理解,修改增加注释之后的 face_detector_v1.py
 1 # created at 2017-11-27
 2 # updated at 2018-09-06
 3
 4 # Author:   coneypo
 5 # Dlib:     http://dlib.net/
 6 # Blog:     http://www.cnblogs.com/AdaminXie/
 7 # Github:   https://github.com/coneypo/Dlib_examples
 8
 9 import dlib
10 from skimage import io
11
12 # 使用 Dlib 的正面人脸检测器 frontal_face_detector
13 detector = dlib.get_frontal_face_detector()
14
15 # 图片所在路径
16 img = io.imread("../imgs/faces_2.jpeg")
17
18 # 生成 Dlib 的图像窗口
19 win = dlib.image_window()
20 win.set_image(img)
21
22 # 使用detector检测器来检测图像中的人脸
23 faces = detector(img, 1)
24 print(type(faces[0]), '
')
25
26 print("人脸数 / faces in all:", len(faces))
27
28 for i, d in enumerate(faces):
29     print("第", i+1, "个人脸的矩形框坐标:",
30           "left:", d.left(), '	', "right:", d.right(), '	', "top:", d.top(),'	',  "bottom:", d.bottom())
31
32 # 绘制矩阵轮廓
33 win.add_overlay(faces)
34
35 # 保持图像
36 dlib.hit_enter_to_continue()
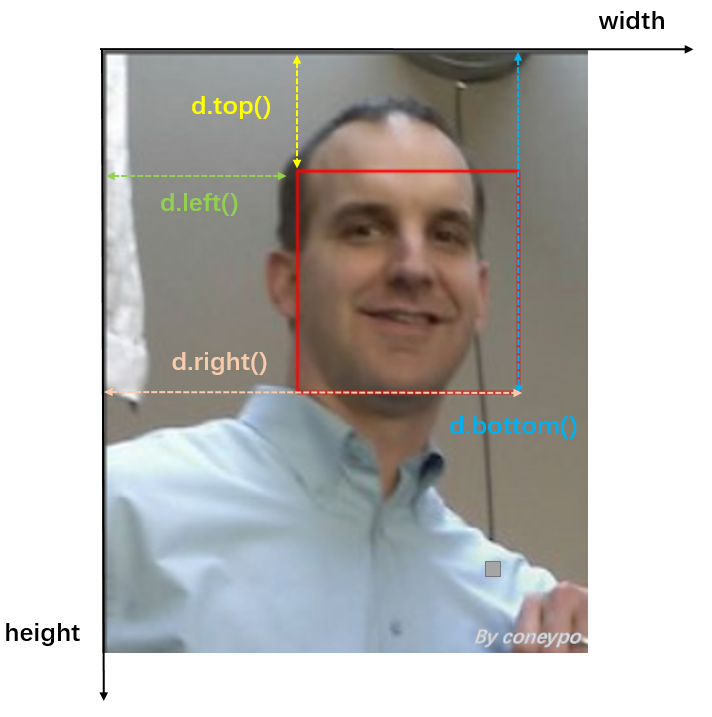
图 3 参数 d.top(), d.right(), d.left(), d.bottom() 位置坐标说明
结果:
生成的图片窗口结果:
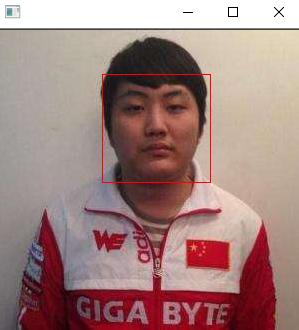
图 4 face_detector.py 的输出结果(单张人脸)
输出结果:
人脸数 / faces in all: 1
第 1 个人脸的矩形框坐标: left: 103      right: 211      top: 44      bottom: 152
Hit enter to continue
对于多个人脸的检测结果:
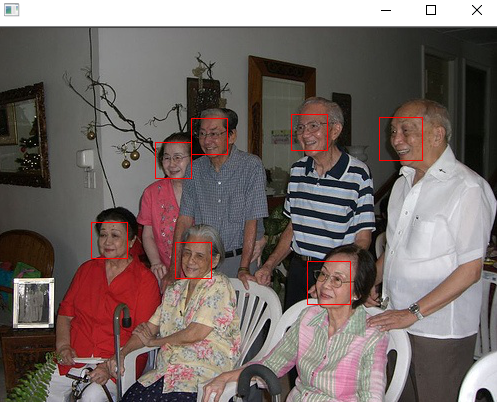
图 5 face_detector.py 的输出结果(多张人脸)
但是我们进行图像处理的时候,经常是用 OpenCv 进行处理,所以我们在下面代码中,使用 OpenCv 的对象( 矩形框用 cv2.rectangle() 函数绘制 ):
face_detector_v2_use_opencv.py :
 1 # created at 2017-11-27
 2 # updated at 2018-09-06
 3
 4 # Author:   coneypo
 5 # Dlib:     http://dlib.net/
 6 # Blog:     http://www.cnblogs.com/AdaminXie/
 7 # Github:   https://github.com/coneypo/Dlib_examples
 8
 9 # create object of OpenCv
10 # use OpenCv to read and show images
11
12 import dlib
13 import cv2
14
15 # 使用 Dlib 的正面人脸检测器 frontal_face_detector
16 detector = dlib.get_frontal_face_detector()
17
18 # 图片所在路径
19 # read image
20 img = cv2.imread("imgs/faces_2.jpeg")
21
22 # 使用 detector 检测器来检测图像中的人脸
23 # use detector of Dlib to detector faces
24 faces = detector(img, 1)
25 print("人脸数 / Faces in all: ", len(faces))
26
27 # Traversal every face
28 for i, d in enumerate(faces):
29     print("第", i+1, "个人脸的矩形框坐标:",
30           "left:", d.left(), "right:", d.right(), "top:", d.top(), "bottom:", d.bottom())
31     cv2.rectangle(img, tuple([d.left(), d.top()]), tuple([d.right(), d.bottom()]), (0, 255, 255), 2)
32
33 cv2.namedWindow("img", 2)
34 cv2.imshow("img", img)
35 cv2.waitKey(0)
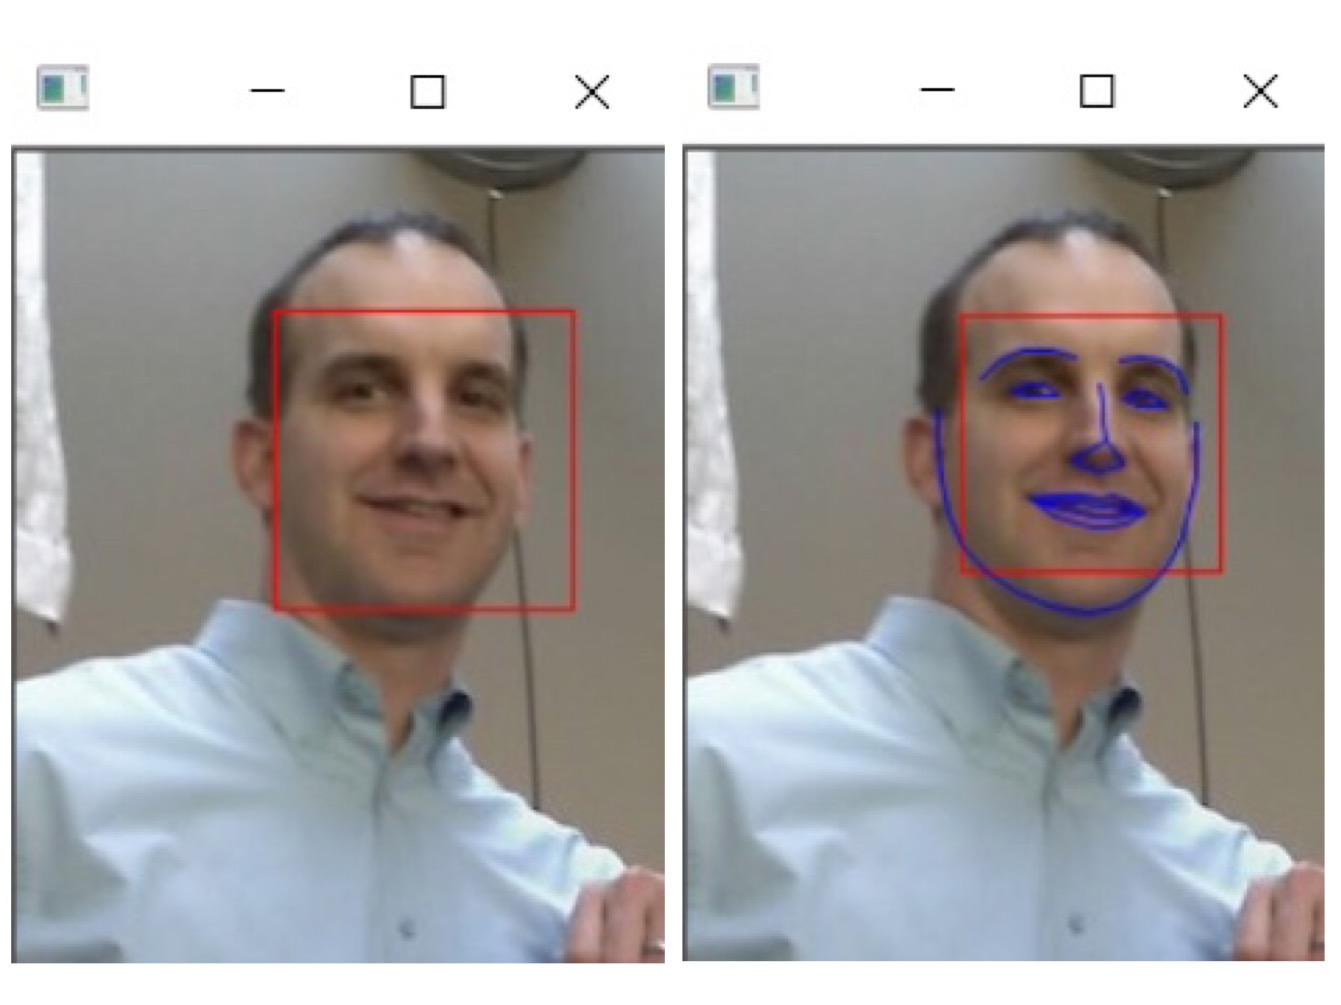
2.2 face_landmark_detection.py
官网 face_landmark_detection.py 源码:
  1 #!/usr/bin/python
  2 # The contents of this file are in the public domain. See LICENSE_FOR_EXAMPLE_PROGRAMS.txt
  3 #
  4 #   This example program shows how to find frontal human faces in an image and
  5 #   estimate their pose.  The pose takes the form of 68 landmarks.  These are
  6 #   points on the face such as the corners of the mouth, along the eyebrows, on
  7 #   the eyes, and so forth.
  8 #
  9 #   The face detector we use is made using the classic Histogram of Oriented
 10 #   Gradients (HOG) feature combined with a linear classifier, an image pyramid,
 11 #   and sliding window detection scheme.  The pose estimator was created by
 12 #   using dlib's implementation of the paper:
 13 #      One Millisecond Face Alignment with an Ensemble of Regression Trees by
 14 #      Vahid Kazemi and Josephine Sullivan, CVPR 2014
 15 #   and was trained on the iBUG 300-W face landmark dataset (see
 16 #   https://ibug.doc.ic.ac.uk/resources/facial-point-annotations/):
 17 #      C. Sagonas, E. Antonakos, G, Tzimiropoulos, S. Zafeiriou, M. Pantic.
 18 #      300 faces In-the-wild challenge: Database and results.
 19 #      Image and Vision Computing (IMAVIS), Special Issue on Facial Landmark Localisation "In-The-Wild". 2016.
 20 #   You can get the trained model file from:
 21 #   http://dlib.net/files/shape_predictor_68_face_landmarks.dat.bz2.
 22 #   Note that the license for the iBUG 300-W dataset excludes commercial use.
 23 #   So you should contact Imperial College London to find out if it's OK for
 24 #   you to use this model file in a commercial product.
 25 #
 26 #
 27 #   Also, note that you can train your own models using dlib's machine learning
 28 #   tools. See train_shape_predictor.py to see an example.
 29 #
 30 #
 31 # COMPILING/INSTALLING THE DLIB PYTHON INTERFACE
 32 #   You can install dlib using the command:
 33 #       pip install dlib
 34 #
 35 #   Alternatively, if you want to compile dlib yourself then go into the dlib
 36 #   root folder and run:
 37 #       python setup.py install
 38 #   or
 39 #       python setup.py install --yes USE_AVX_INSTRUCTIONS
 40 #   if you have a CPU that supports AVX instructions, since this makes some
 41 #   things run faster.
 42 #
 43 #   Compiling dlib should work on any operating system so long as you have
 44 #   CMake installed.  On Ubuntu, this can be done easily by running the
 45 #   command:
 46 #       sudo apt-get install cmake
 47 #
 48 #   Also note that this example requires scikit-image which can be installed
 49 #   via the command:
 50 #       pip install scikit-image
 51 #   Or downloaded from http://scikit-image.org/download.html.
 52
 53 import sys
 54 import os
 55 import dlib
 56 import glob
 57 from skimage import io
 58
 59 if len(sys.argv) != 3:
 60     print(
 61         "Give the path to the trained shape predictor model as the first "
 62         "argument and then the directory containing the facial images.
"
 63         "For example, if you are in the python_examples folder then "
 64         "execute this program by running:
"
 65         "    ./face_landmark_detection.py shape_predictor_68_face_landmarks.dat ../examples/faces
"
 66         "You can download a trained facial shape predictor from:
"
 67         "    http://dlib.net/files/shape_predictor_68_face_landmarks.dat.bz2")
 68     exit()
 69
 70 predictor_path = sys.argv[1]
 71 faces_folder_path = sys.argv[2]
 72
 73 detector = dlib.get_frontal_face_detector()
 74 predictor = dlib.shape_predictor(predictor_path)
 75 win = dlib.image_window()
 76
 77 for f in glob.glob(os.path.join(faces_folder_path, "*.jpg")):
 78     print("Processing file: {}".format(f))
 79     img = io.imread(f)
 80
 81     win.clear_overlay()
 82     win.set_image(img)
 83
 84     # Ask the detector to find the bounding boxes of each face. The 1 in the
 85     # second argument indicates that we should upsample the image 1 time. This
 86     # will make everything bigger and allow us to detect more faces.
 87     dets = detector(img, 1)
 88     print("Number of faces detected: {}".format(len(dets)))
 89     for k, d in enumerate(dets):
 90         print("Detection {}: Left: {} Top: {} Right: {} Bottom: {}".format(
 91             k, d.left(), d.top(), d.right(), d.bottom()))
 92         # Get the landmarks/parts for the face in box d.
 93         shape = predictor(img, d)
 94         print("Part 0: {}, Part 1: {} ...".format(shape.part(0),
 95                                                   shape.part(1)))
 96         # Draw the face landmarks on the screen.
 97         win.add_overlay(shape)
 98
 99     win.add_overlay(dets)
100     dlib.hit_enter_to_continue()
代码处理流程:
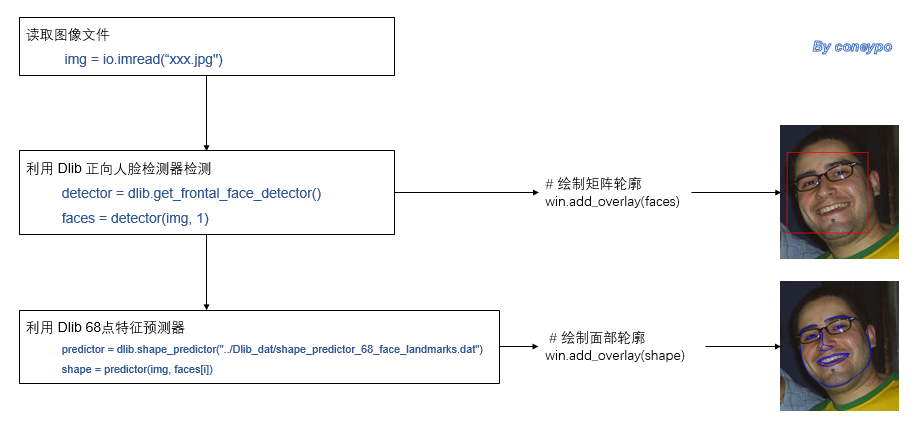
图 6 face_landmark_detection 处理流程
会绘制两个 overlay,人脸外接矩阵框 和 面部特征框 ;
红色的是绘制的 人脸矩形框 win.add_overlay(dets)
蓝色的是绘制的 人脸面部轮廓 win.add_overlay(shape)
我们不用命令行读取,简化代码,直接在代码内指定图像文件地址:
face_landmark_detection_v1.py:
 1 # created at 2017-11-27
 2 # updated at 2018-09-06
 3
 4 # Author:   coneypo
 5 # Dlib:     http://dlib.net/
 6 # Blog:     http://www.cnblogs.com/AdaminXie/
 7 # Github:   https://github.com/coneypo/Dlib_examples
 8
 9 import dlib
10 from skimage import io
11
12 # 使用 Dlib 的正面人脸检测器 frontal_face_detector
13 detector = dlib.get_frontal_face_detector()
14
15 # Dlib 的 68点模型
16 predictor = dlib.shape_predictor("shape_predictor_68_face_landmarks.dat")
17
18 # 图片所在路径
19 img = io.imread("imgs/faces_2.jpeg")
20
21 # 生成 Dlib 的图像窗口
22 win = dlib.image_window()
23 win.set_image(img)
24
25 # 使用 detector 检测器来检测图像中的人脸
26 faces = detector(img, 1)
27 print("人脸数:", len(faces))
28
29 for i, d in enumerate(faces):
30     print("第", i+1, "个人脸的矩形框坐标:",
31           "left:", d.left(), "right:", d.right(), "top:", d.top(), "bottom:", d.bottom())
32
33     # 使用predictor来计算面部轮廓
34     shape = predictor(img, faces[i])
35     # 绘制面部轮廓
36     win.add_overlay(shape)
37
38 # 绘制矩阵轮廓
39 win.add_overlay(faces)
40
41 # 保持图像
42 dlib.hit_enter_to_continue()
输出结果:
人脸数: 1
第 1 个人脸的矩形框坐标: left: 63 right: 384 top: 206 bottom: 527
Hit enter to continue
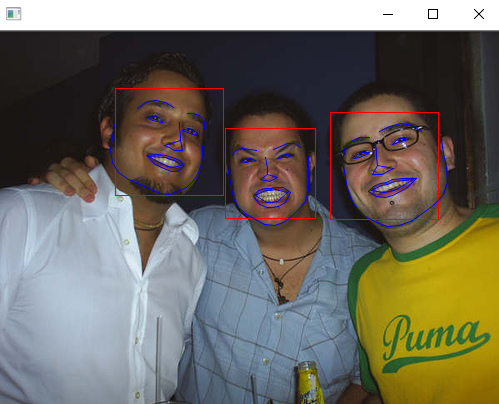
图 7 face_landmark_detection.py 的输出结果(多张人脸)
因为面部轮廓 shape 在 OpenvCv 中不太好转换 ,所以这里不给出 OpenCv 对象的实现;
Appendix: 关于 sys.argv[] 的使用:
官网例程中是利用 sys.argv[] 读取命令行输入,如果对于 sys.argv[] 有疑惑,可以参照下面的总结;
sys.argv[] 用来获取命令交互模式下,尾随的参数;
例如在 cmd 的 console 模式下,输入
>>> python test.py parameter_1
就可以利用 sys.argv[] 拿到 parameter_1 的值;
建议还是直接在源码指定好图片等参数路径;
下面用代码实例来帮助理解:
在 Console( Windows 下是 Command Prompt,命令提示符 )输入以下命令:
python test.py what is your name
test.py 内容:
import sys

print(sys.argv[0])
# test.py

print(sys.argv[1])
# what

print(sys.argv[2])
# is

print(sys.argv[1:])
# [“what”,“is”,“your”,“name”]
# 如果对您有帮助,欢迎在 GitHub 上 Star 支持我 : https://github.com/coneypo/Dlib_examples
# 请尊重他人劳动成果,转载或者使用源码请注明出处 : http://www.cnblogs.com/AdaminXie
# 如有问题请留言或者联系邮箱 : coneypo@foxmail.com