服务是一个函数或对象,AngularJS中可以创建自己的服务或使用内建服务。$http是AngularJS中最常见的服务,服务向服务器发送请求,应用响应服务器传送过来的数据。
- $http服务
它是AngularJS中的一个核心服务,用于读取远程服务器(Web)的数据。$http.get(utl)用于读取数据的函数。也就是get请求服务器。
|
1
2
3
4
5
6
|
app.controller("outController",function($scope,ahui_out,$http){ $scope.hex=ahui_out.myFunc(255); $http.get("welcome.html").then(function(response){ $scope.myWelcome=response.data; });}); |
我们通过$http.get()得到的是数组数据,之后需要在页面上进行遍历输出。
|
1
2
3
4
5
6
|
app.controller("getController",function($scope,$http){ .success(function(response){ $scope.names=response.records //这里到时候返回的是一个数组names[] });}); |
- timeout服务
相当于JS中的window.setTimeout函数。
- interval服务
相当于JS中的window.setInterval函数。
|
1
2
3
4
5
6
7
8
9
10
11
12
13
|
app.controller("myController",function($scope,$location,$timeout,$interval){ $scope.myUrl=$location.absUrl(); //找到url $scope.myHeader="zhanghui"; //延迟显示---相当于js中的setTimeout(); $timeout(function(){ $scope.myHeader="zheng de shi ni ma ?"; },2000); $scope.theTime=new Date().toLocaleTimeString(); //相当于js中的setInterval(); $interval(function(){ $scope.theTime=new Date().toLocaleTimeString(); },1000); }); |
之前以为这里的参数只能写几个,没想到基本的都可以写,它里面是个parametr性质的。
- 创建自定义服务
我们可以自己创建服务给其设置功能,就相当于前面的两个一样。
|
1
2
3
4
5
6
7
8
9
|
app.controller("outController",function($scope,ahui_out){ $scope.hex=ahui_out.myFunc(255);});//自定义模板,这里就相当于我们之前的timeout,interval,location等。app.service("ahui_out",function(){ this.myFunc=function(x){ return x.toString(16); }}); |
利用service函数可以参加自定义的服务,服务名为ahui_out。在控制器中就可以使用它。
AngularJS中的select选择框
可以利用AngularJS往选择框中输入值,进行选择。
|
1
2
3
4
|
<div ng-controller="xuanController"> <select ng-model="selectedName" ng-options="x for x in names"> </select></div> |
|
1
2
3
4
|
//选择框 app.controller("xuanController",function($scope){$scope.names=['1','2','3'];}); |
现在把选择的数据都放在了ng-model=”selectedSite”中。可以使用ng-repeat,但是二者是有区别的,ng-repeat指令时通过数组来循环HTML代码来创建下拉列表,但是ng-options指令更适合创建下拉列表,ng-repeat是一个字符串,ng-options的选项是一个对象。
AngularJS HTML DOM
提供HTML DOM元素的属性提供绑定应用数据的指令。
- ng-disabled指令
直接绑定应用程序数据到html的disabled属性。其实就和HTML中的disable属性一样。
- ng-show指令
隐藏或显示一个html元素,主要是根据value的值来显示和隐藏元素的。ng-hide刚好和它相反,true隐藏,false不隐藏。
AngularJS模块
模块定义了一个应用程序,是应用程序中的不同部分的容器,是应用控制器的容器,控制器通常属于一个模块。
|
1
|
var app=angular.module("myApp",[]); |
在模块定义中[ ]参数用于定义模块的依赖关系,要是模块之间有关系,那么会在中括号写上依赖的模块名字。
注意:对于我们的js脚本,通常是要放在<body>元素的最底部。这回提高网页的加载速度。
AngularJS表单与验证
终于到表单了,其实这次的项目主要是学习表单和验证,因为项目中使用的就是这个。
|
1
2
3
4
5
6
7
8
|
app.controller("FormController",function($scope){ $scope.master={username:'ahui',pwd:'123321'}; //方法 $scope.reset=function(){ $scope.user=angular.copy($scope.master); }; $scope.reset();}); |
|
1
2
3
4
5
6
7
8
9
10
|
<div ng-controller="FormController"> <form novalidate> 登录名:<input type="text" ng-model="user.username"/><br/> 密码:<input type="text" ng-model="user.pwd"/> <button ng-click="reset()">RESET</button> </form> <hr/> <p>{{user}}</p> <p>{{master}}</p></div> |
里面其余的东西应该可以看懂,主要是novalidate,这个是你在需要使用表单时使用,用于重写标准的HMLT5验证。是新增的,禁用了浏览器的默认验证。
AngularJS表单和控件可以提供验证功能,并对用户输入的非法数据进行警告。在里的验证只是前提,减少服务器端的压力,服务器端的验证是必不可少的。
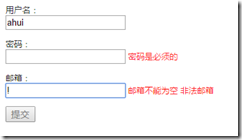
使用了ng-show属性,显示一些错误信息到表单外面。
|
1
2
3
4
5
6
7
8
9
10
11
12
13
14
15
16
17
18
19
20
21
22
23
24
25
26
27
28
29
30
31
32
33
34
35
36
|
<div ng-controller="form"> <form name="myForm" novalidate> <p> 用户名:<br/> <input type="text" ng-model="user" required name="user"/> <span style="color:red" ng-show="myForm.user.$dirty && myForm.user.$invalid"> <span ng-show="myForm.user.$error.required">用户名是必须的</span> </span> </p> <p> 密码:<br/> <input type="text" ng-model="pwd" name="pwd" required/> <span style="color:red" ng-show="myForm.pwd.$dirty&&myForm.pwd.$invalid"> <span ng-show="myForm.pwd.$error.required">密码是必须的</span> </span> </p> <p> 邮箱:<br/> <input type="email" name="email" ng-model="email" required/> <span style="color:red" ng-show="myForm.email.$dirty&&myForm.email.$invalid"> <span ng-show="myForm.email.$dirty&&myForm.email.$invalid">邮箱不能为空</span> <span ng-show="myForm.email.$error.email">非法邮箱</span> </span> </p> <p> <input type="submit" ng-disabled=" myForm.user.$dirty&& myForm.user.$invalid|| myForm.email.$dirty&& myForm.email.$invalid|| myForm.pwd.$dirty&& myForm.pwd.$invalid"/> </p> </form> </div> |
上面图中是代码中验证输入的内容的做法。感觉这个很不爽,需要写很多的小代码在这里面。


