Welcome to Mastering Vim, a book which will teach you to get good with Vim, its plugins, and its ideological successors!
欢迎来到掌握vim,这本书将教你如何掌握vim,它的插件,以及它的思想继承者!
This chapter will establish a foundation for working with Vim.
本章将为VIM工作打下基础。
Every tool is built with a particular usage philosophy in mind, and Vim is not an exception.
每一个工具都是按照特定的使用哲学构建的,vim也不例外。
Vim introduces a different way of working with text compared to what most people are used to these days.
vim介绍了一种不同的处理文本的方式,与现在大多数人所习惯的方式相比。
This chapter focuses on highlighting these differences and establishing a set of healthy editing habits.
本章着重强调这些差异,并建立一套健康的编辑习惯。
It will let you approach Vim in a Vim-friendly frame of mind and will ensure you’re using the right tools for the job.
它将让您以一种对vim友好的心态接近vim,并确保您使用正确的工具来完成工作。
To make examples concrete, we will be using Vim to create a small Python application throughout this chapter.
为了使示例具体化,我们将在本章中使用vim创建一个小的python应用程序。
The following topics will be covered in this chapter:
本章将涵盖以下主题:
Modal versus modeless interfaces, and why is Vim different from other editors
模态接口与非模态接口,以及为什么vim不同于其他编辑器
Installing and updating Vim
安装和更新VIM
The gVim - the graphical user interface for Vim
gvim-vim的图形用户界面
Configuring Vim for working with Python and editing your .vimrc file
配置vim以使用python并编辑.vimrc文件
Common file operations: opening, modifying, saving, and closing files
常用文件操作:打开、修改、保存和关闭文件
Moving around: navigating with arrow keys, hjkl, by words, paragraphs, and so on
移动:使用箭头键、hjkl、按单词、段落等导航
Making simple edits to files and combining editing commands with movement commands
对文件进行简单编辑,并将编辑命令与移动命令结合起来
Persistent undo history
持久撤消历史记录
Navigating the built-in Vim manual
导航内置VIM手册
Technical requirements 技术要求
Throughout this chapter we will be writing a basic Python application.
在本章中,我们将编写一个基本的Python应用程序。
You don’t have to download any code to follow along with this chapter as we’ll be creating files from scratch.
您不必下载任何代码来跟随本章,因为我们将从头开始创建文件。
However, if you ever get lost and need more guidance, you can view the resulting code on
GitHub:
但是,如果您迷路并需要更多指导,可以在GitHub上查看生成的代码:
https:/ / github. com/ PacktPublishing/ Mastering- Vim/ tree/ master/ Chapter01
We will be using Vim to primarily write Python code throughout this book, and it is assumed that the reader is somewhat familiar with the language.
我们将在本书中使用Vim主要编写Python代码,并假设读者对该语言有点熟悉。
Examples assume you’re using Python 3 syntax.
示例假设您使用的是Python 3语法。
If you must live in the past, you can convert Python 3 examples to Python 2 code by changing the print() command syntax.
如果您必须过去,可以通过更改print()命令语法将Python 3示例转换为Python 2代码。
We will also be creating and modifying Vim configuration, which is stored in a .vimrc file.
我们还将创建和修改Vim配置,该配置存储在.vimrc文件中。
The resulting .vimrc file is available from the previously mentioned GitHub link.
生成的.vimrc文件可从前面提到的GitHub链接获得。
Let’s start a conversation (about modal interfaces) 让我们开始一个对话(关于模态接口)
If you’ve ever edited text before, you are most likely to be familiar with modeless interfaces.
如果您以前编辑过文本,则最有可能熟悉无模式界面。
It’s the default option chosen by modern mainstream text editors, and that’s how many of us learned to work with text.
这是现代主流文本编辑器选择的默认选项,这就是我们中有多少人学习使用文本。
The term modeless refers to the fact that the each interface element has only one function.
术语无模式是指每个界面元素只有一个功能的事实。
Each button press results in a letter showing up on screen, or some other action being performed.
按下每个按钮会在屏幕上显示一个字母,或执行其他一些操作。
Each key (or a combination of keys) always does the same thing: the application always operates in a single mode.
每个键(或键的组合)总是做同样的事情:应用程序总是以单一模式运行。
But it’s not the only way.
但这不是唯一的方法。
Welcome to the modal interface, where each trigger performs a different action based on context.
欢迎使用模态界面,其中每个触发器根据上下文执行不同的操作。
The most common example of a modal interface that we encounter today is a smartphone.
我们今天遇到的最常见的模态界面示例是智能手机。
Each time we work in different applications or open different menus, a tap on the screen performs a different function.
每次我们在不同的应用程序中工作或打开不同的菜单时,屏幕上的点击都会执行不同的功能。
It’s similar when it comes to text editors.
它与文本编辑器类似。
Vim is a modal editor, meaning that a single button press might result in different actions, depending on context.
Vim是一个模态编辑器,这意味着按下单个按钮可能会导致不同的操作,具体取决于上下文。
Are you in insert mode (a mode for entering text)?
您是否处于插入模式(输入文本的模式)?
Then hitting o would put the letter o on the screen.
然后点击o会将字母o放在屏幕上。
But as soon as you switch into a different mode, the letter o will change its function to adding a new line below the cursor.
但是一旦你切换到另一种模式,字母o将改变其功能,在光标下面添加一个新行。
Working with Vim is like having a conversation with your editor.
与Vim合作就像与编辑进行对话。
You tell Vim to delete the next three words by pressing d3w (delete 3 words), and you ask Vim to change text inside quotes by pressing ci" (change inside " [quotes]).
你告诉Vim按d3w删除接下来的三个单词(删除3个单词),你要求Vim通过按ci“改变引号内的文字”(在“引号内”更改)。
You may hear very frequently that Vim is faster than other editors, but it’s not necessarily the point of Vim.
您可能经常听到Vim比其他编辑器更快,但它不一定是Vim的重点。
Vim lets you stay in the flow when working with text.
Vim让您在处理文本时保持流畅。
You don’t have to break the pace to reach for your mouse, you don’t have to hit a single key exactly 17 times to get to a particular spot on the page.
您无需为了达到鼠标而缩短步伐,您无需为了到达页面上的特定位置而单击17次。
You don’t have to drag your mouse millimeter by millimeter to ensure you capture the right set of words to copy and paste.
您不必按毫米拖动鼠标毫米,以确保捕获正确的单词集进行复制和粘贴。
When working with a modeless editor, workflow is filled with interruptions.
使用无模式编辑器时,工作流程充满了中断。
Working with modal editors, and Vim in particular, is like having a conversation with your editor.
使用模态编辑器,尤其是Vim,就像与编辑器进行对话一样。
You ask the editor to perform actions (“delete three words”, “change inside quotes”) in a consistent language.
您要求编辑以一致的语言执行操作(“删除三个单词”,“更改内部引号”)。
With Vim, editing becomes a much more deliberate exercise.
使用Vim,编辑变得更加刻意。
Installation 安装
Vim is available on every platform, and comes installed on Linux and Mac OS (however, you may want to upgrade Vim to a more recent version).
Vim可在每个平台上使用,并安装在Linux和Mac OS上(但是,您可能希望将Vim升级到更新版本)。
Find your system in the following paragraphs, and skim through the instructions to set up.
在以下段落中找到您的系统,并浏览设置说明。
Setting up on Linux 在Linux上设置
Linux machines come with Vim installed, which is great news!
Linux机器安装了Vim,这是个好消息!
However, it might be rather out of date, and Vim 8 introduces some much-needed optimizations.
但是,它可能已经过时了,Vim 8引入了一些急需的优化。
Pull up your Command Prompt, and run the following code:
打开终端,然后运行以下代码:
git clone https://github.com/vim/vim.git

cd vim/src

make

sudo make install
If you’re running into issues as you’re installing Vim, you might be missing some dependencies.
如果您在安装Vim时遇到问题,可能会遗漏一些依赖项。
If you’re using a Debian-based distribution, the following command should add common missing dependencies :
如果您使用的是基于Debian的发行版,则以下命令应添加常见的缺失依赖项:
sudo apt-get install make build-essential libncurses5-dev libncursesw5-dev --fix-missing
This will make sure you’re on the latest major and minor patch of Vim.
这将确保您使用Vim的最新版本和最新配置。
If you don’t care for being on the cutting edge, you can also update Vim using a package manager of your choice.
如果您不在乎最前沿,您还可以使用您选择的包管理器更新Vim。
Different Linux distributions use different package managers; the following list includes some common ones:
不同的Linux发行版使用不同的包管理器; 以下列表包括一些常见的:
| Distribution 分配 | Command to install the latest version of Vim 命令安装最新版本的Vim |
|---|---|
| Debian-based (Debian, Ubuntu, Mint) |
sudo apt-get update sudo apt-get install vim-gtk |
| CentOs (and Fedora prior to Fedora22) |
sudo yum check-update sudo yum install vim-enhanced |
| Fedora 22+ | sudo dnf check-update sudo dnf install vim-enhanced |
| Arch | sudo pacman -Syu sudo pacman -S gvim |
| FreeBSD | sudo pkg update sudo pkg install vim |
You can see in the preceding table that Vim uses package names for different repositories.
您可以在上表中看到Vim使用不同存储库的包名称。
Packages like vim-gtk on Debian-based distributions or vim-enhanced on CentOS come with more features enabled (like GUI support for instance).
基于Debian的发行版上的vim-gtk或者CentOS上的vim-enhanced等软件包都启用了更多功能(例如GUI支持)。
Do keep in mind that package manager repositories tend to lag behind from anywhere between a few months to a few years.
请记住,软件包管理器存储库往往会在几个月到几年之间落后。
That’s it, you’re now ready to dive into the world of Vim! You can start the editor by typing the following command:
就是这样,你现在准备潜入Vim的世界! 您可以通过键入以下命令来启动编辑器:
vim
On modern systems, you can also start Vim by invoking vi.
在现代系统上,您还可以通过调用vi来启动Vim。
However, it’s not always the case: on older systems the two are different binaries.
然而,并非总是如此:在较旧的系统上,两者是不同的二进制文件。
Vi is Vim’s predecessor (Vim stands for Vi improved).
Vi是Vim的前身(Vim代表Vi的改进)。
Today, it’s merely an alias pointing to Vim.
今天,它只是一个指向Vim的别名。
There are no reasons to use Vi over Vim, unless, for some reason, you’re unable to install the latter.
没有理由使用Vi而不是Vim,除非由于某种原因,你无法安装后者。
Setting up on MacOS 在MacOS上设置
MacOS comes prepackaged with Vim, but the version can be outdated.
MacOS预装了Vim,但版本可能已经过时了。
There are a few ways to install a fresh version of Vim, and this book will cover two.
有几种方法可以安装新版本的Vim,本书将介绍两种。
First, you can install Vim using Homebrew, a package manager for MacOS.
首先,您可以使用Homebrew(MacOS的包管理器)安装Vim。
You’ll have to install Homebrew first, though.
不过,你必须首先安装Homebrew。
Second, you can download a .dmg image of MacVim.
其次,您可以下载MacVim的.dmg镜像。
This experience would be more familiar because Mac users are used to the visual interface.
这种体验会更加熟悉,因为Mac用户习惯于可视化界面。
Since this book covers interactions with the Command line, I recommend taking the
Homebrew route.
由于本书涵盖了与命令行的交互,我建议采用Homebrew路线。
But you’re welcome to go forward with installing the image if interacting with the Command line does not interest you.
但是如果与命令行交互不感兴趣,欢迎您继续安装映像。
Using Homebrew 使用Homebrew
Homebrew is a third-party package manager for MacOS which makes it easy to install and keep packages up to date.
Homebrew是MacOS的第三方软件包管理器,可以轻松安装和保持软件包最新。
Instructions on how to install Homebrew are available on https:/ / brew. sh, and, as of the moment of writing this book, consist of a single line executed in the following Command line:
有关如何安装Homebrew的说明,请访问https:/ / brew. sh,并且,在撰写本书的那一刻,包含在以下命令行中执行的单行:
/usr/bin/ruby -e "$(curl -fsSL https://raw.githubusercontent.com/Homebrew/install/master/install)"
The following screenshot shows the list of operations you will then see Homebrew perform
during installation:
以下屏幕截图显示了Homebrew在安装过程中执行的操作列表:
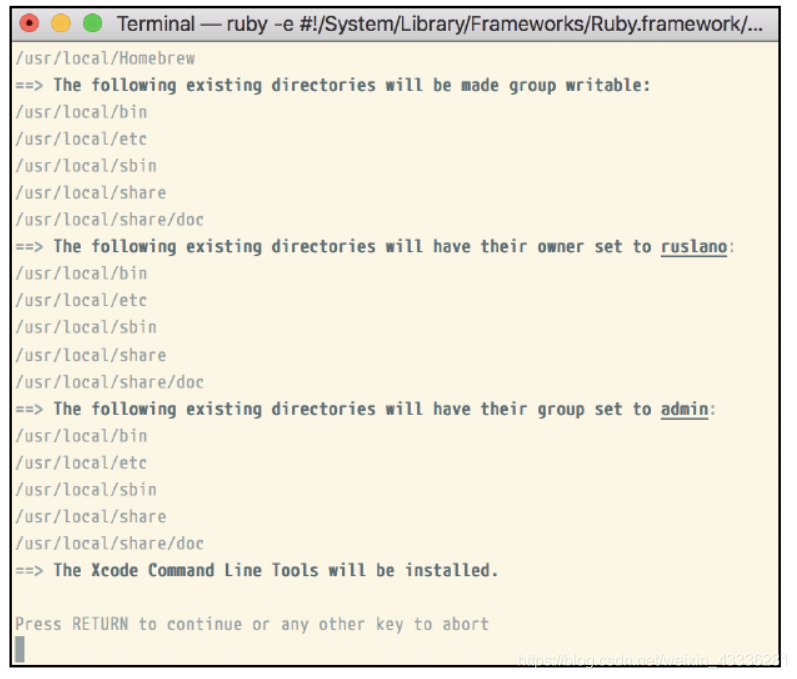
Hit Enter to continue.
按Enter键继续。
If you don’t have XCode installed (which is often a prerequisite for any kind of development-related activity on Mac), you’ll get an XCode installation pop-up.
如果您没有安装XCode(这通常是Mac上任何类型的与开发相关的活动的先决条件),您将获得一个XCode安装弹出窗口。
We won’t be using XCode directly, and you can install it with default settings.
我们不会直接使用XCode,您可以使用默认设置进行安装。
This should take a while to run, but you’ll have Homebrew installed by the end: a fantastic tool you can use to install a lot more than Vim!
这应该需要一段时间才能运行,但是你将在最后安装Homebrew:一个非常棒的工具,你可以用来安装比Vim更多的东西!
You’ll see Installation successful! in bold font once the installation is complete.
你会看到安装成功! 安装完成后以粗体显示。
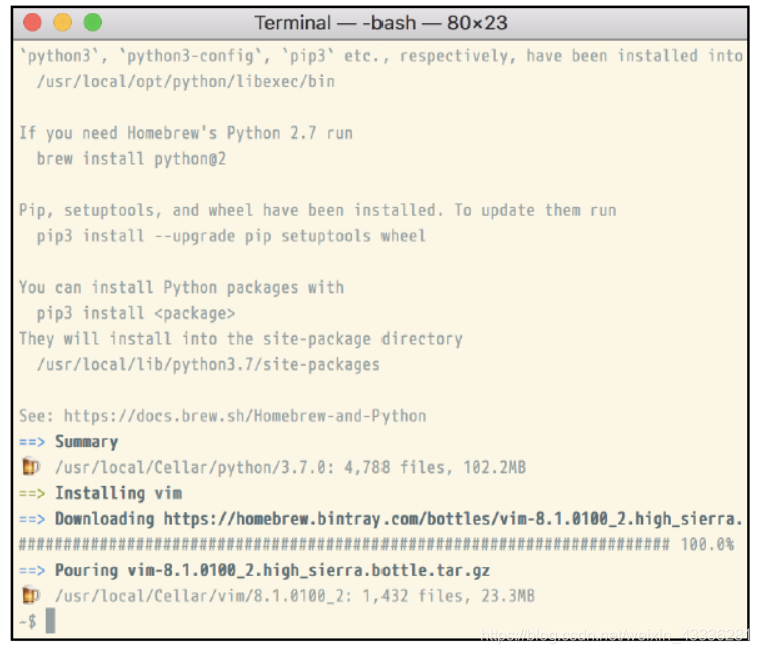
Let’s install a new version of Vim now using the following command:
我们现在使用以下命令安装新版本的Vim:
brew install vim
Homebrew will install all the necessary dependencies too, so you won’t have to worry about a thing, as can be seen in the following screenshot:
Homebrew也将安装所有必需的依赖项,因此您不必担心任何事情,如以下屏幕截图所示:
If you already have Homebrew installed, and you have installed Vim in the past, the preceding command will produce an error.
如果您已经安装了Homebrew,并且过去安装了Vim,则前面的命令将产生错误。
You may want to make sure you have the last version of Vim, though, so run the following command:
但是,您可能希望确保拥有最新版本的Vim,因此请运行以下命令:
brew upgrade vim
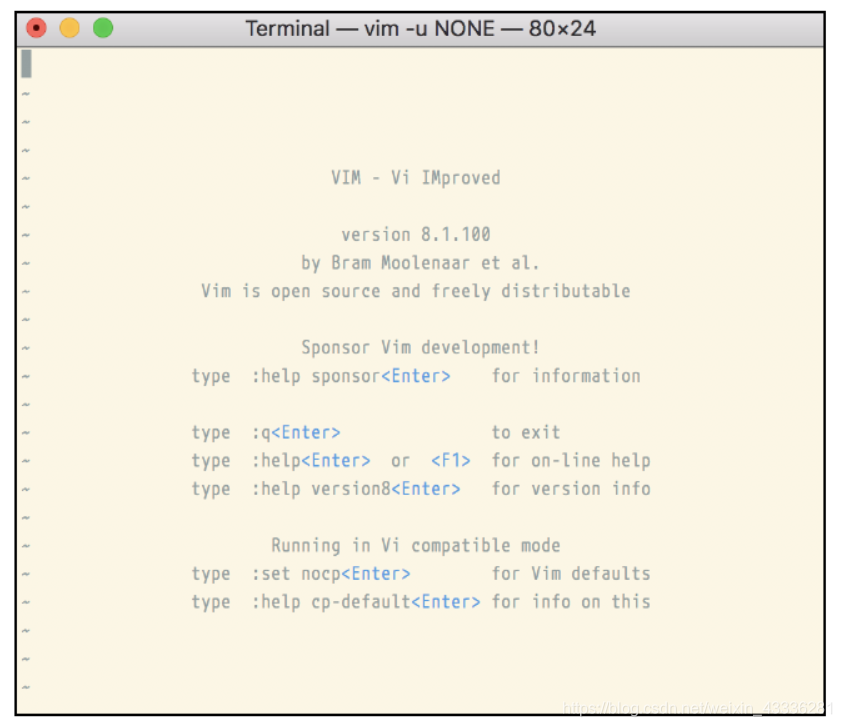
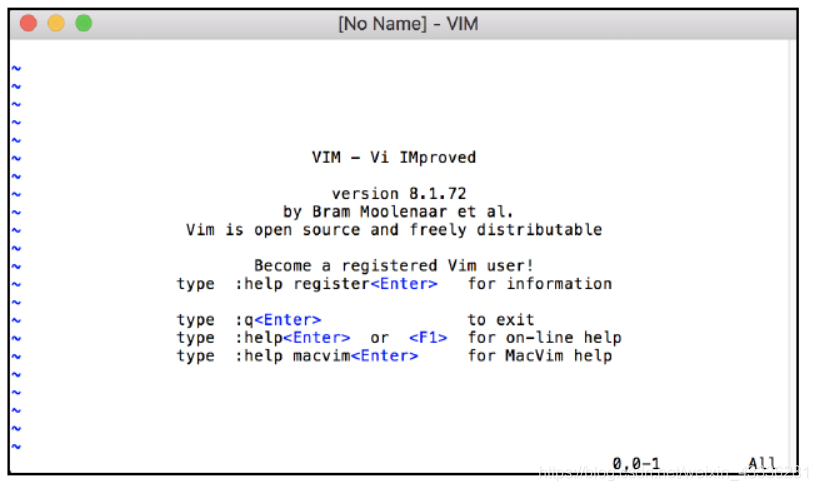
You should now be ready to enjoy Vim; let’s try opening it with the following command:
你现在应该准备好享受Vim; 让我们尝试使用以下命令打开它:
vim
Welcome to Vim:
欢迎来到Vim:
Downloading a .dmg image 下载.dmg图像
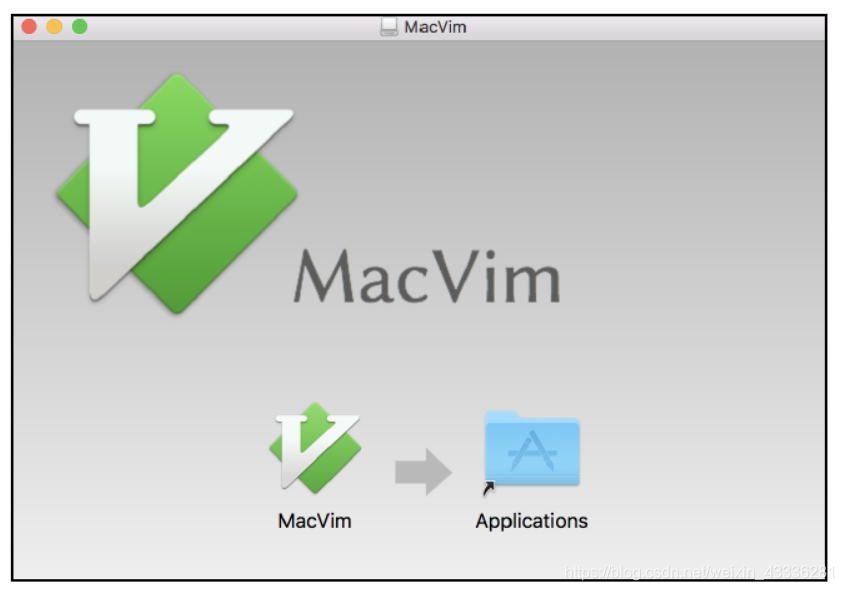
Navigate to https:/ / github. com/ macvim- dev/ macvim/ releases/ latest and download MacVim.dmg.
导航到https://github.com/macvim-dev/macvim/releases/latest并下载MacVim.dmg。
Open MacVim.dmg, and then drag the Vim icon into the Applications directory, as can be seen in the following screenshot:
打开MacVim.dmg,然后将Vim图标拖到Applications目录中,如以下屏幕截图所示:
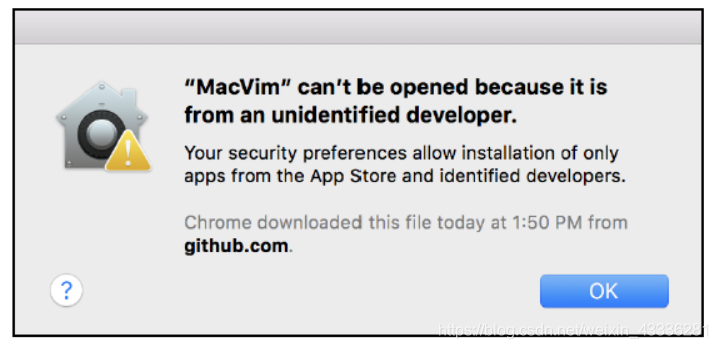
Depending on the security settings of your Mac, you might be greeted by an error when navigating to the Applications folder and trying to open the MacVim app, as demonstrated in the following screenshot:
根据Mac的安全设置,导航到Applications文件夹并尝试打开MacVim应用程序时可能会遇到错误,如以下屏幕截图所示:
Open your Applications folder, find MacVim, right click the icon and select Open.
打开“应用程序”文件夹,找到MacVim,右键单击图标并选择“打开”。
The following prompt will pop up:
将弹出以下提示:
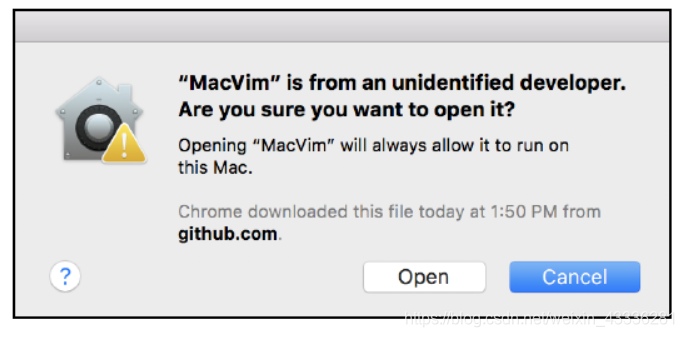
Now hit Open, and MacVim can be opened as usual from now on. Give it a shot:
现在点击Open,MacVim可以像往常一样打开。 试一试:
Setting up on Windows 在Windows上设置
Windows provides two primary routes for using Vim: setting up Cygwin and providing a more Unix-like command-line experience, or installing gVim—a graphical version of Vim (which supports working with cmd.exe on Windows).
Windows为使用Vim提供了两个主要途径:设置Cygwin并提供更类似于Unix的命令行体验,或者安装gVim(Vim的图形版本)(支持在Windows上使用cmd.exe)。
I recommend installing both and picking your favorite: gVim feels slightly more at home on Windows (and it is easier to install), while Cygwin might feel more at home if you’re used to the Unix shell.
我建议安装两个并选择你喜欢的:gVim在Windows上感觉稍微多一点(并且它更容易安装),而如果你习惯了Unix shell,Cygwin可能会有更多的感觉。
Unix-like experience with Cygwin Cygwin的Unix式体验
Cygwin is a Unix-like environment and a command-line interface for Windows.
Cygwin是一个类Unix的环境和Windows的命令行界面。
It aims to bring powerful Unix shell and supporting tools to a Windows machine.
它旨在为Windows机器带来强大的Unix shell和支持工具。
Installing Cygwin 安装Cygwin
To begin the installation process, navigate to https:/ / cygwin. com/ install. html and
download either setup-x86_64.exe or setup-x86.exe depending on the version of
Windows you’re using (64 bit or 32 bit respectively).
要开始安装过程,请导航到https://cygwin.com/install.html并下载setup-x86_64.exe或setup-x86.exe,具体取决于您使用的Windows版本(分别为64位或32位)。
If you’re not sure whether your system is 32 bit or 64 bit, you can open Control Panel | System and Security | System, and look at System type.
如果您不确定系统是32位还是64位,则可以打开“控制面板” 系统和安全| 系统,看看系统类型。
Open the executable file, and you will be greeted by the following Cygwin installation window:
打开可执行文件,您将看到以下Cygwin安装窗口:

Hit Next > a few times, proceeding with the default settings:
点击Next>几次,继续使用默认设置:
Download source: Install from Internet
下载源代码:从Internet安装
Root directory: C:cygwin64 (or a recommended default)
根目录:C: cygwin64(或推荐的默认值)
Install for: all users
安装:所有用户
Local package directory: C:Downloads (or a recommended default)
本地包目录:C: Downloads(或推荐的默认值)
Internet connection: Use System Proxy Settings
Internet连接:使用系统代理设置
Download site: http://cygwin.mirror.constant.com (or any available option)
下载站点:http://cygwin.mirror.constant.com(或任何可用选项)
After this, you will be greeted with the Select Packages screen.
在此之后,您将看到Select Packages屏幕。
Here, we want to select the vim, gvim, and vim-doc packages.
在这里,我们要选择vim,gvim和vim-doc包。
The easiest way to do this is to type vim in a search box, expand the All Editors category, and click on the arrow-looking icons next to the desired packages, as demonstrated in the following screenshot:
最简单的方法是在搜索框中键入vim,展开所有编辑器类别,然后单击所需包旁边的箭头图标,如以下屏幕截图所示:
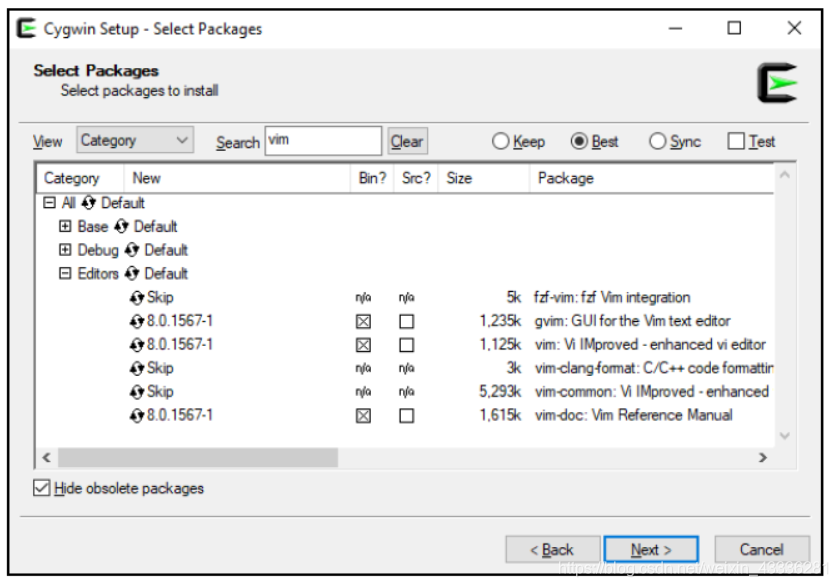
The preceding screenshot shows version 8.0.1567-1.
上面的屏幕截图显示了8.0.1567-1版本。
This is the only version available at the moment of writing this book, November 2018.
这是2018年11月撰写本书时唯一可用的版本。
The primary difference is the absence of the :terminal command (see Chapter 5, Build, Test, and Execute) in Vim 8.0 vs 8.1.
主要区别在于Vim 8.0 vs 8.1中缺少:terminal命令(参见第5章,构建,测试和执行)。
You may want to install curl from under the Net category, and git from under the Devel category, as we’ll be using both in chapter 3.
您可能希望从Net类别下安装curl,并从Devel类别下安装git,因为我们将在第3章中使用它们。
It might also be helpful to install dos2unix from under the Utils category, which is a utility used for converting Windows-style line endings to Linux-style line endings (something you might run into once in a while).
从Utils类别下安装dos2unix也可能会有所帮助,这是一个用于将Windows风格的行结尾转换为Linux风格的行结尾的实用程序(有些可能偶尔遇到过)。
Hit Next > two more times to proceed, which will begin the installation.
点击Next>再继续两次,这将开始安装。
Installation will take some time, and now would be a great moment to prematurely congratulate yourself with some coffee!
安装需要一些时间,现在是过早祝贺自己喝咖啡的好时刻!
You might get a few post-install script errors, which you can safely dismiss (unless you see any errors related to Vim—then Google is your friend: search for an error text and try to find a solution).
您可能会得到一些安装后脚本错误,您可以放心地解除(除非您看到与Vim相关的任何错误 - 然后Google就是您的朋友:搜索错误文本并尝试找到解决方案)。
Hit Next > a few more times, proceeding with the defaults: Create icon on Desktop Add icon to Start Menu Congratulations, you now have Cygwin installed with Vim!
点击Next>几次,继续默认:在桌面上创建图标添加图标到开始菜单祝贺你,你现在已经安装了Cygwin和Vim!
If you ever need to install additional packages in Cygwin, just rerun the installer while selecting the packages you want.
如果您需要在Cygwin中安装其他软件包,只需在选择所需软件包时重新运行安装程序。
Using Cygwin 使用Cygwin
Open Cygwin, the program will be called Cygwin64 Terminal or Cygwin Terminal, depending on the version of your system, as can be seen in the following screenshot:
打开Cygwin,该程序将被称为Cygwin64终端或Cygwin终端,具体取决于您的系统版本,如以下屏幕截图所示:
Open it! You will see the following prompt, familiar to Linux users:
打开它! 您将看到Linux用户熟悉的以下提示:

Cygwin supports all of the Unix-style commands we will be using in this book.
Cygwin支持我们将在本书中使用的所有Unix风格的命令。
This book will also say if any commands need to be changed to work with Cygwin.
本书还将说明是否需要更改任何命令以与Cygwin一起使用。
But for now, let’s open Vim and proceed onto the next chapter!
但是现在,让我们打开Vim继续下一章!
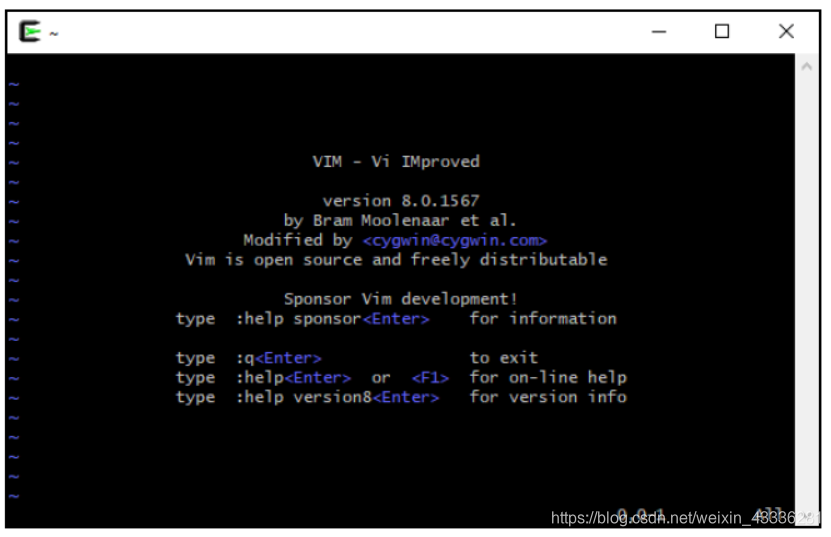
Type vim and hit Enter to start Vim, as demonstrated in the following screenshot:
键入vim并按Enter键启动Vim,如以下屏幕截图所示:
Cygwin is a way to get a Linux-like shell experience on Windows, meaning you’ll have to follow Linux specific instructions throughout this book if you decide to use Cygwin.
Cygwin是一种在Windows上获得类似Linux的shell体验的方法,这意味着如果您决定使用Cygwin,则必须遵循本书中的Linux特定说明。
You’ll also want to be careful with Windows-style line endings vs Linux-style line endings, as Windows and Linux treat line endings differently.
您还需要注意Windows样式的行结尾与Linux样式的行结尾,因为Windows和Linux对行结尾的处理方式不同。
If you run into an odd issue with Vim complaining about ^M characters its unable to recognize, run the dos2unix utility on the offending file to resolve the issue.
如果你遇到一个奇怪的问题,Vim抱怨它无法识别的^ M个字符,请在有问题的文件上运行dos2unix实用程序来解决问题。
Visual Vim with gVim Visual Vim与gVim
In this section. you can read more about the graphical version of Vim in Vanilla Vim vs GVim.
在这个部分。 你可以在Vanilla Vim和GVim中阅读更多关于Vim的图形版本。
As it always is with Windows, the process is slightly more visual.
与Windows一样,这个过程更加直观。
Navigate to www.vim.org/download.php#pc in your browser and download an executable installer.
在浏览器中导航到www.vim.org/download.php#pc并下载可执行安装程序。
At the moment of writing this book, November 2018, the binary is called gvim81.exe, where
81 stands for version 8.1.
在编写本书时,2018年11月,二进制文件名为gvim81.exe,其中81代表版本8.1。
Open the executable and follow the prompts on the screen, as demonstrated by the following screenshot:
打开可执行文件并按照屏幕上的提示操作,如以下屏幕截图所示:
Let’s go ahead and hit Yes, then I Agree until we arrive at the Installation Options screen.
让我们继续,点击是,然后我同意,直到我们到达安装选项屏幕。
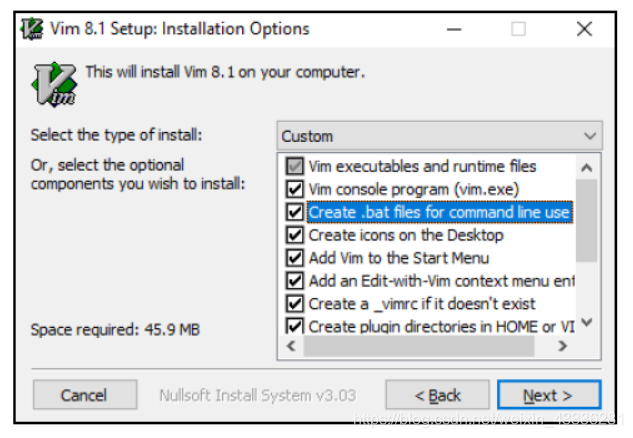
We’re happy with most of the default options gVim has to offer, except that you might want to enable Create .bat files for command line use.
我们对gVim提供的大多数默认选项感到满意,除了您可能希望启用Create .bat文件以供命令行使用。
This option will make the vim command work in Windows Command Prompt.
此选项将使vim命令在Windows命令提示符下工作。
Some examples in this book rely on having a Command Prompt, so enabling this option would help you follow along.
本书中的一些示例依赖于命令提示符,因此启用此选项可帮助您继续操作。
Here’s a screenshot of the Installation Options screen with the proper boxes checked off:
这是安装选项屏幕的屏幕截图,其中选中了正确的框:
Hit Next >. You’ll want to continue with the following settings:
点击下一步>。 您需要继续以下设置:
Select the type of install: Typical, (after Create .bat files for command line use is enabled, type of install value changes to Custom automatically).
选择安装类型:Typical,(在启用命令行使用的Create .bat文件后,安装值的类型会自动更改为Custom)。
Do not remap keys for Windows behavior
不要为Windows行为重新映射密钥
Right button has a popup menu, left button starts visual mode
右键有一个弹出菜单,左键有一个可视模式
Destination Folder: C:Program Files (x86)Vim (or a recommended default)
目标文件夹:C: Program Files(x86) Vim(或推荐的默认值)
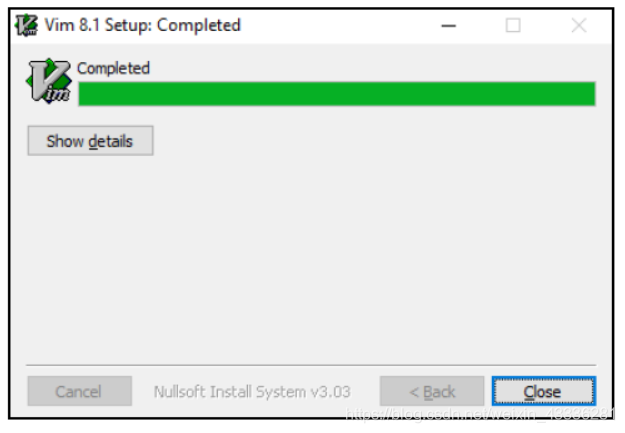
Once you’re done, hit Install and then Close, as demonstrated in the following screenshot:
完成后,单击Install,然后单击Close,如以下屏幕截图所示:
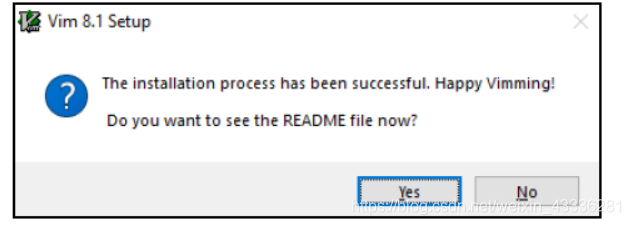
Say No to the request to see the README file (who needs a manual, huh?) as seen in the following command:
对于查看README文件(谁需要手册,是吧?)的请求说“不”,如以下命令所示:
You will now have a few icons pop on your desktop, the most interesting one being gVim 8.1 as shown in the following screenshot:

Start it, and you’re ready to proceed! Happy Vimming!
启动它,你就可以继续了! 快乐的Vimming!
Verifying and troubleshooting the installation 验证安装并对其进行故障排除
Regardless of the platform you used to install Vim, it’s good to make sure that, with Vim, all the right features enabled.
无论您用于安装Vim的平台如何,最好通过Vim确保启用所有正确的功能。
On a command line, run the following command:
在命令行上,运行以下命令:
vim --version
You will see the following output, with a set of features having a + and a - in front of them:
您将看到以下输出,其中包含一组在其前面带有+和 - 的功能:
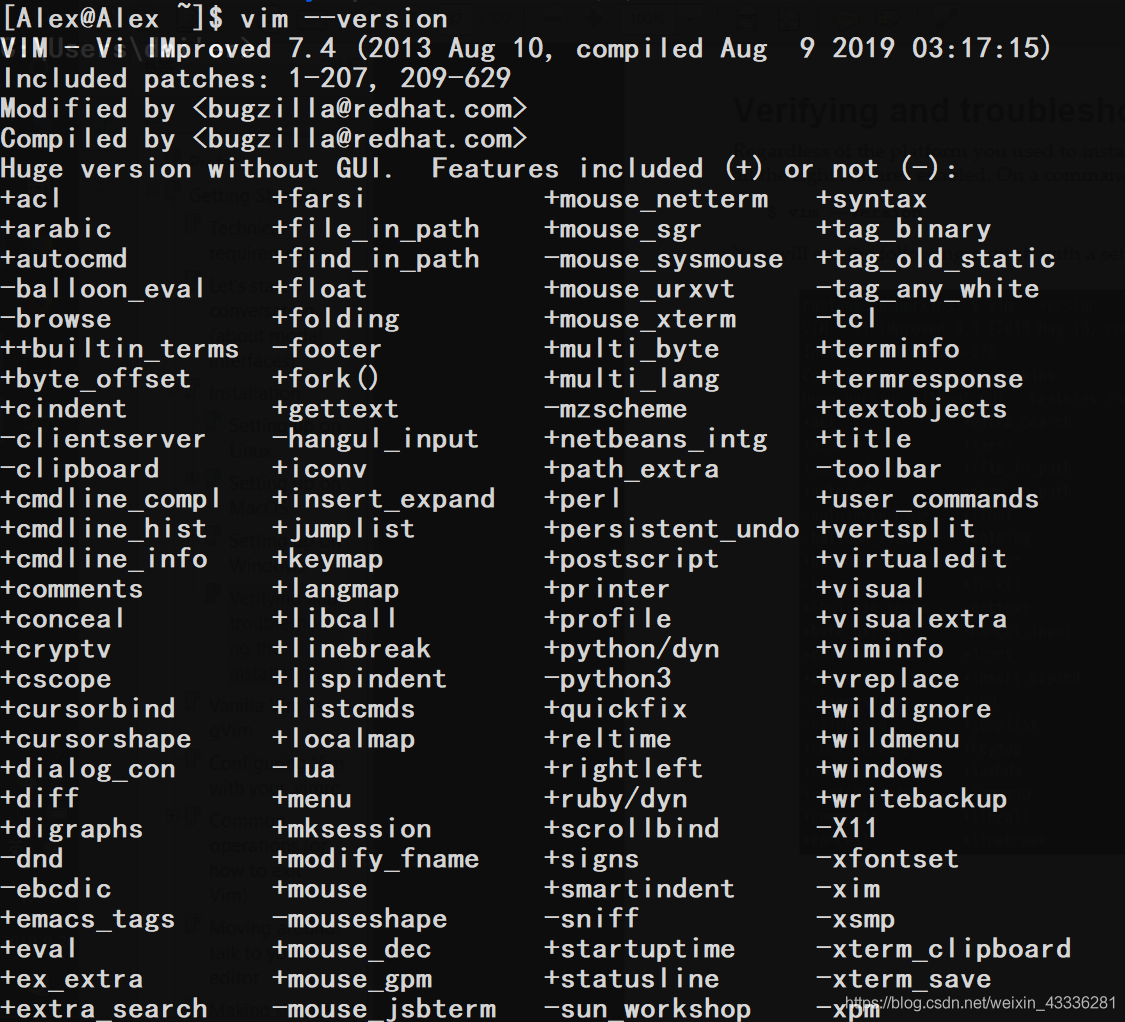
In the preceding screenshot, you can see that my Vim was actually compiled with Python 2 support (+python) instead of Python 3 support (-python3).
在上面的屏幕截图中,您可以看到我的Vim实际上是使用Python 2支持(+ python)而不是Python 3支持(-python3)编译的。
To correct the issue, I’d have to either recompile Vim with +python3 enabled or find a package which distributes a compiled version of Vim with +python3 enabled.
要解决这个问题,我必须在启用+ python3的情况下重新编译Vim,或者找一个包含Vim的编译版本的软件包,启用+ python3。
For a list of all features Vim can have enabled, see :help feature-list.
有关Vim可以启用的所有功能的列表,请参阅:help feature-list。
For instance, if we wanted to recompile Vim 8.1 with Python 3 support on Linux, we would do the following:
例如,如果我们想在Linux上使用Python 3支持重新编译Vim 8.1,我们将执行以下操作:
git clone https://github.com/vim/vim.git

cd vim/src

./configure --with-features=huge --enable-python3interp

make

sudo make install
We’re passing the --with-features=huge flag in order to compile Vim with most features enabled.
我们传递了–with-features = huge标志,以便在启用了大多数功能的情况下编译Vim。
However, --with-features=huge does not install language bindings, so we need to explicitly enable Python 3.
但是, - with-features = huge不会安装语言绑定,因此我们需要显式启用Python 3。
In general, if your Vim is not behaving like other Vim installations (including behavior described in this book), you might be missing a feature.
通常,如果您的Vim不像其他Vim安装(包括本书中描述的行为),您可能会缺少某个功能。
Depending on your system and features you require, the process might be slightly or vastly different.
根据您所需的系统和功能,该过程可能略有不同或大不相同。
A quick web search along the lines of Installing Vim < version > with +< feature > on
< operating system > should help.
在< operating system >上安装Vim < version >和+ < feature >的快速Web搜索应该会有所帮助。
Vanilla Vim vs gVim Vanilla Vim 和 gVim的对比
Using instructions given before, you’ve installed two flavors of Vim: command-line Vim, and gVim.
使用之前给出的说明,您已经安装了两种Vim:命令行Vim和gVim。
This is how gVim looks on Windows:
这就是gVim在Windows上的外观:
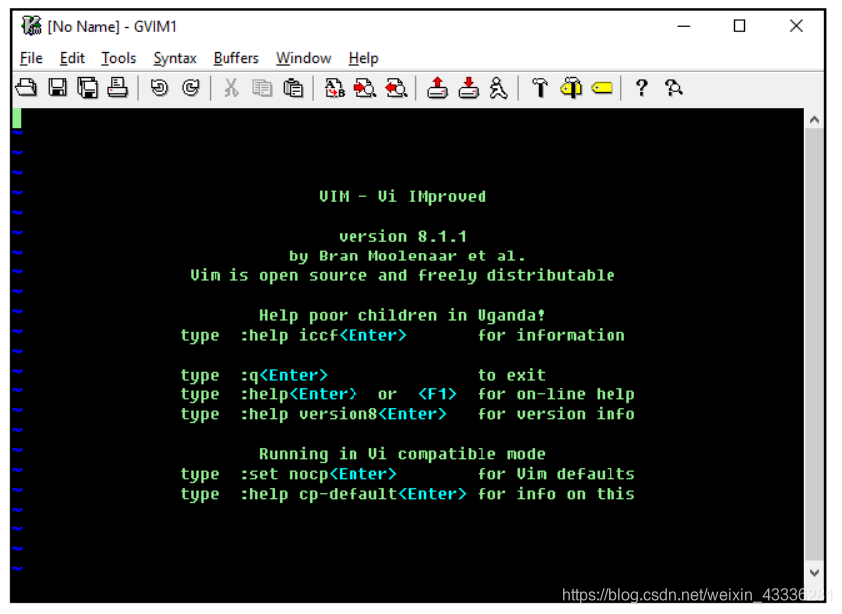
The gVim hooks up a graphical user interface (GUI) to Vim, has better mouse support, and adds more context menus.
gVim将图形用户界面(GUI)连接到Vim,具有更好的鼠标支持,并添加更多上下文菜单。
It also supports a wider range of color than many terminal emulators, and provides some quality of life features you’d expect from a modern GUI.
它还支持比许多终端仿真器更广泛的颜色,并提供您期望从现代GUI中获得的一些生活品质。
You can launch gVim by running gVim 8.1 executable on Windows, or on Linux and MacOS by invoking the following command:
您可以通过在Windows上运行gVim 8.1可执行文件或在Linux和MacOS上运行gVim,方法是调用以下命令:
gvim
Windows users might favor gVim.
Windows用户可能更喜欢gVim。
This book focuses on increasing the effectiveness of one’s text editing skills, so we will shy away from navigating multiple menus in gVim, as these are rather intuitive, and take the user out of the flow.
本书侧重于提高一个人的文本编辑技巧的有效性,因此我们会回避在gVim中导航多个菜单,因为这些菜单非常直观,并且会让用户脱离流程。
Hence, we will focus on a non-graphical version of Vim, but everything that’s applicable to Vim also applies to gVim.
因此,我们将专注于Vim的非图形版本,但适用于Vim的所有内容也适用于gVim。
The two share configuration, and you can swap between the two as you go.
两个共享配置,您可以在两者之间切换。
Overall, gVim is slightly more newbie friendly, but it doesn’t matter which one you choose to use for the purpose of this book.
总的来说,gVim对新手的友好程度稍高一些,但是对于本书来说,选择使用哪一个并不重要。
Try both!
试试两个!
Configuring Vim with your .vimrc 使用.vimrc配置Vim
Vim reads configuration from a .vimrc file.
Vim从.vimrc文件中读取配置。
Vim works out of the box, but there are certain options which make working with code a lot easier.
Vim开箱即用,但有一些选项可以使代码处理变得更加容易。
In Unix-like systems, files starting with a period . are hidden.
在类Unix系统中,文件以句点开头。 是隐藏的。
To see them, run ls -a in a Command line.
要查看它们,请在命令行中运行ls -a。
In Linux and MacOS, .vimrc is located in your user directory (the full path would be /home/< username >/.vimrc).
在Linux和MacOS中,.vimrc位于您的用户目录中(完整路径为/ home / < username > / .vimrc)。
You can also find out your user directory by opening a Command Prompt and running the following command:
您还可以通过打开命令提示符并运行以下命令来查找用户目录:
echo $HOME
Windows does not allow periods in file names, so the file is named _vimrc.
Windows不允许文件名中包含句点,因此该文件名为_vimrc。
It’s usually located in C:Users< username >_vimrc, but you can also locate it by opening the Windows Command Prompt and running the following command:
它通常位于C: Users <用户名> _vimrc中,但您也可以通过打开Windows命令提示符并运行以下命令来找到它:
echo %USERPROFILE%
If you run into problems, open Vim and type in : followed by Enter.
如果遇到问题,请打开Vim并键入:
echo $ MYVIMRC
然后按Enter键。
It should display where Vim is reading the .vimrc from.
它应该显示Vim从哪里读取.vimrc。
Find the proper location for your OS, and place the prepared configuration file there.
找到适合您的操作系统的位置,并将准备好的配置文件放在那里。
You can download the .vimrc used for this chapter from GitHub at https://github.com/PacktPublishing/Mastering-Vim/tree/master/Chapter01.
您可以从https:/ / github. com/PacktPublishing/ Mastering- Vim/ tree/ master/ Chapter01. 下载本章使用的.vimrc。
he following code shows the contents of a .vimrc file used in this chapter:
下面的代码显示了本章中使用的.vimrc文件的内容:
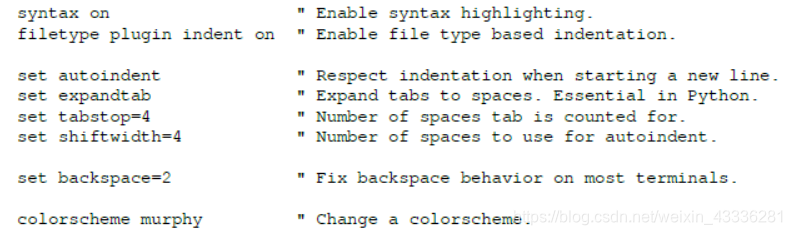
Lines starting with a double quote " are comments and are ignored by Vim.
以双引号开头的行“是评论,并被Vim忽略。
These settings bring in some sensible defaults, like syntax highlighting and consistent indentation.
这些设置带来一些合理的默认值,如语法突出显示和一致缩进。
They also fix one of the common sticking points in a bare-bones Vim installation—inconsistent backspace key behavior across different environments.
他们还修复了在不同环境中的简单Vim安装 - 不一致的退格键行为中的一个常见问题。
When working with Vim configuration, you can try things out before adding them to your .vimrc file To do that, type : followed by a command, for example, :set autoindent (press Enter to execute).
使用Vim配置时,可以在将它们添加到.vimrc文件之前尝试一下。为此,请键入:后跟命令,例如:set autoindent(按Enter键执行)。
If you ever want to know the value of a setting, add ? at the end of the command: for example, :set tabstop? will tell you the current tabstop value.
如果您想知道设置的值,请添加? 在命令的末尾:例如,:set tabstop? 会告诉你当前的tabstop值。
I’ve also changed the colorscheme to make screenshots look better in print, but you don’t
have to.
我也改变了配色方案,使得截图在打印时看起来更好,但你不必这样做。
Vim 8 comes prepackaged with the following color themes: blue, darkblue, default, delek, desert, elflord, evening, industry, koehler, morning, murhpy, pablo, peachpuff, ron, shine, slate, torte, zellner.
Vim 8预先包装了以下颜色主题:蓝色,深蓝色,默认,delek,沙漠,elflord,晚上,行业,koehler,早晨,murhpy,巴勃罗,桃花,ron,闪耀,板岩,蛋糕,zellner。
You can try out a color theme by typing :colorscheme < name > and hitting Enter, and you can cycle through the available color scheme names by typing :colorscheme followed by a space and by hitting Tab multiple times.
您可以通过键入:colorscheme < name >并按Enter键来尝试颜色主题,您可以通过键入:colorscheme后跟空格并多次点击Tab来循环显示可用的颜色方案名称。
You can read more about configuring Vim and color schemes in chapter 7, Making Vim Your Own.
您可以在第7章“自己制作Vim”中阅读有关配置Vim和配色方案的更多信息。
Common operations (or how to exit Vim) 常见操作(或如何退出Vim)
We will now focus on interacting with Vim without the use of a mouse or navigational menus.
我们现在将专注于与Vim进行交互,而无需使用鼠标或导航菜单。
Programming is a focus intensive task on its own.
编程本身就是一项集中精力的任务。
Hunting through context menus is nobody’s idea of a good time, and keeping our hands on the home row of your keyboard helps trim constant switching between a keyboard and a mouse.
通过上下文菜单进行搜索是没有人想到的好时光,并且将手放在键盘的主行上可以帮助调整键盘和鼠标之间的持续切换。
Opening files 打开文件
First, start your favorite Command Prompt (Terminal in Linux and macOS, Cygwin in Windows).
首先,启动您最喜欢的命令提示符(Linux和macOS中的终端,Windows中的Cygwin)。
We’ll be working on a very basic Python application.
我们将开发一个非常基础的Python应用程序。
For simplicity’s sake, let’s make a simple square root calculator.
为简单起见,让我们制作一个简单的平方根计算器。
Run the following command:
运行以下命令:
vim animal_farm.py
If you’re using gVim—you can open a file by going into a File menu and choosing Open.
如果您正在使用gVim,则可以通过进入“文件”菜单并选择“打开”来打开文件。
Sometimes graphical interface is exactly what you need!
有时图形界面正是您所需要的!
This opens a file named animal_farm.py.
这将打开一个名为animal_farm.py的文件。
If the file existed, you’d see its contents here, but since it doesn’t, we’re greeted by an empty screen, as shown in the following example:
如果文件存在,你会在这里看到它的内容,但由于它没有,我们会被一个空屏幕打开,如下例所示:
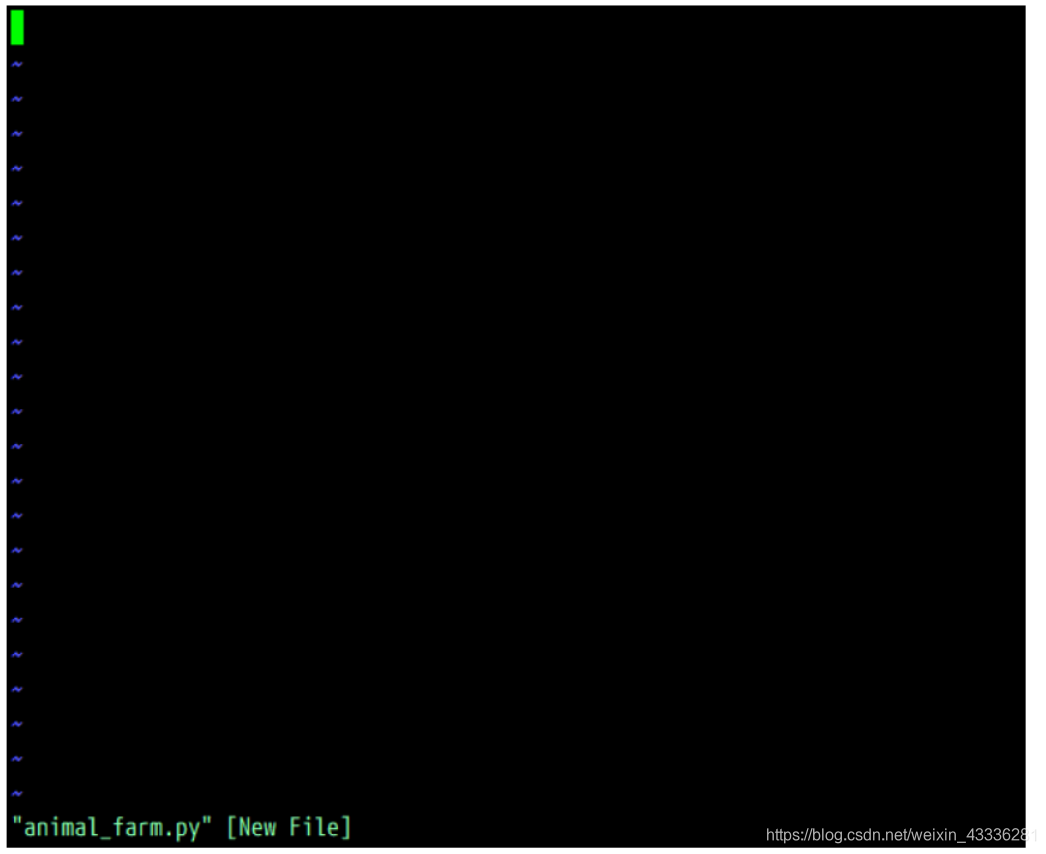
You can tell that the file doesn’t exist by the [New File] text next to a file name in the status line at the bottom of the screen.
您可以通过屏幕底部状态行中文件名旁边的[New File] 文本来判断该文件不存在。
Woohoo! You’ve just opened your first file with Vim!
哇噢! 你刚刚用Vim打开了你的第一个文件!
Vim’s status line often contains a lot of useful information.
Vim的状态行通常包含许多有用的信息。
That’s the primary way for Vim to communicate with a user, so do keep an eye out for messages in the status line!
这是Vim与用户通信的主要方式,因此请留意状态行中的消息!
If you already have Vim open—you can load a file by typing the following, and hitting
Enter:
如果您已打开Vim,则可以通过键入以下内容加载文件,然后按Enter键:
:e animal_farm.py
You have just executed your first Vim command!
你刚刚执行了第一个Vim命令!
Pressing colon character : enters a command-line mode, which lets you enter a line of text which Vim will interpret as a command.
按冒号字符:进入命令行模式,可以输入Vim将其解释为命令的文本行。
Commands are terminated by hitting the Enter key, which allows you to perform various complex operations, as well as accessing your system’s Command line.
通过按Enter键终止命令,这允许您执行各种复杂的操作,以及访问系统的命令行。
Command :e stands for edit.
命令:e代表编辑。
Vim help often refers to the Enter key as a , which stands for carriage return.
Vim帮助通常将Enter键称为< CR >,表示回车。
Changing text 改变文字
By default you’re in Vim’s normal mode, meaning that every key press corresponds to a particular command.
默认情况下,您处于Vim的正常模式,这意味着每次按键都对应于特定命令。
Hit i on your keyboard to enter an insert mode.
点击键盘上的i进入插入模式。
This will display – INSERT – in a status line (at the bottom), (and, if you’re using gVim, it will change the cursor from a block to a vertical line), as can be seen in the following example:
这将在状态行(在底部)显示 - INSERT - (并且,如果您使用gVim,它将光标从块更改为垂直线),如以下示例中所示:

The insert mode behaves just like any other modeless editor.
插入模式的行为与任何其他无模式编辑器一样。
Normally, we wouldn’t spend a lot of time in insert mode except for adding new text.
通常,除了添加新文本之外,我们不会在插入模式下花费大量时间。
You’ve already encountered three of Vim’s modes: command-line mode, normal mode, and insert mode. This book will cover more modes, see、 Chapter 3, Follow the Leader – Plugin Management for details and explanation.
您已经遇到过三种Vim模式:命令行模式,普通模式和插入模式。 本书将介绍更多模式,请参阅第3章“关注领导者 - 插件管理”以获取详细信息和说明。
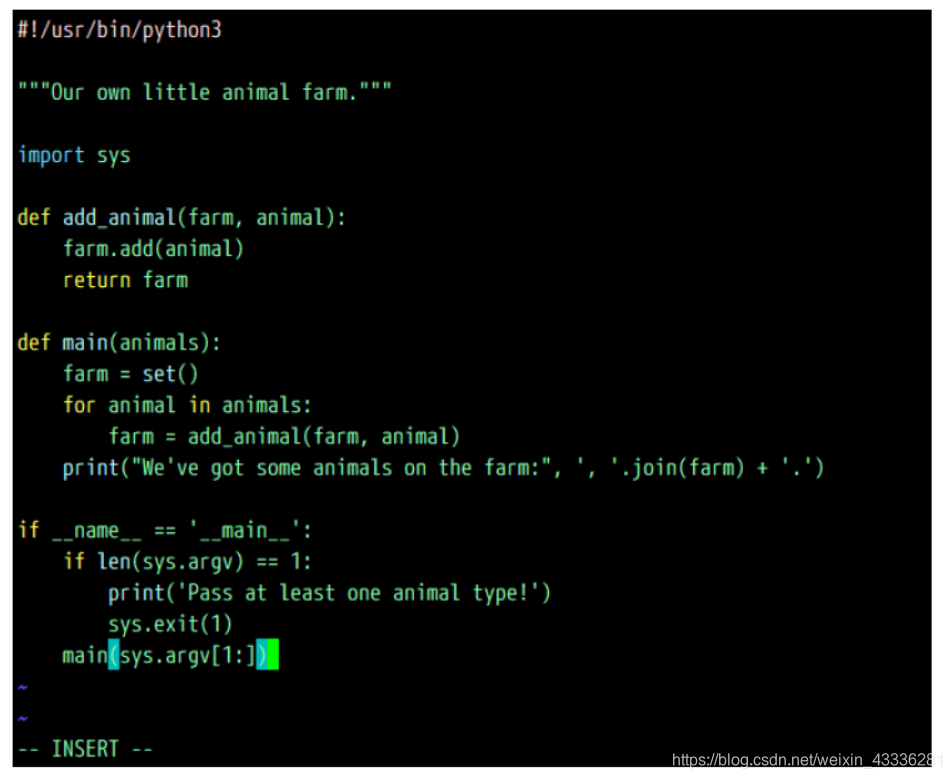
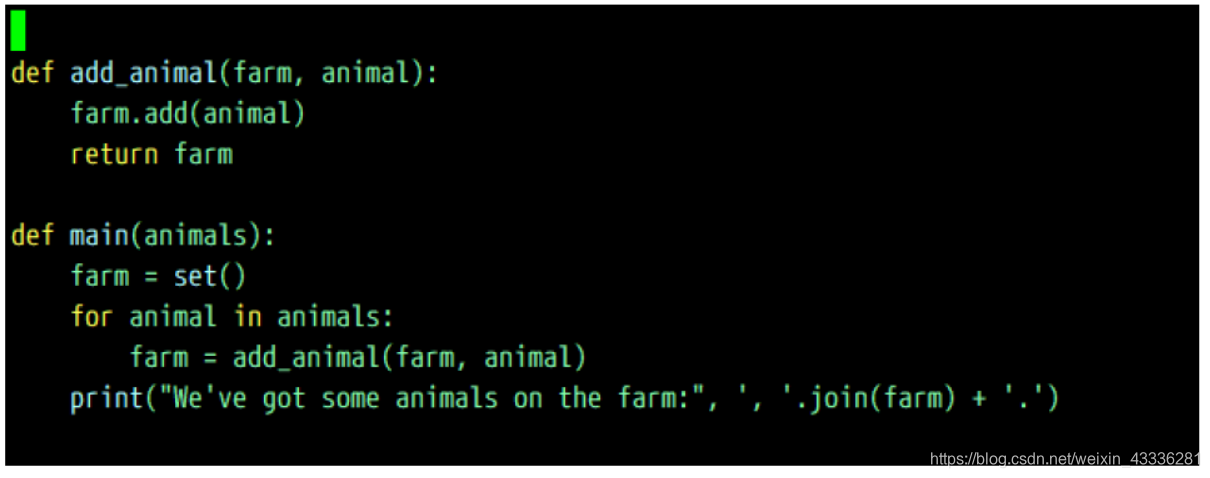
Let’s create our Python application by typing in the following code.
让我们通过输入以下代码来创建我们的Python应用程序。
We’ll be navigating this little snippet throughout this chapter:
在本章中我们将浏览这个小片段:
To get back to normal mode in Vim, hit Esc on your keyboard.
要在Vim中恢复正常模式,请按键盘上的Esc键。
You’ll see that – INSERT – has disappeared from the status line.
你会看到 - INSERT - 从状态行中消失了。
Now, Vim is ready to take commands from you again!
现在,Vim已准备好再次接受你的命令!
The preceding code is not showing Python best practices and is provided to illustrate some of Vim’s capabilities.
上面的代码没有显示Python最佳实践,用于说明Vim的一些功能。
Saving and closing files 保存和关闭文件
Let’s save our file! Execute the following command:
我们保存文件吧! 执行以下命令:
:w
Don’t forget to hit Enter at the end of a command to execute it.
不要忘记在命令结束时按Enter键来执行它。
The write command can also be followed by a filename, making it possible to write to a different file, other than the one that is open.
write命令后面还可以跟一个文件名,这样就可以写入另一个文件,而不是打开的文件。
This will save the changes in a new file, and will change the current open file to a new one.
这将保存新文件中的更改,并将当前打开的文件更改为新文件。
Try it, using the following command: :w animal_farm_2.py.
尝试使用以下命令:: w animal_farm_2.py。
Let’s exit Vim and check if the file was indeed created. :q stands for quit.
让我们退出Vim并检查文件是否确实已创建。 :q代表退出。
You can also combine write and quit commands to write and exit by executing :wq.
您还可以通过执行:wq来组合写入和退出命令以进行写入和退出。
:q
If you made changes to a file and want to exit Vim without saving the changes, you’ll have to use :q! to force Vim to quit.
如果您对文件进行了更改并想要在不保存更改的情况下退出Vim,则必须使用:q! 迫使Vim退出。
Exclamation mark at the end of the command forces its execution.
命令末尾的感叹号强制执行。
Many commands in Vim have shorter and longer versions.
Vim中的许多命令都有更短和更长的版本。
For instance,:e, :w, and :q are short versions of :edit, :write, and :quit.
例如,:e,:w和:q是以下的简短版本:edit,:write和:quit。
In the Vim manual, the optional part of the command is often annotated in square brackets ([]).
在Vim手册中,命令的可选部分通常用方括号([])注释。
For example, :w[rite] or :e[dit].
例如,:w [rite]或:e [dit]。
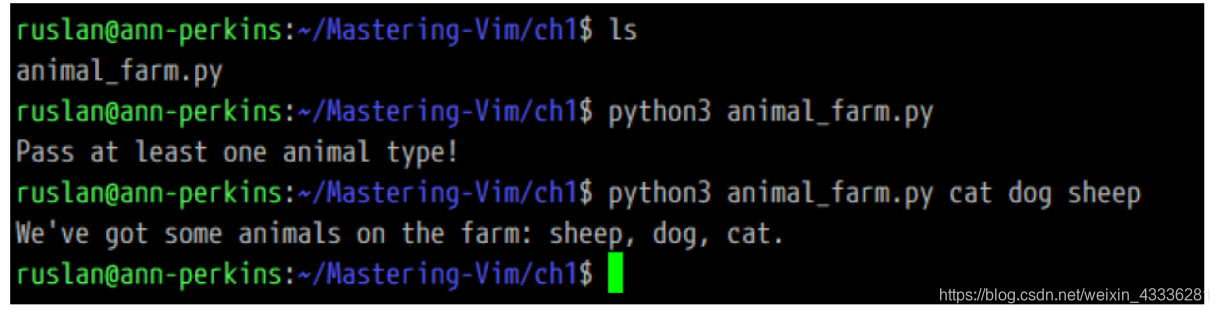
Now that we’re back in our system’s Command line, let’s check the contents of a current directory, as seen in the following code:
现在我们回到系统的命令行,让我们检查当前目录的内容,如下面的代码所示:
ls

python3 animal_farm.py

python3 animal_farm.py cat dog sheep
In Unix, ls lists contents of a current directory.
在Unix中,ls列出了当前目录的内容。
python3 animal_farm.py executes the script using a Python 3 interpreter, and python3 animal_farm.py cat dog sheep passes three arguments (cat, dog, sheep) to our script.
python3 animal_farm.py使用Python 3解释器执行脚本,而python3 animal_farm.py cat dog sheep将三个参数(cat,dog,sheep)传递给我们的脚本。
The following screenshot shows what the three preceding commands should output:
以下屏幕截图显示了前面三个命令应该输出的内容:
A word about swap files 关于交换文件的一个词
By default, Vim keeps track of the changes you make to files in swap files.
默认情况下,Vim会跟踪您对交换文件中的文件所做的更改。
The swap files are created as you edit the files, and are used to recover the contents of your files in case either Vim, your SSH session, or your machine crashes.
交换文件在编辑文件时创建,用于在Vim,SSH会话或计算机崩溃的情况下恢复文件内容。
If you don’t exit Vim cleanly, you’ll be greeted by the following screen:
如果你没有干净地退出Vim,你会看到以下屏幕:
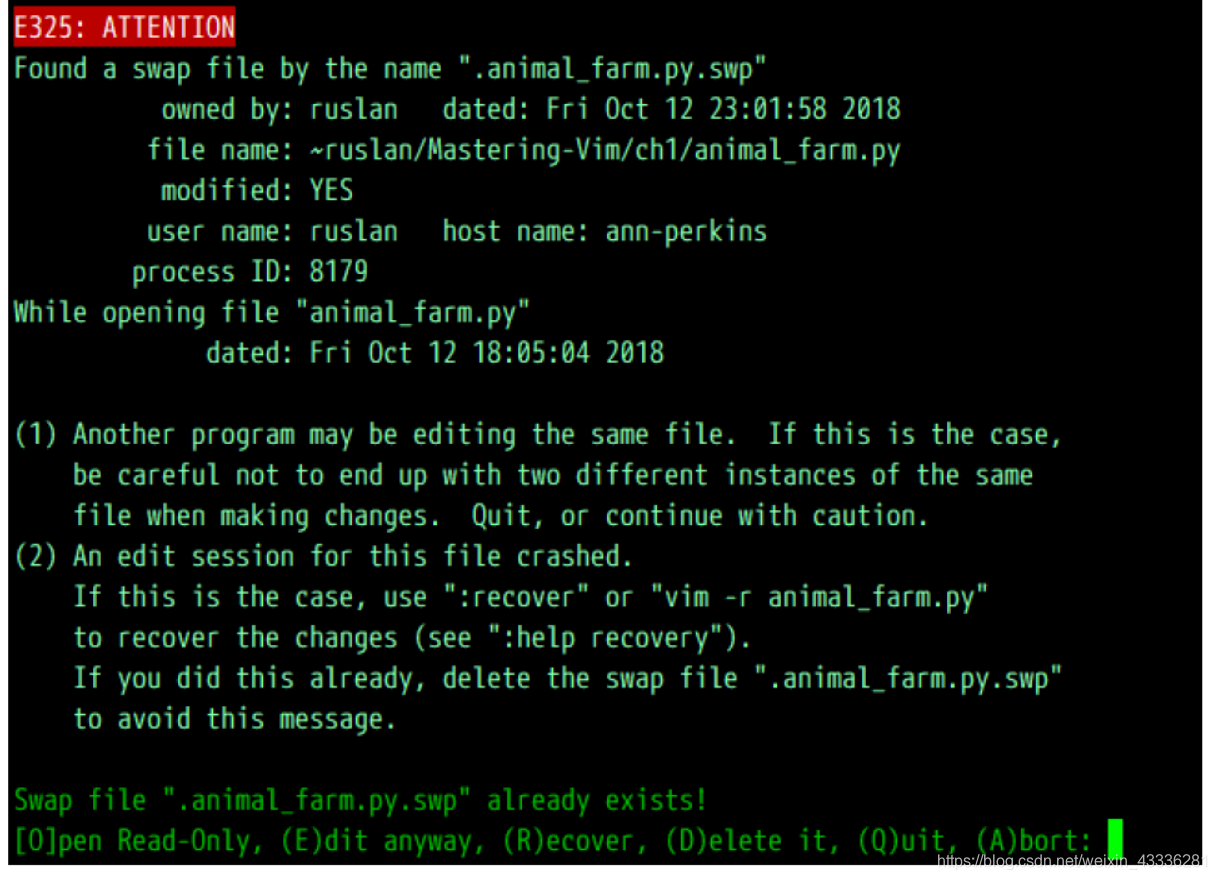
You can either hit r to recover the swap file contents, or d to delete the swap file and dismiss the changes.
您可以按r以恢复交换文件内容,也可以删除交换文件并关闭更改。
If you decide to recover the swap file, you can prevent the same message from showing up next time you open the file in Vim by reopening a file and running :e, and pressing d to delete the swap file.
如果您决定恢复交换文件,则可以通过重新打开文件并运行:e,并按d删除交换文件,以防止下次在Vim中打开文件时显示相同的消息。
By default, Vim creates files like < filename >.swp and .< filename >.swp in the same directory as the original file.
默认情况下,Vim会在与原始文件相同的目录中创建 .swp和。 .swp等文件。
If you don’t like your file system being littered by swap files, you can change this behavior by telling Vim to place all the swap files in a single directory.
如果您不喜欢交换文件占用文件系统,则可以通过告诉Vim将所有交换文件放在一个目录中来更改此行为。
To do so, add the following to your .vimrc:
为此,请将以下内容添加到.vimrc:
set directory=$HOME/.vim/swap//
If you’re on Windows, you should use
如果你在Windows上,你应该使用
set directory=%USERDATA%.vimswap//
(note the direction of the last two slashes).
(注意最后两个斜线的方向)。
You can also choose to disable the swap files completely by adding set noswapfile to your .vimrc.
Moving around: talk to your editor 四处走动:与编辑交谈
Vim allows you to navigate content a lot more efficiently than most conventional editors.
Vim允许您比大多数传统编辑器更有效地导航内容。
Let’s start with the basics.
让我们从基础开始。
You can move your cursor around character by character by using arrow keys or letters h, j, k, and l.
您可以使用箭头键或字母h,j,k和l逐个字符地移动光标。
This is the least efficient and the most precise way to move:
这是效率最低,最精确的移动方式:
| key | Alternative key 替代密钥 | Action 行动 |
|---|---|---|
| h | Left arrow | Move cursor left |
| j | Down arrow | Move cursor down |
| k | Up arrow | Move cursor up |
| l | Right arrow | Move cursor right |
The following diagram is a visual representation which might be a little easier on the eyes:
下图是一个视觉表示,可能会更容易在眼睛上:
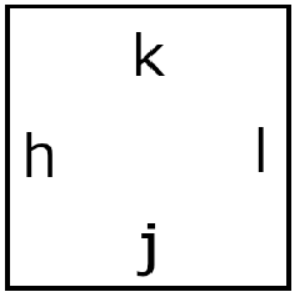
Vi (Vim’s predecessor) was created on an old ADM-3A terminal, which didn’t have arrow keys.
Vi(Vim的前身)是在旧的ADM-3A终端上创建的,该终端没有箭头键。
Keys h, j, k, and l were used as arrows.
键h,j,k和l用作箭头。

Try it! There’s a lot of value to getting used to hjkl for movement: your hands stay on the home row of your keyboard.
试试吧! 习惯hjkl移动有很多价值:你的手停留在键盘的主行上。
This way you don’t have to move your hands and it helps you stay in the flow.
这样你就不必动手了,它可以帮助你保持流畅。
Furthermore, many applications treat hjkl as arrow keys—you’d be surprised how many tools respond to these.
此外,许多应用程序将hjkl视为箭头键 - 您会惊讶地发现有多少工具响应这些。
Now you might be inclined to hit directional keys multiple times to get to a desired position, but there’s a better way!
现在你可能会多次按方向键来达到理想的位置,但是有更好的方法!
You can prefix every command by a number, which would repeat the command that number of times.
您可以为每个命令添加一个数字前缀,这将重复该命令的次数。
For example, hitting 5j will move the cursor five lines down, while hitting 14l will move the cursor 14 characters to the left.
例如,按5j将光标向下移动五行,而按下14l将光标向左移动14个字符。
This works with most commands you encounter in this book.
这适用于本书中遇到的大多数命令。
Calculating the exact number of characters you would like to move is pretty hard (and nobody wants to do it), so there’s a way to move by words.
计算你想要移动的确切字符数是非常困难的(没有人想要这样做),所以有一种方法可以按字词移动。
Use w to move to the beginning of the next word, and use e to get to the end of the closest word.
使用w移动到下一个单词的开头,并使用e到达最近单词的末尾。
To move backwards to the beginning of the word, hit b.
要向后移动到单词的开头,请按b。
You can also capitalize these letters to treat everything but a white space as a word!
您也可以将这些字母大写,以处理除白色空间之外的所有内容!
This allows you to differentiate between the kind of things you’d like to traverse.
这使您可以区分您想要遍历的事物。
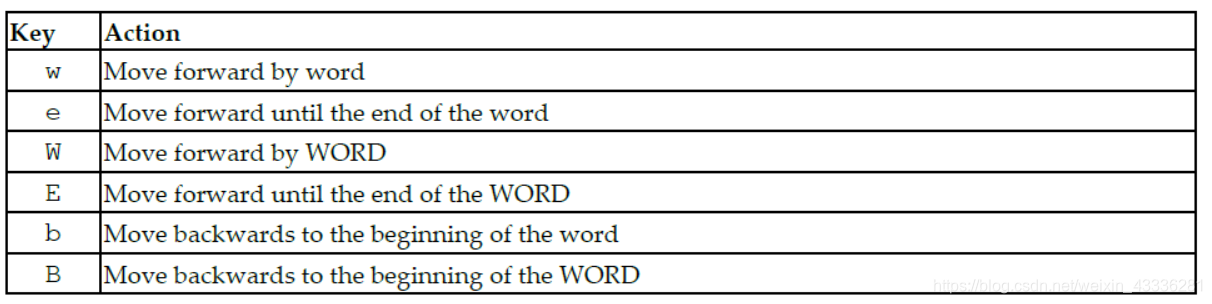
Vim has two kinds of word objects: referred to as lowercase “word” and uppercase “WORD”.
Vim有两种单词对象:称为小写“word”和大写“WORD”。
In Vim world, word is a sequence of letters, digits, and underscores separated by white space.
在Vim世界中,word是由空格分隔的字母,数字和下划线的序列。
WORD is a sequence of any non-blank characters separated by white space.
WORD是由空格分隔的任何非空白字符的序列。
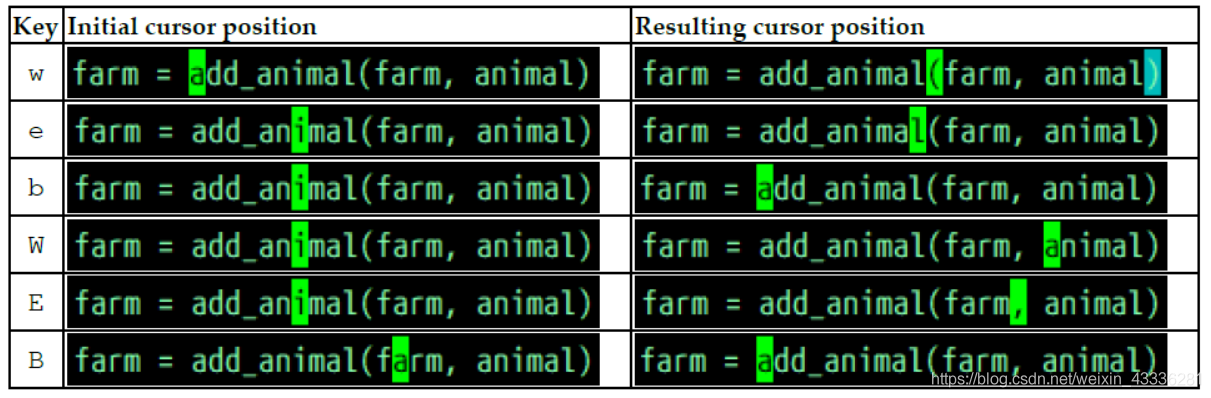
Let’s take the following line of code from our example:
让我们从我们的示例中获取以下代码行:

Notice the cursor position, it’s hovering over the first character of add_animal.
注意光标位置,它悬停在add_animal的第一个字符上。
Hitting w will move the cursor to beginning of the word add_animal, while hitting W will take you to the beginning of animal.
点击w会将光标移动到单词add_animal的开头,而点击W会将你带到动物的开头。
Capitalized W, E, and B will treat any characters bundled together and separated by a space as their own words.
大写的W,E和B将任何捆绑在一起并由空格分隔的字符视为他们自己的单词。
This can be seen in the following table:
这可以在下表中看到:
The following screenshot shows more examples of how each command behaves:
以下屏幕截图显示了每个命令行为的更多示例:
Combine the movements shown with the directional movements you learned earlier to move in fewer keystrokes!
将显示的运动与您之前学习的方向运动相结合,以减少击键次数!
It’s also really useful to move in paragraphs.
移入段落也非常有用。
Everything separated by at least two new lines is considered a paragraph, which also means each code block is a paragraph, as can be seen in the following example:
由至少两个新行分隔的所有内容都被视为段落,这也意味着每个代码块都是一个段落,如以下示例所示:
The functions add_animal and main are two separate paragraphs.
函数add_animal和main是两个单独的段落。
Use a closing curly brace } to move forward, and an opening curly brace { to move backwards as detailed in the following table:
使用右手大括号}向前移动,使用开口花括号{向下移动,如下表所示:

Don’t forget to combine these two with numbers if you need to move by more than one paragraph.
如果您需要移动多个段落,请不要忘记将这两者与数字组合在一起。
There are more ways to move around, but these are the most important basics.
有更多的移动方式,但这些是最重要的基础知识。
We’ll be covering more complex ways to navigate in chapter 2, Advanced Editing and Navigation.
我们将在第2章高级编辑和导航中介绍更复杂的导航方法。
Making simple edits in insert mode 在插入模式下进行简单编辑
When working with Vim, you usually want to spend as little time as possible in the insert mode (unless you’re writing and not editing).
在使用vim时,您通常希望在插入模式下花费尽可能少的时间(除非您正在编写而不是编辑)。
Since most text operations involve editing, we’ll focus on that.
因为大多数文本操作都涉及编辑,所以我们将重点关注这一点。
You’ve already learned to enter the insert mode by pressing i.
你已经学会了按i进入插入模式。
There are more ways to get to the insert mode.
有更多的方法可以进入插入模式。
Often times you will want to change some piece of text for another one, and there’s a command just for that c.
通常情况下,您会想为另一个文本更改一段文本,并且有一个命令只针对那个c。
The change command allows you to remove a portion of text and immediately enter an insert mode.
change命令允许您删除部分文本并立即进入插入模式。
Change is a compound command, meaning that it needs to be followed by a command which tells Vim what needs to be changed.
change是一个复合命令,意味着它后面需要跟着一个命令,该命令告诉vim需要更改什么。
You can combine it with any of the movement commands you’ve learned before.
你可以把它和你以前学过的任何动作命令结合起来。
Here are some examples:
下面是一些例子:
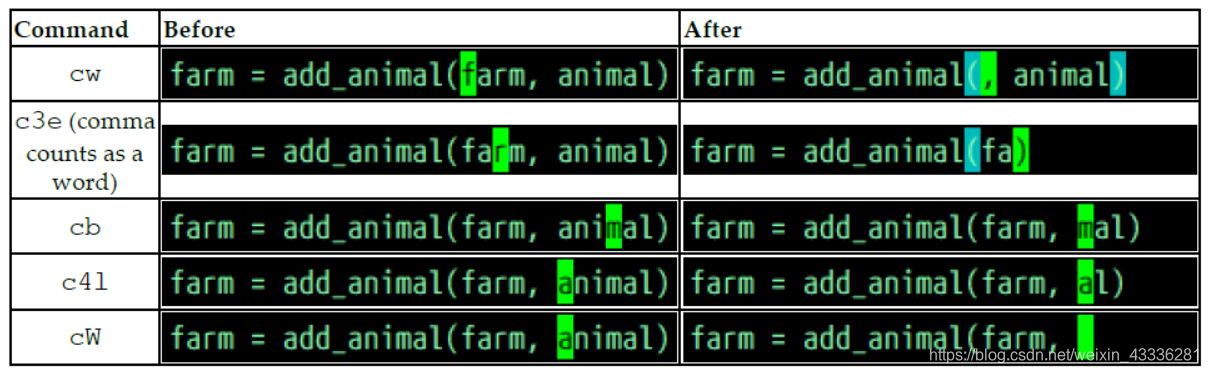
As an odd exception, cw behaves like ce.
作为一个奇怪的例外,cw的行为类似于ce。
This is a leftover from Vi, Vim’s predecessor.
这是Vim的前任Vi留下的。
As you learn more complex movements commands, you can combine these with a change for quick and seamless editing.
当您学习更复杂的动作命令时,可以将这些组合与快速和无缝编辑的更改相结合。
We’ll also be covering a few plugins which will supercharge a change command to allow for even more powerful editing, like changing text within braces, or replacing the type of quotes on the go.
我们还将介绍几个插件,这些插件将增强更改命令的功能,以便进行更强大的编辑,比如在大括号中更改文本,或者在运行时替换引号的类型。
All of these examples follow the < command > < number > < movement or a text object> structure.
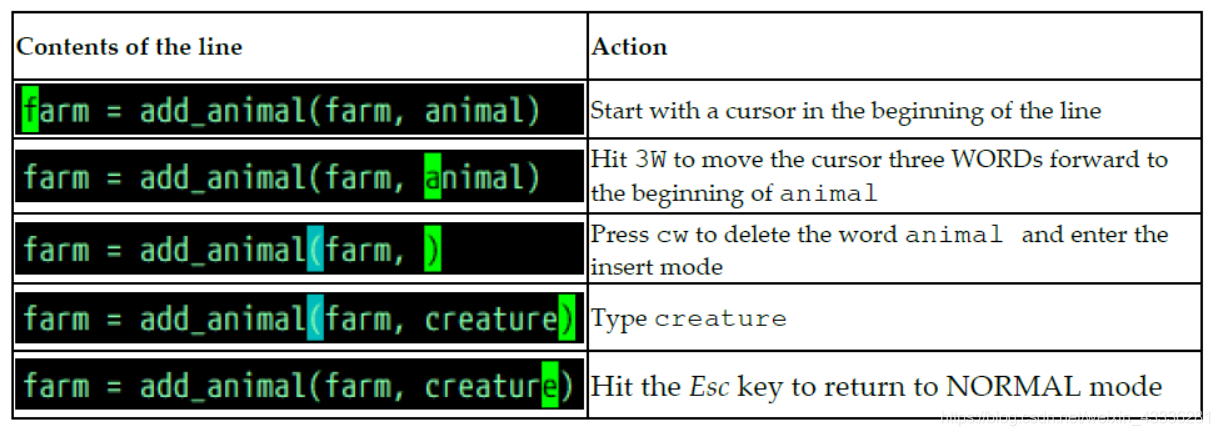
所有这些示例都遵循< command >< number ><movement或text object>结构。
You can put a number before or after the < command >.
你可以在<命令>之前或之后加上一个数字。
For example, if you wish to change farm = add_animal(farm, animal) to farm = add_animal(farm, creature), you can execute the following set of commands:
例如,如果你想改变 farm = add_animal(farm, animal)到farm = add_animal(farm, creature),你可以执行下面的命令集:
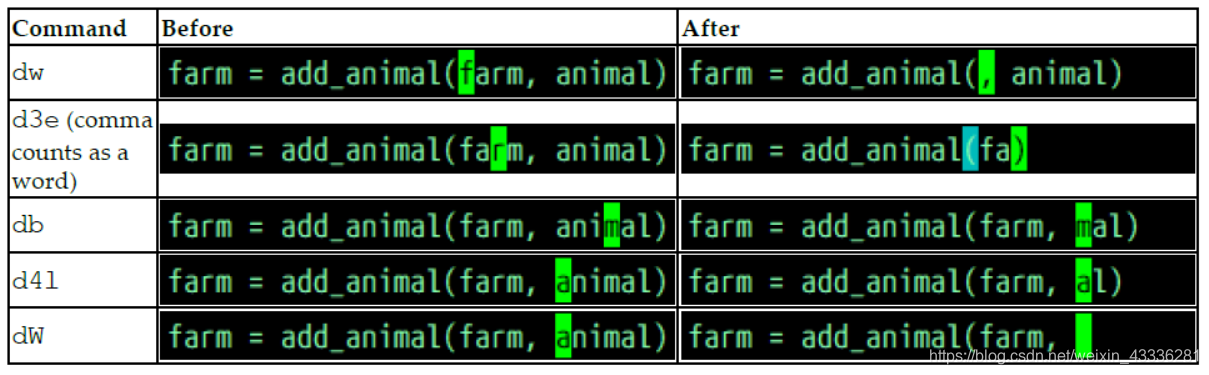
Sometimes we just want to cut things, without putting anything instead, and d does just that.
有时候我们只想切东西,不放东西,D就这么做了。
It stands for delete.
代表删除。
It behaves similarly to c, except that the behavior of w and e is more standard, as can be seen in the following example:
它的行为类似于C,除了W和E的行为更标准,如在下面的例子中可以看到的:
There are also two more nifty shortcuts which allow you to change or delete a whole line:
还有两个更漂亮的快捷方式允许您更改或删除整行:

For example, look at the following piece:
例如,请看以下部分:

By hitting dd you will completely remove a line, as demonstrated in the following example:
By hitting dd you will completely remove a line, as demonstrated in the following example:
按dd将完全删除一行,如下例所示:

Hitting cc will clear the line and enter insert mode with the proper indent, as shown in the following example:
点击“cc”将清除行并以适当的缩进进入插入模式,如下例所示:

If you run into difficulties picking the right movement commands, you can also use the visual mode to select text you want to modify.
如果在选择正确的移动命令时遇到困难,也可以使用视觉模式选择要修改的文本。
Hit v to enter the visual mode and use the usual movement commands to adjust the selection.
按v键进入视觉模式,并使用常用的移动命令调整选择。
Run the desired command (like c to change or d to delete) once you’re satisfied with the selection.
当您对所选内容满意时,运行所需的命令(如C更改或D删除)。
Persistent undo and repeat 持久撤消并重复
Like any editor, Vim keeps track of every operation.
像任何一个编辑器一样,vim跟踪每一个操作。
Press u to undo a last operation, and Ctrl + r to redo it.
按U键撤消上一个操作,按CTRL+R键重新执行。
To learn more about Vim’s undo tree (Vim’s undo history is not linear!) and how to navigate it, see chapter 4, Advanced Workflows.
进一步了解vim的撤销树(vim的撤销历史不是线性的!)以及如何导航,请参阅第4章,高级工作流。
Vim also allows you to persist undo history between sessions, which is great if you want to undo (or remember) something you’ve done a few days ago!
vim还允许您在会话之间持久化撤销历史记录,如果您想撤销(或记住)几天前所做的事情,这是非常好的!
You can enable persistent undo by adding the following line to your .vimrc:
通过向您的.VIMRC添加以下行,可以启用持久撤消:
set undofile
However, this will litter your system with an undo file for each file you’re editing.
但是,这会给您的系统中的每个正在编辑的文件添加一个撤消文件。
You can consolidate the undo files in a single directory, as seen in the following example:
可以在单个目录中合并撤消文件,如下面的示例所示:
" Set up persistent undo across all files.
set undofile
if !isdirectory("$HOME/.vim/undodir")
call mkdir("$HOME/.vim/undodir", "p")
endif
set undodir="$HOME/.vim/undodir"
If you’re using Windows, replace the directories with %USERPROFILE%_vimundodir (and you’ll be making changes to _vimrc instead of .vimrc).
如果您使用的是windows,请将目录替换为%userprofile%u vimundodir(并且您将更改为u vimrc而不是.vimrc)。
Now, you’ll be able to undo and redo your changes across sessions.
现在,您可以在会话之间撤消和重做更改。
Read the Vim manual using :help 使用:help阅读Vim手册
The best learning tool Vim can offer is certainly a :help command, as can be seen in the following screenshot:
VIM所能提供的最好的学习工具肯定是:帮助命令,正如下面截图中可以看到的:
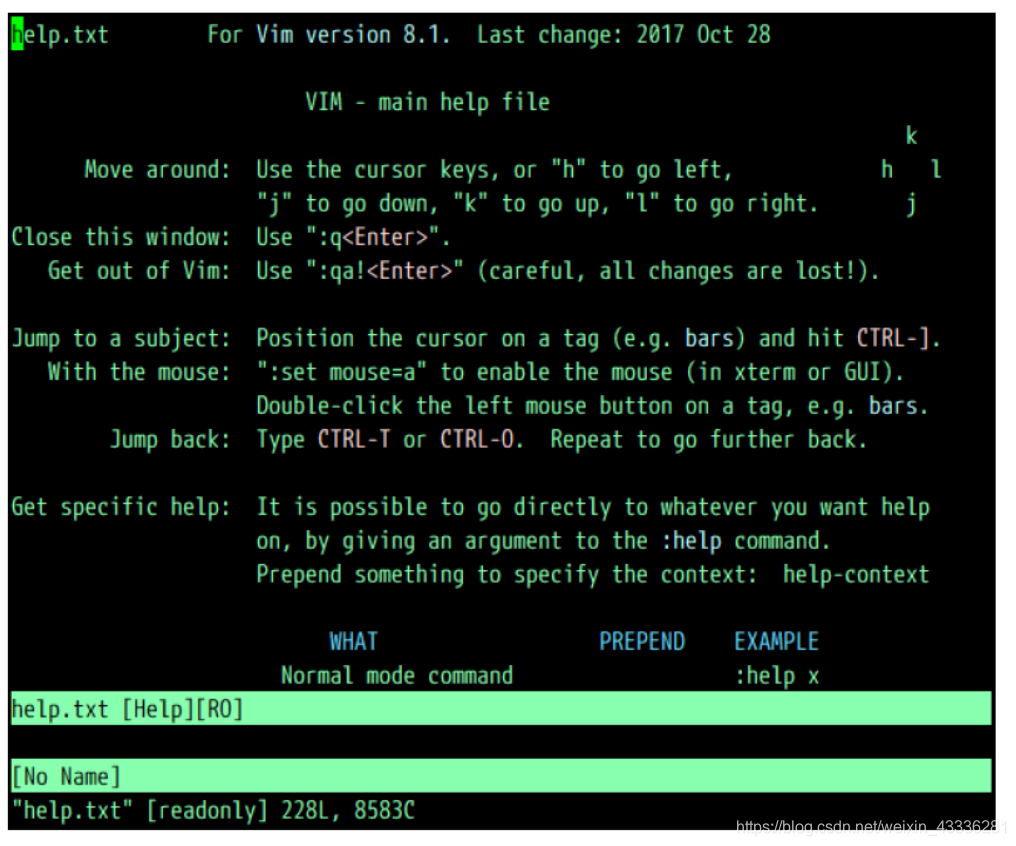
It’s an enormous collection of resources and tutorials which comes installed with Vim.
这是一个巨大的资源和教程的集合,随vim一起安装。
Scroll through using the Page Up and Page Down keys (bonus point for using Ctrl + b and Ctrl + f respectively), there is a lot of useful information there.
使用向上翻页和向下翻页键(分别使用ctrl+b和ctrl+f的优点)滚动,这里有很多有用的信息。
Whenever you are stuck, or want to learn more about a particular command, try searching it using :help (you can shorten it to :h). Let’s try searching for a cc command we’ve learned :
每当你被困,或想了解更多关于一个特定的命令,尝试搜索使用:help(你可以缩短它到:h)。让我们尝试搜索已学习的cc命令:
:h cc
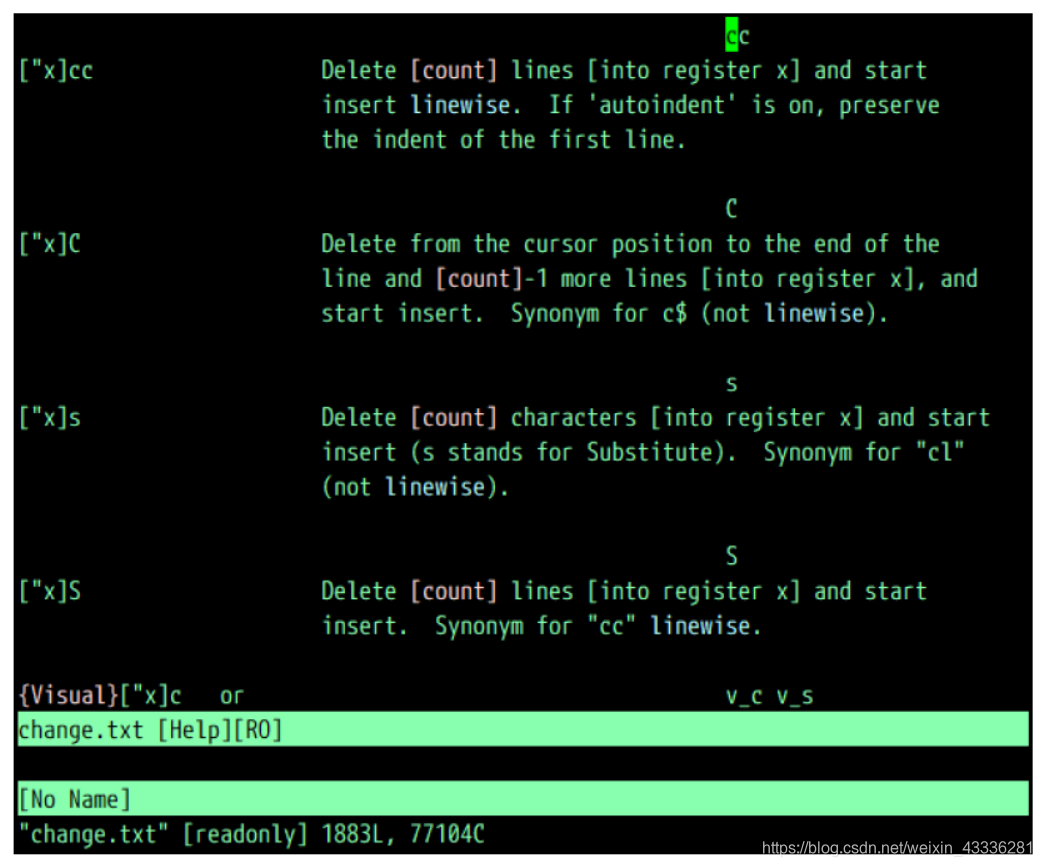
Help tells us the way the command works, as well as how different options and settings affect the command (for instance autoindent setting preserves the indentation).
帮助告诉我们命令的工作方式,以及不同的选项和设置如何影响命令(例如,自动缩进设置保留缩进)。
:help is a command which navigates a set of help files.
:help是导航一组帮助文件的命令。
As you look through the help files, you’ll notice that certain words are highlighted in color.
当您浏览帮助文件时,您会注意到某些单词以颜色突出显示。
These are tags, and can be searched for using the :help command.
这些是标签,可以使用“帮助”命令进行搜索。
Unfortunately, not every tag name is intuitive.
不幸的是,并不是每个标签名都是直观的。
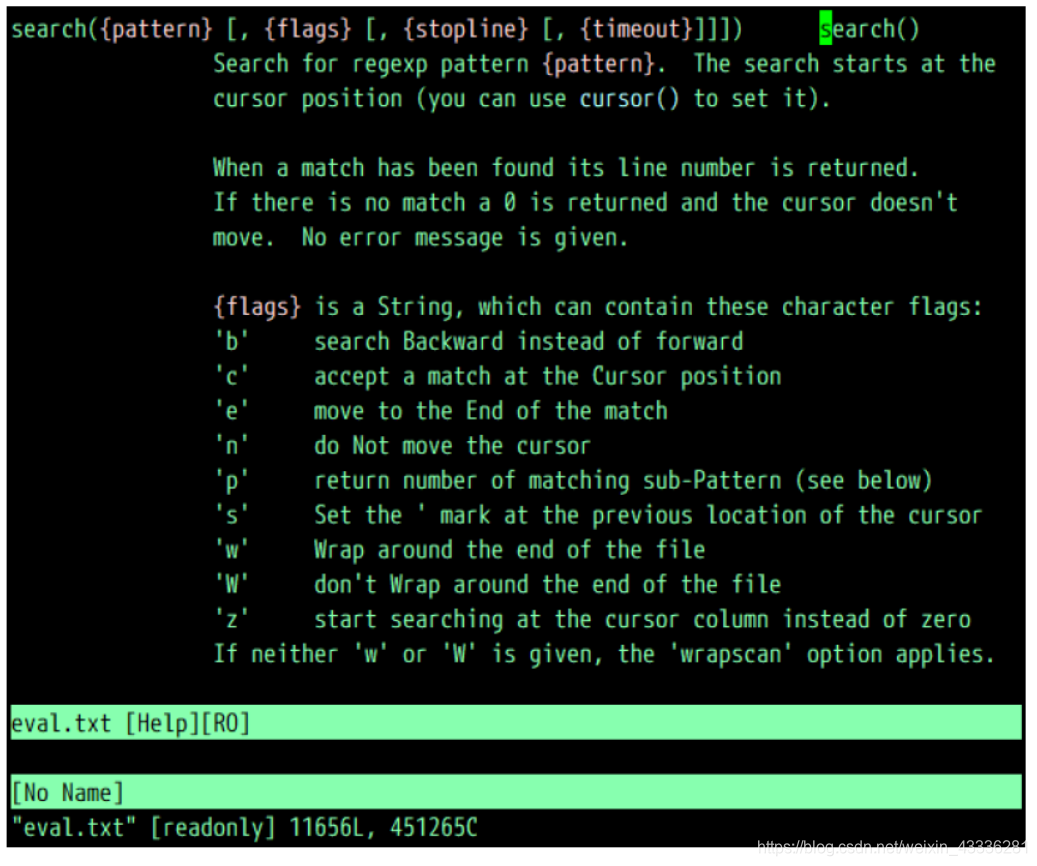
For instance, if we wanted to learn how to search for a string in Vim, we could try using the following:
例如,如果我们想学习如何在vim中搜索字符串,可以尝试使用以下方法:
:h search
However, it looks like this command takes us to the entry on expression evaluation, which is not exactly what we were looking for, as demonstrated by the following screenshot:
但是,这个命令似乎会将我们带到表达式求值的条目,正如下面的屏幕截图所示,这并不是我们要查找的内容:
To find the right entry, type in :h search (don’t hit Enter yet) followed by Ctrl + D.
要找到正确的条目,请键入:h search(还没有按enter键),然后按ctrl+d。
This will give you a list of help tags containing the substring search.
这将为您提供包含子字符串搜索的帮助标记列表。
One of the options shown is search-commands which is what we’d be looking for.
显示的选项之一是search-commands,这是我们要寻找的。
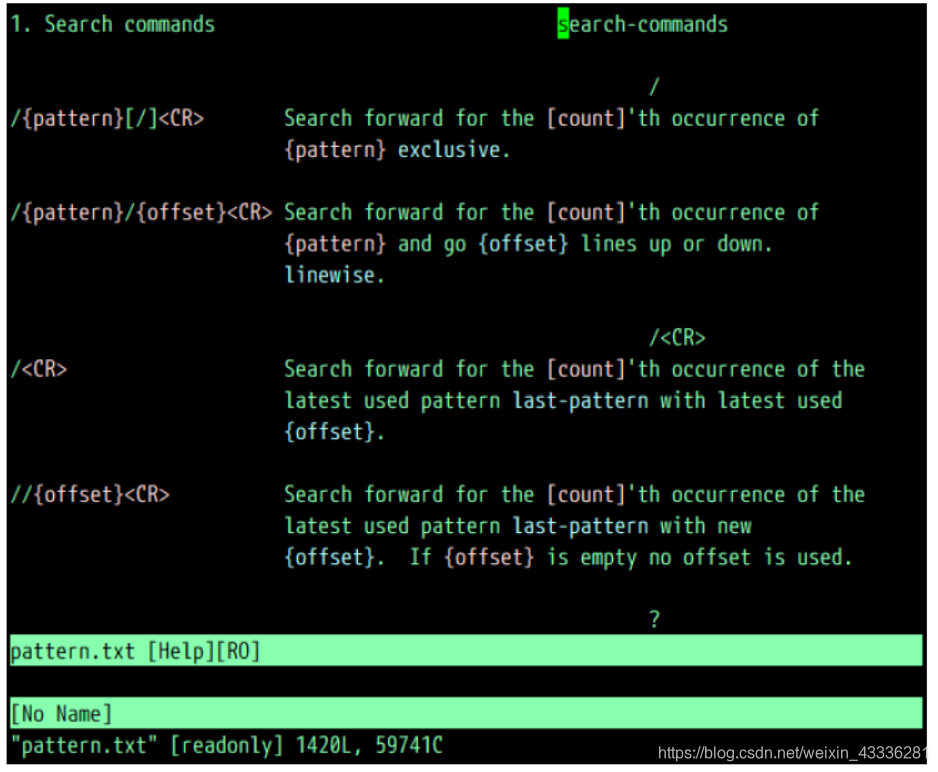
Complete your command in the following way to get to the entry we were looking for:
按以下方式完成您的命令,以进入我们正在查找的条目:
:h search-commands
The following display shows the right help entry for search:
以下显示显示了搜索的正确帮助条目:
Speaking of search functionality, you can search inside help pages (or any file open in Vim) using /search term to search forward from the cursor or ?search term to search backward.
说到搜索功能,你可以使用“搜索”来搜索内部帮助页面(或者在VIM中打开的任何文件),以从光标向前搜索或者?搜索词以向后搜索。
See Chapter 2 , Advanced Editing and Navigation, to learn more about how to perform search operations.
有关如何执行搜索操作的详细信息,请参阅第2章“高级编辑和导航”。
Don’t forget to use Vim’s help system any time you have questions or want to better understand the way Vim behaves.
当您有问题或者希望更好地理解vim的行为方式时,不要忘记使用vim的帮助系统。
Summary 摘要
The original Vi was developed to work through remote terminals, when bandwidth and speed were limited.
最初的vi是在带宽和速度受限的情况下通过远程终端工作的。
These limitations guided Vi towards establishing an efficient and deliberate editing process, which is what’s at the core of Vim—Vi Improved today.
这些限制引导vi建立一个高效和深思熟虑的编辑过程,这是今天改进的vim vi的核心。
In this chapter, you’ve learned how to install and update Vim and it’s graphical counterpart—GVim, on every major platform (in more ways than you will ever need).
在本章中,您已经学习了如何在每个主要平台上安装和更新vim及其图形对应的gvim(以比您需要的更多的方式)。
You’ve learned to configure your Vim through tinkering with .vimrc, which is something you will often go back to as you customize the editor for your own needs.
您已经学会了通过修补.vimrc来配置vim,这是您根据自己的需要定制编辑器时经常会返回到的地方。
You’ve picked up the basics of working with files, moving around Vim, and making changes.
您已经掌握了使用文件、在vim中移动和进行更改的基本知识。
Vim’s concept of text objects (letters, words, paragraphs) and composite commands (like d2w - delete 2 words) empower precise text operations.
vim的文本对象(字母、单词、段落)和复合命令(比如d2w-delete 2 words)的概念支持精确的文本操作。
And if there’s one thing you could take away from this chapter, it would be :help.
如果你能从这一章中得到什么,那就是:帮助。
Vim’s internal help system is incredibly detailed, and it can answer most, if not every, question you might have, as long as you know what you’re looking for.
vim的内部帮助系统非常详细,只要你知道你在寻找什么,它就可以回答你可能遇到的大多数问题,如果不是全部的话。
In the next chapter, we’ll be looking into getting more out of Vim.
在下一章中,我们将研究从vim中获取更多信息。
You’ll learn how to navigate files and get better at editing text.
您将学习如何浏览文件并更好地编辑文本。