概述
RabbitMQ是一种消息队列,它接收并转发消息。
官方例子:可以把RabbitMQ视为一个邮局,将要发布的邮件放在邮箱中,通过邮递员传递给收件人。
但是又有区别二者:RabbitMQ不处理,只做接收,存储和转发数据消息的中间介质
实现最简单的队列通信
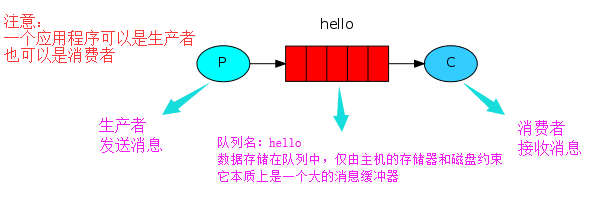
producer_sender.py
 1 #!/usr/bin/env python
 2 # -*- coding:utf-8 -*-
 3
 4 import pika
 5
 6 credentials = pika.PlainCredentials('admin', 'admin123456')
 7 connection = pika.BlockingConnection(pika.ConnectionParameters(host='192.168.1.13', credentials=credentials))
 8 # 建立通道
 9 channel = connection.channel()
10 # 如果将消息发送到不存在的位置,RabbitMQ会删除该消息,创建消息队列叫hello
11 channel.queue_declare(queue='hello')
12 # 发消息了,在RabbitMQ中永远无法将消息直接发送到队列中,它始终需要进行交换(不理解这是为毛线?)
13 # 在这里使用空字符串标识的默认交换,准确的将指定消息放入队列中routing_key来指定
14 channel.basic_publish(exchange='',
15                       routing_key='hello',
16                       body='Hello World!')
17
18 print('[x]发送hello word')
19 # 在关闭连接之前,需要确保缓冲区已刷新消息是否已经传到消息队列中
20 connection.close()
consumer_recv.py
 1 #!/usr/bin/env python
 2 # -*- coding:utf-8 -*-
 3
 4 import pika
 5
 6 credentials = pika.PlainCredentials('admin', 'admin123456')
 7 connection = pika.BlockingConnection(pika.ConnectionParameters(host='192.168.1.13', credentials=credentials))
 8 channel = connection.channel()
 9 #  在此再次申明一次是因为当我们不确定运行哪个程序,在这种情况下,最好在两个程序中重复声明队列
10 channel.queue_declare('hello')
11
12
13 def callback(ch, method, properties, body):
14     """收消息原理:向队列定义一个回调函数,无论何时接收消息,都由Pika库调用"""
15     print('[x] Received %r' % body)
16     print(ch)
17     print(method)
18     print(properties)
19
20
21 # 告诉rabbitmq这个特定的回调函数应该接收来自hello队列的消息
22 channel.basic_consume(queue='hello',
23                       auto_ack=True,
24                       on_message_callback=callback)
25 print(' [*] Waiting for messages.')
26 # 这里只要消费者一直存在通道之上,就一直死循环,源码当中有说明
27 channel.start_consuming()
这里注意首次运行要报错,报错内容如下(因为我在这里是远程连接需要认证证书)

在此时就要看下源码参数设置
 1 def __init__( # pylint: disable=R0913,R0914
 2         self,
 3         host=_DEFAULT,  # 默认'localhost'
 4         port=_DEFAULT,  # 5672
 5         virtual_host=_DEFAULT, # 使用rabbitmq虚拟主机,源码中还做了一次判断
 6             if virtual_host is not self._DEFAULT:
 7                 self.virtual_host = virtual_host
 8         credentials=_DEFAULT, # auth凭证
 9         channel_max=_DEFAULT, # 允许的最大的通道数
10         frame_max=_DEFAULT,   # AMQP帧的最大字节大小 数据链路层的最小传输单位称为帧 为什么要有帧?就是为了保证数据的可靠传输把数据封装成帧了
11         heartbeat=_DEFAULT,   # 默认是None
12         ssl_options=_DEFAULT, # 默认是None
13         connection_attempts=_DEFAULT, #最大重试连接次数默认1次
14         retry_delay=_DEFAULT, # 在几秒钟内就要等待,在之后的那一刻就不等待了 默认2.0秒
15         socket_timeout=_DEFAULT, # socket连接超时 默认10s
16         stack_timeout=_DEFAULT,  # (TCP/[SSL]/AMQP)协议栈超时 建议要比socket_timeout大 默认15s
17         locale=_DEFAULT,         # 默认'en_US'
18         blocked_connection_timeout=_DEFAULT, #默认None 如果不是None,连接保持阻塞(由连接触发)。阻止代理);如果超时在连接解除阻塞之前过期,连接将被断开
19         client_properties=_DEFAULT,  # 默认None 或dict的客户端属性使用覆盖报告给的默认客户端属性中的字段RabbitMQ通过“Connection.StartOk”方法。
20         tcp_options=_DEFAULT,        # 默认None 为套接字设置一个或没有TCP选项的dict
21         **kwargs):
22     """Create a new ConnectionParameters instance. See `Parameters` for
23     default values.
24
25     :param str host: Hostname or IP Address to connect to
26     :param int port: TCP port to connect to
27     :param str virtual_host: RabbitMQ virtual host to use
28     :param pika.credentials.Credentials credentials: auth credentials
29     :param int channel_max: Maximum number of channels to allow
30     :param int frame_max: The maximum byte size for an AMQP frame
31     :param int|None|callable heartbeat: Controls AMQP heartbeat timeout negotiation
32         during connection tuning. An integer value always overrides the value
33         proposed by broker. Use 0 to deactivate heartbeats and None to always
34         accept the broker's proposal. If a callable is given, it will be called
35         with the connection instance and the heartbeat timeout proposed by broker
36         as its arguments. The callback should return a non-negative integer that
37         will be used to override the broker's proposal.
38     :param `pika.SSLOptions`|None ssl_options: None for plaintext or
39         `pika.SSLOptions` instance for SSL/TLS. Defaults to None.
40     :param int connection_attempts: Maximum number of retry attempts
41     :param int|float retry_delay: Time to wait in seconds, before the next
42     :param int|float socket_timeout: Positive socket connect timeout in
43         seconds.
44     :param int|float stack_timeout: Positive full protocol stack
45         (TCP/[SSL]/AMQP) bring-up timeout in seconds. It's recommended to
46         set this value higher than `socket_timeout`.
47     :param str locale: Set the locale value
48     :param int|float|None blocked_connection_timeout: If not None,
49         the value is a non-negative timeout, in seconds, for the
50         connection to remain blocked (triggered by Connection.Blocked from
51         broker); if the timeout expires before connection becomes unblocked,
52         the connection will be torn down, triggering the adapter-specific
53         mechanism for informing client app about the closed connection:
54         passing `ConnectionBlockedTimeout` exception to on_close_callback
55         in asynchronous adapters or raising it in `BlockingConnection`.
56     :param client_properties: None or dict of client properties used to
57         override the fields in the default client properties reported to
58         RabbitMQ via `Connection.StartOk` method.
59     :param tcp_options: None or a dict of TCP options to set for socket
60     """
默认是连接的localhost主机,需要从新增加用户并设置权限即可
运行结果
1 D:pythonpython.exe F:/abc/messagequeue/consumer_recv.py
2  [*] Waiting for messages.
3 [x] Received b'Hello World!'
4 <BlockingChannel impl=<Channel number=1 OPEN conn=<SelectConnection OPEN transport=<pika.adapters.utils.io_services_utils._AsyncPlaintextTransport object at 0x00000171F0AF17B8> params=<ConnectionParameters host=192.168.1.13 port=5672 virtual_host=/ ssl=False>>>>
5 <Basic.Deliver(['consumer_tag=ctag1.1830cf91aad94871b0ed054af1f71e3d', 'delivery_tag=1', 'exchange=', 'redelivered=False', 'routing_key=hello'])>
6 <BasicProperties>