目录
1 下载
从vscode官网下载最新版本,deb包下载地址:https://code.visualstudio.com/Download
2. 安装:dpkg -i 安装包
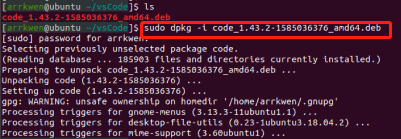
3 执行code 打开vscode
如果无法启动,执行
sudo apt-get install libgconf-2-4
//从这一步开始和windows安装完全一样。

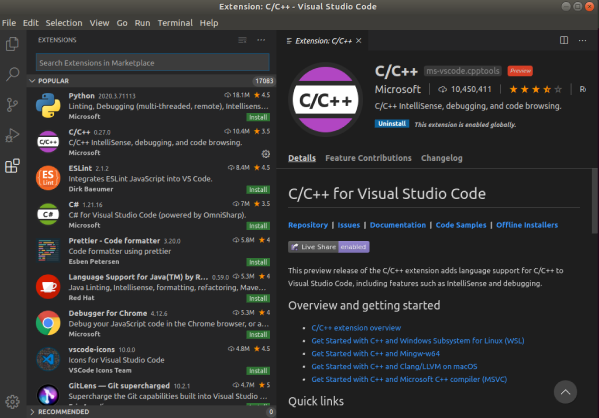
4 ctrl+shift+x 打开插件栏,安装c++
4.1 安装clang和c/c++ Clang Command Adapter
5 创建launch.json
新建文件夹code_c_c++,并打开,提示创建launch.json,点击创建

然后会弹出来一个launch.json文件,把里面的所有内容全部替换如下,具体内容请查看文末。

6 创建Tasks.json
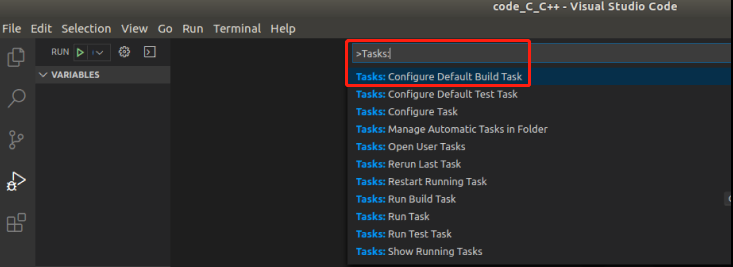
ctrl+shift+P打开Command Palette,输入Tasks: Configure Default Build Task → 使用模版创建Tasks.json文件 → Others:
然后会弹出来一个launch.json文件,把里面的所有内容全部替换成下面这些:
7 创建c_cpp_properties.json
ctrl+shift+P打开Command Palette,输入C/Cpp: Edit configurations...生成c_cpp_properties.json:

内容为:

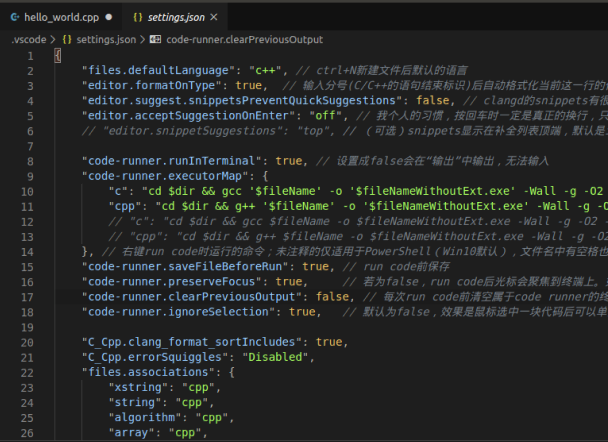
8 创建setting.json
ctrl+shift+P打开Command Palette,输入setting,选择open setting.json

内容替换为
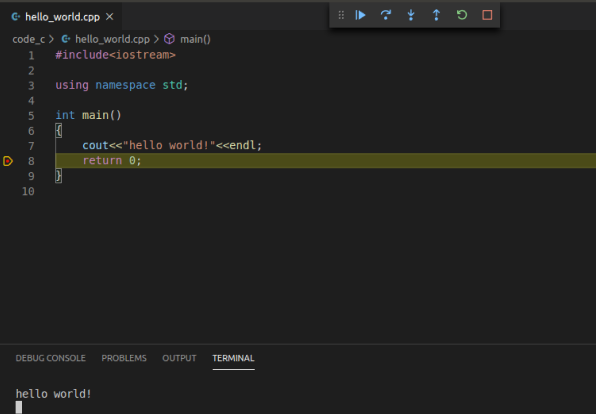
9 新建code文件夹, 编写helloworld.cpp程序测试,F5调试一下:

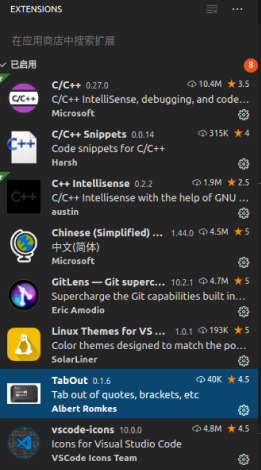
10 安装插件
以下是我觉得还不错的插件:
11 自定义快捷键
1 调出键盘快捷键方式 Ctrl+k,Ctrl+s
2 搜索对应的command
3 右击修改快捷方式+enter保存
待补充
12 配置vim
13 配置git
josn文件内容
launch.json
{
    // Use IntelliSense to learn about possible attributes.
    // Hover to view descriptions of existing attributes.
    // For more information, visit: https://go.microsoft.com/fwlink/?linkid=830387
    "version": "0.2.0",
    "configurations": [
        {
            "name": "(gdb) Launch", // 配置名称,将会在启动配置的下拉菜单中显示
            "type": "cppdbg", // 配置类型,这里只能为cppdbg
            "request": "launch", // 请求配置类型,可以为launch(启动)或attach(附加)
            "program": "${fileDirname}/${fileBasenameNoExtension}.out", // 将要进行调试的程序的路径
            "args": [], // 程序调试时传递给程序的命令行参数,一般设为空即可
            "stopAtEntry": false, // 设为true时程序将暂停在程序入口处,我一般设置为true
            "cwd": "${workspaceFolder}", // 调试程序时的工作目录
            "environment": [],
            "externalConsole": false, // 调试时是否显示控制台窗口,一般设置为true显示控制台,
                                      // 但是最新版cpptools有BUG,具体请看文末的注意
            "internalConsoleOptions": "neverOpen", // 如果不设为neverOpen,调试时会跳到“调试控制台”选项卡,你应该不需要对gdb手动输命令吧?
            "MIMode": "gdb", // 指定连接的调试器,可以为gdb或lldb。但目前lldb在windows下没有预编译好的版本。
            "miDebuggerPath": "gdb", // 调试器路径,Windows下后缀不能省略,Linux下则去掉
            "setupCommands": [ // 用处未知,模板如此
                {
                    "description": "Enable pretty-printing for gdb",
                    "text": "-enable-pretty-printing",
                    "ignoreFailures": false
                }
            ],
            "preLaunchTask": "Compile" // 调试会话开始前执行的任务,一般为编译程序。与tasks.json的label相对应
        }
    ]
}
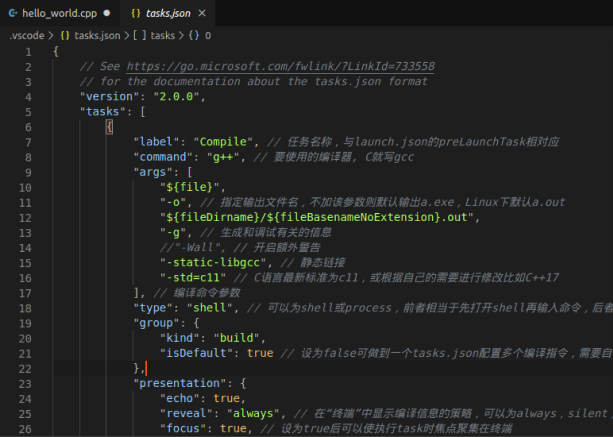
tasks.json
{
    // See https://go.microsoft.com/fwlink/?LinkId=733558
    // for the documentation about the tasks.json format
    "version": "2.0.0",
    "tasks": [
        {
            "label": "Compile", // 任务名称,与launch.json的preLaunchTask相对应
            "command": "g++", // 要使用的编译器, C就写gcc
            "args": [
                "${file}",
                "-o", // 指定输出文件名,不加该参数则默认输出a.exe,Linux下默认a.out
                "${fileDirname}/${fileBasenameNoExtension}.out",
                "-g", // 生成和调试有关的信息
                //"-Wall", // 开启额外警告
                "-static-libgcc", // 静态链接
                "-std=c11" // C语言最新标准为c11,或根据自己的需要进行修改比如C++17
            ], // 编译命令参数
            "type": "shell", // 可以为shell或process,前者相当于先打开shell再输入命令,后者是直接运行命令
            "group": {
                "kind": "build",
                "isDefault": true // 设为false可做到一个tasks.json配置多个编译指令,需要自己修改本文件,我这里不多提
            },
            "presentation": {
                "echo": true,
                "reveal": "always", // 在“终端”中显示编译信息的策略,可以为always,silent,never。具体参见VSC的文档
                "focus": true, // 设为true后可以使执行task时焦点聚集在终端
                "panel": "shared" // 不同的文件的编译信息共享一个终端面板
            },
            //"problemMatcher": "$gcc"
        }
    ]
}
c_cpp_properties.json
{
    "configurations": [
        {
            "name": "Linux",
            "includePath": [
                "${workspaceFolder}/**"
            ],
            "defines": [],
            "compilerPath": "/usr/bin/clang",
            "cStandard": "c11",
            "cppStandard": "c++17",
            "intelliSenseMode": "clang-x64"
        }
    ],
    "version": 4
}
setting.json
{
    "files.defaultLanguage": "c++", // ctrl+N新建文件后默认的语言
    "editor.formatOnType": true,  // 输入分号(C/C++的语句结束标识)后自动格式化当前这一行的代码
    "editor.suggest.snippetsPreventQuickSuggestions": false, // clangd的snippets有很多的跳转点,不用这个就必须手动触发Intellisense了
    "editor.acceptSuggestionOnEnter": "off", // 我个人的习惯,按回车时一定是真正的换行,只有tab才会接受Intellisense
    // "editor.snippetSuggestions": "top", // (可选)snippets显示在补全列表顶端,默认是inline

    "code-runner.runInTerminal": true, // 设置成false会在“输出”中输出,无法输入
    "code-runner.executorMap": {
        "c": "cd $dir && gcc '$fileName' -o '$fileNameWithoutExt.exe' -Wall -g -O2 -static-libgcc -std=c11 -fexec-charset=GBK && &'$dir$fileNameWithoutExt'",
        "cpp": "cd $dir && g++ '$fileName' -o '$fileNameWithoutExt.exe' -Wall -g -O2 -static-libgcc -std=c++17 -fexec-charset=GBK && &'$dir$fileNameWithoutExt'"
        // "c": "cd $dir && gcc $fileName -o $fileNameWithoutExt.exe -Wall -g -O2 -static-libgcc -std=c11 -fexec-charset=GBK && $dir$fileNameWithoutExt",
        // "cpp": "cd $dir && g++ $fileName -o $fileNameWithoutExt.exe -Wall -g -O2 -static-libgcc -std=c++17 -fexec-charset=GBK && $dir$fileNameWithoutExt"
    }, // 右键run code时运行的命令;未注释的仅适用于PowerShell(Win10默认),文件名中有空格也可以编译运行;注释掉的适用于cmd(win7默认),PS和bash也能用,但文件名中有空格时无法运行
    "code-runner.saveFileBeforeRun": true, // run code前保存
    "code-runner.preserveFocus": true,     // 若为false,run code后光标会聚焦到终端上。如果需要频繁输入数据可设为false
    "code-runner.clearPreviousOutput": false, // 每次run code前清空属于code runner的终端消息,默认false
    "code-runner.ignoreSelection": true,   // 默认为false,效果是鼠标选中一块代码后可以单独执行,但C是编译型语言,不适合这样用

    "C_Cpp.clang_format_sortIncludes": true,
    "C_Cpp.errorSquiggles": "Disabled",
    "files.associations": {
        "xstring": "cpp",
        "string": "cpp",
        "algorithm": "cpp",
        "array": "cpp",
        "atomic": "cpp",
        "cctype": "cpp",
        "clocale": "cpp",
        "cstdarg": "cpp",
        "cstddef": "cpp",
        "cstdint": "cpp",
        "cstring": "cpp",
        "cwchar": "cpp",
        "cwctype": "cpp",
        "deque": "cpp",
        "exception": "cpp",
        "fstream": "cpp",
        "initializer_list": "cpp",
        "iosfwd": "cpp",
        "iterator": "cpp",
        "limits": "cpp",
        "list": "cpp",
        "memory": "cpp",
        "new": "cpp",
        "queue": "cpp",
        "sstream": "cpp",
        "stdexcept": "cpp",
        "system_error": "cpp",
        "tuple": "cpp",
        "type_traits": "cpp",
        "typeinfo": "cpp",
        "unordered_map": "cpp",
        "utility": "cpp",
        "vector": "cpp",
        "xfacet": "cpp",
        "xhash": "cpp",
        "xlocale": "cpp",
        "xlocinfo": "cpp",
        "xmemory": "cpp",
        "xmemory0": "cpp",
        "xstddef": "cpp",
        "xtr1common": "cpp",
        "xutility": "cpp",
        "*.tcc": "cpp",
        "cmath": "cpp",
        "cstdio": "cpp",
        "cstdlib": "cpp",
        "memory_resource": "cpp",
        "optional": "cpp",
        "string_view": "cpp",
        "iostream": "cpp",
        "istream": "cpp",
        "ostream": "cpp",
        "streambuf": "cpp",
        "stack": "cpp"
    }, // 格式化时调整include的顺序(按字母排序)
}