本文为本人原创,如需转载请注明出处!
为期五天的实训结束了,其实算起来除去机房被占用顶多四天多一点。
来给我们做培训的是优才学院(没有打广告的意思,本着实事求是的态度),老师很有耐心,确实学到很多东西。
今天刚结束我想趁热打铁赶紧写一份总结,近两天总结完(明天考两门考研大科我怎能安心更博客啊!)。
(代码都是自己照着老师的敲的依照个人喜好略有改动,数据库是老师给的,如果有侵权的地方,请联系我,我将立即删掉。)
简单记录一下五天的内容 重要的是做一个微票的微信小程序。
微信小程序4月份的时候我研究过, 还买了本书(建议不要买书,这个东西改朝换代很快的,而且不像java那么难学),每次登陆开发者工具都有更新, 还有更新日志,发展很迅猛。主要是轻量级的,简易方便。打算暑假做比赛有余力就再写个小程序(上一届比赛肯定是没有这个东西的)。虽然学过,但经过老师一讲,果然!自己看书跟有老师带着就是不一样!!
第一天下午+第二天上午 飞机大战游戏 截图如下
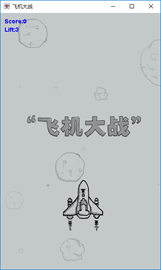


不是特别难,重要的是理清逻辑。
编译器是eclipse jdk8
第二天下午 数据库等基本操作 不做详细记录 但作为后期基础
第三天 json的生成 此处详细记录,后期的基础
1、
首先创建项目导入gson包 https://pan.baidu.com/s/1c2GiCRQ百度云
和mysql-connector包http://pan.baidu.com/s/1nvlyklV
配置文件(右击项目 buil path add jars)
三个sql文件wp,wp_image, wp_cinema http://pan.baidu.com/s/1pLylqFx导入到数据库中
创建这几个包 bean:实体类 biz:控制层也就是业务逻辑层
Dao:访问数据库的方法 servlet:服务器 util:数据库工具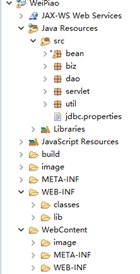
2、 在bean里创建一个WeiPiao的实体类,代码不做展示,照着数据库表的写出成员,其他的构造和getset一键生成。不要把id放到构造函数里!总之不要让id参与进来否则会很 麻烦
a.先搞数据库(无论是什么项目,先把数据库搞通)properties那里边:
jdbcDriver = com.mysql.jdbc.Driver
jdbcUrl = jdbc:mysql://localhost:3306/你的数据库名?user=你的数据库用户名&password=密码
b.util里创建PropertiesUtil类,以下只写类里的方法和必要的成员变量
 public static String getValue(String key,String proName){

         String value = null;

         Properties p = new Properties();

         String path = PropertiesUtil.class.getResource("/").getPath();

         try {

           p.load(new FileInputStream(new File(path,proName)));

           value = p.getProperty(key);

       } catch (FileNotFoundException e) {

           e.printStackTrace();

       } catch (IOException e) {

           e.printStackTrace();

       }

       return value;

    }
和DBUtil类
public static Connection getConn(){

       Connection conn  =null;

       try {

           Class.forName("com.mysql.jdbc.Driver");


           conn =

                  DriverManager.getConnection("jdbc:mysql://localhost:3306/test?user=root&password=123456");

       } catch (Exception e) {

           e.printStackTrace();

       }

       return conn;

    }


    public static void closeAll(Connection conn,PreparedStatement ps,ResultSet rs){

       try {

           if (rs!=null) {

              rs.close();

           }

       } catch (SQLException e) {

           e.printStackTrace();

       }

       try {

           if (ps!=null) {

              ps.close();

           }

       } catch (SQLException e) {

           e.printStackTrace();

       }

       try {

           if (conn!=null) {

              conn.close();

           }

       } catch (SQLException e) {

           e.printStackTrace();

       }

    }
c.
dao包里创建一个InfoDao接口和InfoDaoImpl实现类
就一个方法:
public List<WeiPiao> getAll()

Connection conn=null;

       PreparedStatement ps=null;

       ResultSet rs=null;

       List<WeiPiao> list = new ArrayList<WeiPiao>();

       try {

           conn=(Connection) DBUtils.getConn();

           ps=conn.prepareStatement("select * from wp");

           rs=ps.executeQuery();

           //遍历结果对象,获取对应字段的数据

           while(rs.next()){

              String image=rs.getString("image");

              String title = rs.getString("title");

              String subTitle = rs.getString("subTitle");

              String actor=rs.getString("actor");

              String score=rs.getString("score");

              String action=rs.getString("action");

              //声明weipiao对象,并且传入每个字段的数据

              WeiPiao weiPiao = new WeiPiao(image, title, subTitle, actor, score, action);

              //将对象添加到集合里

              list.add(weiPiao);


           }

       } catch (SQLException e) {

           // TODO Auto-generated catch block

           e.printStackTrace();

       }

       finally {

           DBUtils.closeAll(conn, ps, rs);

       }

       return list;
这个包里主要做的工作就是把数据库里wp表的内容读出来。
d.biz里也就两个:InfoBiz接口和InfoBizImpl实现类
private InfoDao dao = new InfoDaoImpl();

    @Override

    public String getInfo(String type) {

       /*

        * 拿到参数

        * 1、如果参数是wp,获取全部的影片信息

        */

       //声明集合

       List<WeiPiao> list=new ArrayList<WeiPiao>();

       List<WeiPiaoImage> list2=new ArrayList<WeiPiaoImage>();

       List<Cinema> list3=new ArrayList<Cinema>();

       if("wp".equals(type)){//wp在前,避免空指针异常

           list=dao.getAll();

           String json=wpToJson(list);

           return json;

       }

       else if("wp_image".equals(type)){

           list2=dao.getAllimage();

           String json=wpiToJson(list2);

           return json;

       }

       else if("cinema".equals(type)){

           list3=dao.getAllCinema();

           String json=wpcToJson(list3);

           return json;

       }

       return "参数写错";

    }

    //将集合写成json数据并且返回

    public String wpToJson(List<WeiPiao> list){

       //声明一个root对象

       Root root = new Root();

       //将集合放入到root对象中

       root.setResult(list);

       //使用gson,将root写成json数据

       Gson gson = new Gson();

       String json =gson.toJson(root);

       return json;

    }


这个包做的事情就是把都出来数据库里边的数据生成json数据

e.

servlet包里建一个servlet :GetInfo

@WebServlet("/GetInfo")

public class GetInfo extends HttpServlet {

    private static final long serialVersionUID = 1L;

    private InfoBiz biz = new InfoBizImpl();

    public GetInfo() {


    }

    protected void doGet(HttpServletRequest request, HttpServletResponse response) throws ServletException, IOException {

       /*

        * 1、接收用户的请求数据

        * 2、根据要求从数据库中获取数据

        * 3、将取出来的数据封装成对象,并写成json字符串

        * 4、将json数据写入到客户端

        */

       //设置返回数据的编码格式

       response.setContentType("text/html;charset=utf-8");

       //获取请求的参数,交给业务层处理

       String type=request.getParameter("type");

       //获取业务层返回的json数据

       String json=biz.getInfo(type);

       //将json数据写在页面

       response.getWriter().println(json);

    }

    protected void doPost(HttpServletRequest request, HttpServletResponse response) throws ServletException, IOException {

       doGet(request, response);

    }


}
用doget方法!!方便选择不同的数据表!
f.运行:右击项目 run as 第一个 地址栏加入参数:GetInfo?type=wp//传参造么?然后就会出现:
这就是json!!天啦好神奇!!!不好看是吧?百度be json格式化一下!这个就是我们接下来需要的json数据。
当然还有image cinema,都是照葫芦画瓢的,也就是说,我们可以生成三个json的。
走完这一步,因为我是紧跟老师步伐,所以没有什么报错,但是通过给同学改程序,基本有以下几个错误:
①-数据库部分走不动:可能是properties写的不对,也可能mysql-connector放到lib包里了但是没有配置好,还有可能sql语言写错了。建议:单独把数据库部分 拿出来跑,调通后放回去,没毛病。
②-@这个符号所在的一行报错:是没有配置jdk吧?或者jdk版本/tomcat版本过低,jdk1.6以下的请换更高版本,毕竟向下兼容,高了不吃亏。建议:build path 看看,该换换,一般就是这种原因。
③-乱码:数据库有的视图化工具导入表时有选择编码项一定要注意,还有工程本身也有编码,编码不一致才会乱码。建议:重新导表utf8编码,右击项目-- properties---resourse里边改编码。
④-代码怎么看都没错但就是提示各种各样奇怪的错误:李同学经典做法,报错从后往前调,以每个错误为一个结点,输出信息或者其他方式调试程序(不愧是 做ACM的),总比干瞪眼好。实在不行重新创建一个项目把原来的代码粘贴进去。
/(ㄒoㄒ)/~~忍痛离开
----------------------暂更,跑开去复习---------------------------------------------------------------------------------------------------------------------------------------------------------6.23
6.24 继续
艾玛 终于考完了两门大科,行了不吐槽了,血槽空了,来我们继续。
第四天 微信小程序之布局演示、从本地获取视频播放(最后来记录)
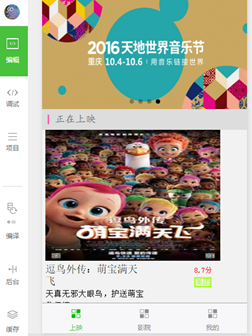
第五天 微信小程序之(#`O′微票 先展示一下老师做的: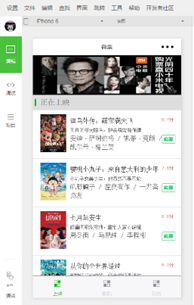
 不一样大就不一样大吧。。。
但如果按照下边的来做,将会看到以下
 样式可以改,改成自己喜欢的都可以。
上面已经生成了json。
现在来写前端。首先,有一个微信小程序开发者工具、还要有一个开发者账号,操作步骤在微信公众号平台都有。域名什么的,买一个就好。
pages里创建三个文件夹 home cinema my
app.json里边:
{
  "pages":[
    "pages/home/index",
    "pages/cinema/index",
    "pages/logs/logs",

    "pages/my/index"
  ],
  "window":{
    "backgroundTextStyle":"light",
    "navigationBarBackgroundColor": "#fff",
    "navigationBarTitleText": "微票",
    "navigationBarTextStyle":"black"
  },
"tabBar": {
 "selectedColor": "#3cc51f",
  "list": [{
    "pagePath": "pages/home/index",
    "text": "上映",
    "iconPath": "image/icon_normal.png",
    "selectedIconPath": "image/icon_pressed.png"
  },

      {
        "pagePath": "pages/cinema/index",
        "text": "影院",
        "iconPath": "image/icon_normal.png",
        "selectedIconPath": "image/icon_pressed.png"

  },
    {
      "pagePath": "pages/my/index",
      "text": "我的",
      "iconPath": "image/icon_normal.png",
      "selectedIconPath": "image/icon_pressed.png"
    }
  ]
}

}
home/index.js
//home/index.js
//获取应用实例
var app = getApp()
//初始化数据
Page({
  data: {

  },
 //生命周期函数,页面加载时调用
  onLoad: function () {
   var that=this
   //获取轮播图数据
   wx.request({
     url: 'https://www.****/WeiPiao/GetInfo?type=image',
     data:{},
     method:'GET',
     //设置请求
     header:{
       "Accept":"application-json"
     },
     success:function(res){
       console.log(res);
       var data=res.data.images;
       console.log(data);
       //解析到数组,设置数据给页面
       that.setData({
          image:data
       })
     }
   }),
   //获取接口请求信息
   wx.request({
     //修改1
     url: 'https://www.****/WeiPiao/GetInfo?type=wp',
     data: {},
     method: 'GET',
     //设置请求
     header: {
       "Accept": "application-json"
     },
     success: function (res) {
       console.log(res);
       //修改2
       var data = res.data.result;
       console.log(data);
       //解析到数组,设置数据给页面
       that.setData(
         //修改三
         {
         items: data
       })
     }
   })
  }
})
home/index.wxml
<!--index.wxml-->
<view class="container">
<!--indicator-dots="true"显示面板指示点-->
<!--autoplay="true" 自动轮播-->
<!--interval="3000"自动轮播的时间间隔-->
<!--duration="1000"滑动动画时长-->
<swiper class="swiper_box" indicator-dots="true" autoplay="true" interval="3000" duration="1000">
<!--swiper-item滑动视图的每一项-->
<!--wx:for 绑定一个数组,即可使用数组中各项的数据重复渲染该组件-->
<!--wx:for-item 子元素,相当于数组中的每一项-->
<swiper-item wx:for="{{image}}" wx:for-item="item">
<image src="{{item.images}}" class="slide_image"></image>
</swiper-item>
</swiper>

<!--2-->
<view class="text">
<view class="line_flag"></view>
<view class="text_content">正在上映</view>
</view>

<!--3-->
<view wx:for="{{items}}" wx:for-item="item">
<view class="item">
<!--左边部分-->
<view class="item_left">
            <image src="{{item.image}}"></image>
</view>
<!--中间-->
<view class="item_middle">
<!--影片名-->
   <view>
    <text class="title"> {{item.title}} </text>
   </view>
   <!--影片简介-->
    <view>
    <text class="sub_title"> {{item.subTitle}} </text>
   </view>
   <!--演员-->
    <view>
    <text class="actor"> {{item.actor}} </text>
   </view>

</view>
<!--右边-->
    <view class="item_right">
    <!--评分-->
     <view>
    <text class="score"> {{item.score}} </text>
   </view>
   <!--购票方式-->
     <view>
    <text class="action"> {{item.action}} </text>
   </view>
   </view>
</view>
</view>
</view>
wxss 样式表里自己可以随意改,按照自己的风格来。css具体样式w3school都有。
/**index.wxss**/
.container{
  background-color: #f2f2f2;
}
.swiper_box{
    100%;
    height:200px;
}
.slide_image{
    100%;
    height:200px;
    display:inline-block;
    overflow:hidden;

}
/*第二部分样式*/
.text{
  display:flex;
   100%;
  padding: 10px;
  color: #656565;
  background-color: #ddd;
}
/*标记的样式*/
.line_flag{
    3px;
height:18px;
  background-color:hotpink;
  margin-left: 10px;
}
.text_content{
  line-height:18px;
  margin-left: 10px;
  font-family: "kaiti";
}
.score{
  color:red;
  font-size: 70%;

}
.item_middle{
  float:left;
  margin:auto;
  50%;
   height:200px;
}
.item_right{
  25%;
   height:200px;
  float:right;


}
.action{
  border-style: solid;
  border-bottom-color: greenyellow;
  font-size:70%;
  color:greenyellow;

}
.actor{
  font-size: 80%;
}
.sub_title{
font-size:80%;

}
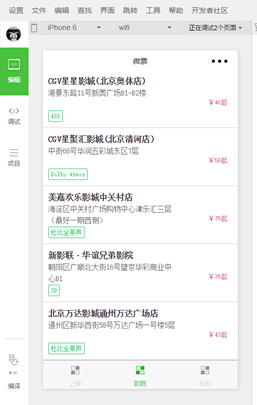
同样,cinema的也可以照猫画虎。
到此,微票这一块就总结完毕了。
 这是做的其他微信小程序的项目,还能发弹幕,神奇!!
--------------------------------------------------------------------------------------------------正经的分割线开始---------------------------------------------------------------------------------------------------
声明:为了保护老师所在培训学校的知识产权某些url打了马赛克。另外,这不是教学帖,只是实训总结,所以没必要因为完全照抄本人的代码而出了任何bug来追究本人的责任。
---------------------------------------------------------------------------------------------------正经的分割线结束---------------------------------------------------------------------------------------------------